Przegląd Przekształcanie pędzla
Klasa Brush udostępnia dwie właściwości przekształcania: Transform i RelativeTransform. Właściwości umożliwiają obracanie, skalowanie, niesymetryczność i tłumaczenie zawartości pędzla. W tym temacie opisano różnice między tymi dwiema właściwościami i przedstawiono przykłady ich użycia.
Wymagania wstępne
Aby zrozumieć ten temat, należy zrozumieć funkcje pędzla, które przekształcasz. Aby zapoznać LinearGradientBrush się z tematem i RadialGradientBrush, zobacz Obraz z kolorami stałymi i gradientami — omówienie. W przypadku ImageBrushelementów , DrawingBrushlub VisualBrushzobacz Malowanie przy użyciu obrazów, rysunków i wizualizacji. Należy również zapoznać się z transformacjami 2D opisanymi w temacie Przegląd przekształceń.
Różnice między właściwościami Transform i RelativeTransform
Po zastosowaniu przekształcenia do właściwości pędzla Transform musisz znać rozmiar malowanego obszaru, jeśli chcesz przekształcić zawartość pędzla na jej środek. Załóżmy, że malowany obszar ma 200 niezależnych pikseli i 150 wysokości. Jeśli użyto elementu RotateTransform do obracania danych wyjściowych szczotki 45 stopni wokół jego środka, dalibyśmy RotateTransform wartość CenterX 100 i CenterY 75.
Po zastosowaniu przekształcenia do właściwości pędzla RelativeTransform ta transformacja jest stosowana do pędzla, zanim jego dane wyjściowe zostaną zamapowane na malowany obszar. Na poniższej liście opisano kolejność przetwarzania i przekształcania zawartości pędzla.
Przetwarzaj zawartość pędzla. W przypadku elementu GradientBrushoznacza to określenie obszaru gradientu. W przypadku elementu TileBrushelement Viewbox jest mapowany na Viewport. Staje się to danymi wyjściowymi pędzla.
Rzutuj dane wyjściowe pędzla na prostokąt przekształcenia 1 x 1.
Zastosuj szczotkę RelativeTransform, jeśli ma jedną.
Przeprojektuj przekształcone dane wyjściowe na obszar do malowania.
Zastosuj szczotkę Transform, jeśli ma jedną.
RelativeTransform Ponieważ element jest stosowany, gdy dane wyjściowe pędzla są mapowane na prostokąt 1 x 1, wartości środka przekształcenia i przesunięcia wydają się być względne. Jeśli na przykład użyto elementu RotateTransform do obracania danych wyjściowych szczotki 45 stopni wokół środka, należy podać RotateTransform wartość CenterX 0,5 i CenterY 0,5.
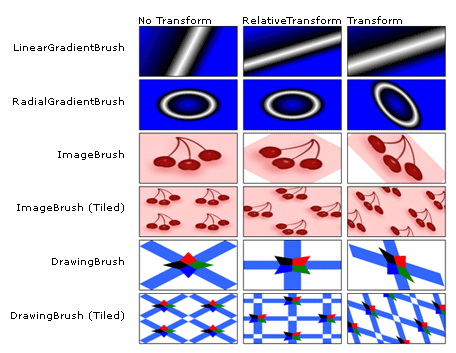
Na poniższej ilustracji przedstawiono dane wyjściowe kilku pędzli, które zostały obrócone o 45 stopni przy użyciu RelativeTransform właściwości i Transform .

Używanie metody RelativeTransform z elementem TileBrush
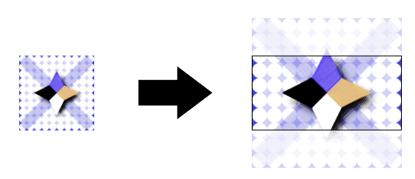
Ponieważ pędzle kafelków są bardziej złożone niż inne pędzle, zastosowanie elementu RelativeTransform do elementu może spowodować nieoczekiwane wyniki. Na przykład wykonaj poniższą ilustrację.

W poniższym przykładzie użyto elementu do ImageBrush malowania prostokątnego obszaru z powyższym obrazem. Stosuje RotateTransform element do ImageBrush właściwości obiektu RelativeTransform i ustawia jego Stretch właściwość na UniformToFill, która powinna zachować współczynnik proporcji obrazu, gdy jest on rozciągany w celu całkowitego wypełnienia prostokąta.
<Rectangle Width="200" Height="100" Stroke="Black" StrokeThickness="1">
  <Rectangle.Fill>
    <ImageBrush Stretch="UniformToFill">
      <ImageBrush.ImageSource>
        <BitmapImage UriSource="sampleImages\square.jpg" />
      </ImageBrush.ImageSource>
      <ImageBrush.RelativeTransform>
        <RotateTransform CenterX="0.5" CenterY="0.5" Angle="90" />
      </ImageBrush.RelativeTransform>
    </ImageBrush>
  </Rectangle.Fill>
</Rectangle>
Ten przykład generuje następujące wyniki:

Zwróć uwagę, że obraz jest zniekształcony, mimo że szczotka Stretch została ustawiona na UniformToFillwartość . Wynika to z faktu, że względna transformacja jest stosowana po zamapowania pędzla Viewbox na jego Viewportelement . Poniższa lista zawiera opis każdego kroku procesu:
Zaprojektuj zawartość pędzla (Viewbox) na kafelku podstawowym (Viewport) przy użyciu ustawienia pędzla Stretch .

Rzutuj kafelek podstawowy na prostokąt przekształcenia 1 x 1.

Zastosuj element RotateTransform.

Projektuj przekształcony kafelek podstawowy na obszarze, aby malować.

Przykład: Obracanie obrazuBrush 45 stopni
Poniższy przykład dotyczy RotateTransformRelativeTransform właściwości .ImageBrush CenterX Właściwości RotateTransform obiektu i CenterY są ustawione na wartość 0,5, współrzędne względne punktu środkowego zawartości. W rezultacie zawartość pędzla jest obracana wokół środka.
//
// Create an ImageBrush with a relative transform and
// use it to paint a rectangle.
//
ImageBrush relativeTransformImageBrush = new ImageBrush();
relativeTransformImageBrush.ImageSource =
    new BitmapImage(new Uri(@"sampleImages\pinkcherries.jpg", UriKind.Relative));

// Create a 45 rotate transform about the brush's center
// and apply it to the brush's RelativeTransform property.
RotateTransform aRotateTransform = new RotateTransform();
aRotateTransform.CenterX = 0.5;
aRotateTransform.CenterY = 0.5;
aRotateTransform.Angle = 45;
relativeTransformImageBrush.RelativeTransform = aRotateTransform;

// Use the brush to paint a rectangle.
Rectangle relativeTransformImageBrushRectangle = new Rectangle();
relativeTransformImageBrushRectangle.Width = 175;
relativeTransformImageBrushRectangle.Height = 90;
relativeTransformImageBrushRectangle.Stroke = Brushes.Black;
relativeTransformImageBrushRectangle.Fill = relativeTransformImageBrush;
'
' Create an ImageBrush with a relative transform and
' use it to paint a rectangle.
'
Dim relativeTransformImageBrush As New ImageBrush()
relativeTransformImageBrush.ImageSource = New BitmapImage(New Uri("sampleImages\pinkcherries.jpg", UriKind.Relative))

' Create a 45 rotate transform about the brush's center
' and apply it to the brush's RelativeTransform property.
Dim aRotateTransform As New RotateTransform()
aRotateTransform.CenterX = 0.5
aRotateTransform.CenterY = 0.5
aRotateTransform.Angle = 45
relativeTransformImageBrush.RelativeTransform = aRotateTransform

' Use the brush to paint a rectangle.
Dim relativeTransformImageBrushRectangle As New Rectangle()
relativeTransformImageBrushRectangle.Width = 175
relativeTransformImageBrushRectangle.Height = 90
relativeTransformImageBrushRectangle.Stroke = Brushes.Black
relativeTransformImageBrushRectangle.Fill = relativeTransformImageBrush
<Rectangle Width="175" Height="90" Stroke="Black">
  <Rectangle.Fill>
    <ImageBrush ImageSource="sampleImages\pinkcherries.jpg">
      <ImageBrush.RelativeTransform>
        <RotateTransform CenterX="0.5" CenterY="0.5" Angle="45" />
      </ImageBrush.RelativeTransform>
    </ImageBrush>
  </Rectangle.Fill>
</Rectangle>
Następny przykład dotyczy RotateTransformImageBrushrównież obiektu , ale używa Transform właściwości zamiast RelativeTransform właściwości . Aby obrócić szczotkę o środku, RotateTransform obiekty CenterX i CenterY muszą być ustawione na współrzędne bezwzględne. Ponieważ prostokąt malowany pędzlem wynosi 175 o 90 pikseli, jego punkt środkowy wynosi (87,5, 45).
//
// Create an ImageBrush with a transform and
// use it to paint a rectangle.
//
ImageBrush transformImageBrush = new ImageBrush();
transformImageBrush.ImageSource =
    new BitmapImage(new Uri(@"sampleImages\pinkcherries.jpg", UriKind.Relative));

// Create a 45 rotate transform about the brush's center
// and apply it to the brush's Transform property.
RotateTransform anotherRotateTransform = new RotateTransform();
anotherRotateTransform.CenterX = 87.5;
anotherRotateTransform.CenterY = 45;
anotherRotateTransform.Angle = 45;
transformImageBrush.Transform = anotherRotateTransform;

// Use the brush to paint a rectangle.
Rectangle transformImageBrushRectangle = new Rectangle();
transformImageBrushRectangle.Width = 175;
transformImageBrushRectangle.Height = 90;
transformImageBrushRectangle.Stroke = Brushes.Black;
transformImageBrushRectangle.Fill = transformImageBrush;
'
' Create an ImageBrush with a transform and
' use it to paint a rectangle.
'
Dim transformImageBrush As New ImageBrush()
transformImageBrush.ImageSource = New BitmapImage(New Uri("sampleImages\pinkcherries.jpg", UriKind.Relative))

' Create a 45 rotate transform about the brush's center
' and apply it to the brush's Transform property.
Dim anotherRotateTransform As New RotateTransform()
anotherRotateTransform.CenterX = 87.5
anotherRotateTransform.CenterY = 45
anotherRotateTransform.Angle = 45
transformImageBrush.Transform = anotherRotateTransform

' Use the brush to paint a rectangle.
Dim transformImageBrushRectangle As New Rectangle()
transformImageBrushRectangle.Width = 175
transformImageBrushRectangle.Height = 90
transformImageBrushRectangle.Stroke = Brushes.Black
transformImageBrushRectangle.Fill = transformImageBrush
<Rectangle Width="175" Height="90" Stroke="Black">
  <Rectangle.Fill>
    <ImageBrush ImageSource="sampleImages\pinkcherries.jpg">
      <ImageBrush.Transform>
        <RotateTransform CenterX="87.5" CenterY="45" Angle="45" />
      </ImageBrush.Transform>
    </ImageBrush>
  </Rectangle.Fill>
</Rectangle>
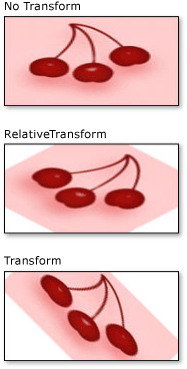
Na poniższej ilustracji przedstawiono pędzla bez przekształcenia, z przekształceniem zastosowanym do RelativeTransform właściwości i przekształceniem zastosowanym Transform do właściwości .

Ten przykład jest częścią większej próbki. Aby zapoznać się z kompletnym przykładem, zobacz Przykład Pędzle. Aby uzyskać więcej informacji na temat pędzli, zobacz Omówienie pędzli WPF.
Zobacz też
.NET Desktop feedback
Opinia
Dostępne już wkrótce: W 2024 r. będziemy stopniowo wycofywać zgłoszenia z serwisu GitHub jako mechanizm przesyłania opinii na temat zawartości i zastępować go nowym systemem opinii. Aby uzyskać więcej informacji, sprawdź: https://aka.ms/ContentUserFeedback.
Prześlij i wyświetl opinię dla
