Set up mobile offline for canvas apps
Turn on offline mode in your canvas app if users need to work without worrying about their Internet connection.
Prerequisites
Explicit column selection must be turned on. To enable the feature, open a canvas app for editing and then go to Settings > Upcoming features > Preview. Set the Explicit column selection toggle to On.
You must have the Environment Maker, System Administrator, or System Customizer role to set up offline mode for canvas apps. These roles have create, read, write, delete, and share privileges on
Canvas AppandMobile offline profiletables. Learn about predefined security roles.Users with Basic User role can't open an offline application. You must create a custom security role with read privileges on
Canvas AppandMobile offline profiletables.If you already have a custom security role, make sure it grants read privileges on
Canvas AppandMobile offline profiletables. Learn about miscellaneous privileges.
Optimize your app for mobile offline
Mobile apps run on small screens with limited connectivity. Before you set up offline mode, make sure your canvas app is optimized for offline and mobile use. Consider the user scenarios you want to cover and the amount of data the app uses. Create an app that's simple and lightweight.
Follow these best practices when you build an app for mobile offline use:
Performance is critical when you run an app on mobile. For more information on to create performant canvas apps, see Overview of creating performant apps.
Identify the on-the-go scenarios that are functionally related, such as tasks that are performed by users who work in the field.
Reduce the complexity of your app by limiting the number of tables that need to be downloaded. Sometimes it's better to have two apps instead of one.
Use views that are optimized for the experience rather than displaying a large set of data. For example, it's preferable to use the My active accounts view, rather than the All accounts view.
Turn on offline capability for tables
Tables that your offline-first app uses must have offline capability turned on. Some built-in tables have it by default. Some tables can't be used offline. However, you can turn on offline capability for any new, custom table.
Sign in to Power Apps.
In the left side panel, select Tables.
Select a table, and then select Edit.
Select Edit table properties.
Select Advanced options, and then scroll to the Rows in this table section.
Select Can be taken offline.
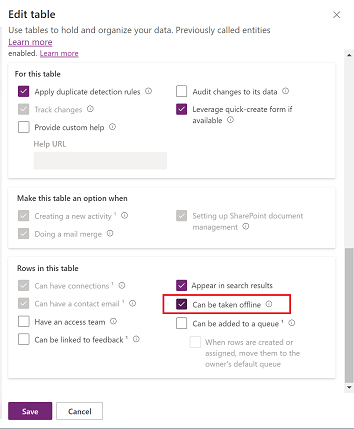
Select Save.
Turn on offline capability for your app
In Power Apps studio, in the left side panel, select Apps.
Select your canvas app, and then select Edit.
Select Settings.
Select General.
Turn on the Can be used offline option.
Select an offline profile. You have two options:
Use an autogenerated profile. This setting downloads the tables that are used in your app and is the recommended option.
Create a custom profile, select the Refresh icon to see your new profile in the list, and then select it.
If you don't see the Can be used offline option, make sure the app is in a solution.
Close the Settings window, and then save and publish your app.
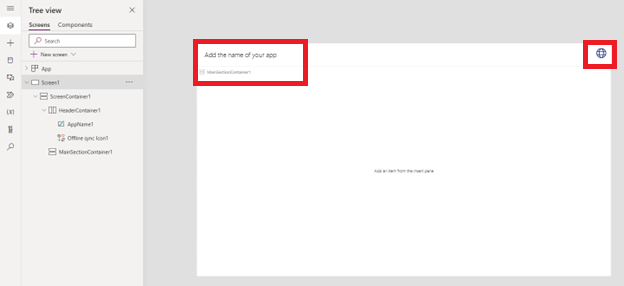
A page that's based on the Offline template is automatically inserted in the app. The page contains an icon that uses the Connection Power Fx function to reflect the app's offline sync status. You can use it as-is or customize it, as appropriate.
Note
If you're turning on offline capability for a brand-new canvas app, make sure the default first screen is based on the Offline template.
Create a mobile offline profile
If the automatically generated offline profile doesn't meet your needs, create your own. Learn about guidelines for offline profiles.
You need to publish your new offline profile before you can select it in your canvas app's settings. If you edit and publish an offline profile, you must also publish any canvas apps that use it.
Create an offline profile (with admin rights)
Sign in to the Power Platform admin center using an admin account.
In the left side panel, select Environments.
Select an environment, and then select Settings.
Expand Users + permissions, and then select Mobile configuration.
Select Create new profile.
Enter a name and description, and then select Create.
After the profile is created, select it to continue editing it.
In the Data available offline section, select Add table.
Select a table from the list. Only tables that can be set for offline use appear in the list.
Select Next.
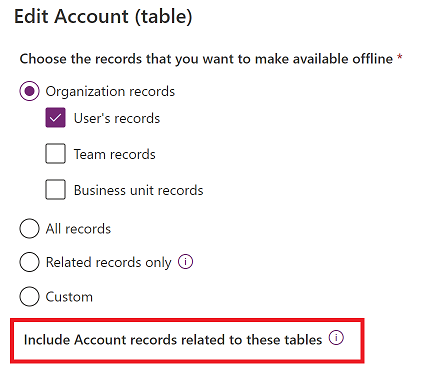
Select a filter based on the table's ownership type.
Table ownership type Available filter options for data download User or team - Download related rows only: Make the table's related data available offline. If you don't set any relationships, no rows in this table are available.
- All rows: Make all rows in this table available offline.
- Other data filter: Make only the specified rows in this table available offline. Select from the following options:
- Download user rows: Make only your rows available offline.
- Download team rows: Make your team's rows available offline.
- Download my business unit's rows: Make your business unit's rows available offline.
Organization - Download related rows only: Make the table's related data available offline. If you don't set any relationships, no rows for this table are available.
- All rows: Make all rows in this table available offline.
Business - Download related data only: Make the table's related data available offline. If you don't set any relationships, no rows for this table are available.
- All rows: Make all rows in this table available offline.
- Other rows: Make only the specified rows in this table available offline. Select the following option:
- Download my business unit's rows: Make your business unit's rows available offline.
None - Download related rows only: Make the table's related data available offline. If you don't set any relationships, no rows for this table are available.
If you select Custom, you can define a custom filter up to three levels deep with the following rules.
Rules equal not equal gt – greater than ge – greater than or equal to le – less than or equal to lt – less than like not-like in not-in null not-null eq-userid ne-userid eq-userteams eq-useroruserteams eq-useroruserhierarchy eq-useroruserhierarchyandteams eq-businessid ne-businessid eq-userlanguage begins-with not-begin-with ends-with not-end-with In the Include [table name] records related to these tables section, select the related table relationships. You must have added the table that you want to create the relationship with. For example, if you want to add a relationship between the
AccountandContacttables, then you need to add both tables to the mobile offline profile.For example, if you select Contact | Field name: Primary Contact, then for every contact, the system also downloads the account that's related to it.
Select Save.
Create an offline profile (without admin rights)
If your Power Apps account doesn't have admin rights, you can still create a mobile offline profile. Coming soon, you'll be able to create an offline profile directly in Power Apps Studio. Until then, use this workaround.
- Create a model-driven app in your test environment that uses the same tables as your canvas app.
- Set up the model-driven app for offline use.
- Generate a default profile and add tables with filters.
- Publish the model-driven app.
- Select the offline profile in your canvas app.
Create an offline canvas app
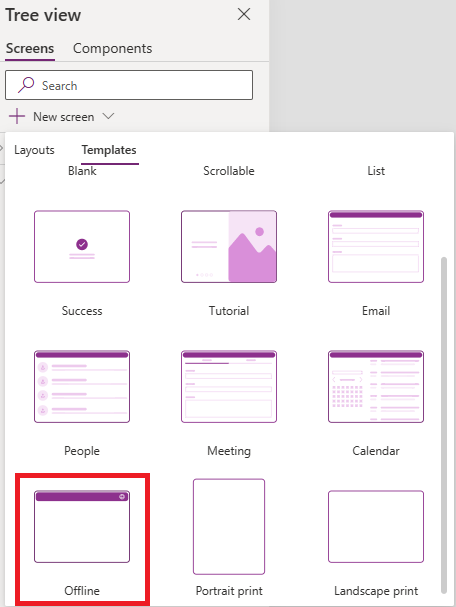
To make it easier to create or convert a canvas app for offline use, we created the Offline template. The template includes a globe icon in the navigation bar that shows the connectivity and sync state, putting offline at the center of the experience. Users always know whether their device and data are ready to go.
A new page created from the Offline template is automatically inserted as soon as you turn on the offline capability in your canvas app.
You can also add a new page based on the Offline template the same way you add pages from any other template.
The globe icon in the template's navigation bar uses different icons depending on the value of the Power Fx Connection.Sync function. You can create your own icon and set the Icon property using the following Power Fx script:
Switch(Connection.Sync,

   ConnectionSync.Connected, Icon.Globe,

   ConnectionSync.ConnectedWithWarning, Icon.GlobeWarning,

   ConnectionSync.ConnectedPendingUpsync, Icon.GlobeChangesPending,

   ConnectionSync.ConnectedError, Icon.GlobeError,

   ConnectionSync.ConnectedRefresh, Icon.GlobeRefresh,

   ConnectionSync.NotConnected, Icon.GlobeNotConnected,

   ConnectionSync.NotConnectedWithWarning, Icon.GlobeWarning,

   ConnectionSync.NotConnectedPendingUpsync, Icon.GlobeChangesPending,

   ConnectionSync.NotConnectedSyncError, Icon.GlobeError)
You can set the OnSelect property using the Power Fx function ShowHostInfo to show the Device status page when selecting the globe icon.
ShowHostInfo(HostInfo.OfflineSync)
You can set the Visible property using the Power Fx function Host to only show the globe icon when the app is used on a player that is supporting the offline mode.
Host.OfflineEnabled
How to create the best offline user experience?
Use the following recommendations to create a faster user experience for specific scenarios.
| Scenario | Approach that is not recommended | Recommended approach |
|---|---|---|
| Show related tables information in a gallery. | Use a look-up to fetch the data. | Use a view containing the column of the related table. |
| Create a filterable gallery with a lot of records. | Load the records from Dataverse and store them in a collection. Set the items of the gallery to the filtered collection. | Directly set the items of the gallery to the Dataverse-filtered data. |
| Update multiple records. | Loop the records and patch them individually. | Bulk patch a collection containing all the modifications. |
Export a solution that contains a canvas app enabled for offline
When you export a solution with an offline canvas app, you also need export the offline profile for the app, as it is a dependency of the app.
- Sign in to Power Apps and in the left navigation pane, select Solutions.
- Select the solution that you want to export and then select Edit.
- Select the canvas app that is enabled for offline and then select Advanced > Add required objects.
Make sure that the associated offline profile is in the solution and then you can export it.
Limitations and known issues
The autogenerated offline profile doesn't handle filters. As a result, for each table used in the app, it downloads all rows to which the user has permissions.
Non-Dataverse connectors like Sharepoint aren't supported in offline mode.
Items in a gallery may appear in a different order in an offline-capable app if no sort order is selected. Choose a sort order in the gallery control to make sure the app behaves consistently in mobile apps and web browsers.
Many-to-many relationships aren't supported in offline mode.
Learn about other mobile offline capabilities and limitations.
Feedback
Coming soon: Throughout 2024 we will be phasing out GitHub Issues as the feedback mechanism for content and replacing it with a new feedback system. For more information see: https://aka.ms/ContentUserFeedback.
Submit and view feedback for