Criar uma fonte de dados (SDK do Android)
O SDK do Android do Azure Mapas armazena dados em fontes de dados. O uso de fontes de dados otimiza as operações de dados para consulta e renderização. No momento, há dois tipos de fontes de dados:
- Fonte GeoJSON: gerencia localmente dados de local brutos no formato GeoJSON. Boa para conjuntos de dados pequenos a médios (com mais de centenas de milhares de formas).
- Fonte de peça de vetor: carrega dados formatados como peças de vetor para a exibição do mapa atual, com base no sistema de peças de mapas. Ideal para conjuntos de dados grandes a enormes (milhões ou bilhões de formas).
Observação
Desativação do SDK do Android do Azure Mapas
O SDK Nativo do Azure Mapas para Android já foi preterido e será desativado em 31/03/25. Para evitar interrupções de serviço, migre para o SDK da Web do Azure Mapas até 31/03/25. Para obter mais informações, confira O guia de migração do SDK do Android do Azure Mapas.
Fonte de dados GeoJSON
O Azure Mapas usa GeoJSON como um de seus modelos de dados primários. GeoJSON é uma forma padrão geoespacial aberta para representar dados geoespaciais no formato JSON. As classes GeoJSON disponíveis no SDK do Android do Azure Mapas para facilitar a criação e serializar dados GeoJSON. Carregar e armazenar dados GeoJSON na classe DataSource e renderizá-los usando camadas. O código a seguir mostra como os dados GeoJSON podem ser criados no Azure Mapas.
/*
    Raw GeoJSON feature

    {
         "type": "Feature",
         "geometry": {
             "type": "Point",
             "coordinates": [-100, 45]
         },
         "properties": {
             "custom-property": "value"
         }
    }

*/

//Create a point feature.
Feature feature = Feature.fromGeometry(Point.fromLngLat(-100, 45));

//Add a property to the feature.
feature.addStringProperty("custom-property", "value");

//Add the feature to the data source.
source.add(feature);
/*
    Raw GeoJSON feature

    {
         "type": "Feature",
         "geometry": {
             "type": "Point",
             "coordinates": [-100, 45]
         },
         "properties": {
             "custom-property": "value"
         }
    }

*/

//Create a point feature.
val feature = Feature.fromGeometry(Point.fromLngLat(-100, 45))

//Add a property to the feature.
feature.addStringProperty("custom-property", "value")

//Add the feature to the data source.
source.add(feature)
Dica
Os dados GeoJSON podem ser adicionados a uma instância DataSource usando um dos três métodos: add, importDataFromUrl e setShapes. O método setShapes oferece uma maneira eficiente de substituir todos os dados em uma fonte de dados. Se você chamar os métodos cleare add para substituir todos os dados em uma fonte de dados, duas chamadas de renderização serão feitas no mapa. O método setShape limpa e adiciona os dados à fonte de dados com uma única chamada de renderização ao mapa.
Como alternativa, as propriedades podem ser carregadas em um JsonObject primeiro, depois passadas para o recurso ao criá-lo, conforme mostrado no código de exemplo a seguir.
//Create a JsonObject to store properties for the feature.
JsonObject properties = new JsonObject();
properties.addProperty("custom-property", "value");

Feature feature = Feature.fromGeometry(Point.fromLngLat(-100, 45), properties);
//Create a JsonObject to store properties for the feature.
val properties = JsonObject()
properties.addProperty("custom-property", "value")

val feature = Feature.fromGeometry(Point.fromLngLat(-100, 45), properties)
Depois que você tiver um recurso GeoJSON criado, uma fonte de dados poderá ser adicionada ao mapa por meio da propriedade sources do mapa. O código a seguir mostra como criar um DataSource, adicioná-lo ao mapa e adicionar um recurso à fonte de dados.
//Create a data source and add it to the map.
DataSource source = new DataSource();
map.sources.add(source);

//Add GeoJSON feature to the data source.
source.add(feature);
O código a seguir mostra várias maneiras de criar um Recurso GeoJSON, FeatureCollection e geometrias.
//GeoJSON Point Geometry
Point point = Point.fromLngLat(LONGITUDE, LATITUDE);

//GeoJSON Point Geometry
LineString linestring = LineString.fromLngLats(PointList);

//GeoJSON Polygon Geometry
Polygon polygon = Polygon.fromLngLats(listOfPointList);

Polygon polygonFromOuterInner = Polygon.fromOuterInner(outerLineStringObject,innerLineStringObject);

//GeoJSON MultiPoint Geometry
MultiPoint multiPoint = MultiPoint.fromLngLats(PointList);

//GeoJSON MultiLineString Geometry
MultiLineString multiLineStringFromLngLat = MultiLineString.fromLngLats(listOfPointList);

MultiLineString multiLineString = MultiLineString.fromLineString(singleLineString);

//GeoJSON MultiPolygon Geometry
MultiPolygon multiPolygon = MultiPolygon.fromLngLats(listOflistOfPointList);

MultiPolygon multiPolygonFromPolygon = MultiPolygon.fromPolygon(polygon);

MultiPolygon multiPolygonFromPolygons = MultiPolygon.fromPolygons(PolygonList);

//GeoJSON Feature
Feature pointFeature = Feature.fromGeometry(Point.fromLngLat(LONGITUDE, LATITUDE));

//GeoJSON FeatureCollection
FeatureCollection featureCollectionFromSingleFeature = FeatureCollection.fromFeature(pointFeature);

FeatureCollection featureCollection = FeatureCollection.fromFeatures(listOfFeatures);
//GeoJSON Point Geometry
val point = Point.fromLngLat(LONGITUDE, LATITUDE)

//GeoJSON Point Geometry
val linestring = LineString.fromLngLats(PointList)

//GeoJSON Polygon Geometry
val polygon = Polygon.fromLngLats(listOfPointList)

val polygonFromOuterInner = Polygon.fromOuterInner(outerLineStringObject, innerLineStringObject)

//GeoJSON MultiPoint Geometry
val multiPoint = MultiPoint.fromLngLats(PointList)

//GeoJSON MultiLineString Geometry
val multiLineStringFromLngLat = MultiLineString.fromLngLats(listOfPointList)

val multiLineString = MultiLineString.fromLineString(singleLineString)

//GeoJSON MultiPolygon Geometry
val multiPolygon = MultiPolygon.fromLngLats(listOflistOfPointList)

val multiPolygonFromPolygon = MultiPolygon.fromPolygon(polygon)

val multiPolygonFromPolygons = MultiPolygon.fromPolygons(PolygonList)

//GeoJSON Feature
val pointFeature = Feature.fromGeometry(Point.fromLngLat(LONGITUDE, LATITUDE))

//GeoJSON FeatureCollection
val featureCollectionFromSingleFeature = FeatureCollection.fromFeature(pointFeature)

val featureCollection = FeatureCollection.fromFeatures(listOfFeatures)
Serializar e desserializar GeoJSON
Todas as classes de coleção de recursos, recurso e geometria têm os métodos estáticos fromJson() e toJson(), que ajudam com a serialização. A Cadeia de caracteres JSON válida formatada, passada pelo método fromJson(), criará o objeto geometria. Esse método fromJson() também significa que você pode usar Gson ou outras estratégias de serialização/desserialização. O código a seguir mostra como pegar um recurso GeoJSON em cadeias e desserializá-lo na classe Recurso e, em seguida, serializá-lo novamente em uma cadeia de caracteres GeoJSON.
//Take a stringified GeoJSON object.
String GeoJSON_STRING = "{"
    + "      \"type\": \"Feature\","
    + "      \"geometry\": {"
    + "            \"type\": \"Point\""
    + "            \"coordinates\": [-100, 45]"
    + "      },"
    + "      \"properties\": {"
    + "            \"custom-property\": \"value\""
    + "      },"
    + "}";

//Deserialize the JSON string into a feature.
Feature feature = Feature.fromJson(GeoJSON_STRING);

//Serialize a feature collection to a string.
String featureString = feature.toJson();
//Take a stringified GeoJSON object.
val GeoJSON_STRING = ("{"
        + "      \"type\": \"Feature\","
        + "      \"geometry\": {"
        + "            \"type\": \"Point\""
        + "            \"coordinates\": [-100, 45]"
        + "      },"
        + "      \"properties\": {"
        + "            \"custom-property\": \"value\""
        + "      },"
        + "}")

//Deserialize the JSON string into a feature.
val feature = Feature.fromJson(GeoJSON_STRING)

//Serialize a feature collection to a string.
val featureString = feature.toJson()
Importar dados GeoJSON da pasta de ativos ou da Web
A maioria dos arquivos GeoJSON contém uma FeatureCollection. Leia arquivos GeoJSON como cadeias de caracteres e use o método FeatureCollection.fromJson para desserializá-lo.
A classe DataSource tem um método interno chamado importDataFromUrl que pode ser carregado em arquivos GeoJSON usando uma URL para um arquivo na Web ou na pasta de ativos. Esse método deve ser chamado antes que a fonte de dados seja adicionada ao mapa.
zone_pivot_groups: azure-maps-android
//Create a data source and add it to the map.
DataSource source = new DataSource();

//Import the geojson data and add it to the data source.
source.importDataFromUrl("URL_or_FilePath_to_GeoJSON_data");

//Examples:
//source.importDataFromUrl("asset://sample_file.json");
//source.importDataFromUrl("https://example.com/sample_file.json");

//Add data source to the map.
map.sources.add(source);
//Create a data source and add it to the map.
var source = new DataSource()

//Import the geojson data and add it to the data source.
source.importDataFromUrl("URL_or_FilePath_to_GeoJSON_data")

//Examples:
//source.importDataFromUrl("asset://sample_file.json")
//source.importDataFromUrl("https://example.com/sample_file.json")

//Add data source to the map.
map.sources.add(source)
O método importDataFromUrl oferece uma maneira fácil de carregar um feed GeoJSON em uma fonte de dados, mas oferece controle limitado sobre como os dados são carregados e o que acontece após seu carregamento. O código a seguir é uma classe reutilizável para importar dados da pasta de ativos da Web ou locais e retorná-los ao thread da interface do usuário por meio de uma função de retorno de chamada. Em seguida, adicione mais lógica de pós-carregamento no retorno de chamada para processar os dados, adicioná-la ao mapa, calcular sua caixa delimitadora e atualizar a câmera de mapas.
import android.content.Context;
import android.os.Handler;
import android.os.Looper;
import android.webkit.URLUtil;

import java.io.BufferedReader;
import java.io.IOException;
import java.io.InputStream;
import java.io.InputStreamReader;
import java.net.URL;
import java.util.concurrent.ExecutorService;
import java.util.concurrent.Executors;

import javax.net.ssl.HttpsURLConnection;

public class Utils {

    interface SimpleCallback {
        void notify(String result);
    }

    /**
     * Imports data from a web url or asset file name and returns it to a callback.
     * @param urlOrFileName A web url or asset file name that points to data to load.
     * @param context The context of the app.
     * @param callback The callback function to return the data to.
     */
    public static void importData(String urlOrFileName, Context context, SimpleCallback callback){
        importData(urlOrFileName, context, callback, null);
    }

    /**
     * Imports data from a web url or asset file name and returns it to a callback.
     * @param urlOrFileName A web url or asset file name that points to data to load.
     * @param context The context of the app.
     * @param callback The callback function to return the data to.
     * @param error A callback function to return errors to.
     */
    public static void importData(String urlOrFileName, Context context, SimpleCallback callback, SimpleCallback error){
        if(urlOrFileName != null && callback != null) {
            ExecutorService executor = Executors.newSingleThreadExecutor();
            Handler handler = new Handler(Looper.getMainLooper());

            executor.execute(() -> {
                String data = null;

                try {

                    if(URLUtil.isNetworkUrl(urlOrFileName)){
                        data = importFromWeb(urlOrFileName);
                    } else {
                        //Assume file is in assets folder.
                        data = importFromAssets(context, urlOrFileName);
                    }

                    final String result = data;

                    handler.post(() -> {
                        //Ensure the resulting data string is not null or empty.
                        if (result != null && !result.isEmpty()) {
                            callback.notify(result);
                        } else {
                            error.notify("No data imported.");
                        }
                    });
                } catch(Exception e) {
                    if(error != null){
                        error.notify(e.getMessage());
                    }
                }
            });
        }
    }

    /**
     * Imports data from an assets file as a string.
     * @param context The context of the app.
     * @param fileName The asset file name.
     * @return
     * @throws IOException
     */
    private static String importFromAssets(Context context, String fileName) throws IOException {
        InputStream stream = null;

        try {
            stream = context.getAssets().open(fileName);

            if(stream != null) {
                return readStreamAsString(stream);
            }
        } catch (Exception e) {
            e.printStackTrace();
        } finally {
            // Close Stream and disconnect HTTPS connection.
            if (stream != null) {
                stream.close();
            }
        }

        return null;
    }

    /**
     * Imports data from the web as a string.
     * @param url URL to the data.
     * @return
     * @throws IOException
     */
    private static String importFromWeb(String url) throws IOException {
        InputStream stream = null;
        HttpsURLConnection connection = null;
        String result = null;

        try {
            connection = (HttpsURLConnection) new URL(url).openConnection();

            //For this use case, set HTTP method to GET.
            connection.setRequestMethod("GET");

            //Open communications link (network traffic occurs here).
            connection.connect();

            int responseCode = connection.getResponseCode();
            if (responseCode != HttpsURLConnection.HTTP_OK) {
                throw new IOException("HTTP error code: " + responseCode);
            }

            //Retrieve the response body as an InputStream.
            stream = connection.getInputStream();

            if (stream != null) {
                return readStreamAsString(stream);
            }
        } catch (Exception e) {
            e.printStackTrace();
        } finally {
            // Close Stream and disconnect HTTPS connection.
            if (stream != null) {
                stream.close();
            }
            if (connection != null) {
                connection.disconnect();
            }
        }

        return result;
    }

    /**
     * Reads an input stream as a string.
     * @param stream Stream to convert.
     * @return
     * @throws IOException
     */
    private static String readStreamAsString(InputStream stream) throws IOException {
        //Convert the contents of an InputStream to a String.
        BufferedReader in = new BufferedReader(new InputStreamReader(stream, "UTF-8"));

        String inputLine;
        StringBuffer response = new StringBuffer();

        while ((inputLine = in.readLine()) != null) {
            response.append(inputLine);
        }

        in.close();

        return response.toString();
    }
}
import android.content.Context
import android.os.Handler
import android.os.Looper
import android.webkit.URLUtil
import java.net.URL
import java.util.concurrent.ExecutorService
import java.util.concurrent.Executors

class Utils {
    companion object {

        /**
            * Imports data from a web url or asset file name and returns it to a callback.
            * @param urlOrFileName A web url or asset file name that points to data to load.
            * @param context The context of the app.
            * @param callback The callback function to return the data to.
            */
        fun importData(urlOrFileName: String?, context: Context, callback: (String?) -> Unit) {
            importData(urlOrFileName, context, callback, null)
        }

        /**
            * Imports data from a web url or asset file name and returns it to a callback.
            * @param urlOrFileName A web url or asset file name that points to data to load.
            * @param context The context of the app.
            * @param callback The callback function to return the data to.
            * @param error A callback function to return errors to.
            */
        public fun importData(urlOrFileName: String?, context: Context, callback: (String?) -> Unit, error: ((String?) -> Unit)?) {
            if (urlOrFileName != null && callback != null) {
                val executor: ExecutorService = Executors.newSingleThreadExecutor()
                val handler = Handler(Looper.getMainLooper())
                executor.execute {
                    var data: String? = null

                    try {
                        data = if (URLUtil.isNetworkUrl(urlOrFileName)) {
                            URL(urlOrFileName).readText()
                        } else { //Assume file is in assets folder.
                            context.assets.open(urlOrFileName).bufferedReader().use{
                                it.readText()
                            }
                        }

                        handler.post {
                            //Ensure the resulting data string is not null or empty.
                            if (data != null && !data.isEmpty()) {
                                callback(data)
                            } else {
                                error!!("No data imported.")
                            }
                        }
                    } catch (e: Exception) {
                        error!!(e.message)
                    }
                }
            }
        }
    }
}
O código a seguir mostra como usar esse utilitário para importar dados GeoJSON como uma cadeia de caracteres e retorná-la ao thread da interface do usuário por meio de um retorno de chamada. No retorno de chamada, os dados de cadeia de caracteres podem ser serializados em uma Coleção de Recursos GeoJSON e adicionados à fonte de dados. Opcionalmente, atualize a câmera de mapas para se concentrar nos dados.
//Create a data source and add it to the map.
DataSource source = new DataSource();
map.sources.add(source);

//Import the geojson data and add it to the data source.
Utils.importData("URL_or_FilePath_to_GeoJSON_data",
    this,
    (String result) -> {
        //Parse the data as a GeoJSON Feature Collection.
        FeatureCollection fc = FeatureCollection.fromJson(result);

        //Add the feature collection to the data source.
        source.add(fc);

        //Optionally, update the maps camera to focus in on the data.

        //Calculate the bounding box of all the data in the Feature Collection.
        BoundingBox bbox = MapMath.fromData(fc);

        //Update the maps camera so it is focused on the data.
        map.setCamera(
            bounds(bbox),
            padding(20));
    });
//Create a data source and add it to the map.
DataSource source = new DataSource();
map.sources.add(source);

//Import the GeoJSON data and add it to the data source.
Utils.importData("SamplePoiDataSet.json", this) {
    result: String? ->
        //Parse the data as a GeoJSON Feature Collection.
            val fc = FeatureCollection.fromJson(result!!)

        //Add the feature collection to the data source.
        source.add(fc)

        //Optionally, update the maps camera to focus in on the data.

        //Calculate the bounding box of all the data in the Feature Collection.
        val bbox = MapMath.fromData(fc);

        //Update the maps camera so it is focused on the data.
        map.setCamera(
            bounds(bbox),

            //Padding added to account for pixel size of rendered points.
            padding(20)
        )
    }
Atualizar um recurso
A classe DataSource facilita a adição e a remoção de recursos. Atualizar a geometria ou as propriedades de um recurso requer a substituição do recurso na fonte de dados. Há dois métodos que podem ser usados para atualizar um ou mais recursos:
- Crie os novos recursos com as atualizações desejadas e substitua todos os recursos na fonte de dados usando o método
setShapes. Esse método funciona bem quando você quer atualizar todos os recursos em uma fonte de dados.
DataSource source;

private void onReady(AzureMap map) {
    //Create a data source and add it to the map.
    source = new DataSource();
    map.sources.add(source);

    //Create a feature and add it to the data source.
    Feature myFeature = Feature.fromGeometry(Point.fromLngLat(0,0));
    myFeature.addStringProperty("Name", "Original value");

    source.add(myFeature);
}

private void updateFeature(){
    //Create a new replacement feature with an updated geometry and property value.
    Feature myNewFeature = Feature.fromGeometry(Point.fromLngLat(-10, 10));
    myNewFeature.addStringProperty("Name", "New value");

    //Replace all features to the data source with the new one.
    source.setShapes(myNewFeature);
}
var source: DataSource? = null

private fun onReady(map: AzureMap) {
    //Create a data source and add it to the map.
    source = DataSource()
    map.sources.add(source)

    //Create a feature and add it to the data source.
    val myFeature = Feature.fromGeometry(Point.fromLngLat(0.0, 0.0))
    myFeature.addStringProperty("Name", "Original value")
    source!!.add(myFeature)
}

private fun updateFeature() {
    //Create a new replacement feature with an updated geometry and property value.
    val myNewFeature = Feature.fromGeometry(Point.fromLngLat(-10.0, 10.0))
    myNewFeature.addStringProperty("Name", "New value")

    //Replace all features to the data source with the new one.
    source!!.setShapes(myNewFeature)
}
- Acompanhe a instância de recurso em uma variável e passe-a para o método de fontes de dados
removepara removê-la. Crie os novos recursos com as atualizações desejadas, atualize a referência de variável e adicione-a à fonte de dados usando o métodoadd.
DataSource source;
Feature myFeature;

private void onReady(AzureMap map) {
    //Create a data source and add it to the map.
    source = new DataSource();
    map.sources.add(source);

    //Create a feature and add it to the data source.
    myFeature = Feature.fromGeometry(Point.fromLngLat(0,0));
    myFeature.addStringProperty("Name", "Original value");

    source.add(myFeature);
}

private void updateFeature(){
    //Remove the feature instance from the data source.
    source.remove(myFeature);

    //Get properties from original feature.
    JsonObject props = myFeature.properties();

    //Update a property.
    props.addProperty("Name", "New value");

    //Create a new replacement feature with an updated geometry.
    myFeature = Feature.fromGeometry(Point.fromLngLat(-10, 10), props);

    //Re-add the feature to the data source.
    source.add(myFeature);
}
var source: DataSource? = null
var myFeature: Feature? = null

private fun onReady(map: AzureMap) {
    //Create a data source and add it to the map.
    source = DataSource()
    map.sources.add(source)

    //Create a feature and add it to the data source.
    myFeature = Feature.fromGeometry(Point.fromLngLat(0.0, 0.0))
    myFeature.addStringProperty("Name", "Original value")
    source!!.add(myFeature)
}

private fun updateFeature() {
    //Remove the feature instance from the data source.
    source!!.remove(myFeature)

    //Get properties from original feature.
    val props = myFeature!!.properties()

    //Update a property.
    props!!.addProperty("Name", "New value")

    //Create a new replacement feature with an updated geometry.
    myFeature = Feature.fromGeometry(Point.fromLngLat(-10.0, 10.0), props)

    //Re-add the feature to the data source.
    source!!.add(myFeature)
}
Dica
Se você tiver alguns dados que serão atualizados regularmente e outros dados que raramente serão alterados, é melhor dividi-los em instâncias de fonte de dados separadas. Quando uma atualização ocorre em uma fonte de dados, ela força o mapa a redesenhar todos os recursos na fonte de dados. Dividindo esses dados, somente os recursos que são atualizados regularmente seriam redesenhados quando ocorre uma atualização nessa fonte de dados, enquanto os recursos da outra fonte de dados não precisariam ser redesenhados. Isso ajuda a melhorar o desempenho.
Fonte da peça de vetor
Uma fonte de peça de vetor descreve como acessar uma camada de peça de vetor. Use a classe VectorTileSource para criar uma instância de uma fonte de bloco de vetor. As camadas de peça de vetor são semelhantes às camadas de peça, mas não são as mesmas. Uma camada de peça é uma imagem de varredura. As camadas de peça de vetor são um arquivo compactado, no formato PBF. Esse arquivo compactado contém dados de mapa de vetor e uma ou mais camadas. O arquivo pode ser renderizado e estilizado no cliente, com base no estilo de cada camada. Os dados em uma peça de vetor contêm recursos geográficos na forma de pontos, linhas e polígonos. Há várias vantagens de usar camadas de peça de vetor em vez de camadas de peça de varredura:
- Um tamanho do arquivo de uma peça de vetor normalmente é muito menor do que uma peça de varredura equivalente. Dessa forma, menos largura de banda é usada. Isso significa menor latência, um mapa mais rápido e melhor experiência do usuário.
- Como as peças de vetor são renderizadas no cliente, elas se adaptam à resolução do dispositivo em que estão sendo exibidos. Como resultado, os mapas renderizados aparecem mais bem definidos, com rótulos nítidos.
- A alteração no estilo dos dados nos mapas de vetor não exige o download dos dados novamente, já que o novo estilo pode ser aplicado no cliente. Por outro lado, alterar o estilo de uma camada de peça de varredura normalmente requer o carregamento de peças do servidor, aplicando o novo estilo.
- Como os dados são entregues na forma de vetor, há menos processamento no lado do servidor necessário para preparar os dados. Como resultado, os dados mais recentes podem ser disponibilizados mais rapidamente.
O Azure Mapas segue a especificação de peça de vetor Mapbox, um padrão aberto. O Azure Mapas fornece os seguintes serviços de peças de vetor como parte da plataforma:
- Peças de peça de estradas
- Incidentes de tráfego
- Fluxo de tráfego
- O Criador do Azure Mapas também permite que peças de vetor personalizadas sejam criadas e acessadas pelo Render - Obter Peça de Mapa
Dica
Ao usar peças de imagem vetorial ou de varredura do serviço de renderização do Azure Mapas com o SDK da Web, você pode substituir atlas.microsoft.com pelo espaço reservado azmapsdomain.invalid. Esse espaço reservado será substituído pelo mesmo domínio usado pelo mapa e também acrescentará automaticamente os mesmos detalhes de autenticação. Isso simplifica muito a autenticação com o serviço de renderização ao usar a autenticação do Microsoft Entra.
Para exibir dados de uma fonte de peça de vetor no mapa, conecte a fonte a uma das camadas de renderização de dados. Todas as camadas que usam uma fonte de vetor precisam especificar um valor sourceLayer nas opções. O código a seguir carrega o serviço de peça de vetor do fluxo de tráfego do Azure Mapas como uma fonte de peça de vetor e o exibe em um mapa usando uma camada de linhas. Essa fonte de peça de vetor tem um conjunto de dados na camada de origem chamada "fluxo de tráfego". Os dados de linha nesse conjunto de dados têm uma propriedade chamada traffic_level que é usada neste código para selecionar a cor e dimensionar o tamanho das linhas.
//Formatted URL to the traffic flow vector tiles, with the maps subscription key appended to it.
String trafficFlowUrl = "https://azmapsdomain.invalid/traffic/flow/tile/pbf?api-version=1.0&style=relative&zoom={z}&x={x}&y={y}";

//Create a vector tile source and add it to the map.
VectorTileSource source = new VectorTileSource(
    tiles(new String[] { trafficFlowUrl }),
    maxSourceZoom(22)
);
map.sources.add(source);

//Create a layer for traffic flow lines.
LineLayer layer = new LineLayer(source,
    //The name of the data layer within the data source to pass into this rendering layer.
    sourceLayer("Traffic flow"),

    //Color the roads based on the traffic_level property.
    strokeColor(
        interpolate(
            linear(),
            get("traffic_level"),
            stop(0, color(Color.RED)),
            stop(0.33, color(Color.YELLOW)),
            stop(0.66, color(Color.GREEN))
        )
    ),

    //Scale the width of roads based on the traffic_level property.
    strokeWidth(
        interpolate(
            linear(),
            get("traffic_level"),
            stop(0, 6),
            stop(1,1)
        )
    )
);

//Add the traffic flow layer below the labels to make the map clearer.
map.layers.add(layer, "labels");
//Formatted URL to the traffic flow vector tiles, with the maps subscription key appended to it.
val trafficFlowUrl = "https://azmapsdomain.invalid/traffic/flow/tile/pbf?api-version=1.0&style=relative&zoom={z}&x={x}&y={y}"

//Create a vector tile source and add it to the map.
val source = VectorTileSource(
    tiles(arrayOf(trafficFlowUrl)),
    maxSourceZoom(22)
)
map.sources.add(source)

//Create a layer for traffic flow lines.
val layer = LineLayer(
    source,  //The name of the data layer within the data source to pass into this rendering layer.
    sourceLayer("Traffic flow"),  //Color the roads based on the traffic_level property.
    strokeColor(
        interpolate(
            linear(),
            get("traffic_level"),
            stop(0, color(Color.RED)),
            stop(0.33, color(Color.YELLOW)),
            stop(0.66, color(Color.GREEN))
        )
    ),  //Scale the width of roads based on the traffic_level property.
    strokeWidth(
        interpolate(
            linear(),
            get("traffic_level"),
            stop(0, 6),
            stop(1, 1)
        )
    )
)

//Add the traffic flow layer below the labels to make the map clearer.
map.layers.add(layer, "labels")
Como conectar uma fonte de dados a uma camada
Os dados são renderizados no mapa usando camadas de renderização. Uma ou mais camadas de renderização podem referenciar uma única fonte de dados. As seguintes camadas de renderização exigem uma fonte de dados:
- Camada de bolha – renderiza os dados de ponto como círculos em escala no mapa.
- Camada de símbolos – renderiza dados de ponto como ícones ou texto.
- Camada do mapa de calor – renderiza dados de ponto como um mapa de calor de densidade.
- Camada de linhas – renderizar uma linha e/ou a estrutura de polígonos.
- Camada de polígonos – preenche a área de um polígono com uma cor sólida ou um padrão de imagem.
O código a seguir mostra como criar uma fonte de dados, adicioná-la ao mapa e conectá-la a uma camada de bolha. Em seguida, importe dados de ponto GeoJSON de um local remoto para a fonte de dados.
//Create a data source and add it to the map.
DataSource source = new DataSource();

//Import the geojson data and add it to the data source.
source.importDataFromUrl("URL_or_FilePath_to_GeoJSON_data");

//Add data source to the map.
map.sources.add(source);

//Create a layer that defines how to render points in the data source and add it to the map.
BubbleLayer layer = new BubbleLayer(source);
map.layers.add(layer);
//Create a data source and add it to the map.
val source = DataSource()

//Import the geojson data and add it to the data source.
source.importDataFromUrl("URL_or_FilePath_to_GeoJSON_data")

//Add data source to the map.
map.sources.add(source)
Há camadas de renderização adicionais que não se conectam a essas fontes de dados, mas carregam diretamente os dados para renderização.
- Camada de peça – sobrepõe uma camada de peça de varredura na parte superior do mapa.
Uma fonte de dados com várias camadas
Várias camadas podem ser conectadas a uma fonte de dados. Há vários cenários diferentes nos quais essa opção é útil. Por exemplo, considere o cenário no qual um usuário desenha um polígono. Devemos renderizar e preencher a área do polígono, pois o usuário adiciona pontos ao mapa. A adição de uma linha com estilo para descrever o polígono facilita a visualização das bordas do polígono, conforme o usuário desenha. Para editar convenientemente uma posição individual no polígono, podemos adicionar um identificador, como uma marcação ou um marcador, acima de cada posição.
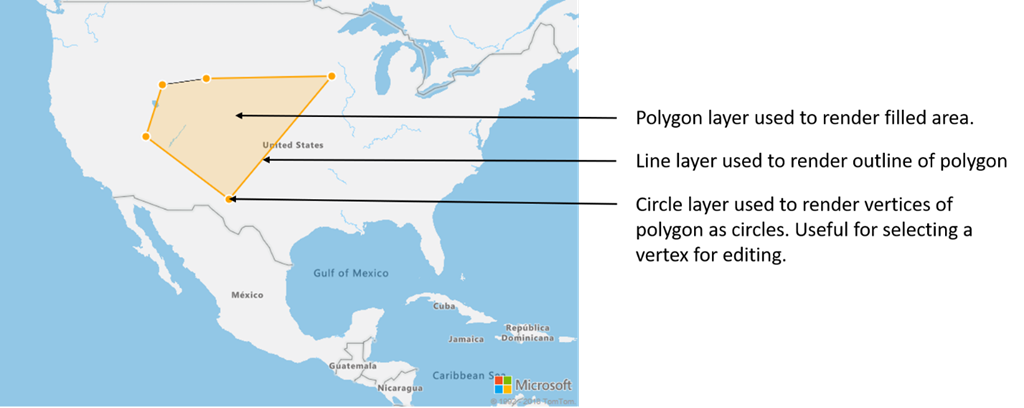
Na maioria das plataformas de mapeamento, você precisaria de um objeto de polígono, de um objeto de linha e de um marcador para cada posição no polígono. À medida que o polígono é modificado, você precisa atualizar manualmente a linha e os marcadores, o que pode se tornar complexo rapidamente.
Com o Azure Mapas, tudo de que você precisa é de um polígono em uma fonte de dados, conforme mostrado no código a seguir.
//Create a data source and add it to the map.
DataSource source = new DataSource();
map.sources.add(source);

//Create a polygon and add it to the data source.
source.add(Polygon.fromLngLats(/* List of points */));

//Create a polygon layer to render the filled in area of the polygon.
PolygonLayer polygonLayer = new PolygonLayer(source,
    fillColor("rgba(255,165,0,0.2)")
);

//Create a line layer for greater control of rendering the outline of the polygon.
LineLayer lineLayer = new LineLayer(source,
    strokeColor("orange"),
    strokeWidth(2f)
);

//Create a bubble layer to render the vertices of the polygon as scaled circles.
BubbleLayer bubbleLayer = new BubbleLayer(source,
    bubbleColor("orange"),
    bubbleRadius(5f),
    bubbleStrokeColor("white"),
    bubbleStrokeWidth(2f)
);

//Add all layers to the map.
map.layers.add(new Layer[] { polygonLayer, lineLayer, bubbleLayer });
//Create a data source and add it to the map.
val source = DataSource()
map.sources.add(source)

//Create a polygon and add it to the data source.
source.add(Polygon.fromLngLats())

//Create a polygon layer to render the filled in area of the polygon.
val polygonLayer = PolygonLayer(
    source,
    fillColor("rgba(255,165,0,0.2)")
)

//Create a line layer for greater control of rendering the outline of the polygon.
val lineLayer = LineLayer(
    source,
    strokeColor("orange"),
    strokeWidth(2f)
)

//Create a bubble layer to render the vertices of the polygon as scaled circles.
val bubbleLayer = BubbleLayer(
    source,
    bubbleColor("orange"),
    bubbleRadius(5f),
    bubbleStrokeColor("white"),
    bubbleStrokeWidth(2f)
)

//Add all layers to the map.
map.layers.add(arrayOf<Layer>(polygonLayer, lineLayer, bubbleLayer))
Dica
Ao adicionar camadas ao mapa usando o método map.layers.add, a ID ou a instância de uma camada existente pode ser passada como um segundo parâmetro. Isso dirá ao mapa para inserir a nova camada que está sendo adicionada abaixo da camada existente. Além de passar uma ID de camada, esse método também dá suporte aos valores a seguir.
"labels"– Insere a nova camada abaixo das camadas do rótulo do mapa."transit"– Insere a nova camada abaixo da estrada do mapa e das camadas de trânsito.
Próximas etapas
Consulte os artigos a seguir para obter mais exemplos de código para adicionar aos seus mapas: