向 Android 应用添加推送通知
概述
本教程介绍如何向 Android 快速入门项目添加推送通知,以便每次插入一条记录时,向设备发送一条推送通知。
如果不使用下载的快速入门服务器项目,则需要推送通知扩展包。 有关详细信息,请参阅使用适用于 Azure 移动应用的 .NET 后端服务器 SDK。
先决条件
需要满足以下条件:
依赖于项目后端的 IDE:
- 如果该应用后端为 Node.js,则需要 Android Studio。
- 如果该应用后端为 Microsoft .NET,则需要 Visual Studio Community 2013 或更高版本。
Android 2.3 或更高版本、Google Repository 修订版 27 或更高版本以及适用于 Firebase Cloud Messaging 的 Google Play Services 9.0.2 或更高版本。
完成 Android 快速入门。
创建支持 Google Cloud Messaging 的项目
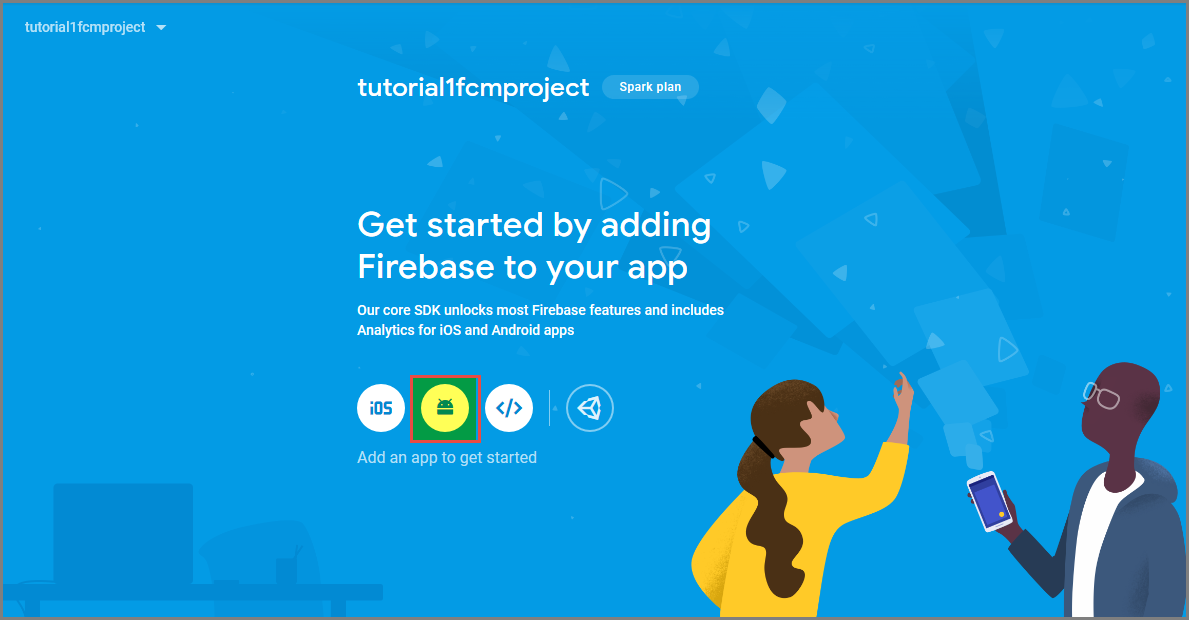
登录到 Firebase 控制台。 如果还没有 Firebase 项目,创建一个新项目。
创建项目后,选择“向 Android 应用添加 Firebase”。
在“将 Firebase 添加到 Android 应用”页上,执行以下步骤:
对于“Android 程序包名称”,请在应用程序的 build.gradle 文件中复制 applicationId 的值。 在此示例中,它是
com.fabrikam.fcmtutorial1app。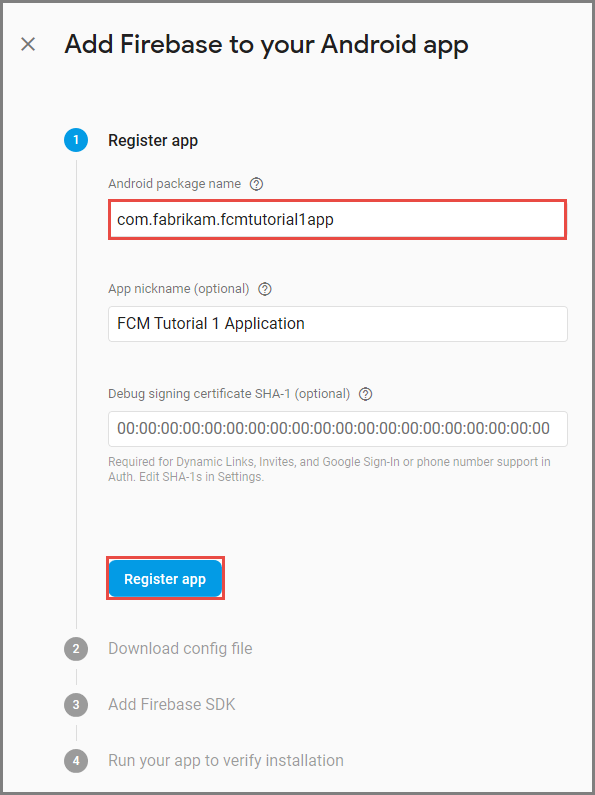
选择“注册应用”。
选择“下载 google-services.json”,将该文件保存到项目的 app 文件夹中,然后选择“下一步”。

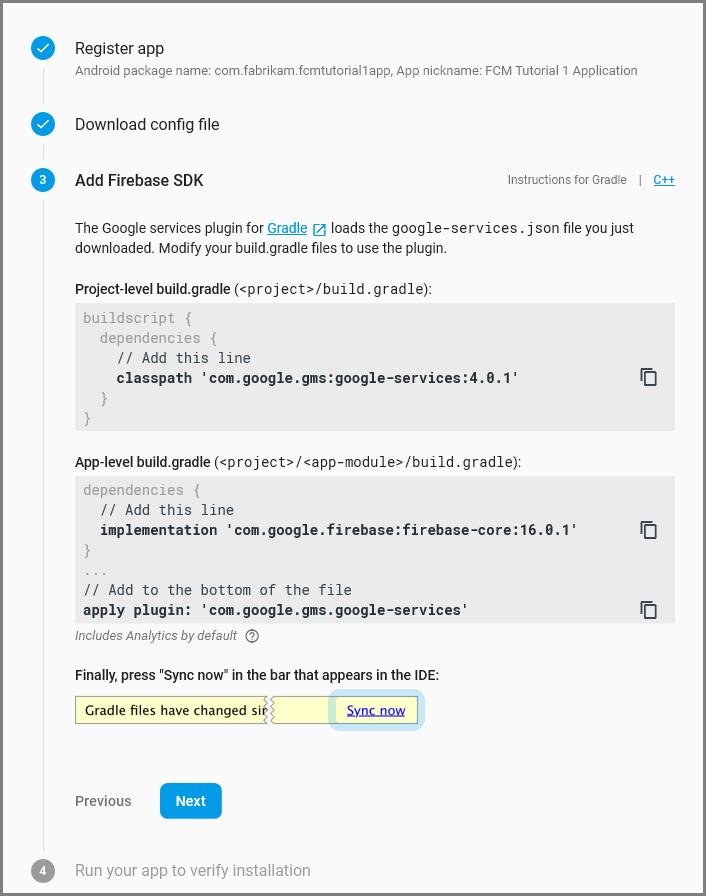
在 Android Studio 中对你的项目进行以下配置更改。
在项目级 build.gradle 文件 (<project>/build.gradle) 中,向 dependencies 部分中添加以下语句。
classpath 'com.google.gms:google-services:4.0.1'在应用级 build.gradle 文件 (<project>/<app-module>/build.gradle) 中,向 dependencies 部分中添加以下语句。
implementation 'com.google.firebase:firebase-core:16.0.8'
implementation 'com.google.firebase:firebase-messaging:17.3.4'
在应用级 build.gradle 文件的末尾,在 dependencies 部分后面添加以下行。
apply plugin: 'com.google.gms.google-services'在工具栏上选择“立即同步”。
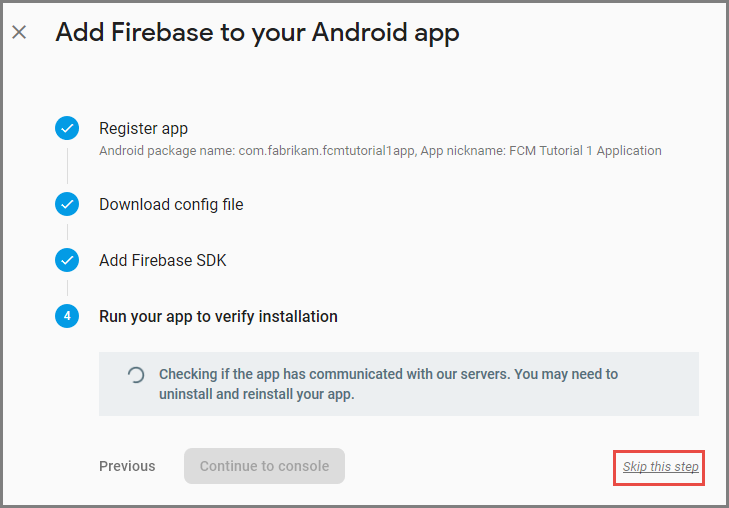
选择“下一步” 。
选择“跳过此步骤”。
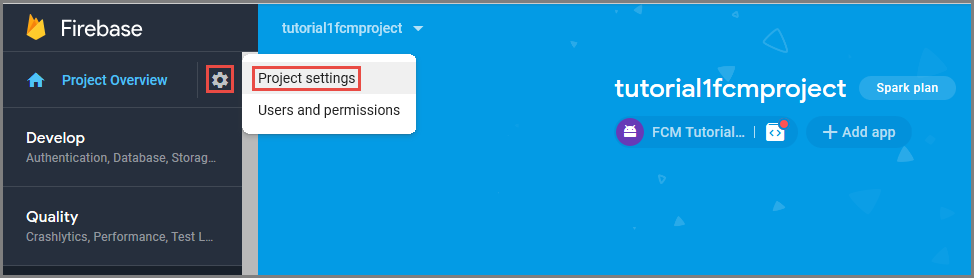
在 Firebase 控制台中,选择与项目相对应的齿轮图标。 然后,选择“项目设置”。
如果尚未将 google-services.json 文件下载到你的 Android Studio 项目的 app 文件夹中,则可以在此页面上执行此操作。
切换到顶部的“Cloud Messaging”选项卡。
复制并保存服务器密钥以供将来使用。 此值将用于配置中心。
配置通知中心
Azure 应用服务的移动应用功能使用 Azure 通知中心发送推送内容,因此用户需为移动应用配置通知中心。
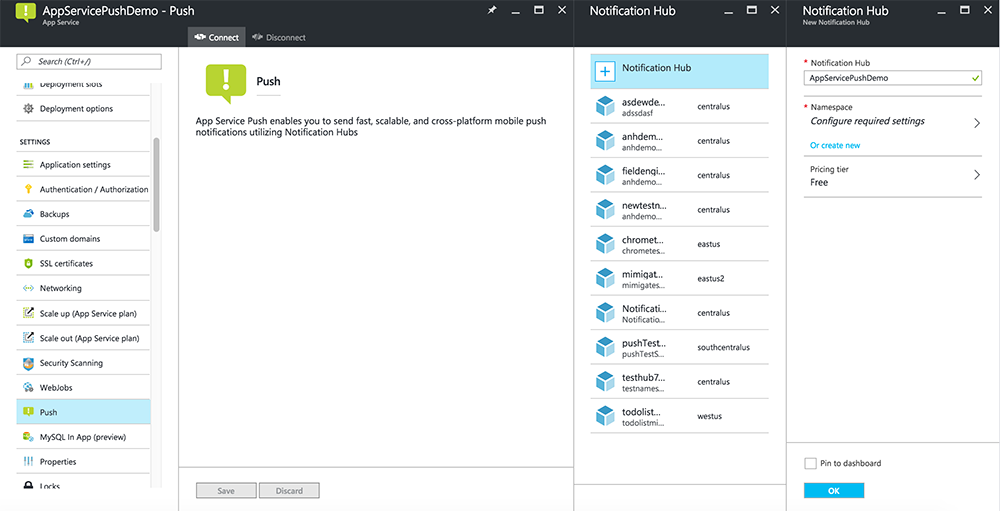
在 Azure 门户中,转到“应用服务”,并选择应用后端。 在“设置”下,选择“推送”。
若要将通知中心资源添加到应用中,请选择“连接”。 可以创建一个中心,也可以连接到一个现有的中心。
现在已将通知中心连接到移动应用后端项目。 稍后需对此通知中心进行配置,以便连接到将内容推送到设备的平台通知系统 (PNS)。
配置 Azure 以发送推送通知
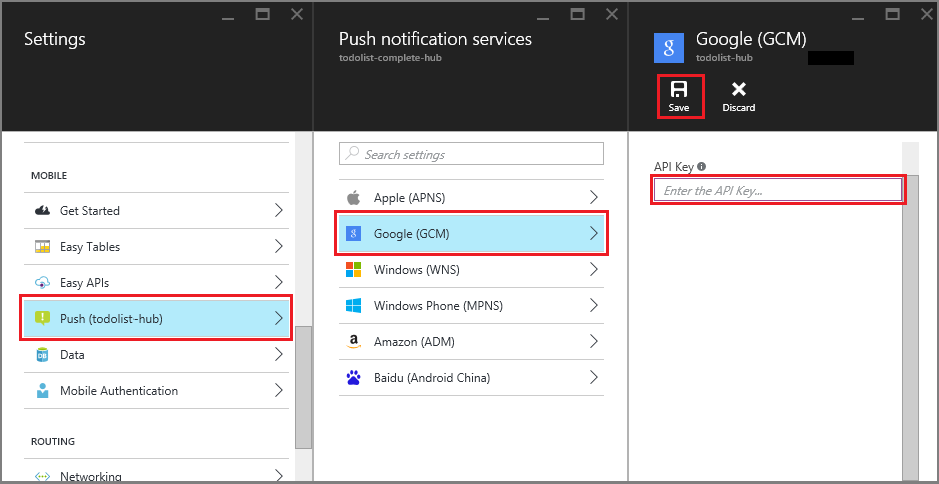
在Azure 门户中,单击“浏览全部”>“应用服务”,并单击移动应用后端。 在“设置”下,单击“应用服务推送”,并单击通知中心名称。
转到“Google (GCM)”,输入上一步骤中从 Firebase 获取的“服务器密钥”值,并单击“保存”。
移动应用后端现在已配置为使用 Firebase Cloud Messaging。 这样便可通过使用通知中心将推送通知发送到 Android 设备上运行的应用。
启用服务器项目的推送通知
使用与后端项目类型匹配的过程-. NET 后端或 Node.js后端。
.NET 后端项目
在 Visual Studio 中,右键单击服务器项目并单击“管理 NuGet 包”。 搜索
Microsoft.Azure.NotificationHubs,并单击“安装”。 这会安装通知中心客户端库。在“控制器”文件夹中,打开“TodoItemController.cs”,添加以下
using语句:using Microsoft.Azure.Mobile.Server.Config; using Microsoft.Azure.NotificationHubs;将
PostTodoItem方法替换为以下代码:public async Task<IHttpActionResult> PostTodoItem(TodoItem item) { TodoItem current = await InsertAsync(item); // Get the settings for the server project. HttpConfiguration config = this.Configuration; MobileAppSettingsDictionary settings = this.Configuration.GetMobileAppSettingsProvider().GetMobileAppSettings(); // Get the Notification Hubs credentials for the Mobile App. string notificationHubName = settings.NotificationHubName; string notificationHubConnection = settings .Connections[MobileAppSettingsKeys.NotificationHubConnectionString].ConnectionString; // Create a new Notification Hub client. NotificationHubClient hub = NotificationHubClient .CreateClientFromConnectionString(notificationHubConnection, notificationHubName); // Android payload var androidNotificationPayload = "{ \"data\" : {\"message\":\"" + item.Text + "\"}}"; try { // Send the push notification and log the results. var result = await hub.SendGcmNativeNotificationAsync(androidNotificationPayload); // Write the success result to the logs. config.Services.GetTraceWriter().Info(result.State.ToString()); } catch (System.Exception ex) { // Write the failure result to the logs. config.Services.GetTraceWriter() .Error(ex.Message, null, "Push.SendAsync Error"); } return CreatedAtRoute("Tables", new { id = current.Id }, current); }重新发布服务器项目。
Node.js 后端项目
设置后端项目。
将 todoitem.js 文件中的现有代码替换为以下内容:
var azureMobileApps = require('azure-mobile-apps'),
promises = require('azure-mobile-apps/src/utilities/promises'),
logger = require('azure-mobile-apps/src/logger');

var table = azureMobileApps.table();

table.insert(function (context) {
// For more information about the Notification Hubs JavaScript SDK,
// see https://aka.ms/nodejshubs
logger.info('Running TodoItem.insert');

// Define the GCM payload.
var payload = {
    "data": {
        "message": context.item.text
    }
};

// Execute the insert.  The insert returns the results as a Promise,
// Do the push as a post-execute action within the promise flow.
return context.execute()
    .then(function (results) {
        // Only do the push if configured
        if (context.push) {
            // Send a GCM native notification.
            context.push.gcm.send(null, payload, function (error) {
                if (error) {
                    logger.error('Error while sending push notification: ', error);
                } else {
                    logger.info('Push notification sent successfully!');
                }
            });
        }
        // Don't forget to return the results from the context.execute()
        return results;
    })
    .catch(function (error) {
        logger.error('Error while running context.execute: ', error);
    });
});

module.exports = table;
插入新的 todo 项时,会发送包含 item.text 的 GCM 通知。
在本地计算机中编辑文件时,请重新发布服务器项目。
向应用程序添加推送通知
本部分将更新客户端 Android 应用,以处理推送通知。
验证 Android SDK 版本
由于 Android SDK 的持续开发,安装在 Android Studio 中的 Android SDK 版本可能与代码中的版本不匹配。 本教程中引用的 Android SDK 是版本 26,是撰写本教程时的最新版本。 随着 SDK 的新版本问世,版本号也会随之增加,建议使用最新版本。
版本不匹配的两种表现是:
- 生成或重新生成项目时,可能会收到类似
Gradle sync failed: Failed to find target with hash string 'android-XX'的 Gradle 错误消息。 - 应该基于
import语句解析的代码中的标准 Android 对象可能产生错误消息。
如果出现上述任何一种情况,说明在 Android Studio 中安装的 Android SDK 版本与已下载项目的 SDK 目标可能不匹配。 若要验证版本,请进行以下更改:
在 Android Studio 中,单击 “工具>Android>SDK 管理器”。 如果尚未安装最新版本的 SDK 平台,请单击安装。 记下版本号。
在“项目资源管理器”选项卡的“Gradle 脚本”下,打开文件 build.gradle (Module: app)。 确保 compileSdkVersion 和 targetSdkVersion 设置为安装的最新 SDK 版本。
build.gradle可能如下所示:android { compileSdkVersion 26 defaultConfig { targetSdkVersion 26 } }
下一步就是安装 Google Play Services。 Firebase Cloud Messaging 针对开发和测试有一些最低的 API 级别要求,清单中的 minSdkVersion 属性必须符合这些要求。
如果要测试一台较旧的设备,请查阅将 Firebase 添加到 Android 项目,以确定此值可设置到的最小值,并相应地进行设置。
将 Firebase Cloud Messaging 添加到项目
在 Android Studio 中,选择 “文件>项目结构”。 选择“通知”,再选择“Firebase Cloud Messaging”,然后单击“确定”。
添加代码
在应用项目中,打开文件
AndroidManifest.xml。 在application开始标记之后添加以下代码:<service android:name=".ToDoMessagingService"> <intent-filter> <action android:name="com.google.firebase.MESSAGING_EVENT"/> </intent-filter> </service> <service android:name=".ToDoInstanceIdService"> <intent-filter> <action android:name="com.google.firebase.INSTANCE_ID_EVENT"/> </intent-filter> </service>打开
ToDoActivity.java文件并进行以下更改:添加 Import 语句:
import com.google.firebase.iid.FirebaseInstanceId;将
MobileServiceClient的定义从“专用”更改为“专用静态”,使之现在如以下所示:private static MobileServiceClient mClient;添加
registerPush方法:public static void registerPush() { final String token = FirebaseInstanceId.getInstance().getToken(); if (token != null) { new AsyncTask<Void, Void, Void>() { protected Void doInBackground(Void... params) { mClient.getPush().register(token); return null; } }.execute(); } }更新
ToDoActivity类的 onCreate 方法。 请确保在MobileServiceClient实例化之后再添加此代码。registerPush();
添加新类以处理通知。 在项目资源管理器中,打开 应用>java>your-project-namespace 节点,然后右键单击包名称节点。 单击“新建”,并单击“Java 类”。 在“名称”中,键入
ToDoMessagingService,然后单击“确认”。 然后将类声明替换为:import android.app.Notification; import android.app.NotificationManager; import android.app.PendingIntent; import android.content.Context; import android.content.Intent; import com.google.firebase.messaging.FirebaseMessagingService; import com.google.firebase.messaging.RemoteMessage; public class ToDoMessagingService extends FirebaseMessagingService { private static final int NOTIFICATION_ID = 1; @Override public void onMessageReceived(RemoteMessage remoteMessage) { String message = remoteMessage.getData().get("message"); if (message != null) { sendNotification("Notification Hub Demo", message); } } private void sendNotification(String title, String messageBody) { PendingIntent contentIntent = PendingIntent.getActivity(this, 0, new Intent(this, ToDoActivity.class), 0); Notification.Builder notificationBuilder = new Notification.Builder(this) .setSmallIcon(R.drawable.ic_launcher) .setContentTitle(title) .setContentText(messageBody) .setContentIntent(contentIntent); NotificationManager notificationManager = (NotificationManager) getSystemService(Context.NOTIFICATION_SERVICE); if (notificationManager != null) { notificationManager.notify(NOTIFICATION_ID, notificationBuilder.build()); } } }添其加他类来处理令牌更新。 创建
ToDoInstanceIdServicejava 类,然后将类声明替换为:import com.google.firebase.iid.FirebaseInstanceIdService; public class ToDoInstanceIdService extends FirebaseInstanceIdService { @Override public void onTokenRefresh() { ToDoActivity.registerPush(); } }
应用现已更新,可支持推送通知。
针对发布的移动服务测试应用程序
可以通过以下方式测试应用程序:使用 USB 电缆直接连接 Android 手机,或者在模拟器中使用虚拟设备。
后续步骤
完成此教程后,请考虑继续学习以下教程之一:
- 将身份验证添加到 Android 应用。 介绍如何使用支持的标识提供者将身份验证添加到 Android 上的待办事项列表快速入门项目。
- 为 Android 应用启用脱机同步。 了解如何使用移动应用后端向应用添加脱机支持。 使用脱机同步,用户可以与移动应用进行交互(查看、添加或修改数据),即使在没有网络连接时也是如此。