你当前正在访问 Microsoft Azure Global Edition 技术文档网站。 如果需要访问由世纪互联运营的 Microsoft Azure 中国技术文档网站,请访问 https://docs.azure.cn。
快速入门:使用 ARM 模板创建流量管理器配置文件
本快速入门介绍如何使用 Azure 资源管理器模板(ARM 模板)创建具有使用性能路由方法的外部终结点的流量管理器配置文件。
Azure 资源管理器模板是定义项目基础结构和配置的 JavaScript 对象表示法 (JSON) 文件。 模板使用声明性语法。 你可以在不编写用于创建部署的编程命令序列的情况下,描述预期部署。
如果你的环境满足先决条件,并且你熟悉如何使用 ARM 模板,请选择“部署到 Azure”按钮。 Azure 门户中会打开模板。

先决条件
如果没有 Azure 订阅,请在开始之前创建一个免费帐户。
查看模板
本快速入门中使用的模板来自 Azure 快速启动模板。
{
  "$schema": "https://schema.management.azure.com/schemas/2019-04-01/deploymentTemplate.json#",
  "contentVersion": "1.0.0.0",
  "metadata": {
    "_generator": {
      "name": "bicep",
      "version": "0.25.53.49325",
      "templateHash": "17662726020644193974"
    }
  },
  "parameters": {
    "uniqueDnsName": {
      "type": "string",
      "metadata": {
        "description": "Relative DNS name for the traffic manager profile, must be globally unique."
      }
    }
  },
  "resources": [
    {
      "type": "Microsoft.Network/trafficmanagerprofiles",
      "apiVersion": "2022-04-01",
      "name": "ExternalEndpointExample",
      "location": "global",
      "properties": {
        "profileStatus": "Enabled",
        "trafficRoutingMethod": "Performance",
        "dnsConfig": {
          "relativeName": "[parameters('uniqueDnsName')]",
          "ttl": 30
        },
        "monitorConfig": {
          "protocol": "HTTPS",
          "port": 443,
          "path": "/",
          "expectedStatusCodeRanges": [
            {
              "min": 200,
              "max": 202
            },
            {
              "min": 301,
              "max": 302
            }
          ]
        },
        "endpoints": [
          {
            "type": "Microsoft.Network/TrafficManagerProfiles/ExternalEndpoints",
            "name": "endpoint1",
            "properties": {
              "target": "www.microsoft.com",
              "endpointStatus": "Enabled",
              "endpointLocation": "northeurope"
            }
          },
          {
            "type": "Microsoft.Network/TrafficManagerProfiles/ExternalEndpoints",
            "name": "endpoint2",
            "properties": {
              "target": "docs.microsoft.com",
              "endpointStatus": "Enabled",
              "endpointLocation": "southcentralus"
            }
          }
        ]
      }
    }
  ],
  "outputs": {
    "name": {
      "type": "string",
      "value": "ExternalEndpointExample"
    },
    "resourceGroupName": {
      "type": "string",
      "value": "[resourceGroup().name]"
    },
    "resourceId": {
      "type": "string",
      "value": "[resourceId('Microsoft.Network/trafficmanagerprofiles', 'ExternalEndpointExample')]"
    }
  }
}
模板中定义了一个 Azure 资源:
若要查找与 Azure 流量管理器相关的更多模板,请参阅 Azure 快速入门模板。
部署模板
从以下代码块中选择“试用”,以打开 Azure Cloud Shell,然后按照相关说明登录到 Azure。
$projectName = Read-Host -Prompt "Enter a project name that is used for generating resource names"
$location = Read-Host -Prompt "Enter the location (i.e. centralus)"
$templateUri = "https://raw.githubusercontent.com/Azure/azure-quickstart-templates/master/quickstarts/microsoft.network/traffic-manager-external-endpoint/azuredeploy.json"

$resourceGroupName = "${projectName}rg"

New-AzResourceGroup -Name $resourceGroupName -Location "$location"
New-AzResourceGroupDeployment -ResourceGroupName $resourceGroupName -TemplateUri $templateUri

Read-Host -Prompt "Press [ENTER] to continue ..."
等到控制台中显示提示。
从上一个代码块中选择“复制”,以复制 PowerShell 脚本。
右键单击 shell 控制台窗格,然后选择“粘贴”。
输入相应的值。
模板部署将创建包含两个外部终结点的配置文件。 “Endpoint1”使用位于欧洲北部的目标终结点
www.microsoft.com。 “Endpoint2”使用位于美国中南部的目标终结点learn.microsoft.com。资源组名称是追加了 rg 的项目名称。
注意
“uniqueDNSname”需要是全局唯一名称,才能成功部署模板。 如果部署失败,请从步骤 1 重新开始。
部署模板需要几分钟时间。 完成后,输出类似于:
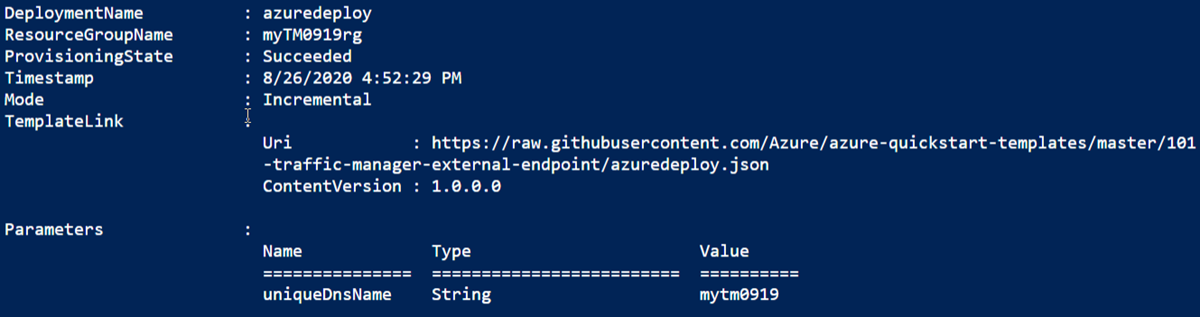
使用 Azure PowerShell 部署模板。 除了 Azure PowerShell,还可以使用 Azure 门户、Azure CLI 和 REST API。 若要了解其他部署方法,请参阅部署模板。
验证部署
使用 Get-AzTrafficManagerProfile 确定流量管理器配置文件的 DNS 名称。
Get-AzTrafficManagerProfile -Name ExternalEndpointExample -ResourceGroupName $resourceGroupName | Select RelativeDnsName复制 RelativeDnsName 值。 流量管理器配置文件的 DNS 名称为
<relativednsname>.trafficmanager.net。在本地 PowerShell 中,运行以下命令,将 {relativeDNSname} 变量替换为
<relativednsname>.trafficmanager.net。Resolve-DnsName -Name {relativeDNSname} | Select-Object NameHost | Select -First 1你应该获得的 NameHost 为
www.microsoft.com或learn.microsoft.com,具体取决于哪个区域离你更近。若要检查是否可以解析为其他终结点,请禁用在上一步中获得的目标的终结点。 将 {endpointName} 替换为 endpoint1 或 endpoint2,分别禁用
www.microsoft.com或learn.microsoft.com的目标 。Disable-AzTrafficManagerEndpoint -Name {endpointName} -Type ExternalEndpoints -ProfileName ExternalEndpointExample -ResourceGroupName $resourceGroupName -Force在本地 PowerShell 中再次运行步骤 2 中的命令。 这一次你应该获得其他终结点的其他 NameHost。
清理资源
如果不再需要流量管理器配置文件,请删除资源组。 这会删除流量管理器配置文件和所有相关资源。
若要删除资源组,请调用 Remove-AzResourceGroup cmdlet:
Remove-AzResourceGroup -Name <your resource group name>
后续步骤
本快速入门介绍了如何创建流量管理器配置文件,
若要详细了解如何路由流量,请继续学习流量管理器教程。