使用 Azure CLI 创建虚拟网络(经典)
重要
经典虚拟网络现已为新客户弃用,所有客户将于 2024 年 8 月 31 日停用。 新部署应使用基于 Azure 资源管理器 的新部署模型 Azure 资源管理器基于 虚拟网络
Azure 虚拟网络 (VNet) 是你自己的网络在云中的表示形式。 可以控制 Azure 网络设置并定义 DHCP 地址块、DNS 设置、安全策略和路由。 还可以进一步将 VNet 细分为子网,并以将物理计算机和虚拟机部署到本地数据中心的相同方式部署 Azure IaaS 虚拟机 (VM) 和 PaaS 角色实例。 从本质上讲,可以将网络扩展到 Azure,自带 IP 地址块。 如果不熟悉 VNet,请阅读 虚拟网络概述。
重要
在使用 Azure 资源之前,请务必了解 Azure 当前使用两种部署模型:Azure 资源管理器部署模型和经典部署模型。 在使用任何 Azure 资源之前,请确保了解 部署模型和工具 。 可以通过单击本文顶部的选项卡来查看不同工具的文档。
本文档介绍如何使用经典部署模型创建 VNet。 还可以通过 Azure CLI 使用 Resource Manager 部署模型创建虚拟网络。
方案
为了说明如何创建 VNet 和子网,本文档使用以下方案:
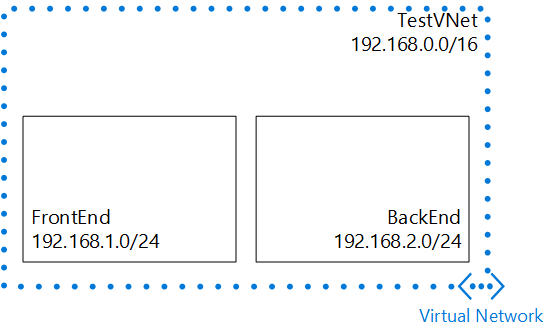
在此方案中,将创建名为 TestVNet 的 VNet,其中有保留 CIDR 块 192.168.0.0./16。 该 VNet 包含以下子网:
- FrontEnd,使用 192.168.1.0/24 作为其 CIDR 块。
- BackEnd,使用 192.168.2.0/24 作为其 CIDR 块。
如何使用 Azure CLI 创建经典 VNet
可以使用 Azure CLI 从运行 Windows、Linux 或 OSX 的任何计算机上的命令提示符管理 Azure 资源。
如果从未使用过 Azure CLI,请参阅 安装和配置 Azure CLI ,并按照说明操作,一直选择 Azure 帐户和订阅。
若要创建 VNet 和子网,请运行 azure network vnet create 命令:
azure network vnet create --vnet TestVNet -e 192.168.0.0 -i 16 -n FrontEnd -p 192.168.1.0 -r 24 -l "Central US"预期输出:
info: Executing command network vnet create + Looking up network configuration + Looking up locations + Setting network configuration info: network vnet create command OK- --vnet。 要创建的 VNet 的名称。 对于该方案,为 TestVNet
- -e(或 --address-space)。 VNet 地址空间。 对于该方案,为 192.168.0.0
- -i(或 -cidr)。 采用 CIDR 格式的网络掩码。 对于该方案,为 16。
- -n (或 --subnet-name) 。 第一个子网的名称。 对于该方案,为 FrontEnd。
- -p(或 --subnet-start-ip)。 子网或子网地址空间的起始 IP 地址。 对于该方案,为 192.168.1.0。
- -r(或 --subnet-cidr)。 子网的网络掩码(采用 CIDR 格式)。 对于该方案,为 24。
- -l(或 --location)。 要在其中创建 VNet 的 Azure 区域 。 对于该方案,为 Central US。
若要创建子网,请运行 azure network vnet subnet create 命令:
azure network vnet subnet create -t TestVNet -n BackEnd -a 192.168.2.0/24上述命令的预期输出:
info: Executing command network vnet subnet create + Looking up network configuration + Creating subnet "BackEnd" + Setting network configuration + Looking up the subnet "BackEnd" + Looking up network configuration data: Name : BackEnd data: Address prefix : 192.168.2.0/24 info: network vnet subnet create command OK- -t (或 --vnet-name。 将在其中创建子网的 VNet 的名称。 对于方案, 为 TestVNet。
- -n(或 --name)。 新子网的名称。 对于该方案,为 BackEnd。
- -a(或 --address-prefix)。 子网 CIDR 块。 对于该方案,为 192.168.2.0/24。
若要查看新 vnet 的属性,请运行 azure network vnet show 命令:
azure network vnet show上述命令的预期输出:
     info:    Executing command network vnet show
     Virtual network name: TestVNet
     + Looking up the virtual network sites
     data:    Name                            : TestVNet
     data:    Location                        : Central US
     data:    State                           : Created
     data:    Address space                   : 192.168.0.0/16
     data:    Subnets:
     data:      Name                          : FrontEnd
     data:      Address prefix                : 192.168.1.0/24
     data:
     data:      Name                          : BackEnd
     data:      Address prefix                : 192.168.2.0/24
     data:
     info:    network vnet show command OK