Xamarin.iOS 中的 ARKit 2
自去年在 iOS 11 中推出以来,ARKit 已经相当成熟。 首先,你现在可以检测垂直和水平平面,这大大提高了室内增强现实体验的实用性。 此外,还有新功能:
- 将参考图像和对象确定为真实世界和数字图像之间的连接
- 模拟真实照明情况的新照明模式
- 共享和保留 AR 环境的功能
- 存储 AR 内容的首选新文件格式
识别参考对象
ARKit 2 中的一项突出特性是能够识别参考图像和对象。 可以从普通图像文件中加载参考图像(稍后讨论),但是必须使用以开发人员为中心的 ARObjectScanningConfiguration 扫描参考对象。
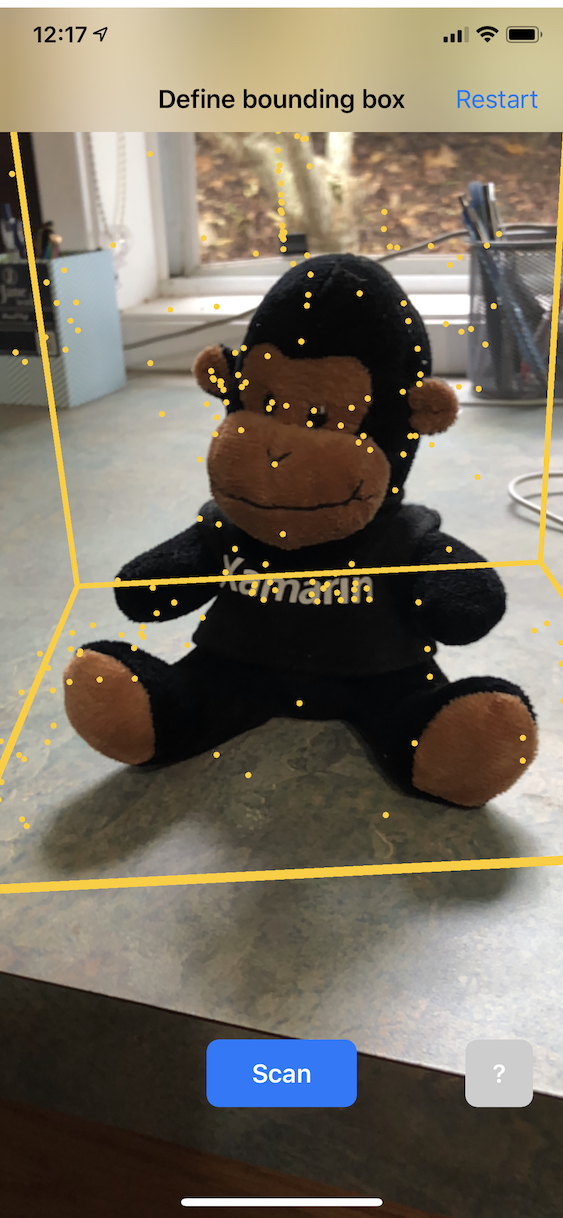
示例应用:扫描和检测 3D 对象
扫描和检测 3D 对象示例是 Apple 项目的移植,演示了:
- 使用
NSNotification对象进行应用程序状态管理 - 自定义可视化效果
- 复杂手势
- 对象扫描
- 存储
ARReferenceObject
扫描参考对象需要大量耗电和处理器,较旧的设备通常很难实现稳定的跟踪。
使用 NSNotification 对象管理状态
此应用程序使用状态机在以下状态之间转换:
AppState.StartARSessionAppState.NotReadyAppState.ScanningAppState.Testing
除外,在 AppState.Scanning 中时使用一组嵌入的状态和转换:
Scan.ScanState.ReadyScan.ScanState.DefineBoundingBoxScan.ScanState.ScanningScan.ScanState.AdjustingOrigin
该应用使用反应式体系结构来将状态转换通知发布到 NSNotificationCenter 并订阅这些通知。 安装程序与 ViewController.cs 中的以下代码片段类似:
// Configure notifications for application state changes
var notificationCenter = NSNotificationCenter.DefaultCenter;

notificationCenter.AddObserver(Scan.ScanningStateChangedNotificationName, State.ScanningStateChanged);
notificationCenter.AddObserver(ScannedObject.GhostBoundingBoxCreatedNotificationName, State.GhostBoundingBoxWasCreated);
notificationCenter.AddObserver(ScannedObject.GhostBoundingBoxRemovedNotificationName, State.GhostBoundingBoxWasRemoved);
notificationCenter.AddObserver(ScannedObject.BoundingBoxCreatedNotificationName, State.BoundingBoxWasCreated);
notificationCenter.AddObserver(BoundingBox.ScanPercentageChangedNotificationName, ScanPercentageChanged);
notificationCenter.AddObserver(BoundingBox.ExtentChangedNotificationName, BoundingBoxExtentChanged);
notificationCenter.AddObserver(BoundingBox.PositionChangedNotificationName, BoundingBoxPositionChanged);
notificationCenter.AddObserver(ObjectOrigin.PositionChangedNotificationName, ObjectOriginPositionChanged);
notificationCenter.AddObserver(NSProcessInfo.PowerStateDidChangeNotification, DisplayWarningIfInLowPowerMode);
典型的通知处理程序将更新 UI,并可能修改应用程序状态,例如以下处理程序在扫描对象时进行更新:
private void ScanPercentageChanged(NSNotification notification)
{
    var pctNum = TryGet<NSNumber>(notification.UserInfo, BoundingBox.ScanPercentageUserKey);
    if (pctNum == null)
    {
        return;
    }
    double percentage = pctNum.DoubleValue;
    // Switch to the next state if scan is complete
    if (percentage >= 100.0)
    {
        State.SwitchToNextState();
    }
    else
    {
        DispatchQueue.MainQueue.DispatchAsync(() => navigationBarController.SetNavigationBarTitle($"Scan ({percentage})"));
    }
}
最后,Enter{State} 方法根据新状态修改模型和 UX:
internal void EnterStateTesting()
{
    navigationBarController.SetNavigationBarTitle("Testing");
    navigationBarController.ShowBackButton(false);
    loadModelButton.Hidden = true;
    flashlightButton.Hidden = false;
    nextButton.Enabled = true;
    nextButton.SetTitle("Share", UIControlState.Normal);

    testRun = new TestRun(sessionInfo, sceneView);
    TestObjectDetection();
    CancelMaxScanTimeTimer();
}
自定义可视化效果
该应用显示投影到检测到的水平平面的边界框中包含的对象的低级别“点云”。
开发人员可在 ARFrame.RawFeaturePoints 属性中使用此点云。 有效地可视化点云可能是一个棘手的问题。 循环访问点,然后为每个点创建并放置一个新的 SceneKit 节点,这会降低帧速率。 或者,如果异步完成,则会有延迟。 该示例使用三部分策略维护性能:
- 使用不安全代码将数据固定到位,并将数据解释为原始字节缓冲区。
- 将该原始缓冲区转换为
SCNGeometrySource并创建“模板”SCNGeometryElement对象。 - 使用
SCNGeometry.Create(SCNGeometrySource[], SCNGeometryElement[])快速“拼接”原始数据和模板
internal static SCNGeometry CreateVisualization(NVector3[] points, UIColor color, float size)
{
  if (points.Length == 0)
  {
    return null;
  }

  unsafe
  {
    var stride = sizeof(float) * 3;

    // Pin the data down so that it doesn't move
    fixed (NVector3* pPoints = &points[0])
    {
      // Important: Don't unpin until after `SCNGeometry.Create`, because geometry creation is lazy

      // Grab a pointer to the data and treat it as a byte buffer of the appropriate length
      var intPtr = new IntPtr(pPoints);
      var pointData = NSData.FromBytes(intPtr, (System.nuint) (stride * points.Length));

      // Create a geometry source (factory) configured properly for the data (3 vertices)
      var source = SCNGeometrySource.FromData(
        pointData,
        SCNGeometrySourceSemantics.Vertex,
        points.Length,
        true,
        3,
        sizeof(float),
        0,
        stride
      );

      // Create geometry element
      // The null and bytesPerElement = 0 look odd, but this is just a template object
      var template = SCNGeometryElement.FromData(null, SCNGeometryPrimitiveType.Point, points.Length, 0);
      template.PointSize = 0.001F;
      template.MinimumPointScreenSpaceRadius = size;
      template.MaximumPointScreenSpaceRadius = size;

      // Stitch the data (source) together with the template to create the new object
      var pointsGeometry = SCNGeometry.Create(new[] { source }, new[] { template });
      pointsGeometry.Materials = new[] { Utilities.Material(color) };
      return pointsGeometry;
    }
  }
}
结果类似以下形式:
复杂手势
用户可以缩放、旋转和拖动围绕目标对象的边界框。 相关的手势识别器中有两件有趣的事情。
首先,所有手势识别器仅在超过阈值后才激活;例如,手指拖动了这么多像素或旋转超过了某个角度。 技巧是累积移动,直到超过阈值,然后逐渐应用它:
// A custom rotation gesture recognizer that fires only when a threshold is passed
internal partial class ThresholdRotationGestureRecognizer : UIRotationGestureRecognizer
{
    // The threshold after which this gesture is detected.
    const double threshold = Math.PI / 15; // (12°)

    // Indicates whether the currently active gesture has exceeded the threshold
    private bool thresholdExceeded = false;

    private double previousRotation = 0;
    internal double RotationDelta { get; private set; }

    internal ThresholdRotationGestureRecognizer(IntPtr handle) : base(handle)
    {
    }

    // Observe when the gesture's state changes to reset the threshold
    public override UIGestureRecognizerState State
    {
        get => base.State;
        set
        {
            base.State = value;

            switch(value)
            {
                case UIGestureRecognizerState.Began :
                case UIGestureRecognizerState.Changed :
                    break;
                default :
                    // Reset threshold check
                    thresholdExceeded = false;
                    previousRotation = 0;
                    RotationDelta = 0;
                    break;
            }
        }
    }

    public override void TouchesMoved(NSSet touches, UIEvent evt)
    {
        base.TouchesMoved(touches, evt);

        if (thresholdExceeded)
        {
            RotationDelta = Rotation - previousRotation;
            previousRotation = Rotation;
        }

        if (! thresholdExceeded && Math.Abs(Rotation) > threshold)
        {
            thresholdExceeded = true;
            previousRotation = Rotation;
        }
    }
}
与手势相关的第二个有趣的事情是,边界框相对于检测到的现实世界平面移动的方式。 这篇 Xamarin 博客文章对此部分进行了讨论。
ARKit 2 中的其他新功能
更多跟踪配置
现在,你可将下面任何一种用作混合现实体验的基础:
- 仅设备加速计(
AROrientationTrackingConfiguration,iOS 11) - 人脸(
ARFaceTrackingConfiguration,iOS 11) - 参考图像(
ARImageTrackingConfiguration,iOS 12) - 扫描 3D 对象(
ARObjectScanningConfiguration,iOS 12) - 视觉惯性里程计(
ARWorldTrackingConfiguration,已在 iOS 12 中改进)
AROrientationTrackingConfiguration 在这篇博客文章和 F# 示例中进行了讨论,它是最受限的,提供的混合现实体验较差,因为它仅根据设备的运动放置数字对象,而不会尝试将设备和屏幕绑定到现实世界。
通过 ARImageTrackingConfiguration,你就可以识别现实世界的 2D 图像(绘画、徽标等),并使用这些图像来定位数字图像:
var imagesAndWidths = new[] {
    ("cover1.jpg", 0.185F),
    ("cover2.jpg", 0.185F),
     //...etc...
    ("cover100.jpg", 0.185F),
};

var referenceImages = new NSSet<ARReferenceImage>(
    imagesAndWidths.Select( imageAndWidth =>
    {
      // Tuples cannot be destructured in lambda arguments
        var (image, width) = imageAndWidth;
        // Read the image
        var img = UIImage.FromFile(image).CGImage;
        return new ARReferenceImage(img, ImageIO.CGImagePropertyOrientation.Up, width);
    }).ToArray());

configuration.TrackingImages = referenceImages;
此配置有两个有趣的方面:
- 它很高效,可用于潜在的大量参考图像
- 数字图像被定位到图像上,即使该图像在现实世界中移动也是如此(例如,如果某本书的封面被识别,它将跟踪这本书从书架上取下、放下等过程)。
之前讨论过 ARObjectScanningConfiguration,它是以开发人员为中心的配置,用于扫描 3D 对象。 它会消耗大量电量和处理器,不得在最终应用应用程序中使用。 示例扫描和检测 3D 对象演示了此配置的用法。
最后的跟踪配置 ARWorldTrackingConfiguration 是大多数混合现实体验的主力配置。 此配置使用“视觉惯性里程计”将现实世界的“特征点”与数字图像相关联。 数字几何(也称为子画面)相对于现实世界的水平和垂直平面,或者相对于检测到的 ARReferenceObject 实例进行定位。 在这种配置中,世界原点是相机在空间中的原始位置,Z 轴与重力对齐,数字对象相对于现实世界中的对象“保持原位”。
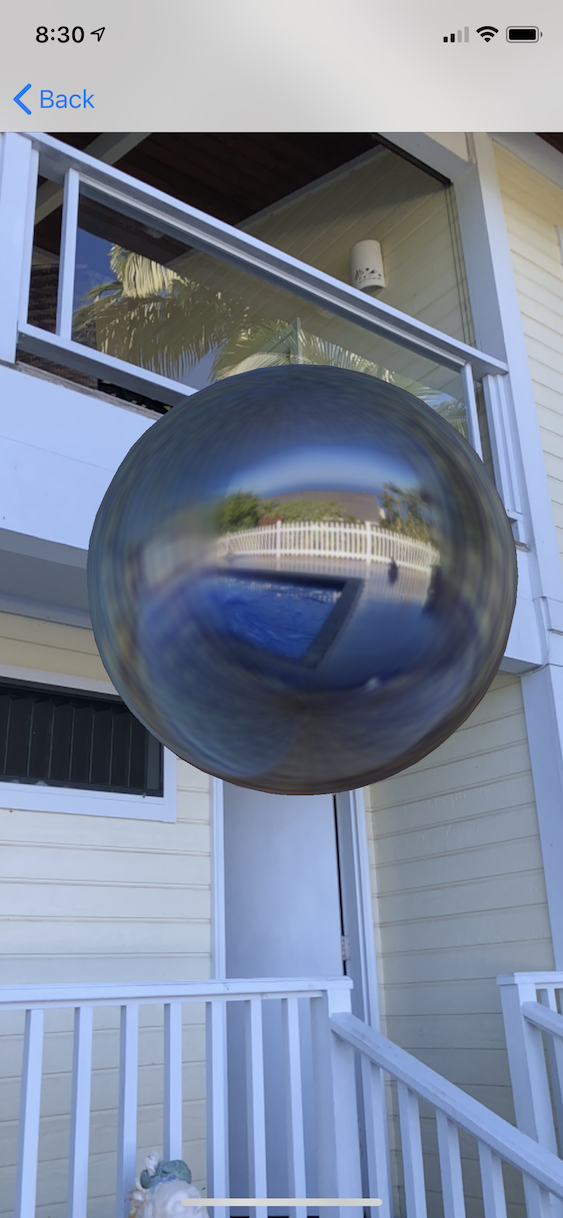
环境纹理
ARKit 2 支持“环境纹理”,它使用捕获到的图像来估计照明,甚至对有光泽的对象应用镜面高光。 环境立方图是动态构建的,一旦相机观察到所有方向,就可以产生令人印象深刻的现实体验:
若要使用环境纹理,需满足以下条件:
SCNMaterial对象必须使用SCNLightingModel.PhysicallyBased,并为Metalness.Contents和Roughness.Contents分配一个范围在 0 到 1 之间的值;并且- 跟踪配置必须设置
EnvironmentTexturing=AREnvironmentTexturing.Automatic:
var sphere = SCNSphere.Create(0.33F);
sphere.FirstMaterial.LightingModelName = SCNLightingModel.PhysicallyBased;
// Shiny metallic sphere
sphere.FirstMaterial.Metalness.Contents = new NSNumber(1.0F);
sphere.FirstMaterial.Roughness.Contents = new NSNumber(0.0F);

// Session configuration:
var configuration = new ARWorldTrackingConfiguration
{
    PlaneDetection = ARPlaneDetection.Horizontal | ARPlaneDetection.Vertical,
    LightEstimationEnabled = true,
    EnvironmentTexturing = AREnvironmentTexturing.Automatic
};
尽管上述代码片段中显示的完美反射纹理在示例中很有趣,但环境纹理可能最好在有约束的情况下使用,以免引发“恐怖谷”反应(纹理只是根据相机记录的内容得出的估计)。
共享和持久 AR 体验
ARKit 2 的另一个主要内容是 ARWorldMap 类,可用于共享或存储世界跟踪数据。 你可以使用 ARSession.GetCurrentWorldMapAsync 或 GetCurrentWorldMap(Action<ARWorldMap,NSError>) 获得当前世界地图:
// Local storage
var PersistentWorldPath => Environment.GetFolderPath(Environment.SpecialFolder.Personal) + "/arworldmap";

// Later, after scanning the environment thoroughly...
var worldMap = await Session.GetCurrentWorldMapAsync();
if (worldMap != null)
{
    var data = NSKeyedArchiver.ArchivedDataWithRootObject(worldMap, true, out var err);
    if (err != null)
    {
        Console.WriteLine(err);
    }
    File.WriteAllBytes(PersistentWorldPath, data.ToArray());
}
若要共享或还原世界地图,请执行以下操作:
- 从文件加载数据,
- 将它取消存档到
ARWorldMap对象中, - 将其用作
ARWorldTrackingConfiguration.InitialWorldMap属性的值:
var data = NSData.FromArray(File.ReadAllBytes(PersistentWorldController.PersistenWorldPath));
var worldMap = (ARWorldMap)NSKeyedUnarchiver.GetUnarchivedObject(typeof(ARWorldMap), data, out var err);

var configuration = new ARWorldTrackingConfiguration
{
    PlaneDetection = ARPlaneDetection.Horizontal | ARPlaneDetection.Vertical,
    LightEstimationEnabled = true,
    EnvironmentTexturing = AREnvironmentTexturing.Automatic,
    InitialWorldMap = worldMap
};
ARWorldMap 只包含不可见的世界跟踪数据和 ARAnchor 对象,它不包含数字资产。 若要共享几何图形或图像,必须自行制定适合你的用例的策略(也许只存储/传输几何图形的位置和方向,并将其应用于静态 SCNGeometry,或者存储/传输序列化对象)。 ARWorldMap 的优势是,资产一旦相对于共享 ARAnchor 放置,就将在设备或会话之间一致地显示。
通用场景描述文件格式
ARKit 2 的最后一个重要特性是 Apple 采用了 Pixar 的通用场景描述文件格式。 此格式取代了 Collada 的 DAE 格式,成为共享和存储 ARKit 资源的首选格式。 对可视化资产的支持内置在 iOS 12 和 Mojave 中。 USDZ 文件扩展名是包含 USD 文件的未压缩且未加密的 zip 存档。 Pixar 提供了用于处理 USD 文件 的工具,但还没有多少第三方支持。
ARKit 编程提示
手动资源管理
在 ARKit 中,手动管理资源至关重要。 这不仅允许高帧速率,它实际上也是必要的,以避免令人困惑的“屏幕冻结”。ARKit 框架在提供新的相机帧 (ARSession.CurrentFrame) 方面很迟缓。 已在当前的 ARFrame 上调用 Dispose() 之前,ARKit 不会提供新的帧! 这会导致视频“冻结”,即使应用的其余部分可响应也是如此。 解决方案是始终使用 using 块访问 ARSession.CurrentFrame,或者在其上手动调用 Dispose()。
派生自 NSObject 的所有对象都是 IDisposable,并且 NSObject 实现释放模式,因此通常应遵循此模式在派生类上实现 Dispose。
操作变换矩阵
在任何 3D 应用程序中,你都将处理 4x4 变换矩阵,这些矩阵紧凑地描述了如何通过 3D 空间移动、旋转和剪切对象。 在 SceneKit 中,这些是 SCNMatrix4 对象。
对于行主序 simdfloat4x4 类型支持的 SCNNode,SCNNode.Transform 属性返回 SCNMatrix4 变换矩阵。 因此,例如:
var node = new SCNNode { Position = new SCNVector3(2, 3, 4) };
var xform = node.Transform;
Console.WriteLine(xform);
// Output is: "(1, 0, 0, 0)\n(0, 1, 0, 0)\n(0, 0, 1, 0)\n(2, 3, 4, 1)"
可以看到,位置编码在底部行的前三个元素中。
在 Xamarin 中,用于操作变换矩阵的常见类型是 NVector4,按照惯例,它以列主序的方式解释。 也就是说,转换/位置分量应该出现在 M14、M24 和 M34 中,而不是在 M41、M42 和 M43 中:
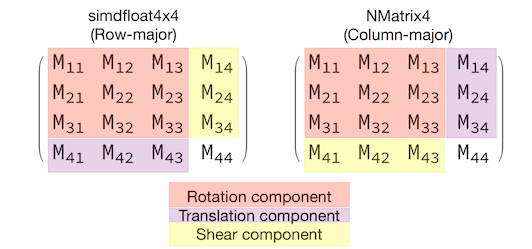
要有适当的行为,与矩阵解释的选择一致至关重要。 由于 3D 变换矩阵为 4x4 的,因此一致性错误不会产生任何类型的编译时甚至运行时异常,只是操作会意外执行。 如果你的 SceneKit/ARKit 对象似乎被卡住、飞走或抖动,那么很可能是由于变换矩阵错误导致的。 解决方案很简单:NMatrix4.Transpose 将执行元素就地转置。