Troubleshoot issues with the wrap feature in Power Apps
This article helps you resolve the most common issues with the wrap feature in Microsoft Power Apps.
Issue 1 - Wrap build is failing
If your wrap build fails, you can take the following steps to solve the issue.
Step 1: Verify that your images are in PNG format
Ensure that the images you use in wrap are in PNG format. Using images in any format other than PNG in wrap will cause the build to fail. Use an image converter to save your images as .png files, or ensure that your original image files are in PNG format.
Important
Manually changing your image file extension from .jpeg or any other format to .png won't automatically reformat the image to PNG format.
Step 2: Verify that your App Center is correctly configured
Your App Center link must be created as an app within an organization and not as a standalone app. The following screenshot shows how to create a new organization in wrap wizard.
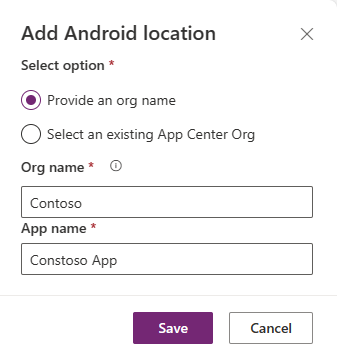
For more information about how to automatically create a new location in wrap wizard, see Step 5: Manage output in the "Create native mobile apps for iOS and Android using the wizard" section.
Step 3: Verify that your key vault configuration is correct
Make sure that an Azure service principal is created, and the service principal role is added correctly. For more information, see steps 1 and 2 in Create native mobile apps for iOS and Android using the wizard.
Ensure that your key vault contains all necessary certificates, secrets, and tags for iOS, Android, or both:
- iOS: two tags, one certificate, and one secret
- Android: one tag and one certificate
For more information, see Create Azure key vault for wrap in Power Apps.
Step 4: Try again if you have all the proper configurations
If your wrap build still fails after you've verified that your wrap project has all the proper configurations, see the Other issues in wrap section of this article.
Issue 2 - Wrap button is disabled for my app
You can only wrap apps with edit permissions. Make sure that you have edit permissions to the app you want to wrap, and try again.
Issue 3 - Can't save my project or trigger a wrap build
To resolve this issue, you can:
- Update to the latest wrap solution version and try again.
- Ensure that no UI validation errors block the Save or Build submission.
Issue 4 - Can't install a wrapped mobile app on a device
Make sure that you've signed the outputted application. You can sign it by configuring a key vault and providing it at build trigger time, or manually signing. For more information on code signing, see:
Verify that your mobile device meets these minimum requirements.
Issue 5 - Can't sign in to a wrapped mobile app or can't see data
If you can't sign in to your wrapped mobile app, verify that:
Your Microsoft Entra app is properly configured.
All API permissions for the app have been added correctly. For more information about how to see and configure API permissions for the app, see the following screenshot and Configure API Permissions.

The
Add-AdminAllowedThirdPartyAppsscript has run successfully. For more information, see Allow registered apps in your environment.Your Microsoft Entra app type is Multitenant. Under your Microsoft Entra app's Authentication tab, the supported account type should be Accounts in any organizational directory (Any Microsoft Entra directory - Multitenant).
The proper redirect URIs have been created for iOS and Android. For Android, confirm that the hash is provided correctly. For more information about configuring a redirect URI, see Configure platform settings.

Issue 6 - Errors in Azure key vault in wrap for Power Apps
The following Azure key vault errors might appear in wrap for Power Apps and can be rectified.
Error code 1000118
| Error code | Description |
|---|---|
| 1000118 | Default subscription not found, or missing access permissions |
Note
Azure AD and MSOnline PowerShell modules are deprecated as of March 30, 2024. To learn more, read the deprecation update. After this date, support for these modules are limited to migration assistance to Microsoft Graph PowerShell SDK and security fixes. The deprecated modules will continue to function through March, 30 2025.
We recommend migrating to Microsoft Graph PowerShell to interact with Microsoft Entra ID (formerly Azure AD). For common migration questions, refer to the Migration FAQ. Note: Versions 1.0.x of MSOnline may experience disruption after June 30, 2024.
Make sure that your Azure key vault is in your tenant's Default subscription.
Run these commands in PowerShell as an admin:
Connect-AzureAD -TenantId <your tenant ID>New-AzureADServicePrincipal -AppId 4e1f8dc5-5a42-45ce-a096-700fa485ba20 -DisplayName "Wrap KeyVault Access App"In the Azure portal, go to your default subscription. On the Access Control (IAM) page, add a Reader role assignment to the Service Principal representing your app, for example, Wrap KeyVault Access App. Make sure that it's in the Subscription's IAM and Keyvault's IAM. Here are the steps:
Go to the Access control (IAM) tab, and select the Add role assignment option under the Add menu button.

Select the Job function roles tab, and make sure that the Reader role is selected. Then select the Members tab on the top menu.

Search for Wrap KeyVault Access App on the Members tab.

Select Wrap KeyVault Access App and then select the Review + assign button at the bottom of the tab to assign it the Reader role.


Error code 1000119
| Error code | Description |
|---|---|
| 1000119 | Keyvault does not exist, or Keyvault is missing access privileges |
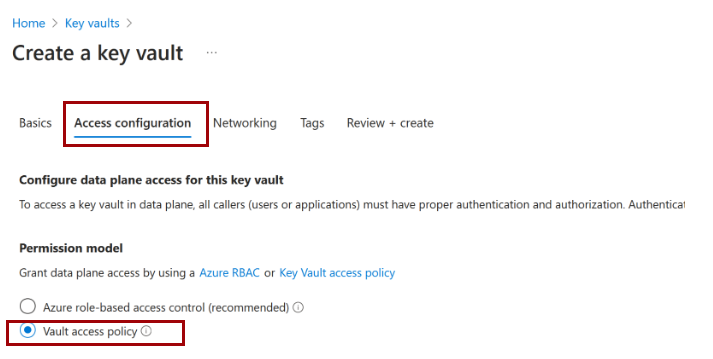
Verify that your Azure key vault is in your tenant's Default subscription.
Make sure that the Vault access policy option is selected when you create your key vault.
Run these commands in PowerShell as an admin:
Connect-AzureAD -TenantId <your tenant ID>New-AzureADServicePrincipal -AppId 4e1f8dc5-5a42-45ce-a096-700fa485ba20 -DisplayName "Wrap KeyVault Access App"In the Azure portal, go to your default subscription. On the Access Control (IAM) page, add a Reader role assignment to the Service Principal representing your app, for example, Wrap KeyVault Access App. Make sure that it's in the Subscription's IAM and Keyvault's IAM. Here are the steps:
Go to the Access control (IAM) tab, and select the Add role assignment option under the Add menu button.
Select the Job function roles tab, and make sure that the Reader role is selected. Then select the Members tab on the top menu.
Search for Wrap KeyVault Access App on the Members tab.
Select Wrap KeyVault Access App and then select the Review + assign button at the bottom of the tab to assign it the Reader role.
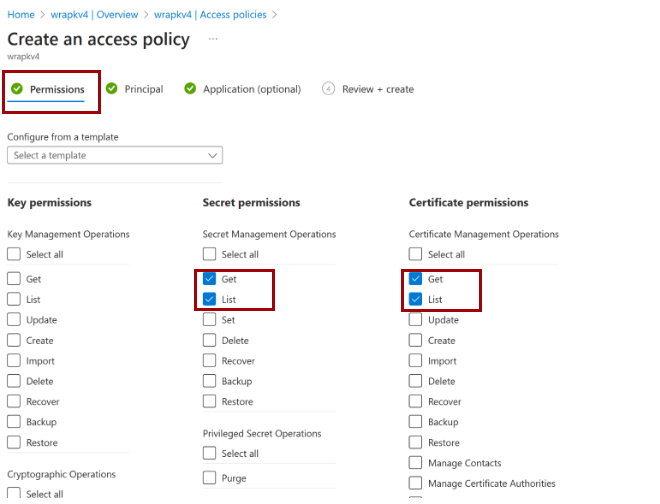
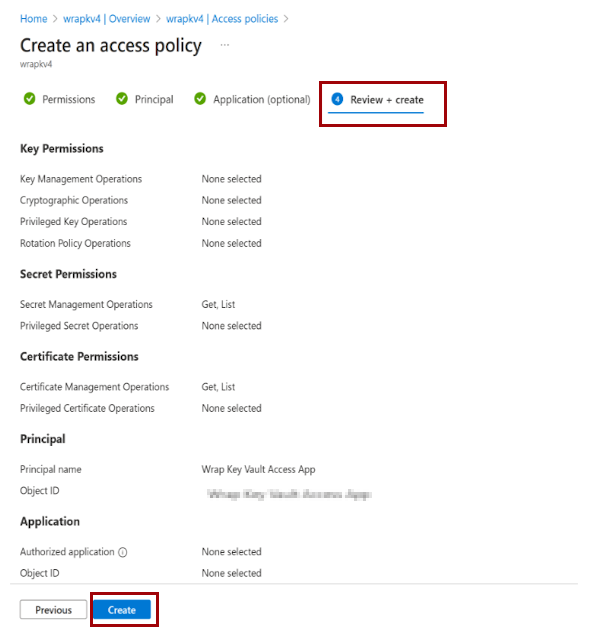
Add access policies to your Azure key vault.
Error code 1000120
| Error code | Description |
|---|---|
| 1000120 | No organization ID tags found on key vault |
Go to the Power Platform admin center, select Environments and then select the environment where your wrap project is.

Copy the Organization ID.
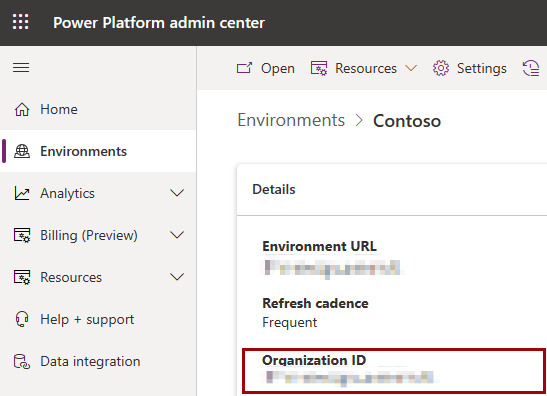
In your key vault in the Azure portal, go to Tags, create a new tag named organization-id, and add your organization ID to this tag.


Error code 1000121
| Error code | Description |
|---|---|
| 1000121 | Android keystore is not valid. Missing Tag and/or Certificate |
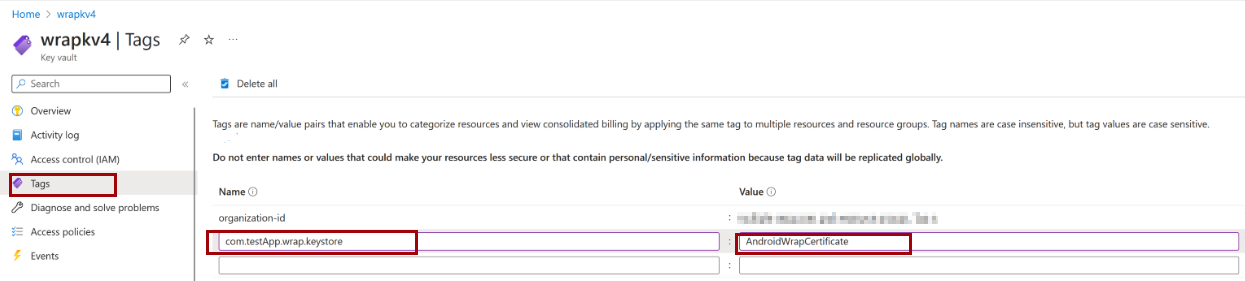
Import your Android Certificate.


Add a new Tag for your Certificate.
The Tag name should be based on the bundle id that you used in your wrap project. For example, if the bundle id for your wrapped app is com.testApp.wrap, then the new Tag name should be com.testApp.wrap.keystore.
The Tag value should correspond to the name you chose for your Certificate when uploading the certificate file in the previous step. For example, if your Certificate is named AndroidWrapCertificate, then the value of the Tag value should also be AndroidWrapCertificate.


Error code 1000122
| Error code | Description |
|---|---|
| 1000122 | iOS certificate is not valid |
Import your iOS Certificate.

Add a new Tag for your Certificate.
The Tag name should be based on the bundle id that you used in your wrap project. For example, if the bundle id for your wrapped app is com.testApp.wrap, then the new Tag name should be com.testApp.wrap.cert.
The Tag value should correspond to the name you chose for your Certificate when uploading the certificate file in the previous step. For example, if your Certificate is named iOSCertificate1, then the value of the Tag value should also be iOSCertificate1.


Error code 1000123
| Error code | Description |
|---|---|
| 1000123 | iOS profile is not valid |
Import your Provisioning Profile as a Secret.
Add a new Tag for your Provisioning Profile.
The Tag name should be based on the bundle id that you used in your wrap project. For example, if the bundle id for your wrapped app is com.testApp.wrap, then the new Tag name should be com.testApp.wrap.profile.
The Tag value should correspond to the name you chose for your Secret when uploading the povisioning profile in the previous step. For example, if your Secret is named iOSProvisioningProfileSecret, then the value of the Tag value should also be iOSProvisioningProfileSecret.


Other issues in wrap for Power Apps
For all other issues, or if your issue persists after following these steps, see Next steps later in this article to report the issue through a support request. You need to provide a repro video, screenshots, or both, and a session ID that can be get in the following ways:
- On the sign-in screen, go to the lower right corner to select the gear icon, and then select Session Details.
- After you open the app, tap and hold on the screen, and then select Session Details.
Next steps
If your issue isn't listed in this article, you can search for more support resources, or contact Microsoft support. For more information, see Get Help + Support.
Σχόλια
Σύντομα διαθέσιμα: Καθ' όλη τη διάρκεια του 2024 θα καταργήσουμε σταδιακά τα ζητήματα GitHub ως μηχανισμό ανάδρασης για το περιεχόμενο και θα το αντικαταστήσουμε με ένα νέο σύστημα ανάδρασης. Για περισσότερες πληροφορίες, ανατρέξτε στο θέμα: https://aka.ms/ContentUserFeedback.
Υποβολή και προβολή σχολίων για