Set up a sign-in flow in Azure Active Directory B2C
Before you begin, use the Choose a policy type selector at the top of this page to choose the type of policy you’re setting up. Azure Active Directory B2C offers two methods to define how users interact with your applications: through predefined user flows or through fully configurable custom policies. The steps required in this article are different for each method.
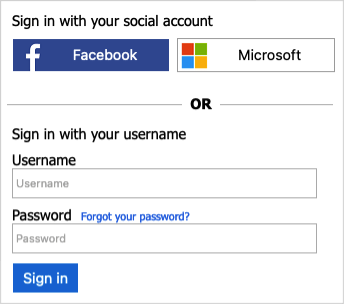
Sign-in flow overview
The sign-in policy lets users:
- Sign in with an Azure AD B2C Local Account
- Users can sign-in with a social account
- Password reset
- Users cannot sign up for an Azure AD B2C Local Account. To create an account, an administrator can use the Azure portal, or Microsoft Graph API.
Prerequisites
- If you haven't already done so, register a web application in Azure Active Directory B2C.
- Complete the steps in Create user flows and custom policies in Azure Active Directory B2C.
Create a sign-in user flow
To add sign-in policy:
Sign in to the Azure portal.
If you have access to multiple tenants, select the Settings icon in the top menu to switch to your Azure AD B2C tenant from the Directories + subscriptions menu.
In the Azure portal, search for and select Azure AD B2C.
Under Policies, select User flows, and then select New user flow.
On the Create a user flow page, select the Sign in user flow.
Under Select a version, select Recommended, and then select Create. (Learn more about user flow versions.)
Enter a Name for the user flow. For example, signupsignin1.
Under Identity providers select at least one identity provider:
- Under Local accounts, select one of the following: Email signin, User ID signin, Phone signin, Phone/Email signin, User ID/Email signin, or None. Learn more.
- Under Social identity providers, select any of the external social or enterprise identity providers you've set up. Learn more.
Under Multifactor authentication, if you want to require users to verify their identity with a second authentication method, choose the method type and when to enforce multi-factor authentication (MFA). Learn more.
Under Conditional access, if you've configured Conditional Access policies for your Azure AD B2C tenant and you want to enable them for this user flow, select the Enforce conditional access policies check box. You don't need to specify a policy name. Learn more.
Under Application claims, choose the claims you want returned to the application in the token. For the full list of values, select Show more, choose the values, and then select OK.
Note
You can also create custom attributes for use in your Azure AD B2C tenant.
Click Create to add the user flow. A prefix of B2C_1 is automatically prepended to the name.
Test the user flow
- Select the user flow you created to open its overview page, then select Run user flow.
- For Application, select the web application named webapp1 that you previously registered. The Reply URL should show
https://jwt.ms. - Click Run user flow.
- You should be able to sign in with the account that you created (using MS Graph API), without the sign-up link. The returned token includes the claims that you selected.
Remove the sign-up link
The SelfAsserted-LocalAccountSignin-Email technical profile is a self-asserted, which is invoked during the sign-up or sign-in flow. To remove the sign-up link, set the setting.showSignupLink metadata to false. Override the SelfAsserted-LocalAccountSignin-Email technical profiles in the extension file.
Open the extensions file of your policy. For example,
SocialAndLocalAccounts/TrustFrameworkExtensions.xml.Find the
ClaimsProviderselement. If the element doesn't exist, add it.Add the following claims provider to the
ClaimsProviderselement:<!-- <ClaimsProviders> --> <ClaimsProvider> <DisplayName>Local Account</DisplayName> <TechnicalProfiles> <TechnicalProfile Id="SelfAsserted-LocalAccountSignin-Email"> <Metadata> <Item Key="setting.showSignupLink">false</Item> </Metadata> </TechnicalProfile> </TechnicalProfiles> </ClaimsProvider> <!-- </ClaimsProviders> -->Within
<BuildingBlocks>element, add the following ContentDefinition to reference the version 1.2.0, or newer data URI:<!-- <BuildingBlocks> <ContentDefinitions>--> <ContentDefinition Id="api.localaccountsignup"> <DataUri>urn:com:microsoft:aad:b2c:elements:contract:unifiedssp:1.2.0</DataUri> </ContentDefinition> <!-- </ContentDefinitions> </BuildingBlocks> -->
Update and test your policy
- Sign in to the Azure portal.
- If you have access to multiple tenants, select the Settings icon in the top menu to switch to your Azure AD B2C tenant from the Directories + subscriptions menu.
- Choose All services in the top-left corner of the Azure portal, and then search for and select App registrations.
- Select Identity Experience Framework.
- Select Upload Custom Policy, and then upload the policy file that you changed, TrustFrameworkExtensions.xml.
- Select the sign-in policy that you uploaded, and click the Run now button.
- You should be able to sign in with the account that you created (using MS Graph API), without the sign-up link.
Next steps
- Add a sign-in with social identity provider.
- Set up a password reset flow.
Feedback
Coming soon: Throughout 2024 we will be phasing out GitHub Issues as the feedback mechanism for content and replacing it with a new feedback system. For more information see: https://aka.ms/ContentUserFeedback.
Submit and view feedback for