Manage video during calls
Learn how to manage video calls with the Azure Communication Services SDKS. We'll learn how to manage receiving and sending video within a call.
Prerequisites
- An Azure account with an active subscription. Create an account for free.
- A deployed Communication Services resource. Create a Communication Services resource.
- A user access token to enable the calling client. For more information, see Create and manage access tokens.
- Optional: Complete the quickstart to add voice calling to your application
Install the SDK
Use the npm install command to install the Azure Communication Services Common and Calling SDKs for JavaScript:
npm install @azure/communication-common --save
npm install @azure/communication-calling --save
Initialize required objects
A CallClient instance is required for most call operations. When you create a new CallClient instance, you can configure it with custom options like a Logger instance.
With the CallClient instance, you can create a CallAgent instance by calling the createCallAgent. This method asynchronously returns a CallAgent instance object.
The createCallAgent method uses CommunicationTokenCredential as an argument. It accepts a user access token.
You can use the getDeviceManager method on the CallClient instance to access deviceManager.
const { CallClient } = require('@azure/communication-calling');
const { AzureCommunicationTokenCredential} = require('@azure/communication-common');
const { AzureLogger, setLogLevel } = require("@azure/logger");

// Set the logger's log level
setLogLevel('verbose');

// Redirect log output to console, file, buffer, REST API, or whatever location you want
AzureLogger.log = (...args) => {
    console.log(...args); // Redirect log output to console
};

const userToken = '<USER_TOKEN>';
callClient = new CallClient(options);
const tokenCredential = new AzureCommunicationTokenCredential(userToken);
const callAgent = await callClient.createCallAgent(tokenCredential, {displayName: 'optional Azure Communication Services user name'});
const deviceManager = await callClient.getDeviceManager()
Device management
To begin using video with the Calling SDK, you need to be able to manage devices. Devices allow you to control what transmits Audio and Video to the call.
With the deviceManager, you can enumerate local devices that can transmit your audio and video streams in a call. You can also use the deviceManager to request permission to access the local device's microphones and cameras.
You can access deviceManager by calling the callClient.getDeviceManager() method:
const deviceManager = await callClient.getDeviceManager();
Get local devices
To access local devices, you can use the deviceManager enumeration methods getCameras() and getMicrophones. Those methods are asynchronous actions.
//  Get a list of available video devices for use.
const localCameras = await deviceManager.getCameras(); // [VideoDeviceInfo, VideoDeviceInfo...]

// Get a list of available microphone devices for use.
const localMicrophones = await deviceManager.getMicrophones(); // [AudioDeviceInfo, AudioDeviceInfo...]

// Get a list of available speaker devices for use.
const localSpeakers = await deviceManager.getSpeakers(); // [AudioDeviceInfo, AudioDeviceInfo...]
Set the default devices
Once you know what devices are available to use, you can set default devices for microphone, speaker, and camera. If client defaults aren't set, the Communication Services SDK uses operating system defaults.
Microphone
Access the device used
// Get the microphone device that is being used.
const defaultMicrophone = deviceManager.selectedMicrophone;
Setting the device to use
// Set the microphone device to use.
await deviceManager.selectMicrophone(localMicrophones[0]);
Speaker
Access the device used
// Get the speaker device that is being used.
const defaultSpeaker = deviceManager.selectedSpeaker;
Setting the device to use
// Set the speaker device to use.
await deviceManager.selectSpeaker(localSpeakers[0]);
Camera
Access the device used
// Get the camera device that is being used.
const defaultSpeaker = deviceManager.selectedSpeaker;
Setting the device to use
// Set the speaker device to use.
await deviceManager.selectSpeaker(localCameras[0]);
Each CallAgent can choose its own microphone and speakers on its associated DeviceManager. We recommend that different CallAgents use different microphones and speakers. They shouldn't share the same microphones nor speakers. If sharing happens, then Microphone User Facing Diagnostics might be triggered and the microphone stops working depending on the browser / os.
Local video stream
To be able to send video in a call, you need to create a LocalVideoStreamobject.
const localVideoStream = new LocalVideoStream(camera);
The camera passed as parameter is one of the VideoDeviceInfo object returned by the deviceManager.getCameras()method.
A LocalVideoStream has the following properties:
source: The device information.
const source = localVideoStream.source;
mediaStreamType: Can beVideo,ScreenSharing, orRawMedia.
const type: MediaStreamType = localVideoStream.mediaStreamType;
Local camera preview
You can use deviceManager and VideoStreamRenderer to begin rendering streams from your local camera.
Once a LocalVideoStream is created, use it to set upVideoStreamRenderer. Once the VideoStreamRendereris
created call its createView() method to get a view that you can add as a child to your page.
This stream isn't sent to other participants; it's a local preview feed.
// To start viewing local camera preview
const cameras = await deviceManager.getCameras();
const camera = cameras[0];
const localVideoStream = new LocalVideoStream(camera);
const videoStreamRenderer = new VideoStreamRenderer(localVideoStream);
const view = await videoStreamRenderer.createView();
htmlElement.appendChild(view.target);
Stop the local preview
To stop the local preview call, dispose on the view derived from the VideoStreamRenderer.
Once the VideoStreamRenderer is disposed, remove the view from the html tree by calling
the removeChild() method from the DOM Node containing your preview.
// To stop viewing local camera preview
view.dispose();
htmlElement.removeChild(view.target);
Request permission to camera and microphone
An application can’t use the camera or microphone without permissions. You can use the deviceManager to prompt a user to grant camera and/or microphone permissions:
const result = await deviceManager.askDevicePermission({audio: true, video: true});
Once the promise is resolved, the method returns with a DeviceAccess object that indicates whether audio and video permissions were granted:
console.log(result.audio);
console.log(result.video);
Notes
videoDevicesUpdatedevent fires when video devices are plugging-in/unplugged.audioDevicesUpdatedevent fires when audio devices are plugged.- When the DeviceManager is created, at first it doesn't know about any devices if permissions aren't granted yet, so initially its device name is empty and it doesn't contain detailed device information. If we then call the DeviceManager.askPermission() API, the user is prompted for device access. When the user selects on 'allow' to grant the access the device manager learns about the devices on the system, update it's device lists and emit the 'audioDevicesUpdated' and 'videoDevicesUpdated' events. If a user refreshes the page and creates a device manager, the device manager is able to learn about devices because user granted access previously. It has its device lists filled initially and it doesn't emit 'audioDevicesUpdated' nor 'videoDevicesUpdated' events.
- Speaker enumeration/selection isn't supported on Android Chrome, iOS Safari, nor macOS Safari.
Place a call with video camera
Important
Currently only one outgoing local video stream is supported.
To place a video call, you have to enumerate local cameras by using the getCameras() method in deviceManager.
After you select a camera, use it to construct a LocalVideoStream instance.
Pass it within videoOptions as an item within the localVideoStream array to the CallAgent startCall method.
const deviceManager = await callClient.getDeviceManager();
const cameras = await deviceManager.getCameras();
const camera = cameras[0]
const localVideoStream = new LocalVideoStream(camera);
const placeCallOptions = {videoOptions: {localVideoStreams:[localVideoStream]}};
const userCallee = { communicationUserId: '<ACS_USER_ID>' }
const call = callAgent.startCall([userCallee], placeCallOptions);
- You can also join a call with video with
CallAgent.join()API, and accept and call with video withCall.Accept()API. - When your call connects, it automatically starts sending a video stream from the selected camera to the other participant.
Start and stop sending local video while on a call
Start video
To start a video while on a call, you have to enumerate cameras using the getCameras method on the deviceManager object.
Then create a new instance of LocalVideoStream with the desired camera and then pass the LocalVideoStream
object into the startVideo method of an existing call object:
const deviceManager = await callClient.getDeviceManager();
const cameras = await deviceManager.getCameras();
const camera = cameras[0]
const localVideoStream = new LocalVideoStream(camera);
await call.startVideo(localVideoStream);
Stop Video
After you successfully start sending video, a LocalVideoStream instance of type Video is added to the localVideoStreams
collection on a call instance.
Find the video stream in the Call object
const localVideoStream = call.localVideoStreams.find( (stream) => { return stream.mediaStreamType === 'Video'} );
Stop the local video
To stop local video while on a call, pass the localVideoStream instance that's being used for video to the stopVideo method of the Call:
await call.stopVideo(localVideoStream);
You can switch to a different camera device while having an active LocalVideoStream by invoking switchSource on that LocalVideoStream instance:
const cameras = await callClient.getDeviceManager().getCameras();
const camera = cameras[1];
localVideoStream.switchSource(camera);
If the specified video device isn't available:
- While in a call, if your video is off and you start video using
call.startVideo(), this method throws aSourceUnavailableErrorandcameraStartFaileduser facing diagnostic is set to true. - A call to the
localVideoStream.switchSource()method causescameraStartFailedto be set to true. Our Call Diagnostics guide provides additional information on how to diagnose call related issues.
To verify if the local video is on or off you can use the Call method isLocalVideoStarted, which returns true or false:
// Check if local video is on or off
call.isLocalVideoStarted;
To listen for changes to the local video, you can subscribe and unsubscribe to the isLocalVideoStartedChanged event:
// Subscribe to local video event
call.on('isLocalVideoStartedChanged', () => {
    // Callback();
});
// Unsubscribe from local video event
call.off('isLocalVideoStartedChanged', () => {
    // Callback();
});
Start and stop screen sharing while on a call
To start screen sharing while on a call, you can use the asynchronous method startScreenSharing() on a Call object:
Start screen sharing
// Start screen sharing
await call.startScreenSharing();
Find the screen sharing in the collection of LocalVideoStream
After you successfully start sending screen sharing, a LocalVideoStream instance of type ScreenSharing, is added to the localVideoStreams collection on the call instance.
const localVideoStream = call.localVideoStreams.find( (stream) => { return stream.mediaStreamType === 'ScreenSharing'} );
Stop screen sharing
To stop screen sharing while on a call, you can use asynchronous API stoptScreenSharing:
// Stop screen sharing
await call.stopScreenSharing();
Check the screen sharing status
To verify if screen sharing is on or off, you can use isScreenSharingOn API, which returns true or false:
// Check if screen sharing is on or off
call.isScreenSharingOn;
To listen for changes to the screen share, you can subscribe and unsubscribe to the isScreenSharingOnChanged event:
// Subscribe to screen share event
call.on('isScreenSharingOnChanged', () => {
    // Callback();
});
// Unsubscribe from screen share event
call.off('isScreenSharingOnChanged', () => {
    // Callback();
});
Important
This feature of Azure Communication Services is currently in preview.
Preview APIs and SDKs are provided without a service-level agreement. We recommend that you don't use them for production workloads. Some features might not be supported, or they might have constrained capabilities.
For more information, review Supplemental Terms of Use for Microsoft Azure Previews.
Local screen share preview is in public preview and available as part of version 1.15.1-beta.1+.
Local screen share preview
You can use a VideoStreamRenderer to begin rendering streams from your local screen share so you can see what you are sending as a screen sharing stream.
// To start viewing local screen share preview
await call.startScreenSharing();
const localScreenSharingStream = call.localVideoStreams.find( (stream) => { return stream.mediaStreamType === 'ScreenSharing' });
const videoStreamRenderer = new VideoStreamRenderer(localScreenSharingStream);
const view = await videoStreamRenderer.createView();
htmlElement.appendChild(view.target);

// To stop viewing local screen share preview.
await call.stopScreenSharing();
view.dispose();
htmlElement.removeChild(view.target);

// Screen sharing can also be stoped by clicking on the native browser's "Stop sharing" button.
// The isScreenSharingOnChanged event will be triggered where you can check the value of call.isScreenSharingOn.
// If the value is false, then that means screen sharing is turned off and so we can go ahead and dispose the screen share preview.
// This event is also triggered for the case when stopping screen sharing via Call.stopScreenSharing() API.
call.on('isScreenSharingOnChanged', () => {
    if (!call.isScreenSharingOn) {
        view.dispose();
        htmlElement.removeChild(view.target);
    }
});
Render remote participant video/screensharing streams
To render a remote participant video or screen sharing, the first step is to get a reference on the RemoteVideoStream you want to render.
This can be done by going through the array or video stream (videoStreams) of the RemoteParticipant. The remote participants collection
is accessed via the Call object.
const remoteVideoStream = call.remoteParticipants[0].videoStreams[0];
const streamType = remoteVideoStream.mediaStreamType;
To render RemoteVideoStream, you have to subscribe to its isAvailableChanged event. If the isAvailable property changes to true,
a remote participant is sending a video stream.
After that happens, create a new instance of VideoStreamRenderer, and then create a new VideoStreamRendererView
instance by using the asynchronous createView method.
You can then attach view.target to any UI element.
Whenever the availability of a remote stream changes, you can destroy the whole VideoStreamRenderer or a specific VideoStreamRendererView.
If you decide to keep them, then the view displays a blank video frame.
// Reference to the html's div where we would display a grid of all remote video stream from all participants.
let remoteVideosGallery = document.getElementById('remoteVideosGallery');

subscribeToRemoteVideoStream = async (remoteVideoStream) => {
    let renderer = new VideoStreamRenderer(remoteVideoStream);
    let view;
    let remoteVideoContainer = document.createElement('div');
    remoteVideoContainer.className = 'remote-video-container';

    let loadingSpinner = document.createElement('div');
    // See the css example below for styling the loading spinner.
    loadingSpinner.className = 'loading-spinner';
    remoteVideoStream.on('isReceivingChanged', () => {
        try {
            if (remoteVideoStream.isAvailable) {
                const isReceiving = remoteVideoStream.isReceiving;
                const isLoadingSpinnerActive = remoteVideoContainer.contains(loadingSpinner);
                if (!isReceiving && !isLoadingSpinnerActive) {
                    remoteVideoContainer.appendChild(loadingSpinner);
                } else if (isReceiving && isLoadingSpinnerActive) {
                    remoteVideoContainer.removeChild(loadingSpinner);
                }
            }
        } catch (e) {
            console.error(e);
        }
    });

    const createView = async () => {
        // Create a renderer view for the remote video stream.
        view = await renderer.createView();
        // Attach the renderer view to the UI.
        remoteVideoContainer.appendChild(view.target);
        remoteVideosGallery.appendChild(remoteVideoContainer);
    }

    // Remote participant has switched video on/off
    remoteVideoStream.on('isAvailableChanged', async () => {
        try {
            if (remoteVideoStream.isAvailable) {
                await createView();
            } else {
                view.dispose();
                remoteVideosGallery.removeChild(remoteVideoContainer);
            }
        } catch (e) {
            console.error(e);
        }
    });

    // Remote participant has video on initially.
    if (remoteVideoStream.isAvailable) {
        try {
            await createView();
        } catch (e) {
            console.error(e);
        }
    }

    console.log(`Initial stream size: height: ${remoteVideoStream.size.height}, width: ${remoteVideoStream.size.width}`);
    remoteVideoStream.on('sizeChanged', () => {
        console.log(`Remote video stream size changed: new height: ${remoteVideoStream.size.height}, new width: ${remoteVideoStream.size.width}`);
    });
}
CSS for styling the loading spinner over the remote video stream.
.remote-video-container {
   position: relative;
}
.loading-spinner {
   border: 12px solid #f3f3f3;
   border-radius: 50%;
   border-top: 12px solid #ca5010;
   width: 100px;
   height: 100px;
   -webkit-animation: spin 2s linear infinite; /* Safari */
   animation: spin 2s linear infinite;
   position: absolute;
   margin: auto;
   top: 0;
   bottom: 0;
   left: 0;
   right: 0;
   transform: translate(-50%, -50%);
}
@keyframes spin {
   0% { transform: rotate(0deg); }
   100% { transform: rotate(360deg); }
}
/* Safari */
@-webkit-keyframes spin {
   0% { -webkit-transform: rotate(0deg); }
   100% { -webkit-transform: rotate(360deg); }
}
Remote video quality
The Azure Communication Services WebJS SDK, provides a feature called Optimal Video Count (OVC), starting in version 1.15.1.
This feature can be used to inform applications at run-time about how many incoming videos from different participants can be optimally rendered at a given moment in a group call (2+ participants).
This feature exposes a property optimalVideoCount that is dynamically changing during the call based on the network and
hardware capabilities of a local endpoint. The value of optimalVideoCount details how many videos from different participant
application should render at a given moment. Applications should handle these changes and update number of rendered videos
accordingly to the recommendation. There's a debounce period (around 10 s) between each update.
Usage
The optimalVideoCount feature is a call feature. You need to reference the feature OptimalVideoCount via the feature method of the Call object. You can then set a listener via the on method of the OptimalVideoCountCallFeature to be notified when the optimalVideoCount changes. To unsubscribe from the changes, you can call the off method.
const optimalVideoCountFeature = call.feature(Features.OptimalVideoCount);
optimalVideoCountFeature.on('optimalVideoCountChanged', () => {
    const localOptimalVideoCountVariable = optimalVideoCountFeature.optimalVideoCount;
})
Example usage: Application should subscribe to changes of Optimal Video Count in group calls. A change in the optimal video count can be handled
by either creating new renderer (createView method) or dispose views (dispose) and update the application layout accordingly.
Remote video stream properties
Remote video streams have the following properties:
const id: number = remoteVideoStream.id;
id: The ID of a remote video stream.
const type: MediaStreamType = remoteVideoStream.mediaStreamType;
mediaStreamType: Can beVideoorScreenSharing.
const isAvailable: boolean = remoteVideoStream.isAvailable;
isAvailable: Defines whether a remote participant endpoint is actively sending a stream.
const isReceiving: boolean = remoteVideoStream.isReceiving;
isReceiving:Informs the application if remote video stream data is being received or not.
The flag moves to
falsein the following scenarios:- A remote participant who is on mobile browser brings the browser app to the background.
- A remote participant or the user receiving the video has network issue that affects video quality drastically.
- A remote participant who is On macOS/iOS Safari selects "Pause" from their address bar.
- A remote participant has a network disconnection.
- A remote participant on mobile kills or terminate the browser.
- A remote participant on mobile or desktop locks its device. This scenario applies also if the remote participant is on a desktop computer and it goes to sleep.
The flag moves to
truein the following scenarios:- A remote participant who is on mobile browser and has its browser backgrounded brings it back to foreground.
- A remote participant who is On macOS/iOS Safari selects on "Resume" from their address bar after having paused its video.
- A remote participant reconnects to the network after a temporary disconnection.
- A remote participant on mobile unlock its device and return to the call on its mobile browser.
This feature improves the user experience for rendering remote video streams.
You can display a loading spinner over the remote video stream when isReceiving flag changes to false. You don't have to implement loading spinner, but a loading spinner is the most common usage for better user experience.
const size: StreamSize = remoteVideoStream.size;
size: The stream size with information about the width and height of the video.
VideoStreamRenderer methods and properties
await videoStreamRenderer.createView();
Create a VideoStreamRendererView instance that can be attached in the application UI to render the remote video stream,
use asynchronous createView() method, it resolves when stream is ready to render and returns an object with target
property that represents video element that can be inserted anywhere in the DOM tree.
videoStreamRenderer.dispose();
Dispose of videoStreamRenderer and all associated VideoStreamRendererView instances.
VideoStreamRendererView methods and properties
When you create a VideoStreamRendererView, you can specify the scalingMode and isMirrored properties. scalingMode can be Stretch, Crop, or Fit. If isMirrored is specified, the rendered stream is flipped vertically.
const videoStreamRendererView: VideoStreamRendererView = await videoStreamRenderer.createView({ scalingMode, isMirrored });
Every VideoStreamRendererView instance has a target property that represents the rendering surface. Attach this property in the application UI:
htmlElement.appendChild(view.target);
You can update scalingMode by invoking the updateScalingMode method:
view.updateScalingMode('Crop');
Send video streams from two different cameras, in the same call from the same desktop device.
Important
This feature of Azure Communication Services is currently in preview.
Preview APIs and SDKs are provided without a service-level agreement. We recommend that you don't use them for production workloads. Some features might not be supported, or they might have constrained capabilities.
For more information, review Supplemental Terms of Use for Microsoft Azure Previews.
Send video streams from two different cameras in the same call is supported as part of version 1.17.1-beta.1+ on desktop supported browsers.
- You can send video streams from two different cameras from a single desktop browser tab/app, in the same call, with the following code snippet:
// Create your first CallAgent with identity A
const callClient1 = new CallClient();
const callAgent1 = await callClient1.createCallAgent(tokenCredentialA);
const deviceManager1 = await callClient1.getDeviceManager();

// Create your second CallAgent with identity B
const callClient2 = new CallClient();
const callAgent2 = await callClient2.createCallAgent(tokenCredentialB);
const deviceManager2 = await callClient2.getDeviceManager();

// Join the call with your first CallAgent
const camera1 = await deviceManager1.getCameras()[0];
const callObj1 = callAgent1.join({ groupId: ‘123’}, { videoOptions: { localVideoStreams: [new LocalVideoStream(camera1)] } });

// Join the same call with your second CallAgent and make it use a different camera
const camera2 = (await deviceManager2.getCameras()).filter((camera) => { return camera !== camera1 })[0];
const callObj2 = callAgent2.join({ groupId: '123' }, { videoOptions: { localVideoStreams: [new LocalVideoStream(camera2)] } });

//Mute the microphone and speakers of your second CallAgent’s Call, so that there is no echos/noises.
await callObj2.muteIncomingAudio();
await callObj2.mute();
Limitations:
- This must be done with two different
CallAgentinstances using different identities. The code snippet shows two call agents being used, each with its own Call object. - In the code example, both CallAgents are joining the same call (same call Ids). You can also join different calls with each agent and send one video on one call and a different video on the other call.
- Sending the same camera in both CallAgent, isn't supported. They must be two different cameras.
- Sending two different cameras with one CallAgent is currently not supported.
- On macOS Safari, background blur video effects (from @azure/communication-effects), can only be applied to one camera, and not both at the same time.
Install the SDK
Locate your project-level build.gradle file and add mavenCentral() to the list of repositories under buildscript and allprojects:
buildscript {
    repositories {
    ...
        mavenCentral()
    ...
    }
}
allprojects {
    repositories {
    ...
        mavenCentral()
    ...
    }
}
Then, in your module-level build.gradle file, add the following lines to the dependencies section:
dependencies {
    ...
    implementation 'com.azure.android:azure-communication-calling:1.0.0'
    ...
}
Initialize the required objects
To create a CallAgent instance, you have to call the createCallAgent method on a CallClient instance. This call asynchronously returns a CallAgent instance object.
The createCallAgent method takes CommunicationUserCredential as an argument, which encapsulates an access token.
To access DeviceManager, you must create a callAgent instance first. Then you can use the CallClient.getDeviceManager method to get DeviceManager.
String userToken = '<user token>';
CallClient callClient = new CallClient();
CommunicationTokenCredential tokenCredential = new CommunicationTokenCredential(userToken);
android.content.Context appContext = this.getApplicationContext(); // From within an activity, for instance
CallAgent callAgent = callClient.createCallAgent(appContext, tokenCredential).get();
DeviceManager deviceManager = callClient.getDeviceManager(appContext).get();
To set a display name for the caller, use this alternative method:
String userToken = '<user token>';
CallClient callClient = new CallClient();
CommunicationTokenCredential tokenCredential = new CommunicationTokenCredential(userToken);
android.content.Context appContext = this.getApplicationContext(); // From within an activity, for instance
CallAgentOptions callAgentOptions = new CallAgentOptions();
callAgentOptions.setDisplayName("Alice Bob");
DeviceManager deviceManager = callClient.getDeviceManager(appContext).get();
CallAgent callAgent = callClient.createCallAgent(appContext, tokenCredential, callAgentOptions).get();
Device management
To begin using video with Calling, you will need to know how to manage devices. Devices allow you to control what transmits Audio and Video to the call.
DeviceManager lets you enumerate local devices that can be used in a call to transmit your audio/video streams. It also allows you to request permission from a user to access their microphone and camera using the native browser API.
You can access deviceManager by calling callClient.getDeviceManager() method.
Context appContext = this.getApplicationContext();
DeviceManager deviceManager = callClient.getDeviceManager(appContext).get();
Enumerate local devices
To access local devices, you can use enumeration methods on the Device Manager. Enumeration is a synchronous action.
//  Get a list of available video devices for use.
List<VideoDeviceInfo> localCameras = deviceManager.getCameras(); // [VideoDeviceInfo, VideoDeviceInfo...]
Local camera preview
You can use DeviceManager and Renderer to begin rendering streams from your local camera. This stream won't be sent to other participants; it's a local preview feed. This is an asynchronous action.
VideoDeviceInfo videoDevice = <get-video-device>; // See the `Enumerate local devices` topic above
Context appContext = this.getApplicationContext();

LocalVideoStream currentVideoStream = new LocalVideoStream(videoDevice, appContext);

LocalVideoStream[] localVideoStreams = new LocalVideoStream[1];
localVideoStreams[0] = currentVideoStream;

VideoOptions videoOptions = new VideoOptions(localVideoStreams);

RenderingOptions renderingOptions = new RenderingOptions(ScalingMode.Fit);
VideoStreamRenderer previewRenderer = new VideoStreamRenderer(currentVideoStream, appContext);

VideoStreamRendererView uiView = previewRenderer.createView(renderingOptions);

// Attach the uiView to a viewable location on the app at this point
layout.addView(uiView);
Place a 1:1 call with video camera
Warning
Currently only one outgoing local video stream is supported
To place a call with video you have to enumerate local cameras using the deviceManager getCameras API.
Once you select a desired camera, use it to construct a LocalVideoStream instance and pass it into videoOptions
as an item in the localVideoStream array to a call method.
Once the call connects it will automatically start sending a video stream from the selected camera to other participant(s).
Note
Due to privacy concerns, video will not be shared to the call if it is not being previewed locally. See Local camera preview for more details.
VideoDeviceInfo desiredCamera = <get-video-device>; // See the `Enumerate local devices` topic above
Context appContext = this.getApplicationContext();

LocalVideoStream currentVideoStream = new LocalVideoStream(desiredCamera, appContext);

LocalVideoStream[] localVideoStreams = new LocalVideoStream[1];
localVideoStreams[0] = currentVideoStream;

VideoOptions videoOptions = new VideoOptions(localVideoStreams);

// Render a local preview of video so the user knows that their video is being shared
Renderer previewRenderer = new VideoStreamRenderer(currentVideoStream, appContext);
View uiView = previewRenderer.createView(new CreateViewOptions(ScalingMode.FIT));

// Attach the uiView to a viewable location on the app at this point
layout.addView(uiView);

CommunicationUserIdentifier[] participants = new CommunicationUserIdentifier[]{ new CommunicationUserIdentifier("<acs user id>") };

StartCallOptions startCallOptions = new StartCallOptions();
startCallOptions.setVideoOptions(videoOptions);

Call call = callAgent.startCall(context, participants, startCallOptions);
Start and stop sending local video
To start a video, you have to enumerate cameras using the getCameraList API on deviceManager object. Then create a new instance of LocalVideoStream passing the desired camera, and pass it in the startVideo API as an argument:
VideoDeviceInfo desiredCamera = <get-video-device>; // See the `Enumerate local devices` topic above
Context appContext = this.getApplicationContext();

LocalVideoStream currentLocalVideoStream = new LocalVideoStream(desiredCamera, appContext);

VideoOptions videoOptions = new VideoOptions(currentLocalVideoStream);

Future startVideoFuture = call.startVideo(appContext, currentLocalVideoStream);
startVideoFuture.get();
Once you successfully start sending video, a LocalVideoStream instance will be added to the localVideoStreams collection on the call instance.
List<LocalVideoStream> videoStreams = call.getLocalVideoStreams();
LocalVideoStream currentLocalVideoStream = videoStreams.get(0); // Please make sure there are VideoStreams in the list before calling get(0).
To stop local video, pass the LocalVideoStream instance available in localVideoStreams collection:
call.stopVideo(appContext, currentLocalVideoStream).get();
You can switch to a different camera device while video is being sent by invoking switchSource on a LocalVideoStream instance:
currentLocalVideoStream.switchSource(source).get();
Render remote participant video streams
To list the video streams and screen sharing streams of remote participants, inspect the videoStreams collections:
List<RemoteParticipant> remoteParticipants = call.getRemoteParticipants();
RemoteParticipant remoteParticipant = remoteParticipants.get(0); // Please make sure there are remote participants in the list before calling get(0).

List<RemoteVideoStream> remoteStreams = remoteParticipant.getVideoStreams();
RemoteVideoStream remoteParticipantStream = remoteStreams.get(0); // Please make sure there are video streams in the list before calling get(0).

MediaStreamType streamType = remoteParticipantStream.getType(); // of type MediaStreamType.Video or MediaStreamType.ScreenSharing
To render a RemoteVideoStream from a remote participant, you have to subscribe to a OnVideoStreamsUpdated event.
Within the event, the change of isAvailable property to true indicates that remote participant is currently sending a stream. Once that happens, create new instance of a Renderer, then create a new RendererView using asynchronous createView API and attach view.target anywhere in the UI of your application.
Whenever availability of a remote stream changes you can choose to destroy the whole Renderer, a specific RendererView or keep them, but this will result in displaying blank video frame.
VideoStreamRenderer remoteVideoRenderer = new VideoStreamRenderer(remoteParticipantStream, appContext);
VideoStreamRendererView uiView = remoteVideoRenderer.createView(new RenderingOptions(ScalingMode.FIT));
layout.addView(uiView);

remoteParticipant.addOnVideoStreamsUpdatedListener(e -> onRemoteParticipantVideoStreamsUpdated(p, e));

void onRemoteParticipantVideoStreamsUpdated(RemoteParticipant participant, RemoteVideoStreamsEvent args) {
    for(RemoteVideoStream stream : args.getAddedRemoteVideoStreams()) {
        if(stream.getIsAvailable()) {
            startRenderingVideo();
        } else {
            renderer.dispose();
        }
    }
}
Remote video stream properties
Remote video stream has couple of properties
Id- ID of a remote video stream
int id = remoteVideoStream.getId();
MediaStreamType- Can be 'Video' or 'ScreenSharing'
MediaStreamType type = remoteVideoStream.getMediaStreamType();
isAvailable- Indicates if remote participant endpoint is actively sending stream
boolean availability = remoteVideoStream.isAvailable();
Renderer methods and properties
Renderer object following APIs
- Create a
VideoStreamRendererViewinstance that can be later attached in the application UI to render remote video stream.
// Create a view for a video stream
VideoStreamRendererView.createView()
- Dispose renderer and all
VideoStreamRendererViewassociated with this renderer. To be called when you have removed all associated views from the UI.
VideoStreamRenderer.dispose()
StreamSize- size (width/height) of a remote video stream
StreamSize renderStreamSize = VideoStreamRenderer.getSize();
int width = renderStreamSize.getWidth();
int height = renderStreamSize.getHeight();
RendererView methods and properties
When creating a VideoStreamRendererView you can specify the ScalingMode and mirrored properties that will apply to this view:
Scaling mode can be either of 'CROP' | 'FIT'
VideoStreamRenderer remoteVideoRenderer = new VideoStreamRenderer(remoteVideoStream, appContext);
VideoStreamRendererView rendererView = remoteVideoRenderer.createView(new CreateViewOptions(ScalingMode.Fit));
The created RendererView can then be attached to the application UI using the following snippet:
layout.addView(rendererView);
You can later update the scaling mode by invoking updateScalingMode API on the RendererView object with one of ScalingMode.CROP | ScalingMode.FIT as an argument.
// Update the scale mode for this view.
rendererView.updateScalingMode(ScalingMode.CROP)
Set up your system
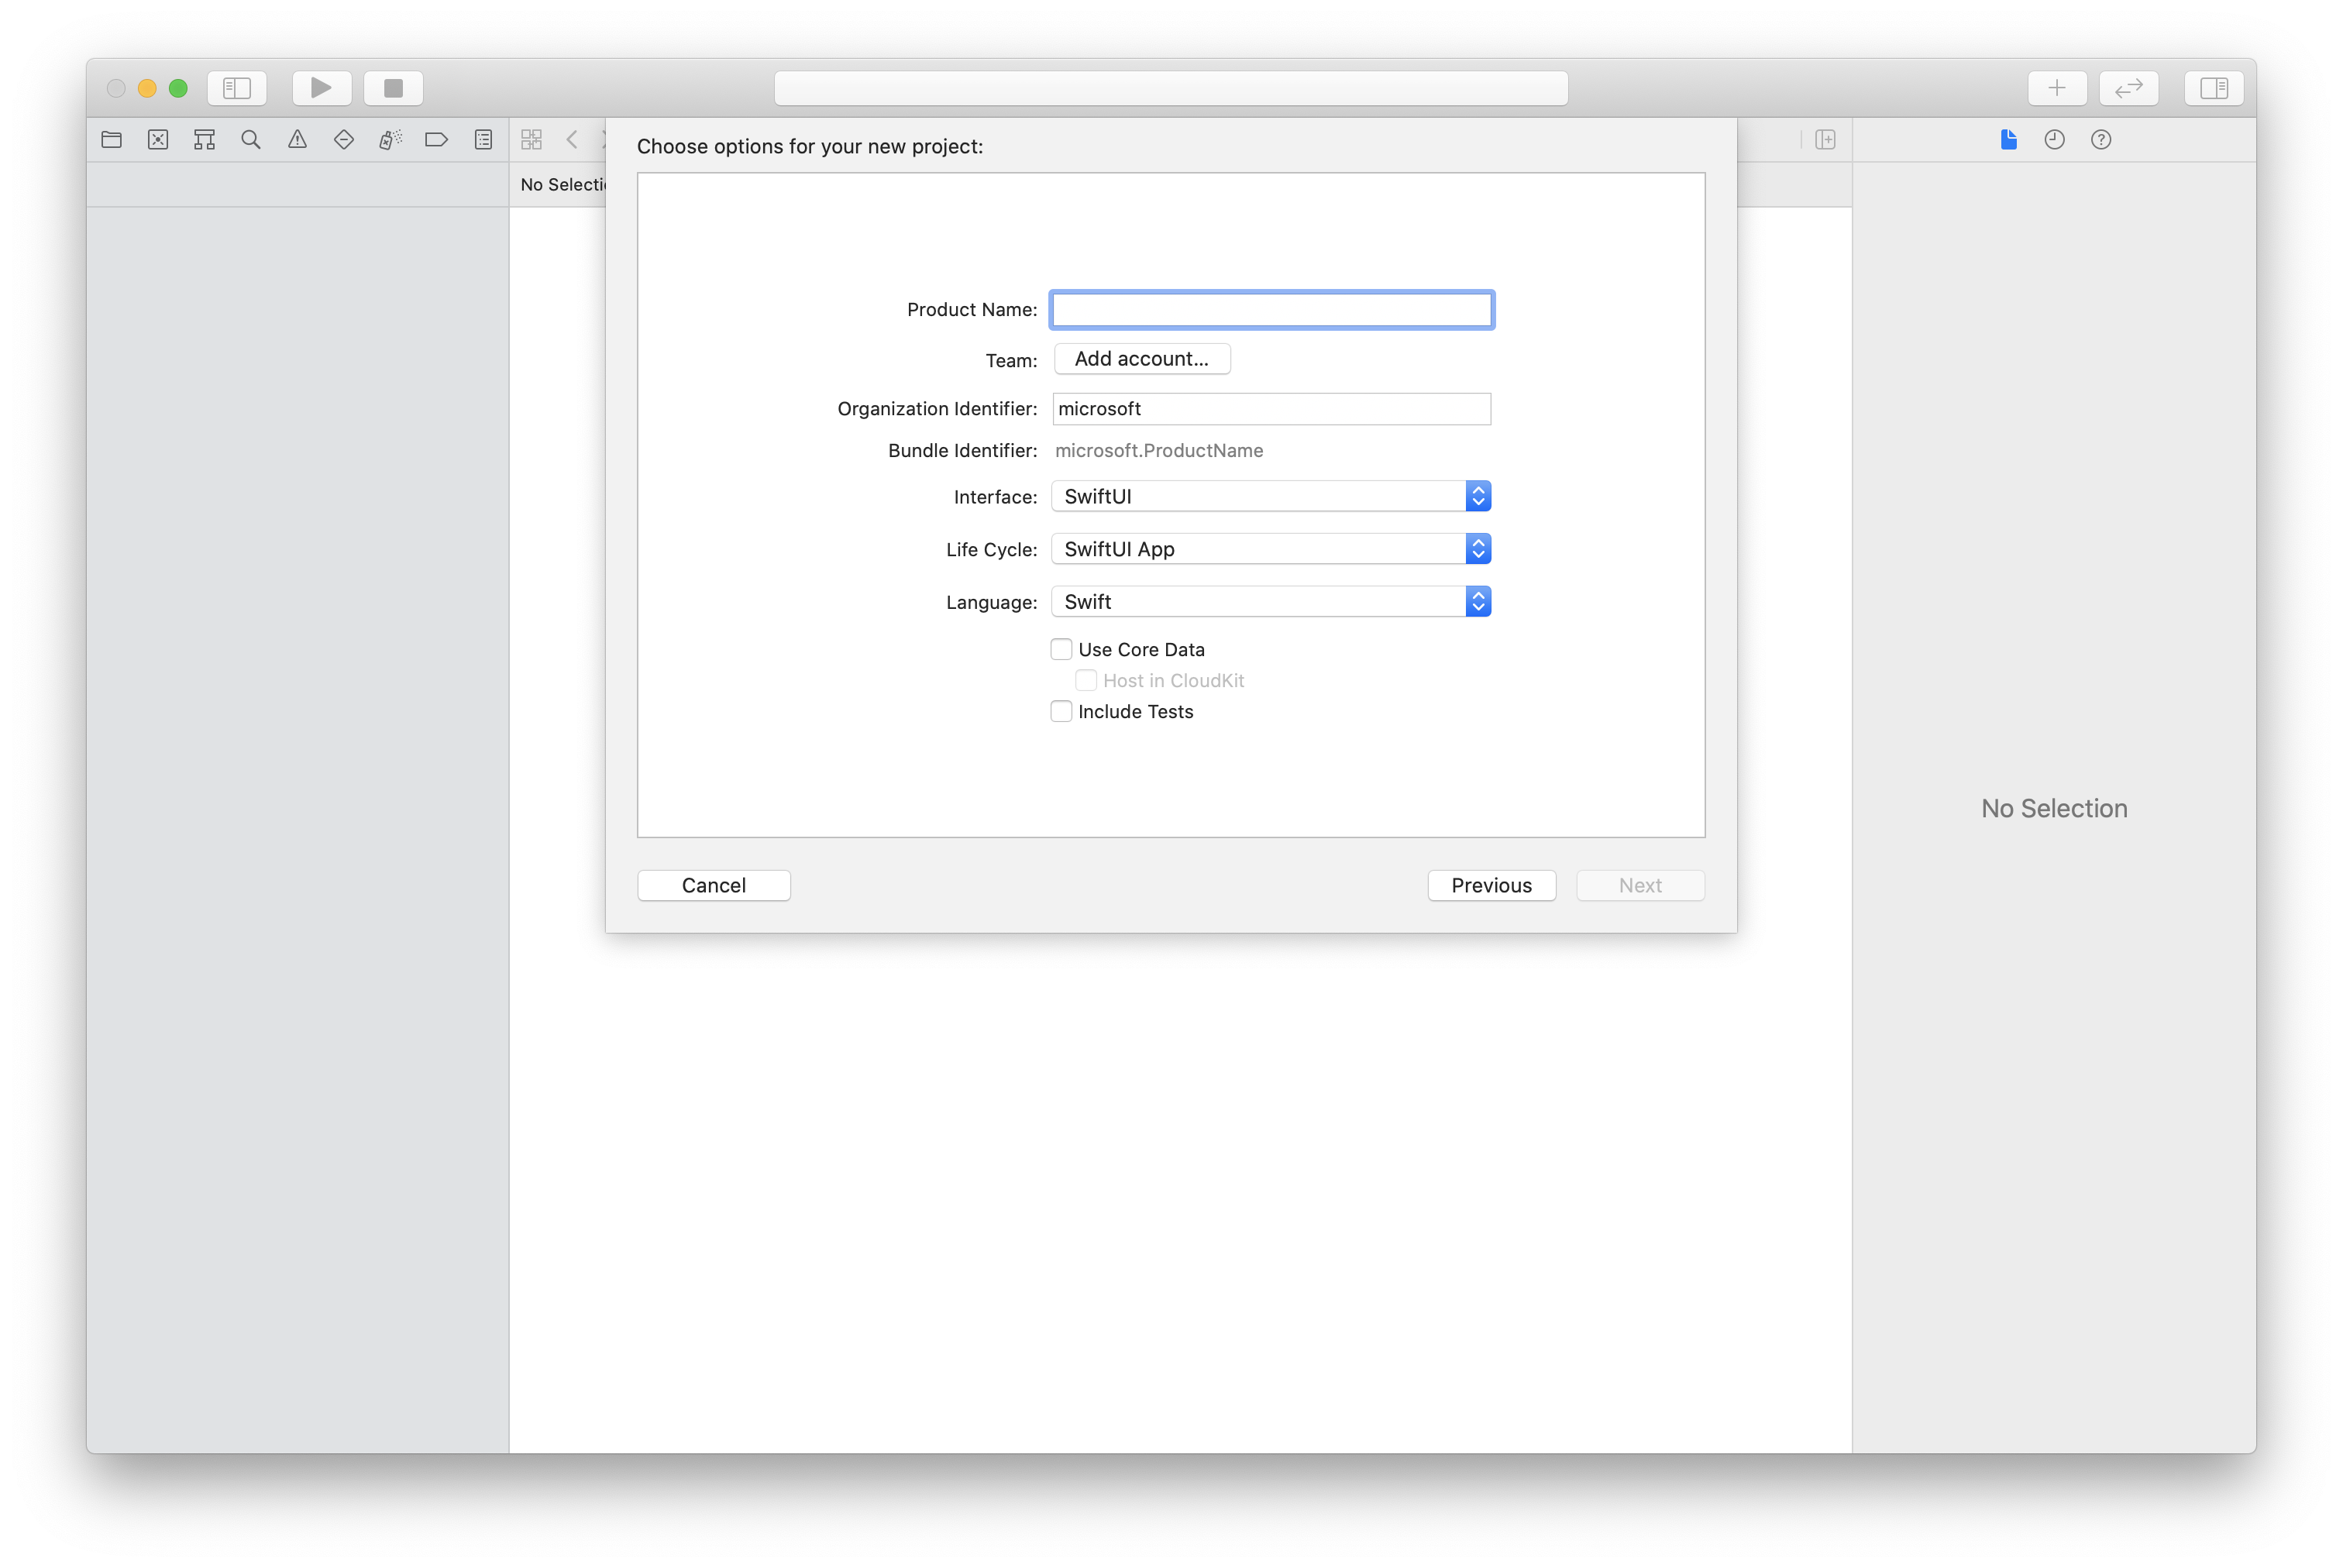
Create the Xcode project
In Xcode, create a new iOS project and select the Single View App template. This quickstart uses the SwiftUI framework, so you should set Language to Swift and set Interface to SwiftUI.
You're not going to create tests during this quickstart. Feel free to clear the Include Tests checkbox.
Install the package and dependencies by using CocoaPods
Create a Podfile for your application, like this example:
platform :ios, '13.0'
use_frameworks!
target 'AzureCommunicationCallingSample' do
    pod 'AzureCommunicationCalling', '~> 1.0.0'
end
Run
pod install.Open
.xcworkspaceby using Xcode.
Request access to the microphone
To access the device's microphone, you need to update your app's information property list by using NSMicrophoneUsageDescription. You set the associated value to a string that will be included in the dialog that the system uses to request access from the user.
Right-click the Info.plist entry of the project tree, and then select Open As > Source Code. Add the following lines in the top-level <dict> section, and then save the file.
<key>NSMicrophoneUsageDescription</key>
<string>Need microphone access for VOIP calling.</string>
Set up the app framework
Open your project's ContentView.swift file. Add an import declaration to the top of the file to import the AzureCommunicationCalling library. In addition, import AVFoundation. You'll need it for audio permission requests in the code.
import AzureCommunicationCalling
import AVFoundation
Initialize CallAgent
To create a CallAgent instance from CallClient, you have to use a callClient.createCallAgent method that asynchronously returns a CallAgent object after it's initialized.
To create a call client, pass a CommunicationTokenCredential object:
import AzureCommunication

let tokenString = "token_string"
var userCredential: CommunicationTokenCredential?
do {
    let options = CommunicationTokenRefreshOptions(initialToken: token, refreshProactively: true, tokenRefresher: self.fetchTokenSync)
    userCredential = try CommunicationTokenCredential(withOptions: options)
} catch {
    updates("Couldn't created Credential object", false)
    initializationDispatchGroup!.leave()
    return
}

// tokenProvider needs to be implemented by Contoso, which fetches a new token
public func fetchTokenSync(then onCompletion: TokenRefreshOnCompletion) {
    let newToken = self.tokenProvider!.fetchNewToken()
    onCompletion(newToken, nil)
}
Pass the CommunicationTokenCredential object that you created to CallClient, and set the display name:
self.callClient = CallClient()
let callAgentOptions = CallAgentOptions()
options.displayName = " iOS Azure Communication Services User"

self.callClient!.createCallAgent(userCredential: userCredential!,
    options: callAgentOptions) { (callAgent, error) in
        if error == nil {
            print("Create agent succeeded")
            self.callAgent = callAgent
        } else {
            print("Create agent failed")
        }
})
Manage devices
To begin using video with Calling, you will need to know how to manage devices. Devices allow you to control what transmits Audio and Video to the call.
DeviceManager lets you enumerate local devices that can be used in a call to transmit audio or video streams. It also allows you to request permission from a user to access a microphone or camera. You can access deviceManager on the callClient object.
self.callClient!.getDeviceManager { (deviceManager, error) in
        if (error == nil) {
            print("Got device manager instance")
            self.deviceManager = deviceManager
        } else {
            print("Failed to get device manager instance")
        }
    }
Enumerate local devices
To access local devices, you can use enumeration methods on the device manager. Enumeration is a synchronous action.
// enumerate local cameras
var localCameras = deviceManager.cameras // [VideoDeviceInfo, VideoDeviceInfo...]
Get a local camera preview
You can use Renderer to begin rendering a stream from your local camera. This stream won't be sent to other participants; it's a local preview feed. This is an asynchronous action.
let camera: VideoDeviceInfo = self.deviceManager!.cameras.first!
let localVideoStream = LocalVideoStream(camera: camera)
let localRenderer = try! VideoStreamRenderer(localVideoStream: localVideoStream)
self.view = try! localRenderer.createView()
Get local camera preview properties
The renderer has set of properties and methods that allow you to control the rendering.
// Constructor can take in LocalVideoStream or RemoteVideoStream
let localRenderer = VideoStreamRenderer(localVideoStream:localVideoStream)
let remoteRenderer = VideoStreamRenderer(remoteVideoStream:remoteVideoStream)

// [StreamSize] size of the rendering view
localRenderer.size

// [VideoStreamRendererDelegate] an object you provide to receive events from this Renderer instance
localRenderer.delegate

// [Synchronous] create view
try! localRenderer.createView()

// [Synchronous] create view with rendering options
try! localRenderer!.createView(withOptions: CreateViewOptions(scalingMode: ScalingMode.fit))

// [Synchronous] dispose rendering view
localRenderer.dispose()
Place a 1:1 call with video
To get a device manager instance, see the section about managing devices.
let firstCamera = self.deviceManager!.cameras.first
self.localVideoStreams = [LocalVideoStream]()
self.localVideoStreams!.append(LocalVideoStream(camera: firstCamera!))
let videoOptions = VideoOptions(localVideoStreams: self.localVideoStreams!)

let startCallOptions = StartCallOptions()
startCallOptions.videoOptions = videoOptions

let callee = CommunicationUserIdentifier('UserId')
self.callAgent?.startCall(participants: [callee], options: startCallOptions) { (call, error) in
    if error == nil {
        print("Successfully started outgoing video call")
        self.call = call
    } else {
        print("Failed to start outgoing video call")
    }
}
Render remote participant video streams
Remote participants can initiate video or screen sharing during a call.
Handle video-sharing or screen-sharing streams of remote participants
To list the streams of remote participants, inspect the videoStreams collections.
var remoteParticipantVideoStream = call.remoteParticipants[0].videoStreams[0]
Get remote video stream properties
var type: MediaStreamType = remoteParticipantVideoStream.type // 'MediaStreamTypeVideo'
var isAvailable: Bool = remoteParticipantVideoStream.isAvailable // indicates if remote stream is available
var id: Int = remoteParticipantVideoStream.id // id of remoteParticipantStream
Render remote participant streams
To start rendering remote participant streams, use the following code.
let renderer = VideoStreamRenderer(remoteVideoStream: remoteParticipantVideoStream)
let targetRemoteParticipantView = renderer?.createView(withOptions: CreateViewOptions(scalingMode: ScalingMode.crop))
// To update the scaling mode later
targetRemoteParticipantView.update(scalingMode: ScalingMode.fit)
Get remote video renderer methods and properties
// [Synchronous] dispose() - dispose renderer and all `RendererView` associated with this renderer. To be called when you have removed all associated views from the UI.
remoteVideoRenderer.dispose()
Set up your system
Create the Visual Studio project
For a UWP app, in Visual Studio 2022, create a new Blank App (Universal Windows) project. After you enter the project name, feel free to choose any Windows SDK later than 10.0.17763.0.
For a WinUI 3 app, create a new project with the Blank App, Packaged (WinUI 3 in Desktop) template to set up a single-page WinUI 3 app. Windows App SDK version 1.3 or later is required.
Install the package and dependencies by using NuGet Package Manager
The Calling SDK APIs and libraries are publicly available via a NuGet package.
The following steps exemplify how to find, download, and install the Calling SDK NuGet package:
- Open NuGet Package Manager by selecting Tools > NuGet Package Manager > Manage NuGet Packages for Solution.
- Select Browse, and then enter
Azure.Communication.Calling.WindowsClientin the search box. - Make sure that the Include prerelease check box is selected.
- Select the
Azure.Communication.Calling.WindowsClientpackage, and then selectAzure.Communication.Calling.WindowsClient1.4.0-beta.1 or a newer version. - Select the checkbox that corresponds to the Communication Services project on the right-side tab.
- Select the Install button.
Request access to the microphone
The app requires access to the camera to run properly. In UWP apps, the camera capability should be declared in the app manifest file.
The following steps exemplify how to achieve that.
- In the
Solution Explorerpanel, double click on the file with.appxmanifestextension. - Click on the
Capabilitiestab. - Select the
Cameracheck box from the capabilities list.
Create UI buttons to place and hang up the call
This simple sample app contains two buttons. One for placing the call and another to hang up a placed call. The following steps exemplify how to add these buttons to the app.
- In the
Solution Explorerpanel, double click on the file namedMainPage.xamlfor UWP, orMainWindows.xamlfor WinUI 3. - In the central panel, look for the XAML code under the UI preview.
- Modify the XAML code by the following excerpt:
<TextBox x:Name="CalleeTextBox" PlaceholderText="Who would you like to call?" />
<StackPanel>
    <Button x:Name="CallButton" Content="Start/Join call" Click="CallButton_Click" />
    <Button x:Name="HangupButton" Content="Hang up" Click="HangupButton_Click" />
</StackPanel>
Setting up the app with Calling SDK APIs
The Calling SDK APIs are in two different namespaces. The following steps inform the C# compiler about these namespaces allowing Visual Studio's Intellisense to assist with code development.
- In the
Solution Explorerpanel, click on the arrow on the left side of the file namedMainPage.xamlfor UWP, orMainWindows.xamlfor WinUI 3. - Double click on file named
MainPage.xaml.csorMainWindows.xaml.cs. - Add the following commands at the bottom of the current
usingstatements.
using Azure.Communication.Calling.WindowsClient;
Keep MainPage.xaml.cs or MainWindows.xaml.cs open. The next steps will add more code to it.
Allow app interactions
The UI buttons previously added need to operate on top of a placed CommunicationCall. It means that a CommunicationCall data member should be added to the MainPage or MainWindow class.
Additionally, to allow the asynchronous operation creating CallAgent to succeed, a CallAgent data member should also be added to the same class.
Add the following data members to the MainPage or MainWindow class:
CallAgent callAgent;
CommunicationCall call;
Create button handlers
Previously, two UI buttons were added to the XAML code. The following code adds the handlers to be executed when a user selects the button. The following code should be added after the data members from the previous section.
private async void CallButton_Click(object sender, RoutedEventArgs e)
{
    // Start call
}

private async void HangupButton_Click(object sender, RoutedEventArgs e)
{
    // End the current call
}
Object model
The following classes and interfaces handle some of the major features of the Azure Communication Services Calling client library for UWP.
| Name | Description |
|---|---|
CallClient |
The CallClient is the main entry point to the Calling client library. |
CallAgent |
The CallAgent is used to start and join calls. |
CommunicationCall |
The CommunicationCall is used to manage placed or joined calls. |
CommunicationTokenCredential |
The CommunicationTokenCredential is used as the token credential to instantiate the CallAgent. |
CallAgentOptions |
The CallAgentOptions contains information to identify the caller. |
HangupOptions |
The HangupOptions informs if a call should be terminated to all its participants. |
Register video schema handler
A UI component, like XAML's MediaElement or MediaPlayerElement, you need the app registering a configuration for rendering local and remote video feeds.
Add the following content between the Package tags of the Package.appxmanifest:
<Extensions>
    <Extension Category="windows.activatableClass.inProcessServer">
        <InProcessServer>
            <Path>RtmMvrUap.dll</Path>
            <ActivatableClass ActivatableClassId="VideoN.VideoSchemeHandler" ThreadingModel="both" />
        </InProcessServer>
    </Extension>
</Extensions>
Initialize the CallAgent
To create a CallAgent instance from CallClient, you must use CallClient.CreateCallAgentAsync method that asynchronously returns a CallAgent object once it's initialized.
To create CallAgent, you must pass a CallTokenCredential object and a CallAgentOptions object. Keep in mind that CallTokenCredential throws if a malformed token is passed.
The following code should be added inside and helper function to be called in app initialization.
var callClient = new CallClient();
this.deviceManager = await callClient.GetDeviceManagerAsync();

var tokenCredential = new CallTokenCredential("<AUTHENTICATION_TOKEN>");
var callAgentOptions = new CallAgentOptions()
{
    DisplayName = "<DISPLAY_NAME>"
};

this.callAgent = await callClient.CreateCallAgentAsync(tokenCredential, callAgentOptions);
this.callAgent.CallsUpdated += Agent_OnCallsUpdatedAsync;
this.callAgent.IncomingCallReceived += Agent_OnIncomingCallAsync;
Change the <AUTHENTICATION_TOKEN> with a valid credential token for your resource. Refer to the user access token documentation if a credential token has to be sourced.
Place a 1:1 call with video camera
The objects needed for creating a CallAgent are now ready. It's time to asynchronously create CallAgent and place a video call.
private async void CallButton_Click(object sender, RoutedEventArgs e)
{
    var callString = CalleeTextBox.Text.Trim();

    if (!string.IsNullOrEmpty(callString))
    {
        if (callString.StartsWith("8:")) // 1:1 Azure Communication Services call
        {
            this.call = await StartAcsCallAsync(callString);
        }
    }

    if (this.call != null)
    {
        this.call.RemoteParticipantsUpdated += OnRemoteParticipantsUpdatedAsync;
        this.call.StateChanged += OnStateChangedAsync;
    }
}

private async Task<CommunicationCall> StartAcsCallAsync(string acsCallee)
{
    var options = await GetStartCallOptionsAsynnc();
    var call = await this.callAgent.StartCallAsync( new [] { new UserCallIdentifier(acsCallee) }, options);
    return call;
}

var micStream = new LocalOutgoingAudioStream(); // Create a default local audio stream
var cameraStream = new LocalOutgoingVideoStreamde(this.viceManager.Cameras.FirstOrDefault() as VideoDeviceDetails); // Create a default video stream

private async Task<StartCallOptions> GetStartCallOptionsAsynnc()
{
    return new StartCallOptions() {
        OutgoingAudioOptions = new OutgoingAudioOptions() { IsMuted = true, Stream = micStream  },
        OutgoingVideoOptions = new OutgoingVideoOptions() { Streams = new OutgoingVideoStream[] { cameraStream } }
    };
}
Local camera preview
We can optionally set up local camera preview. The video can be rendered through MediaPlayerElement:
<Grid>
    <MediaPlayerElement x:Name="LocalVideo" AutoPlay="True" />
    <MediaPlayerElement x:Name="RemoteVideo" AutoPlay="True" />
</Grid>
To initialize the local preview MediaPlayerElement:
private async void CameraList_SelectionChanged(object sender, SelectionChangedEventArgs e)
{
    if (cameraStream != null)
    {
        await cameraStream?.StopPreviewAsync();
        if (this.call != null)
        {
            await this.call?.StopVideoAsync(cameraStream);
        }
    }
    var selectedCamerea = CameraList.SelectedItem as VideoDeviceDetails;
    cameraStream = new LocalOutgoingVideoStream(selectedCamerea);

    var localUri = await cameraStream.StartPreviewAsync();
    LocalVideo.Source = MediaSource.CreateFromUri(localUri);

    if (this.call != null) {
        await this.call?.StartVideoAsync(cameraStream);
    }
}
Render remote camera stream
Set up even handler in response to OnCallsUpdated event:
private async void OnCallsUpdatedAsync(object sender, CallsUpdatedEventArgs args)
{
    var removedParticipants = new List<RemoteParticipant>();
    var addedParticipants = new List<RemoteParticipant>();

    foreach(var call in args.RemovedCalls)
    {
        removedParticipants.AddRange(call.RemoteParticipants.ToList<RemoteParticipant>());
    }

    foreach (var call in args.AddedCalls)
    {
        addedParticipants.AddRange(call.RemoteParticipants.ToList<RemoteParticipant>());
    }

    await OnParticipantChangedAsync(removedParticipants, addedParticipants);
}

private async void OnRemoteParticipantsUpdatedAsync(object sender, ParticipantsUpdatedEventArgs args)
{
    await OnParticipantChangedAsync(
        args.RemovedParticipants.ToList<RemoteParticipant>(),
        args.AddedParticipants.ToList<RemoteParticipant>());
}

private async Task OnParticipantChangedAsync(IEnumerable<RemoteParticipant> removedParticipants, IEnumerable<RemoteParticipant> addedParticipants)
{
    foreach (var participant in removedParticipants)
    {
        foreach(var incomingVideoStream in  participant.IncomingVideoStreams)
        {
            var remoteVideoStream = incomingVideoStream as RemoteIncomingVideoStream;
            if (remoteVideoStream != null)
            {
                await remoteVideoStream.StopPreviewAsync();
            }
        }
        participant.VideoStreamStateChanged -= OnVideoStreamStateChanged;
    }

    foreach (var participant in addedParticipants)
    {
        participant.VideoStreamStateChanged += OnVideoStreamStateChanged;
    }
}

private void OnVideoStreamStateChanged(object sender, VideoStreamStateChangedEventArgs e)
{
    CallVideoStream callVideoStream = e.CallVideoStream;

    switch (callVideoStream.StreamDirection)
    {
        case StreamDirection.Outgoing:
            OnOutgoingVideoStreamStateChanged(callVideoStream as OutgoingVideoStream);
            break;
        case StreamDirection.Incoming:
            OnIncomingVideoStreamStateChanged(callVideoStream as IncomingVideoStream);
            break;
    }
}
Start rendering remote video stream on MediaPlayerElement:
private async void OnIncomingVideoStreamStateChanged(IncomingVideoStream incomingVideoStream)
{
    switch (incomingVideoStream.State)
    {
        case VideoStreamState.Available:
            {
                switch (incomingVideoStream.Kind)
                {
                    case VideoStreamKind.RemoteIncoming:
                        var remoteVideoStream = incomingVideoStream as RemoteIncomingVideoStream;
                        var uri = await remoteVideoStream.StartPreviewAsync();

                        await Dispatcher.RunAsync(Windows.UI.Core.CoreDispatcherPriority.Normal, () =>
                        {
                            RemoteVideo.Source = MediaSource.CreateFromUri(uri);
                        });

                        /* Or WinUI 3
                        this.DispatcherQueue.TryEnqueue(() => {
                            RemoteVideo.Source = MediaSource.CreateFromUri(uri);
                            RemoteVideo.MediaPlayer.Play();
                        });
                        */

                        break;

                    case VideoStreamKind.RawIncoming:
                        break;
                }

                break;
            }
        case VideoStreamState.Started:
            break;
        case VideoStreamState.Stopping:
            break;
        case VideoStreamState.Stopped:
            if (incomingVideoStream.Kind == VideoStreamKind.RemoteIncoming)
            {
                var remoteVideoStream = incomingVideoStream as RemoteIncomingVideoStream;
                await remoteVideoStream.StopPreviewAsync();
            }
            break;
        case VideoStreamState.NotAvailable:
            break;
    }
}
End a call
Once a call is placed, the HangupAsync method of the CommunicationCall object should be used to hang up the call.
An instance of HangupOptions should also be used to inform if the call must be terminated to all its participants.
The following code should be added inside HangupButton_Click.
var call = this.callAgent?.Calls?.FirstOrDefault();
if (call != null)
{
    var call = this.callAgent?.Calls?.FirstOrDefault();
    if (call != null)
    {
        foreach (var localVideoStream in call.OutgoingVideoStreams)
        {
            await call.StopVideoAsync(localVideoStream);
        }

        try
        {
            if (cameraStream != null)
            {
                await cameraStream.StopPreviewAsync();
            }

            await call.HangUpAsync(new HangUpOptions() { ForEveryone = false });
        }
        catch(Exception ex)
        {
            var errorCode = unchecked((int)(0x0000FFFFU & ex.HResult));
            if (errorCode != 98) // Sample error code, sam_status_failed_to_hangup_for_everyone (98)
            {
                throw;
            }
        }
    }
}
Run the code
Make sure Visual Studio builds the app for x64, x86 or ARM64, then hit F5 to start running the app. After that, click on the CommunicationCall button to place a call to the callee defined.
Keep in mind that the first time the app runs, the system prompts user for granting access to the microphone.
Next steps
Feedback
Coming soon: Throughout 2024 we will be phasing out GitHub Issues as the feedback mechanism for content and replacing it with a new feedback system. For more information see: https://aka.ms/ContentUserFeedback.
Submit and view feedback for