Link work items to objects
Azure DevOps Services | Azure DevOps Server 2022 - Azure DevOps Server 2019
Work item links are associations between two work items, or a work item and another object, that describe their relationship. You can use work item links to track dependencies and related work for traceability, share information, manage complex projects that involve multiple teams or products, track code changes, tests, and more.
- Link work items to various objects
- Link work items to other work items
- Link several work items
- Change the link type of an existing link
- Link work items to new work items
- Link work items to work items in different projects (cross-organization)
- Link work items to pull requests
- Link work items to GitHub objects
- Link several items to new Git branches
- Link work items to builds
- Link work items to deployments
- Link work items to TFVC code development
- Link work items to tests
- Link work items to a Web site, network share, storyboard, or document
- View dependencies and track related work
- Query for linked work items
- Use Azure CLI to add, remove, or show links
- Delete work item links
In this article learn how to do the following tasks:
- Link work items to various objects
- Link work items to other work items
- Link several work items
- Change the link type of an existing link
- Link work items to new work items
- Link work items to pull requests
- Link work items to GitHub objects
- Link several items to new Git branches
- Link work items to builds
- Link work items to deployments
- Link work items to TFVC code development
- Link work items to tests
- Link work items to a Web site, network share, storyboard, or document
- View dependencies and track related work
- Query for linked work items
- Use Azure CLI to add, remove, or show links
- Delete work item links
Prerequisites
| Prerequisite | Description |
|---|---|
| Project Administrator or Contributor member | You must be added to a project as a member of the Contributors or Project Administrators security group. |
| Stakeholder access | To add or modify work items, you must be granted Stakeholder access or higher. Users with Stakeholder access for public projects have full access to backlog and board features, like users with Basic access. For more information, see Stakeholder access quick reference. |
| Contributor member or Allow perms on | - To view or modify work items, you must have your View work items in this node and Edit work items in this node permissions set to Allow. By default, the Contributors group has this permission set to Allow. For more information, see Set permissions and access for work tracking. - To configure the integration options for a Classic release pipeline, you must have permissions to edit the release. - To link work items to commits and pull requests, you must have your Edit work items in this node permissions set to Allow for the Area Path assigned to the work item. By default, the Contributors group has this permission set. - To view work items, you must have your View work items in this node permissions set to Allow for the Area Path assigned to the work item. |
| Defined iterations | To use the Planning pane, your team administrator must define iteration (sprint) paths and configure team iterations. |
| Prerequisite | Description |
|---|---|
| Project Administrator or Contributor member | You must be added to a project as a member of the Contributors or Project Administrators security group. |
| Stakeholder access | To add or modify work items, you must be granted Stakeholder access or higher. |
| Contributor member or Allow perms on | To view or modify work items, you must have your View work items in this node and Edit work items in this node permissions set to Allow. By default, the Contributors group has this permission set to Allow. For more information, see Set permissions and access for work tracking. |
| Defined iterations | To use the Planning pane, your team administrator must define iteration (sprint) paths and configure team iterations. |
What types of links are there?
The following types of links help you manage the various relationships between work items and other objects.
| Link type | Column2 |
|---|---|
| Hyperlink | Connects a work item to any URL or network share |
| External link type | Connects a work item to an external object, such as a code object, build, or wiki page |
| Remote work link type | Connects work items that are defined in different organizations |
| GitHub link type | Connects a work item to a GitHub repository commit, issue, or pull request |
| Work link type | Links work items including select test case management work items |
For more information about link types, including parent/child, related, predecessor-successor, and so on, see Link type reference/Work link types.
Link work items to various objects
To link work items to various objects, do the following steps.
- From the web portal, open the work item that you want to link from, or create a new one.
- Select the Links tab, and then select Link to.
- In the Link type drop-down list, select the type of link that you want to create.
- In the Link to field, enter or select the object that you want to link to. Depending on the link type, you can enter or select the following objects. Select each object for more details.
- (Optional) Enter a comment to describe the link.
- Select OK to create the link.
Tip
There are other features that you can use to quickly link or change links that use the Parent/Child link type (some features are version-dependent, see the linked articles for details).
- To link backlog items to portfolio backlog items or to change the link structure among these items, use the mapping pane to organize your backlog. Or, you can choose to Show Parents and drag-and-drop items within the tree hierarchy.
- To create and link tasks to backlog items, use the sprint backlog page; from the web portal you can also drag-and-drop items to change the link structure.
- To indent (
 ), outdent (
 ), and change the link structure of a tree hierarchy, reparent and reorder items from a backlog in the web portal, or use a tree query in Team Explorer.
 - To add or delete work items or change the link structure, you can use Excel. See Bulk add or modify work items with Excel.
Link work items to other work items
Do the following steps to add a link to another user story, epic, feature, bug, issue, or task from the web portal.
- Open the work item that you want to link to another work item.
- In the work item form, select the Related Work section.
- Select Add link, and then Existing item.
- In the Link type dropdown list, select the type of link you want to create (for example, Parent, Child, Related, and so on).
- In the Work item field, enter the ID of the work item you want to link to, then select OK. In the following example, we use the Related link type to link three items to the bug with ID of 400.

You can only add links one at a time. You can't enter their IDs separated by commas or spaces.
To link to multiple work items, enter their IDs separated by commas or spaces. If you don't know the IDs or you want to link to an item in a different project, select ![]() More actions.
More actions.
- (Optional) If you're working from the Query Results page, bulk save the work items you modified. When you work from a backlog, work items automatically get saved.

Link several work items
From the web portal, open a backlog or query results page, and multi-select the work items you want to add a link to.
Open the … context menu of one of the selected work items, choose Add link, and then choose Existing item... or New item....
In the following example, we multi-select from the product backlog and choose Existing item....

Change the link type of an existing link
From the web portal, open your work item and select Links.
Select
 More actions > Edit link.
Choose the link type to change to, and then select Save.

Save the work item.
Link work items to new work items
Do the following steps to link a work item to a new work item.
Specify the link type, work item type, and title of the new work item. Select OK. A work item of the type you selected opens.

Enter additional information and Save the work item.

(Optional) If you're working from the Query Results page, bulk save the work items that you modified.
Link work items to remote work items (cross-organization)
Organizations that use Microsoft Entra ID can link to work items that exist in different projects across organizations. Use the following link types as indicated:
- Use the Consumes From/Produces For link types when you want to track dependencies of work items that are defined in different organizations and managed by different teams.
- Use the Remote Related link type when the work items being linked are defined in different organizations and managed by different teams, but don't have strong inter-dependencies.

Do the following steps to link work items to objects defined in other Azure DevOps organizations. You can only do so if both organizations use the same Microsoft Entra ID to manage users.
Choose from one of the following remote link types:
- Consumes From/Produces For: When you want to track dependencies of work items that are defined in different organizations and managed by different teams.
- Remote Related: When the work items being linked are defined in different organizations and managed by different teams, but don't have strong inter-dependencies.
From the Add link dialog, select the link type, enter the URL of the remote work item, and then select OK.
In the following example, we use the Remote Related link type to link to work item ID 350 that exists in the remotelinkingtest2 organization, RemoteLinking project.

The link tab maintains a count of all links to the work item. The Remote Link Count field maintains a count of the number of links added to a work item that link to a work item defined in another project or organization.
The following example shows two remote links, indicated by the ![]() cloud icon, added to a user story.
cloud icon, added to a user story.
::: moniker-end
Link work items to pull requests
In the description of your pull request, enter
#to trigger the#IDwork item picker. A list displays of 50 work items that you recently modified or are assigned to you.
Enter up to five keywords that match the work item type, ID, or title to narrow the list of suggested work items.

For more information, see Link to work items from pull requests, commits, and comments.
When you connect Azure Boards with GitHub repositories, you can link work items to a GitHub Commit, GitHub Issue, and GitHub Pull Request. This way you can use GitHub for software development while you use Azure Boards to plan and track your work.
When you connect Azure Boards with GitHub repositories, you can link work items to a GitHub Commit and GitHub Pull Request. This way you can use GitHub for software development while you use Azure Boards to plan and track your work.
Important
You can only link work items to GitHub objects that have repositories connected to Azure Boards. For more information, see Connect Azure Boards to GitHub, and Link to work items from pull requests, commits, and comments.
For more information, see Link GitHub commits, pull requests, and issues to work items and Auto complete work items with pull requests.
Link several work items to new git branches
From a backlog or query results page, multi-select the work items that you want to link to a new git branch, choose the ![]() actions icon, and then New branch.... For more information, see Link work items to Git development objects.
actions icon, and then New branch.... For more information, see Link work items to Git development objects.

Link work items to builds
Do the following steps to link work items to existing builds. These builds can be within your project or to other projects in your organization or collection.
Note
This feature requires installation of Azure DevOps Server 2020.1 update. For more information, see Azure DevOps Server 2020 Update 1 RC1 Release Notes, Boards.
From the Links tab of a work item, select Add link > Existing item.
From the Add link dialog, choose one of the build link types—Build, Found in build, Integrated in build— and specify the build number.
If you don't know the build number—a combination of the pipeline and build name—you can search for it by choosing the
 icon.
icon.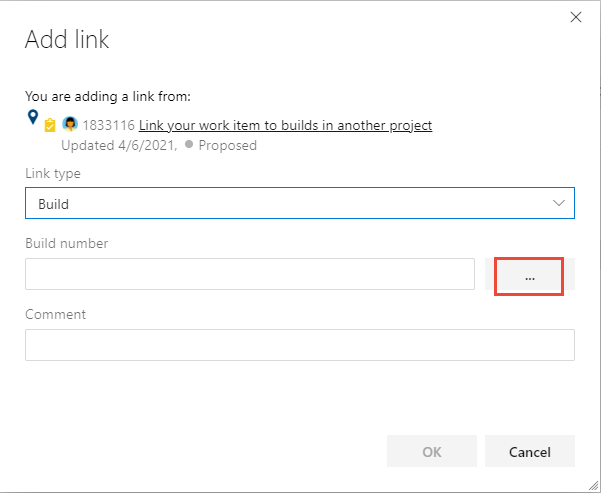
From the Link builds dialog, choose the parameters to filter your search of builds.
To link to a build in a different project, first choose the Project whose build you want to link to.
For example, you can specify a build number, select a build pipeline, a build result—such as, All, succeeded, partially succeeded, failed, or canceled. Or, with All selected for Result, choose Find to list the available builds to link to.
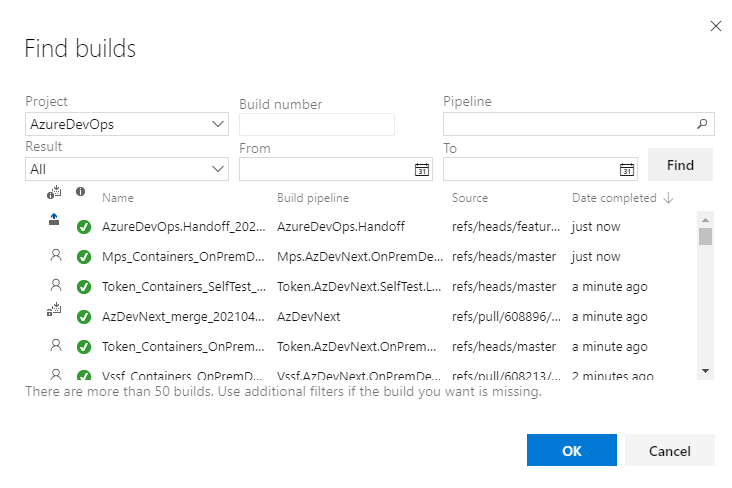
Choose the build from the list you want to link to and then select OK.
From the Add link dialog, select OK to complete the operation.

You can link work items to existing builds from the Add link dialog.
From the Links tab of a work item, choose Add link > Existing item.
From the Add link dialog, choose one of the build link types—Build, Found in build, Integrated in build— and specify the build number.
If you don't know the build number—a combination of the pipeline and build name—you can search for it by choosing the
icon.
From the Link builds dialog, choose the parameters to filter your search of builds.
For example, you can specify a build number, select a build pipeline, a build result—such as, All, succeeded, partially succeeded, failed, or canceled. Or, with All selected for Result, choose Find to list the available builds to link to.

Choose the build from the list you want to link to and then select OK.
From the Add link dialog, choose OK to complete the operation.
Link work items to deployments
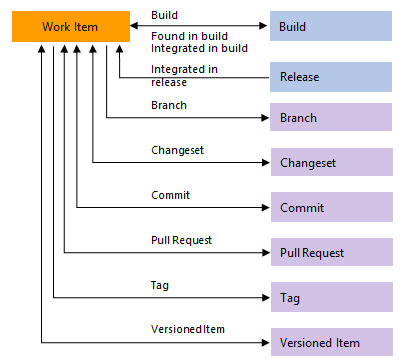
As you develop your software, you can capture which code changes and builds support the completion of a work item. This way, your team can understand what work was done or how a bug was fixed through the audit trail of changes to the code base.
The link types used to construct these links—as illustrated in the following image—are: Branch, Build, Changeset, Commit, Found in build, Integrated in build, Pull Request, Versioned Item, and Integrated in release environment.
Tip
We recommend that you drive development from the work item at the time you create it. You can also add the work item ID when you create branches, commits, and pull requests. Git lets you link work items to commits by using the Commit link type. You can do so in the following ways.
- Add work item IDs in Visual Studio Team Explorer before you commit your changes.
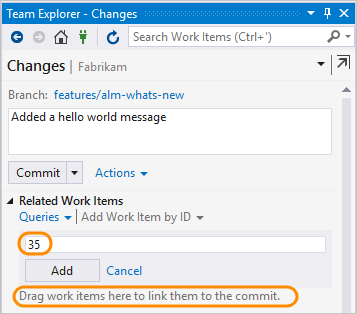
- Use the git-commit command and include the work item ID in your comment. For example, apply this comment
#35 Catch null exceptionto your commit. When you push the commit, the system creates a Commit link between the commit and work item #35. - Use the Development control, to drive your git development from the work item.
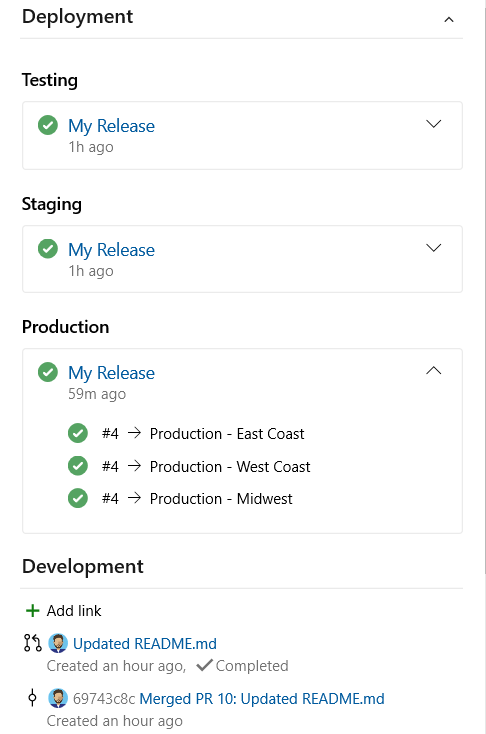
As shown in the following image, the Deployment control shows release information for two release stages those work items that have been linked to a Git commit or pull request for a release pipeline configured to integrate with Azure Boards.
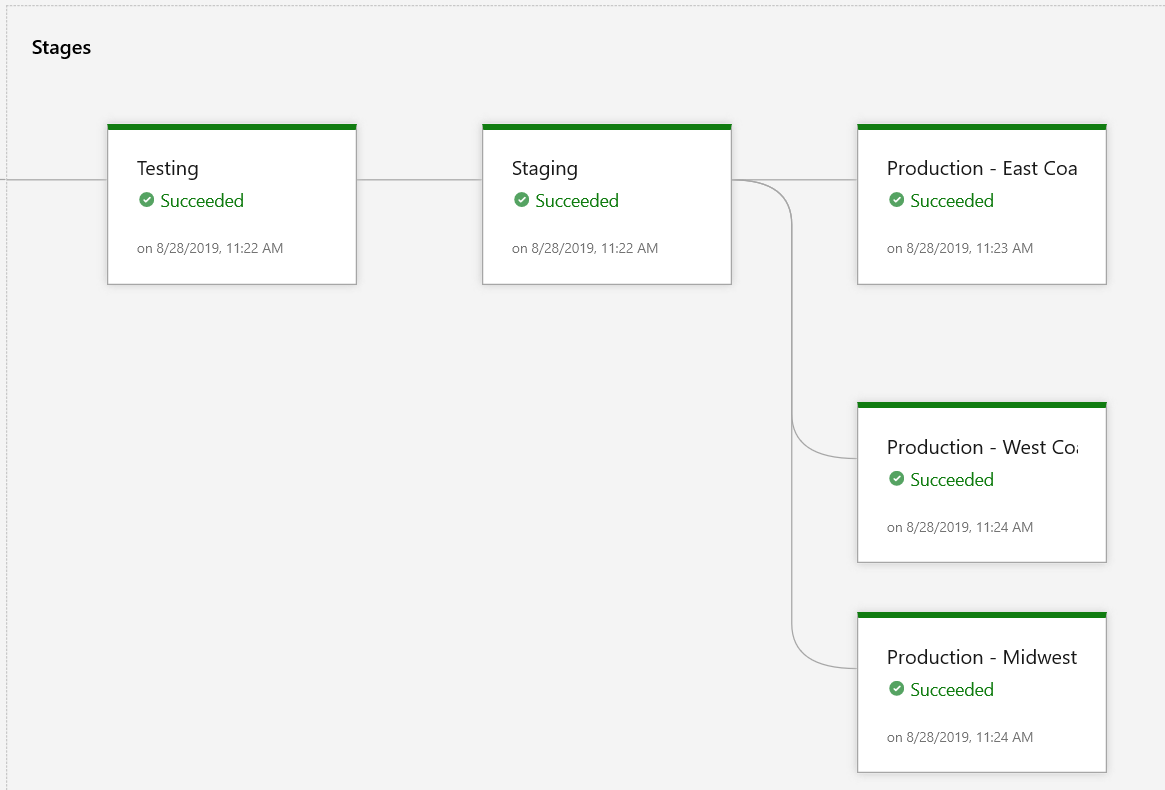
Deployment control
Work item forms provide two controls to show and quickly go to development objects. The Deployment control is described in this article, and the Development control is described in Drive Git development from a work item.
The Deployment control appears by default on the work item forms for User Story (Agile), Product Backlog Item (Scrum), Issue (Basic), Requirement (CMMI), Feature, Epic, Bug, Task, and Test Case work item types. It’s also automatically enabled for custom work item types that use the Inherited process. The Deployment control displays the release information for two stages of the release pipeline that's integrated with Azure Boards. This control only shows the work items that are linked to a Git commit or pull request for this pipeline. You can also gain visual insight into the status of a work item as it gets deployed to different release environments and quickly go to each release stage and run.
Work items associated with commits in the build show the status of the release. But, only work items within the same project get linked to where the release pipeline is defined.
You can see the stages in real time when you open a work item.
To populate the Deployment control, do the following steps:
Note
The Deployment control requires configuration of a Classic release pipeline. It doesn't support linking to release stages defined for a YAML pipeline.
- Define a Classic release pipeline and set up the release stages as described in Define your multi-stage continuous deployment (CD) pipeline.
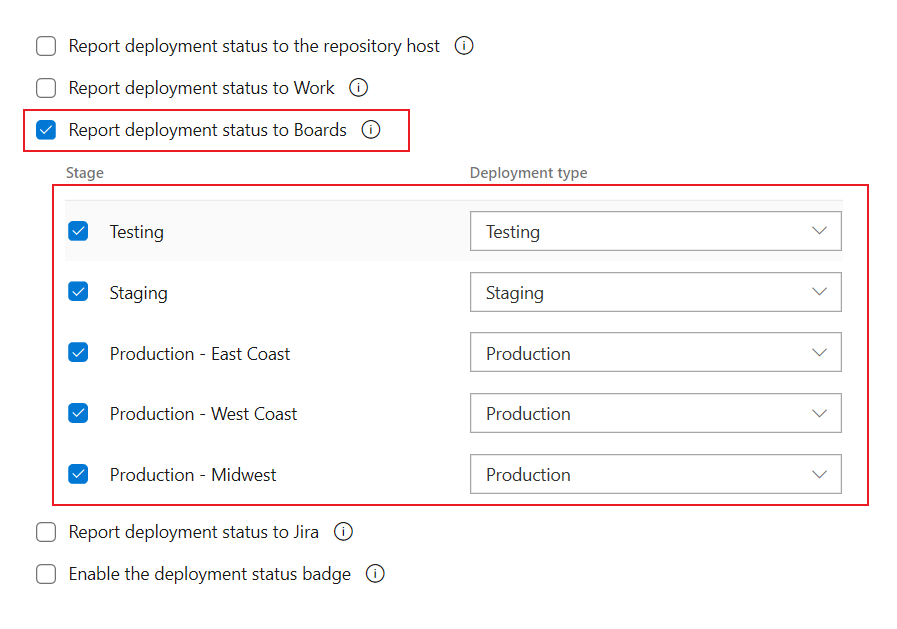
- Configure the pipeline as described in Configure pipelines to support work tracking, Report deployment status to Boards.
- Link work items to a commit or pull request in Azure Repos Git repository. For more information, see:
- Run the pipeline.
Link work items to TFVC code development
Team Foundation version control (TFVC) lets you link work items to version control changesets or versioned source code files by using the Changeset and Versioned Item link types. When you check in pending changes or use My Work to check in changes, work items automatically get linked to your changes.

Link work items to tests
Test-related link types link test case management work items to one another, or to other work items. From the web portal or Microsoft Test Manager, you can view which test cases are defined for a test suite, and which test suites are defined for a test plan. But, these objects aren't linked to each other through link types.
You can link work items to test cases using the Tested/Tested By link types. Use the same link controls you use to link work items to other work items as described earlier.
The following image shows the full set of link types that you can use with test management work item types. Most links between test management objects occur by executing a task from the Test pages or Microsoft Test Manager.
![]()
For example, when you add Shared Steps to a Test Case, they automatically get linked using the Test Case/Shared Steps link types. For more information, see Share steps between test cases.


From Test you can add test plans, test suites, and test cases—which are linked, but not through a specific link type. Also, the test system creates and manages the associations of test results to test cases and test plans.
Link work items to a Web site, network share, storyboard, or document
You can use a hyperlink or Storyboard link type to link a work item to a Web site, network share, or document located on a network share. Both of these link types are one-way links. To add these link types, use the same controls described earlier for linking work items.
When you use the storyboard link type, you differentiate the link to specify a storyboard or document that provides work item specifications. Use this link type to provide your team access to the shared file where they can add their comments.
![]()
View dependencies and track related work
Azure DevOps provides several ways to view dependencies and track related work: • Query Editor: You can use the Query Editor to create custom queries that show all work items linked to a specific work item. • Backlogs and Boards: The Backlogs and Boards views show parent-child relationships between work items, allowing you to see dependencies at a glance. • Dependency Tracker: The Dependency Tracker is a Power BI report that provides a visual representation of dependencies between work items.
To view the list of all objects linked to a work item, do the following steps.
- Open the work item and select
 Links. The links tab indicates the count of all linked objects. Linked objects get grouped under their link type, with a count within each group.

- (Optional) Expand or collapse each group, and sort within each group by State, Latest Update, or Comment by choosing the corresponding column title.
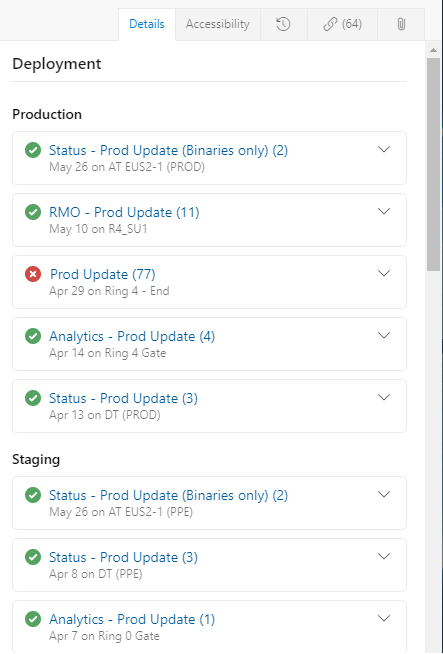
For example, the following Links tab shows a portion of the 64 linked objects for a work item.
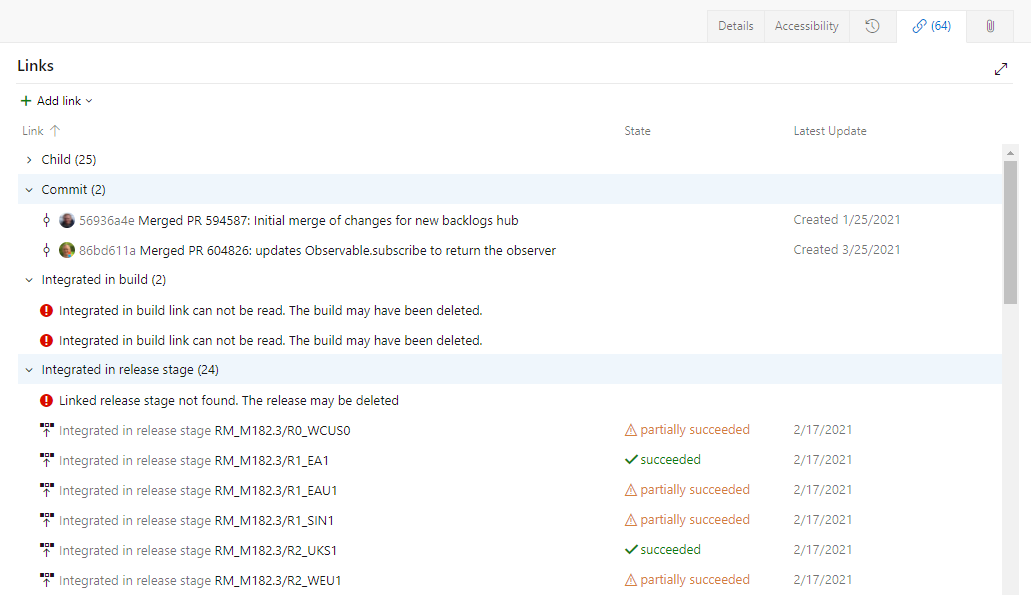
Links prefaced with the ![]() exclamation mark indicate that the build, release, or other object is deleted. Due to retention policies, these objects automatically get deleted after a certain time period.
exclamation mark indicate that the build, release, or other object is deleted. Due to retention policies, these objects automatically get deleted after a certain time period.
Query for linked work items
To filter items based on hierarchical links, use the Tree of work items query type. To filter items based on all link types, use Work items and direct links.
To find work items linked to other work items with specific link types, use a query that shows a primary and a secondary set of work items. The primary set meets the field criteria, and the secondary set is linked to the primary set. You can’t query for work items in releases, but you can query for work items with external links. Add more query filters to refine your search.
For query examples, see Link and attachment queries.
You can't construct a query that shows a hierarchical view of Test Plans, Test Suites, and Test Cases. These items aren't linked together using Parent/Child or any other link type. You can only view the hierarchy through the Test > Test Plans page.
Use Azure CLI to add, remove, or show links
You can add, remove, and show details of links to a work item with the az boards work-item relation command. For more information, see Get started with Azure DevOps CLI.
Link types include work link types, remote link types, hyperlinks, and attached files. For a list of all link types that you can specify, run the az boards work-item relation list-type command.
az boards work-item relation add
az boards work-item relation remove
az boards work-item relation show
In the following examples, the organization is fabrikam and the project ID corresponds to cebd7ef5-4282-448b-9701-88c8637581b7. The table format is used to show the output. For other formats, see Output formats for Azure CLI commands.
Link work items
To link one or more work items to a single work item, enter the az boards work-item relation add command.
Syntax
Required parameters include the ID of the work item to link to and the link type. Supported link types include Parent, Child, Related, Remote Related. For a list of all link types that you can specify, run the az boards work-item relation list-type command.
For work items defined within the same organization, you must specify the work item ID or target URL. For work items defined in a remote organization, you must specify the target URL. You can specify multiple values by separating IDs or URLs with a comma.
az boards work-item relation add --id
                                 --relation-type
                                 [--detect {false, true}]
                                 [--org]
                                 [--target-id]
                                 [--target-url]
Example
The following command links work item ID=2807 to work item ID=2794 with the Child link type. The command returns a list of all links currently defined for the work item.
az boards work-item relation add --id 2794 --relation-type Child --target-id 2856 --output table
Are you sure you want to remove this relation(s)? (y/n): y
Relation Type    Url
---------------  -------------------------------------------------------------------------------------------------
Child            https://dev.azure.com/fabrikam/cebd7ef5-4282-448b-9701-88c8637581b7/_apis/wit/workItems/2850
Child            https://dev.azure.com/fabrikam/cebd7ef5-4282-448b-9701-88c8637581b7/_apis/wit/workItems/2808
Child            https://dev.azure.com/fabrikam/cebd7ef5-4282-448b-9701-88c8637581b7/_apis/wit/workItems/2820
Child            https://dev.azure.com/fabrikam/cebd7ef5-4282-448b-9701-88c8637581b7/_apis/wit/workItems/2856
Parent           https://dev.azure.com/fabrikam/cebd7ef5-4282-448b-9701-88c8637581b7/_apis/wit/workItems/2811
Child            https://dev.azure.com/fabrikam/cebd7ef5-4282-448b-9701-88c8637581b7/_apis/wit/workItems/2876
Child            https://dev.azure.com/fabrikam/cebd7ef5-4282-448b-9701-88c8637581b7/_apis/wit/workItems/2801
Child            https://dev.azure.com/fabrikam/cebd7ef5-4282-448b-9701-88c8637581b7/_apis/wit/workItems/2877
Child            https://dev.azure.com/fabrikam/cebd7ef5-4282-448b-9701-88c8637581b7/_apis/wit/workItems/2805
Child            https://dev.azure.com/fabrikam/cebd7ef5-4282-448b-9701-88c8637581b7/_apis/wit/workItems/2807
To view the information for the linked work items, enter one of the URLs listed in your browser.
Remove work item links
To remove one or more linked work items from a single work item, enter the az boards work-item relation remove command.
Required parameters include the ID of the work item to remove the link from and the link type. You can only remove links to work items defined in the same organization. You can specify any of the supported link types except remote link types.
You must specify the target work item ID. You can specify multiple values by separating IDs or URLs with a comma.
Syntax
az boards work-item relation remove --id
                                    --relation-type
                                    --target-id
                                    [--detect {false, true}]
                                    [--org]
                                    [--yes]
Example
The following command removes the link to work item ID=2794 from work item ID=2856 to work item with the Child link type. The command returns a list of all links currently defined for the work item.
az boards work-item relation remove --id 2794 --relation-type Child --target-id 2807 --output table
Are you sure you want to remove this relation(s)? (y/n): y
Relation Type    Url
---------------  -------------------------------------------------------------------------------------------------
Child            https://dev.azure.com/fabrikam/cebd7ef5-4282-448b-9701-88c8637581b7/_apis/wit/workItems/2850
Child            https://dev.azure.com/fabrikam/cebd7ef5-4282-448b-9701-88c8637581b7/_apis/wit/workItems/2808
Child            https://dev.azure.com/fabrikam/cebd7ef5-4282-448b-9701-88c8637581b7/_apis/wit/workItems/2820
Child            https://dev.azure.com/fabrikam/cebd7ef5-4282-448b-9701-88c8637581b7/_apis/wit/workItems/2856
Parent           https://dev.azure.com/fabrikam/cebd7ef5-4282-448b-9701-88c8637581b7/_apis/wit/workItems/2811
Child            https://dev.azure.com/fabrikam/cebd7ef5-4282-448b-9701-88c8637581b7/_apis/wit/workItems/2876
Child            https://dev.azure.com/fabrikam/cebd7ef5-4282-448b-9701-88c8637581b7/_apis/wit/workItems/2801
Child            https://dev.azure.com/fabrikam/cebd7ef5-4282-448b-9701-88c8637581b7/_apis/wit/workItems/2877
Child            https://dev.azure.com/fabrikam/cebd7ef5-4282-448b-9701-88c8637581b7/_apis/wit/workItems/2805
To view the information for the linked work items, enter one of the URLs listed in your browser.
Show details of links made for a single work item
To view the work items linked to a single work item, enter the az boards work-item relation show command. For a list of all link types that can be returned, run the az boards work-item relation list-type command.
Syntax
az boards work-item relation show --id
                                  [--detect {false, true}]
                                  [--org]
Example
The following command lists the details of links defined for work item ID=2931 in the fabrikam organization in table format.
az boards work-item relation show --id 2931 --output table
Relation Type    Url
---------------  -----------------------------------------------------------------------------------------------------------------------------------
Related          https://dev.azure.com/fabrikam/cebd7ef5-4282-448b-9701-88c8637581b7/_apis/wit/workItems/2932
Successor        https://dev.azure.com/fabrikam/cebd7ef5-4282-448b-9701-88c8637581b7/_apis/wit/workItems/2932
Remote Related   https://dev.azure.com/fabrikam-fiber5/847568d2-6541-4a99-a240-228510ccbff7/_apis/wit/workItems/1777
Parent           https://dev.azure.com/fabrikam/cebd7ef5-4282-448b-9701-88c8637581b7/_apis/wit/workItems/2930
Predecessor      https://dev.azure.com/fabrikam/cebd7ef5-4282-448b-9701-88c8637581b7/_apis/wit/workItems/2933
Attached File    https://dev.azure.com/fabrikam/cebd7ef5-4282-448b-9701-88c8637581b7/_apis/wit/attachments/1cc6c026-b4ed-420c-bfe6-065be726cba7
To view the information for the linked work items, enter one of the URLs listed in your browser. Choose the URL for an attached file to download the attachment.
Delete work item links
Do the following steps to delete a work item link.
- Open the work item that has links, or select it from a query result.
- Select the Links tab to see the list of links.
- Select the link that you want to delete, and then select Remove link.
- Confirm that you want to delete the link.
Once a work item gets linked to a commit or pull request, it continues to appear as part of the release stages. For example, if you have a work item that didn't pass testing criteria, you might want to remove it from the builds and releases.
To remove the work item from participating in future builds and releases, delete the link to the most recent commit and pull request.
Next steps
Visualize related work and other objects. Download the Work item visualization extension, available from the Visual Studio Marketplace, Azure DevOps tab.
Related articles
Feedback
Coming soon: Throughout 2024 we will be phasing out GitHub Issues as the feedback mechanism for content and replacing it with a new feedback system. For more information see: https://aka.ms/ContentUserFeedback.
Submit and view feedback for