Quickstart: Send events to or receive events from event hubs by using JavaScript
In this Quickstart, you learn how to send events to and receive events from an event hub using the @azure/event-hubs npm package.
Prerequisites
If you're new to Azure Event Hubs, see Event Hubs overview before you do this quickstart.
To complete this quickstart, you need the following prerequisites:
- Microsoft Azure subscription. To use Azure services, including Azure Event Hubs, you need a subscription. If you don't have an existing Azure account, you can sign up for a free trial.
- Node.js LTS. Download the latest long-term support (LTS) version.
- Visual Studio Code (recommended) or any other integrated development environment (IDE).
- Create an Event Hubs namespace and an event hub. The first step is to use the Azure portal to create a namespace of type Event Hubs, and obtain the management credentials your application needs to communicate with the event hub. To create a namespace and an event hub, follow the procedure in this article.
Install npm packages to send events
To install the Node Package Manager (npm) package for Event Hubs, open a command prompt that has npm in its path, change the directory to the folder where you want to keep your samples.
Run these commands:
npm install @azure/event-hubs
npm install @azure/identity
Authenticate the app to Azure
This quickstart shows you two ways of connecting to Azure Event Hubs: passwordless and connection string. The first option shows you how to use your security principal in Microsoft Entra ID and role-based access control (RBAC) to connect to an Event Hubs namespace. You don't need to worry about having hard-coded connection strings in your code or in a configuration file or in a secure storage like Azure Key Vault. The second option shows you how to use a connection string to connect to an Event Hubs namespace. If you're new to Azure, you may find the connection string option easier to follow. We recommend using the passwordless option in real-world applications and production environments. For more information, see Authentication and authorization. You can also read more about passwordless authentication on the overview page.
Assign roles to your Microsoft Entra user
When developing locally, make sure that the user account that connects to Azure Event Hubs has the correct permissions. You'll need the Azure Event Hubs Data Owner role in order to send and receive messages. To assign yourself this role, you'll need the User Access Administrator role, or another role that includes the Microsoft.Authorization/roleAssignments/write action. You can assign Azure RBAC roles to a user using the Azure portal, Azure CLI, or Azure PowerShell. Learn more about the available scopes for role assignments on the scope overview page.
The following example assigns the Azure Event Hubs Data Owner role to your user account, which provides full access to Azure Event Hubs resources. In a real scenario, follow the Principle of Least Privilege to give users only the minimum permissions needed for a more secure production environment.
Azure built-in roles for Azure Event Hubs
For Azure Event Hubs, the management of namespaces and all related resources through the Azure portal and the Azure resource management API is already protected using the Azure RBAC model. Azure provides the below Azure built-in roles for authorizing access to an Event Hubs namespace:
- Azure Event Hubs Data Owner: Enables data access to Event Hubs namespace and its entities (queues, topics, subscriptions, and filters)
- Azure Event Hubs Data Sender: Use this role to give the sender access to Event Hubs namespace and its entities.
- Azure Event Hubs Data Receiver: Use this role to give the receiver access to Event Hubs namespace and its entities.
If you want to create a custom role, see Rights required for Event Hubs operations.
Important
In most cases, it will take a minute or two for the role assignment to propagate in Azure. In rare cases, it may take up to eight minutes. If you receive authentication errors when you first run your code, wait a few moments and try again.
In the Azure portal, locate your Event Hubs namespace using the main search bar or left navigation.
On the overview page, select Access control (IAM) from the left-hand menu.
On the Access control (IAM) page, select the Role assignments tab.
Select + Add from the top menu and then Add role assignment from the resulting drop-down menu.

Use the search box to filter the results to the desired role. For this example, search for
Azure Event Hubs Data Ownerand select the matching result. Then choose Next.Under Assign access to, select User, group, or service principal, and then choose + Select members.
In the dialog, search for your Microsoft Entra username (usually your user@domain email address) and then choose Select at the bottom of the dialog.
Select Review + assign to go to the final page, and then Review + assign again to complete the process.
Send events
In this section, you create a JavaScript application that sends events to an event hub.
Open your favorite editor, such as Visual Studio Code.
Create a file called send.js, and paste the following code into it:
In the code, use real values to replace the following placeholders:
EVENT HUBS NAMESPACE NAMEEVENT HUB NAME
const { EventHubProducerClient } = require("@azure/event-hubs"); const { DefaultAzureCredential } = require("@azure/identity"); // Event hubs const eventHubsResourceName = "EVENT HUBS NAMESPACE NAME"; const fullyQualifiedNamespace = `${eventHubsResourceName}.servicebus.windows.net`; const eventHubName = "EVENT HUB NAME"; // Azure Identity - passwordless authentication const credential = new DefaultAzureCredential(); async function main() { // Create a producer client to send messages to the event hub. const producer = new EventHubProducerClient(fullyQualifiedNamespace, eventHubName, credential); // Prepare a batch of three events. const batch = await producer.createBatch(); batch.tryAdd({ body: "passwordless First event" }); batch.tryAdd({ body: "passwordless Second event" }); batch.tryAdd({ body: "passwordless Third event" }); // Send the batch to the event hub. await producer.sendBatch(batch); // Close the producer client. await producer.close(); console.log("A batch of three events have been sent to the event hub"); } main().catch((err) => { console.log("Error occurred: ", err); });Run
node send.jsto execute this file. This command sends a batch of three events to your event hub. If you're using the Passwordless (Azure Active Directory's Role-based Access Control) authentication, you might want to runaz loginand sign into Azure using the account that was added to the Azure Event Hubs Data Owner role.In the Azure portal, verify that the event hub received the messages. Refresh the page to update the chart. It might take a few seconds for it to show that the messages are received.

Note
For the complete source code, including additional informational comments, go to the GitHub sendEvents.js page.

Receive events
In this section, you receive events from an event hub by using an Azure Blob storage checkpoint store in a JavaScript application. It performs metadata checkpoints on received messages at regular intervals in an Azure Storage blob. This approach makes it easy to continue receiving messages later from where you left off.
Follow these recommendations when using Azure Blob Storage as a checkpoint store:
- Use a separate container for each consumer group. You can use the same storage account, but use one container per each group.
- Don't use the container for anything else, and don't use the storage account for anything else.
- Storage account should be in the same region as the deployed application is located in. If the application is on-premises, try to choose the closest region possible.
On the Storage account page in the Azure portal, in the Blob service section, ensure that the following settings are disabled.
- Hierarchical namespace
- Blob soft delete
- Versioning
Create an Azure storage account and a blob container
To create an Azure storage account and a blob container in it, do the following actions:
- Create an Azure storage account
- Create a blob container in the storage account
- Authenticate to the blob container
When developing locally, make sure that the user account that is accessing blob data has the correct permissions. You'll need Storage Blob Data Contributor to read and write blob data. To assign yourself this role, you'll need to be assigned the User Access Administrator role, or another role that includes the Microsoft.Authorization/roleAssignments/write action. You can assign Azure RBAC roles to a user using the Azure portal, Azure CLI, or Azure PowerShell. You can learn more about the available scopes for role assignments on the scope overview page.
In this scenario, you'll assign permissions to your user account, scoped to the storage account, to follow the Principle of Least Privilege. This practice gives users only the minimum permissions needed and creates more secure production environments.
The following example will assign the Storage Blob Data Contributor role to your user account, which provides both read and write access to blob data in your storage account.
Important
In most cases it will take a minute or two for the role assignment to propagate in Azure, but in rare cases it may take up to eight minutes. If you receive authentication errors when you first run your code, wait a few moments and try again.
In the Azure portal, locate your storage account using the main search bar or left navigation.
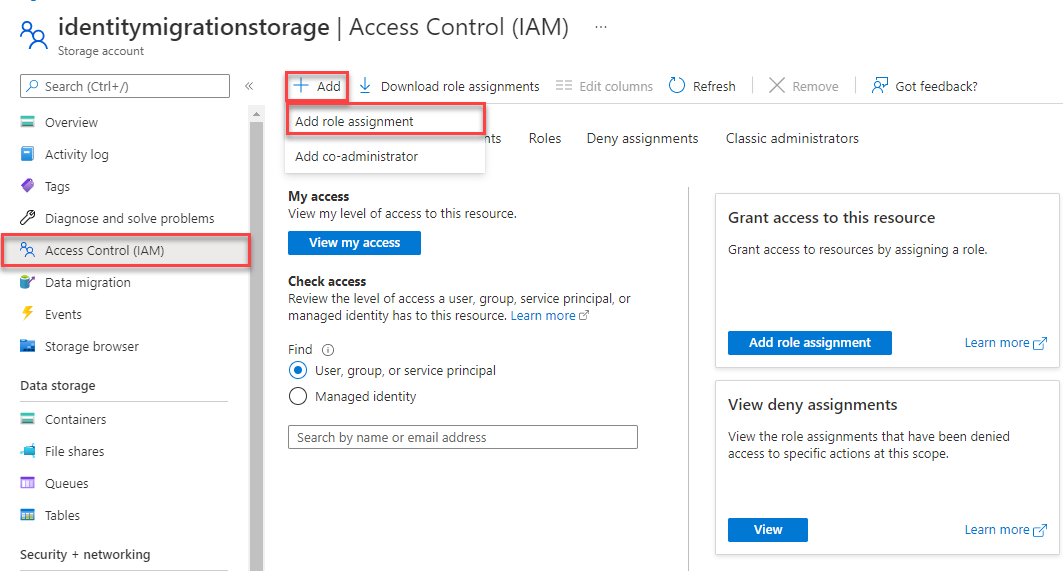
On the storage account overview page, select Access control (IAM) from the left-hand menu.
On the Access control (IAM) page, select the Role assignments tab.
Select + Add from the top menu and then Add role assignment from the resulting drop-down menu.
Use the search box to filter the results to the desired role. For this example, search for Storage Blob Data Contributor and select the matching result and then choose Next.
Under Assign access to, select User, group, or service principal, and then choose + Select members.
In the dialog, search for your Microsoft Entra username (usually your user@domain email address) and then choose Select at the bottom of the dialog.
Select Review + assign to go to the final page, and then Review + assign again to complete the process.
Install the npm packages to receive events
For the receiving side, you need to install two more packages. In this quickstart, you use Azure Blob storage to persist checkpoints so that the program doesn't read the events that it already read. It performs metadata checkpoints on received messages at regular intervals in a blob. This approach makes it easy to continue receiving messages later from where you left off.
Run these commands:
npm install @azure/storage-blob
npm install @azure/eventhubs-checkpointstore-blob
npm install @azure/identity
Write code to receive events
Open your favorite editor, such as Visual Studio Code.
Create a file called receive.js, and paste the following code into it:
In the code, use real values to replace the following placeholders:
EVENT HUBS NAMESPACE NAMEEVENT HUB NAMESTORAGE ACCOUNT NAMESTORAGE CONTAINER NAME
const { DefaultAzureCredential } = require("@azure/identity"); const { EventHubConsumerClient, earliestEventPosition } = require("@azure/event-hubs"); const { ContainerClient } = require("@azure/storage-blob"); const { BlobCheckpointStore } = require("@azure/eventhubs-checkpointstore-blob"); // Event hubs const eventHubsResourceName = "EVENT HUBS NAMESPACE NAME"; const fullyQualifiedNamespace = `${eventHubsResourceName}.servicebus.windows.net`; const eventHubName = "EVENT HUB NAME"; const consumerGroup = "$Default"; // name of the default consumer group // Azure Storage const storageAccountName = "STORAGE ACCOUNT NAME"; const storageContainerName = "STORAGE CONTAINER NAME"; const baseUrl = `https://${storageAccountName}.blob.core.windows.net`; // Azure Identity - passwordless authentication const credential = new DefaultAzureCredential(); async function main() { // Create a blob container client and a blob checkpoint store using the client. const containerClient = new ContainerClient( `${baseUrl}/${storageContainerName}`, credential ); const checkpointStore = new BlobCheckpointStore(containerClient); // Create a consumer client for the event hub by specifying the checkpoint store. const consumerClient = new EventHubConsumerClient(consumerGroup, fullyQualifiedNamespace, eventHubName, credential, checkpointStore); // Subscribe to the events, and specify handlers for processing the events and errors. const subscription = consumerClient.subscribe({ processEvents: async (events, context) => { if (events.length === 0) { console.log(`No events received within wait time. Waiting for next interval`); return; } for (const event of events) { console.log(`Received event: '${event.body}' from partition: '${context.partitionId}' and consumer group: '${context.consumerGroup}'`); } // Update the checkpoint. await context.updateCheckpoint(events[events.length - 1]); }, processError: async (err, context) => { console.log(`Error : ${err}`); } }, { startPosition: earliestEventPosition } ); // After 30 seconds, stop processing. await new Promise((resolve) => { setTimeout(async () => { await subscription.close(); await consumerClient.close(); resolve(); }, 30000); }); } main().catch((err) => { console.log("Error occurred: ", err); });Run
node receive.jsin a command prompt to execute this file. The window should display messages about received events.C:\Self Study\Event Hubs\JavaScript>node receive.js Received event: 'First event' from partition: '0' and consumer group: '$Default' Received event: 'Second event' from partition: '0' and consumer group: '$Default' Received event: 'Third event' from partition: '0' and consumer group: '$Default'Note
For the complete source code, including additional informational comments, go to the GitHub receiveEventsUsingCheckpointStore.js page.
The receiver program receives events from all the partitions of the default consumer group in the event hub.
Clean up resources
Delete the resource group that has the Event Hubs namespace or delete only the namespace if you want to keep the resource group.
Related content
Check out these samples on GitHub:
Feedback
Coming soon: Throughout 2024 we will be phasing out GitHub Issues as the feedback mechanism for content and replacing it with a new feedback system. For more information see: https://aka.ms/ContentUserFeedback.
Submit and view feedback for