Tutorial: Create an end-to-end data pipeline to derive sales insights in Azure HDInsight
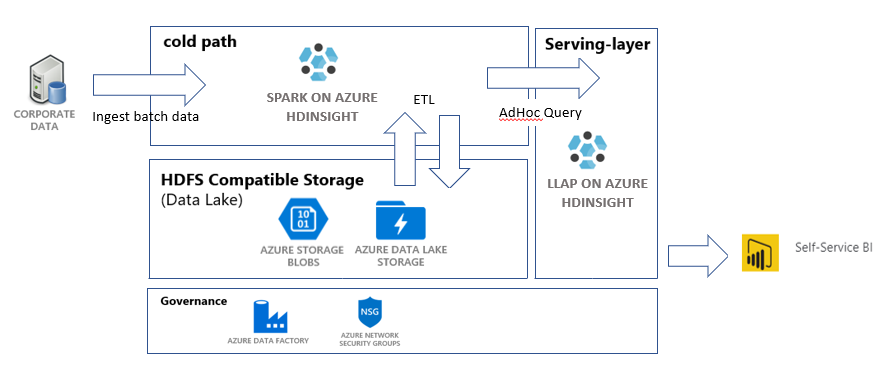
In this tutorial, you'll build an end-to-end data pipeline that performs extract, transform, and load (ETL) operations. The pipeline will use Apache Spark and Apache Hive clusters running on Azure HDInsight for querying and manipulating the data. You'll also use technologies like Azure Data Lake Storage Gen2 for data storage, and Power BI for visualization.
This data pipeline combines the data from various stores, removes any unwanted data, appends new data, and loads all this back to your storage to visualize business insights. Read more about ETL pipelines in Extract, transform, and load (ETL) at scale.
If you don't have an Azure subscription, create a free account before you begin.
Prerequisites
Azure CLI - at least version 2.2.0. See Install the Azure CLI.
jq, a command-line JSON processor. See https://stedolan.github.io/jq/.
A member of the Azure built-in role - owner.
If using PowerShell to trigger the Data Factory pipeline, you'll need the Az Module.
Power BI Desktop to visualize business insights at the end of this tutorial.
Create resources
Clone the repository with scripts and data
Log in to your Azure subscription. If you plan to use Azure Cloud Shell, then select Try it in the upper-right corner of the code block. Else, enter the command below:
az login

# If you have multiple subscriptions, set the one to use
# az account set --subscription "SUBSCRIPTIONID"
Ensure you're a member of the Azure role owner. Replace
user@contoso.comwith your account and then enter the command:az role assignment list \ --assignee "user@contoso.com" \ --role "Owner"If no record is returned, you aren't a member and won't be able to complete this tutorial.
Download the data and scripts for this tutorial from the HDInsight sales insights ETL repository. Enter the following command:
git clone https://github.com/Azure-Samples/hdinsight-sales-insights-etl.git
cd hdinsight-sales-insights-etl
Ensure
salesdata scripts templateshave been created. Verify with the following command:ls
Deploy Azure resources needed for the pipeline
Add execute permissions for all of the scripts by entering:
chmod +x scripts/*.shSet variable for resource group. Replace
RESOURCE_GROUP_NAMEwith the name of an existing or new resource group, then enter the command:RESOURCE_GROUP="RESOURCE_GROUP_NAME"Execute the script. Replace
LOCATIONwith a desired value, then enter the command:./scripts/resources.sh $RESOURCE_GROUP LOCATIONIf you're not sure which region to specify, you can retrieve a list of supported regions for your subscription with the az account list-locations command.
The command will deploy the following resources:
- An Azure Blob storage account. This account will hold the company sales data.
- An Azure Data Lake Storage Gen2 account. This account will serve as the storage account for both HDInsight clusters. Read more about HDInsight and Data Lake Storage Gen2 in Azure HDInsight integration with Data Lake Storage Gen2.
- A user-assigned managed identity. This account gives the HDInsight clusters access to the Data Lake Storage Gen2 account.
- An Apache Spark cluster. This cluster will be used to clean up and transform the raw data.
- An Apache Hive Interactive Query cluster. This cluster will allow querying the sales data and visualizing it with Power BI.
- An Azure virtual network supported by network security group (NSG) rules. This virtual network allows the clusters to communicate and secures their communications.
Cluster creation can take around 20 minutes.
The default password for SSH access to the clusters is Thisisapassword1. If you want to change the password, go to the ./templates/resourcesparameters_remainder.json file and change the password for the sparksshPassword, sparkClusterLoginPassword, llapClusterLoginPassword, and llapsshPassword parameters.
Verify deployment and collect resource information
If you want to check the status of your deployment, go to the resource group on the Azure portal. Under Settings, select Deployments, then your deployment. Here you can see the resources that have successfully deployed and the resources that are still in progress.
To view the names of the clusters, enter the following command:
SPARK_CLUSTER_NAME=$(cat resourcesoutputs_remainder.json | jq -r '.properties.outputs.sparkClusterName.value')
LLAP_CLUSTER_NAME=$(cat resourcesoutputs_remainder.json | jq -r '.properties.outputs.llapClusterName.value')

echo "Spark Cluster" $SPARK_CLUSTER_NAME
echo "LLAP cluster" $LLAP_CLUSTER_NAME
To view the Azure storage account and access key, enter the following command:
BLOB_STORAGE_NAME=$(cat resourcesoutputs_storage.json | jq -r '.properties.outputs.blobStorageName.value')

blobKey=$(az storage account keys list \
    --account-name $BLOB_STORAGE_NAME \
    --resource-group $RESOURCE_GROUP \
    --query [0].value -o tsv)

echo $BLOB_STORAGE_NAME
echo $BLOB_KEY
To view the Data Lake Storage Gen2 account and access key, enter the following command:
ADLSGEN2STORAGENAME=$(cat resourcesoutputs_storage.json | jq -r '.properties.outputs.adlsGen2StorageName.value')

ADLSKEY=$(az storage account keys list \
    --account-name $ADLSGEN2STORAGENAME \
    --resource-group $RESOURCE_GROUP \
    --query [0].value -o tsv)

echo $ADLSGEN2STORAGENAME
echo $ADLSKEY
Create a data factory
Azure Data Factory is a tool that helps automate Azure Pipelines. It's not the only way to accomplish these tasks, but it's a great way to automate the processes. For more information on Azure Data Factory, see the Azure Data Factory documentation.
This data factory will have one pipeline with two activities:
- The first activity will copy the data from Azure Blob storage to the Data Lake Storage Gen 2 storage account to mimic data ingestion.
- The second activity will transform the data in the Spark cluster. The script transforms the data by removing unwanted columns. It also appends a new column that calculates the revenue that a single transaction generates.
To set up your Azure Data Factory pipeline, execute the command below. You should still be at the hdinsight-sales-insights-etl directory.
BLOB_STORAGE_NAME=$(cat resourcesoutputs_storage.json | jq -r '.properties.outputs.blobStorageName.value')
ADLSGEN2STORAGENAME=$(cat resourcesoutputs_storage.json | jq -r '.properties.outputs.adlsGen2StorageName.value')

./scripts/adf.sh $RESOURCE_GROUP $ADLSGEN2STORAGENAME $BLOB_STORAGE_NAME
This script does the following things:
- Creates a service principal with
Storage Blob Data Contributorpermissions on the Data Lake Storage Gen2 storage account. - Obtains an authentication token to authorize POST requests to the Data Lake Storage Gen2 file system REST API.
- Fills in the actual name of your Data Lake Storage Gen2 storage account in the
sparktransform.pyandquery.hqlfiles. - Obtains storage keys for the Data Lake Storage Gen2 and Blob storage accounts.
- Creates another resource deployment to create an Azure Data Factory pipeline, with its associated linked services and activities. It passes the storage keys as parameters to the template file so that the linked services can access the storage accounts correctly.
Run the data pipeline
Trigger the Data Factory activities
The first activity in the Data Factory pipeline that you've created moves the data from Blob storage to Data Lake Storage Gen2. The second activity applies the Spark transformations on the data and saves the transformed .csv files to a new location. The entire pipeline might take a few minutes to finish.
To retrieve the Data Factory name, enter the following command:
cat resourcesoutputs_adf.json | jq -r '.properties.outputs.factoryName.value'
To trigger the pipeline, you can either:
Trigger the Data Factory pipeline in PowerShell. Replace
RESOURCEGROUP, andDataFactoryNamewith the appropriate values, then run the following commands:# If you have multiple subscriptions, set the one to use # Select-AzSubscription -SubscriptionId "<SUBSCRIPTIONID>" $resourceGroup="RESOURCEGROUP" $dataFactory="DataFactoryName" $pipeline =Invoke-AzDataFactoryV2Pipeline ` -ResourceGroupName $resourceGroup ` -DataFactory $dataFactory ` -PipelineName "IngestAndTransform" Get-AzDataFactoryV2PipelineRun ` -ResourceGroupName $resourceGroup ` -DataFactoryName $dataFactory ` -PipelineRunId $pipelineRe-execute
Get-AzDataFactoryV2PipelineRunas needed to monitor progress.Or
Open the data factory and select Author & Monitor. Trigger the
IngestAndTransformpipeline from the portal. For information on triggering pipelines through the portal, see Create on-demand Apache Hadoop clusters in HDInsight using Azure Data Factory.
To verify that the pipeline has run, you can take either of the following steps:
- Go to the Monitor section in your data factory through the portal.
- In Azure Storage Explorer, go to your Data Lake Storage Gen 2 storage account. Go to the
filesfile system, and then go to thetransformedfolder and check its contents to see if the pipeline succeeded.
For other ways to transform data by using HDInsight, see this article on using Jupyter Notebook.
Create a table on the Interactive Query cluster to view data on Power BI
Copy the
query.hqlfile to the LLAP cluster by using SCP. Enter the command:LLAP_CLUSTER_NAME=$(cat resourcesoutputs_remainder.json | jq -r '.properties.outputs.llapClusterName.value') scp scripts/query.hql sshuser@$LLAP_CLUSTER_NAME-ssh.azurehdinsight.net:/home/sshuser/Reminder: The default password is
Thisisapassword1.Use SSH to access the LLAP cluster. Enter the command:
ssh sshuser@$LLAP_CLUSTER_NAME-ssh.azurehdinsight.netUse the following command to run the script:
beeline -u 'jdbc:hive2://localhost:10001/;transportMode=http' -f query.hqlThis script will create a managed table on the Interactive Query cluster that you can access from Power BI.
Create a Power BI dashboard from sales data
Open Power BI Desktop.
From the menu, navigate to Get data > More... > Azure > HDInsight Interactive Query.
Select Connect.
From the HDInsight Interactive Query dialog:
- In the Server text box, enter the name of your LLAP cluster in the format of
https://LLAPCLUSTERNAME.azurehdinsight.net. - In the database text box, enter
default. - Select OK.
- In the Server text box, enter the name of your LLAP cluster in the format of
From the AzureHive dialog:
- In the User name text box, enter
admin. - In the Password text box, enter
Thisisapassword1. - Select Connect.
- In the User name text box, enter
From Navigator, select
sales, and/orsales_rawto preview the data. After the data is loaded, you can experiment with the dashboard that you want to create. See the following links to get started with Power BI dashboards:
Clean up resources
If you're not going to continue to use this application, delete all resources by using the following command so that you aren't charged for them.
To remove the resource group, enter the command:
az group delete -n $RESOURCE_GROUPTo remove the service principal, enter the commands:
SERVICE_PRINCIPAL=$(cat serviceprincipal.json | jq -r '.name')
az ad sp delete --id $SERVICE_PRINCIPAL
Next steps
Feedback
Coming soon: Throughout 2024 we will be phasing out GitHub Issues as the feedback mechanism for content and replacing it with a new feedback system. For more information see: https://aka.ms/ContentUserFeedback.
Submit and view feedback for