Get started with device twins (Java)
Device twins are JSON documents that store device state information, including metadata, configurations, and conditions. IoT Hub persists a device twin for each device that connects to it.
Note
The features described in this article are available only in the standard tier of IoT Hub. For more information about the basic and standard/free IoT Hub tiers, see Choose the right IoT Hub tier for your solution.
Use device twins to:
Store device metadata from your solution back end.
Report current state information such as available capabilities and conditions, for example, the connectivity method used, from your device app.
Synchronize the state of long-running workflows, such as firmware and configuration updates, between a device app and a back-end app.
Query your device metadata, configuration, or state.
Device twins are designed for synchronization and for querying device configurations and conditions. For more information about device twins, including when to use device twins, see Understand device twins.
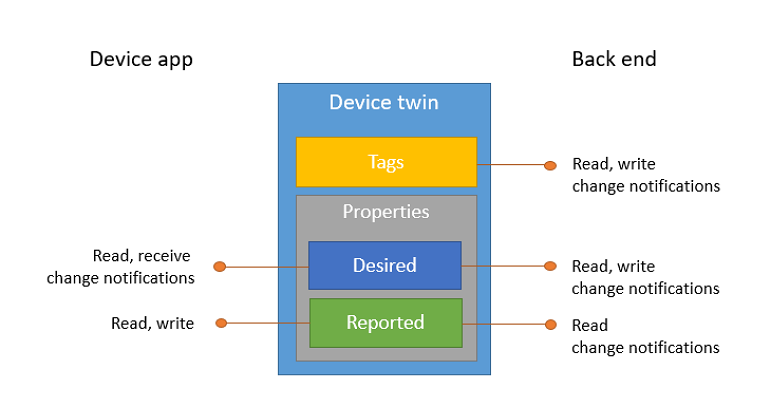
IoT hubs store device twins, which contain the following elements:
Tags. Device metadata accessible only by the solution back end.
Desired properties. JSON objects modifiable by the solution back end and observable by the device app.
Reported properties. JSON objects modifiable by the device app and readable by the solution back end.
Tags and properties can't contain arrays, but can contain nested objects.
The following illustration shows device twin organization:
Additionally, the solution back end can query device twins based on all the above data. For more information about device twins, see Understand device twins. For more information about querying, see IoT Hub query language.
This article shows you how to:
Use a simulated device app to report its connectivity channel as a reported property on the device twin.
Query devices from your back-end app using filters on the tags and properties previously created.
In this article, you create two Java console apps:
- add-tags-query: a back-end app that adds tags and queries device twins.
- simulated-device: a simulated device app that connects to your IoT hub and reports its connectivity condition.
Note
See Azure IoT SDKs for more information about the SDK tools available to build both device and back-end apps.
Prerequisites
An IoT hub. Create one with the CLI or the Azure portal.
A registered device. Register one in the Azure portal.
Java SE Development Kit 8. Make sure you select Java 8 under Long-term support to get to downloads for JDK 8.
Make sure that port 8883 is open in your firewall. The device sample in this article uses MQTT protocol, which communicates over port 8883. This port may be blocked in some corporate and educational network environments. For more information and ways to work around this issue, see Connecting to IoT Hub (MQTT).
Get the IoT hub connection string
In this article, you create a back-end service that adds desired properties to a device twin and then queries the identity registry to find all devices with reported properties that have been updated accordingly. Your service needs the service connect permission to modify desired properties of a device twin, and it needs the registry read permission to query the identity registry. There is no default shared access policy that contains only these two permissions, so you need to create one.
To create a shared access policy that grants service connect and registry read permissions and get a connection string for this policy, follow these steps:
In the Azure portal, select Resource groups. Select the resource group where your hub is located, and then select your hub from the list of resources.
On the left-side pane of your hub, select Shared access policies.
From the top menu above the list of policies, select Add shared policy access policy.
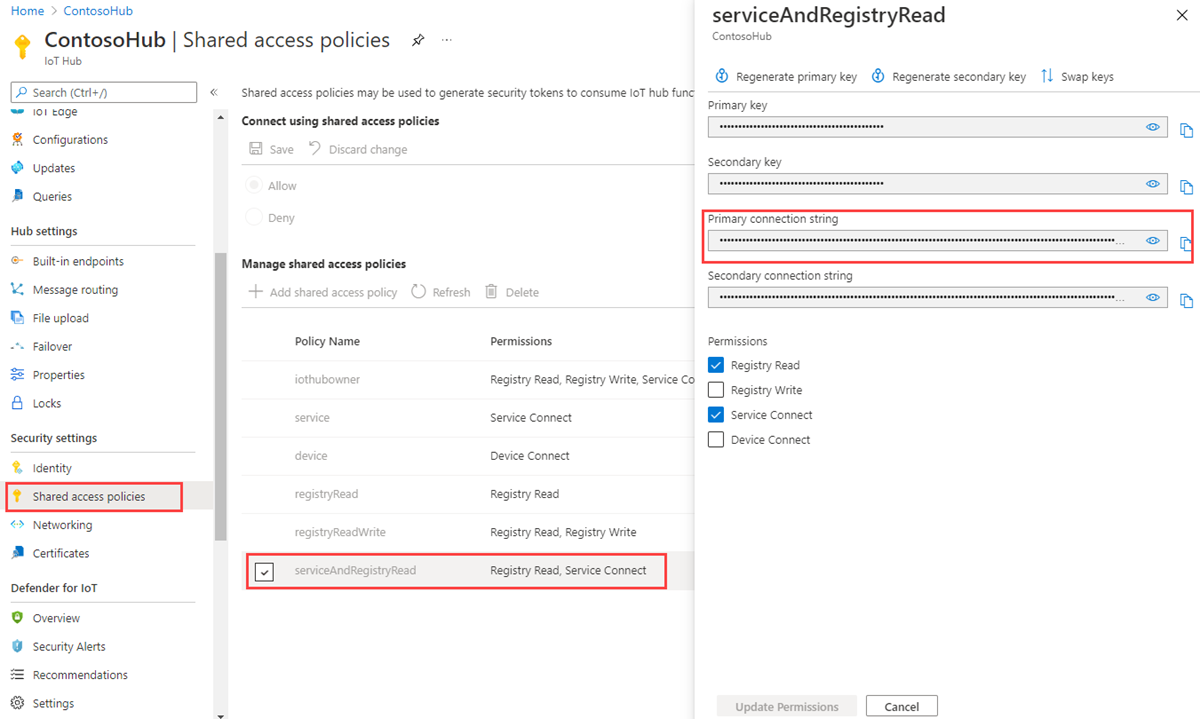
In the Add shared access policy pane on the right, enter a descriptive name for your policy, such as serviceAndRegistryRead. Under Permissions, select Registry Read and Service Connect, and then select Add.

Select your new policy from the list of policies.
Select the copy icon for the Primary connection string and save the value.


For more information about IoT Hub shared access policies and permissions, see Access control and permissions.
Create a device app that updates reported properties
In this section, you create a Java console app that connects to your hub as myDeviceId, and then updates its device twin's reported properties to confirm that it's connected using a cellular network.
In the iot-java-twin-getstarted folder, create a Maven project named simulated-device using the following command at your command prompt:
mvn archetype:generate -DgroupId=com.mycompany.app -DartifactId=simulated-device -DarchetypeArtifactId=maven-archetype-quickstart -DinteractiveMode=falseAt your command prompt, navigate to the simulated-device folder.
Using a text editor, open the pom.xml file in the simulated-device folder and add the following dependencies to the dependencies node. This dependency enables you to use the iot-device-client package in your app to communicate with your IoT hub.
<dependency>
  <groupId>com.microsoft.azure.sdk.iot</groupId>
  <artifactId>iot-device-client</artifactId>
  <version>1.17.5</version>
</dependency>
Note
You can check for the latest version of iot-device-client using Maven search.
Add the following dependency to the dependencies node. This dependency configures a NOP for the Apache SLF4J logging facade, which is used by the device client SDK to implement logging. This configuration is optional, but, if you omit it, you may see a warning in the console when you run the app. For more information about logging in the device client SDK, see Logging in the Samples for the Azure IoT device SDK for Java readme file.
<dependency>
  <groupId>org.slf4j</groupId>
  <artifactId>slf4j-nop</artifactId>
  <version>1.7.28</version>
</dependency>
Add the following build node after the dependencies node. This configuration instructs Maven to use Java 1.8 to build the app:
<build>
  <plugins>
    <plugin>
      <groupId>org.apache.maven.plugins</groupId>
      <artifactId>maven-compiler-plugin</artifactId>
      <version>3.3</version>
      <configuration>
        <source>1.8</source>
        <target>1.8</target>
      </configuration>
    </plugin>
  </plugins>
</build>
Save and close the pom.xml file.
Using a text editor, open the simulated-device\src\main\java\com\mycompany\app\App.java file.
Add the following import statements to the file:
import com.microsoft.azure.sdk.iot.device.*;
import com.microsoft.azure.sdk.iot.device.DeviceTwin.*;

import java.io.IOException;
import java.net.URISyntaxException;
import java.util.Scanner;
Add the following class-level variables to the App class. Replace
{yourdeviceconnectionstring}with the device connection string you saw when you registered a device in the IoT Hub:private static String connString = "{yourdeviceconnectionstring}"; private static IotHubClientProtocol protocol = IotHubClientProtocol.MQTT; private static String deviceId = "myDeviceId";This sample app uses the protocol variable when it instantiates a DeviceClient object.
Add the following method to the App class to print information about twin updates:
protected static class DeviceTwinStatusCallBack implements IotHubEventCallback {
    @Override
    public void execute(IotHubStatusCode status, Object context) {
      System.out.println("IoT Hub responded to device twin operation with status " + status.name());
    }
  }
Replace the code in the main method with the following code to:
Create a device client to communicate with IoT Hub.
Create a Device object to store the device twin properties.
DeviceClient client = new DeviceClient(connString, protocol);

// Create a Device object to store the device twin properties
Device dataCollector = new Device() {
  // Print details when a property value changes
  @Override
  public void PropertyCall(String propertyKey, Object propertyValue, Object context) {
    System.out.println(propertyKey + " changed to " + propertyValue);
  }
};
Add the following code to the main method to create a connectivityType reported property and send it to IoT Hub:
try {
  // Open the DeviceClient and start the device twin services.
  client.open();
  client.startDeviceTwin(new DeviceTwinStatusCallBack(), null, dataCollector, null);

  // Create a reported property and send it to your IoT hub.
  dataCollector.setReportedProp(new Property("connectivityType", "cellular"));
  client.sendReportedProperties(dataCollector.getReportedProp());
}
catch (Exception e) {
  System.out.println("On exception, shutting down \n" + " Cause: " + e.getCause() + " \n" + e.getMessage());
  dataCollector.clean();
  client.closeNow();
  System.out.println("Shutting down...");
}
Add the following code to the end of the main method. Waiting for the Enter key allows time for IoT Hub to report the status of the device twin operations.
System.out.println("Press any key to exit...");

Scanner scanner = new Scanner(System.in);
scanner.nextLine();

dataCollector.clean();
client.close();
Modify the signature of the main method to include the exceptions as follows:
public static void main(String[] args) throws URISyntaxException, IOExceptionSave and close the simulated-device\src\main\java\com\mycompany\app\App.java file.
Build the simulated-device app and correct any errors. At your command prompt, navigate to the simulated-device folder and run the following command:
mvn clean package -DskipTests
Create a service app that updates desired properties and queries twins
In this section, you create a Java app that adds location metadata as a tag to the device twin in IoT Hub associated with myDeviceId. The app queries IoT hub for devices located in the US and then queries devices that report a cellular network connection.
On your development machine, create an empty folder named iot-java-twin-getstarted.
In the iot-java-twin-getstarted folder, create a Maven project named add-tags-query using the following command at your command prompt:
mvn archetype:generate -DgroupId=com.mycompany.app -DartifactId=add-tags-query -DarchetypeArtifactId=maven-archetype-quickstart -DinteractiveMode=falseAt your command prompt, navigate to the add-tags-query folder.
Using a text editor, open the pom.xml file in the add-tags-query folder and add the following dependency to the dependencies node. This dependency enables you to use the iot-service-client package in your app to communicate with your IoT hub:
<dependency>
  <groupId>com.microsoft.azure.sdk.iot</groupId>
  <artifactId>iot-service-client</artifactId>
  <version>1.17.1</version>
  <type>jar</type>
</dependency>
Note
You can check for the latest version of iot-service-client using Maven search.
Add the following build node after the dependencies node. This configuration instructs Maven to use Java 1.8 to build the app.
<build>
  <plugins>
    <plugin>
      <groupId>org.apache.maven.plugins</groupId>
      <artifactId>maven-compiler-plugin</artifactId>
      <version>3.3</version>
      <configuration>
        <source>1.8</source>
        <target>1.8</target>
      </configuration>
    </plugin>
  </plugins>
</build>
Save and close the pom.xml file.
Using a text editor, open the add-tags-query\src\main\java\com\mycompany\app\App.java file.
Add the following import statements to the file:
import com.microsoft.azure.sdk.iot.service.devicetwin.*;
import com.microsoft.azure.sdk.iot.service.exceptions.IotHubException;

import java.io.IOException;
import java.util.HashSet;
import java.util.Set;
Add the following class-level variables to the App class. Replace
{youriothubconnectionstring}with the IoT hub connection string you copied in Get the IoT hub connection string.public static final String iotHubConnectionString = "{youriothubconnectionstring}"; public static final String deviceId = "myDeviceId"; public static final String region = "US"; public static final String plant = "Redmond43";Update the main method signature to include the following
throwsclause:public static void main( String[] args ) throws IOExceptionReplace the code in the main method with the following code to create the DeviceTwin and DeviceTwinDevice objects. The DeviceTwin object handles the communication with your IoT hub. The DeviceTwinDevice object represents the device twin with its properties and tags:
// Get the DeviceTwin and DeviceTwinDevice objects
DeviceTwin twinClient = DeviceTwin.createFromConnectionString(iotHubConnectionString);
DeviceTwinDevice device = new DeviceTwinDevice(deviceId);
Add the following
try/catchblock to the main method:try { // Code goes here } catch (IotHubException e) { System.out.println(e.getMessage()); } catch (IOException e) { System.out.println(e.getMessage()); }To update the region and plant device twin tags in your device twin, add the following code in the
tryblock:// Get the device twin from IoT Hub System.out.println("Device twin before update:"); twinClient.getTwin(device); System.out.println(device); // Update device twin tags if they are different // from the existing values String currentTags = device.tagsToString(); if ((!currentTags.contains("region=" + region) && !currentTags.contains("plant=" + plant))) { // Create the tags and attach them to the DeviceTwinDevice object Set<Pair> tags = new HashSet<Pair>(); tags.add(new Pair("region", region)); tags.add(new Pair("plant", plant)); device.setTags(tags); // Update the device twin in IoT Hub System.out.println("Updating device twin"); twinClient.updateTwin(device); } // Retrieve the device twin with the tag values from IoT Hub System.out.println("Device twin after update:"); twinClient.getTwin(device); System.out.println(device);To query the device twins in IoT hub, add the following code to the
tryblock after the code you added in the previous step. The code runs two queries. Each query returns a maximum of 100 devices.// Query the device twins in IoT Hub System.out.println("Devices in Redmond:"); // Construct the query SqlQuery sqlQuery = SqlQuery.createSqlQuery("*", SqlQuery.FromType.DEVICES, "tags.plant='Redmond43'", null); // Run the query, returning a maximum of 100 devices Query twinQuery = twinClient.queryTwin(sqlQuery.getQuery(), 100); while (twinClient.hasNextDeviceTwin(twinQuery)) { DeviceTwinDevice d = twinClient.getNextDeviceTwin(twinQuery); System.out.println(d.getDeviceId()); } System.out.println("Devices in Redmond using a cellular network:"); // Construct the query sqlQuery = SqlQuery.createSqlQuery("*", SqlQuery.FromType.DEVICES, "tags.plant='Redmond43' AND properties.reported.connectivityType = 'cellular'", null); // Run the query, returning a maximum of 100 devices twinQuery = twinClient.queryTwin(sqlQuery.getQuery(), 3); while (twinClient.hasNextDeviceTwin(twinQuery)) { DeviceTwinDevice d = twinClient.getNextDeviceTwin(twinQuery); System.out.println(d.getDeviceId()); }Save and close the add-tags-query\src\main\java\com\mycompany\app\App.java file
Build the add-tags-query app and correct any errors. At your command prompt, navigate to the add-tags-query folder and run the following command:
mvn clean package -DskipTests
Run the apps
You are now ready to run the console apps.
At a command prompt in the add-tags-query folder, run the following command to run the add-tags-query service app:
mvn exec:java -Dexec.mainClass="com.mycompany.app.App"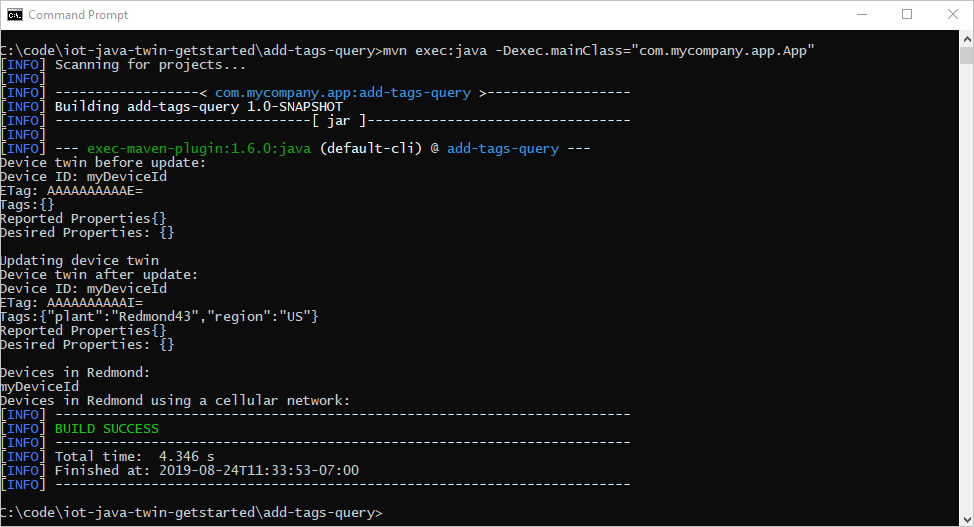
You can see the plant and region tags added to the device twin. The first query returns your device, but the second does not.
At a command prompt in the simulated-device folder, run the following command to add the connectivityType reported property to the device twin:
mvn exec:java -Dexec.mainClass="com.mycompany.app.App"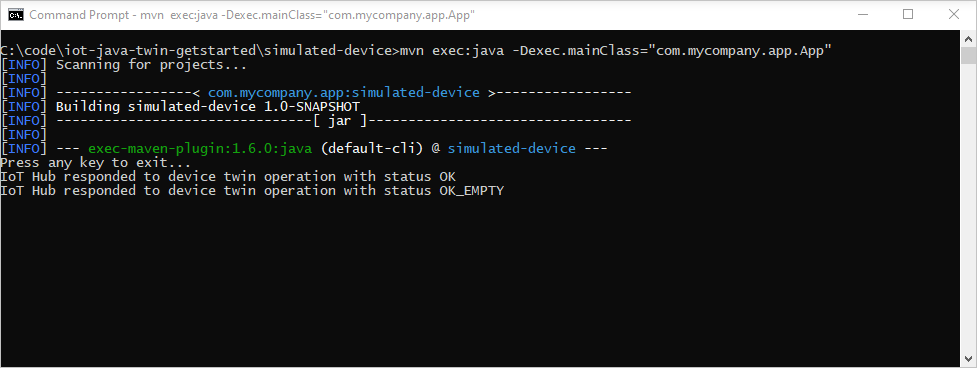
At a command prompt in the add-tags-query folder, run the following command to run the add-tags-query service app a second time:
mvn exec:java -Dexec.mainClass="com.mycompany.app.App"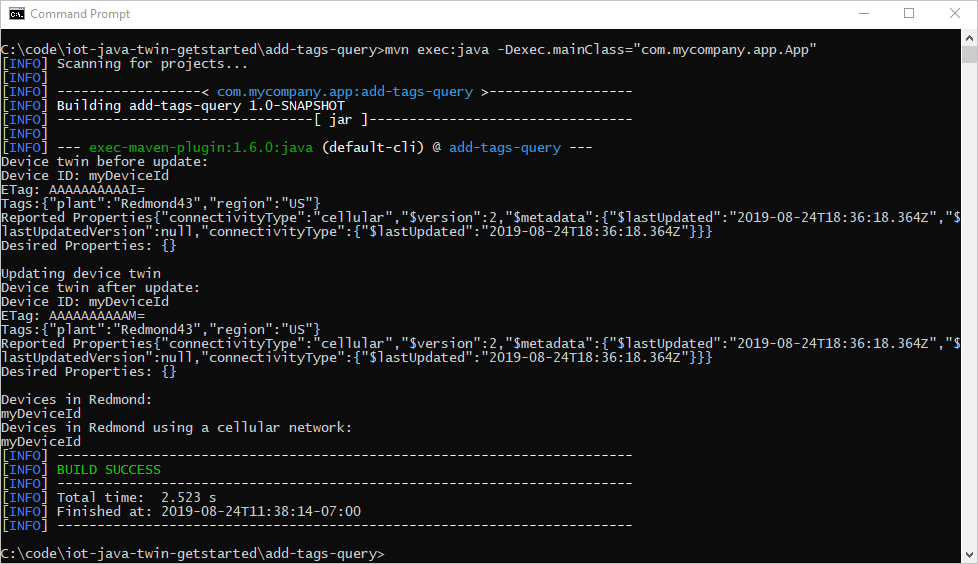
Now that your device has sent the connectivityType property to IoT Hub, the second query returns your device.
In this article, you:
- Added device metadata as tags from a back-end app
- Reported device connectivity information in the device twin
- Queried the device twin information, using SQL-like IoT Hub query language
Next steps
To learn how to:
Send telemetry from devices, see Quickstart: Send telemetry from an IoT Plug and Play device to Azure IoT Hub
Configure devices using device twin's desired properties, see Tutorial: Configure your devices from a back-end service
Control devices interactively, such as turning on a fan from a user-controlled app, see Quickstart: Control a device connected to an IoT hub
Feedback
Coming soon: Throughout 2024 we will be phasing out GitHub Issues as the feedback mechanism for content and replacing it with a new feedback system. For more information see: https://aka.ms/ContentUserFeedback.
Submit and view feedback for