Send cloud-to-device messages with IoT Hub (Node.js)
Azure IoT Hub is a fully managed service that helps enable reliable and secure bi-directional communications between millions of devices and a solution back end.
This article shows you how to:
Send cloud-to-device (C2D) messages from your solution backend to a single device through IoT Hub
Receive cloud-to-device messages on a device
Request delivery acknowledgment (feedback), from your solution backend, for messages sent to a device from IoT Hub
Note
The features described in this article are available only in the standard tier of IoT Hub. For more information about the basic and standard/free IoT Hub tiers, see Choose the right IoT Hub tier for your solution.
At the end of this article, you run two Node.js console apps:
simple_sample_device: a sample device app included with the Microsoft Azure IoT SDK for Node.js, which connects to your IoT hub and receives cloud-to-device messages.
SendCloudToDevice: a service app that sends a cloud-to-device message to the device app through IoT Hub and then receives its delivery acknowledgment.
Note
IoT Hub has SDK support for many device platforms and languages (C, Java, Python, and JavaScript) through the Azure IoT device SDKs.
To learn more about cloud-to-device messages, see Send cloud-to-device messages from an IoT hub.
Prerequisites
An Azure subscription. If you don't have an Azure subscription, create a free account before you begin.
An IoT hub in your Azure subscription. If you don't have a hub yet, you can follow the steps in Create an IoT hub.
A device registered in your IoT hub. If you haven't registered a device yet, register one in the Azure portal.
This article uses sample code from the Azure IoT SDK for Node.js.
- Download or clone the SDK repository from GitHub to your development machine.
- Make sure that Node.js version 10.0.x or greater is installed on your development machine. Prepare your development environment describes how to install Node.js for this article on either Windows or Linux.
Make sure that port 8883 is open in your firewall. The device sample in this article uses MQTT protocol, which communicates over port 8883. This port may be blocked in some corporate and educational network environments. For more information and ways to work around this issue, see Connecting to IoT Hub (MQTT).
Get the device connection string
In this article, you run a sample app that simulates a device, which receives cloud-to-device messages sent through your IoT Hub. The simple_sample_device sample app included with the Microsoft Azure IoT SDK for Node.js connects to your IoT hub and acts as your simulated device. The sample uses the primary connection string of the registered device on your IoT hub.
To get the primary connection string for a device registered to your IoT hub, follow these steps:
In the Azure portal, select Resource groups. Select the resource group where your hub is located, and then select your hub from the list of resources.
On the left-side pane of your IoT hub, under Device Management, select Devices.
From the list of devices, select the appropriate device.
Copy the Primary connection string and save the value.


Receive messages in the device app
In this section, run the simple_sample_device sample device app to receive C2D messages sent through your IoT hub. Open a new command prompt and navigate to the azure-iot-sdk-node\device\samples\javascript folder, under the folder where you expanded the Azure IoT Node.js SDK. Run the following commands, replacing the {Your device connection string} placeholder value with the device connection string you copied from the registered device in your IoT hub.
set IOTHUB_DEVICE_CONNECTION_STRING={Your device connection string}
node simple_sample_device.js
The following output is from the sample device app after it successfully starts and connects to your IoT hub:
Client connected
Client connected
Client connected
Sending message: {"deviceId":"myFirstDevice","windSpeed":10.949952400617569,"temperature":26.0096515658525,"humidity":72.59398225838534}
Client connected
Client connected
send status: MessageEnqueued
Sending message: {"deviceId":"myFirstDevice","windSpeed":12.917649160180087,"temperature":27.336831253904613,"humidity":77.37300365434534}
In this example, the device invokes the complete function to notify IoT Hub that it has processed the message and that it can safely be removed from the device queue. The call to complete isn't required if you're using MQTT transport and can be omitted. It's required for AMQP and HTTPS.
With AMQP and HTTPS, but not MQTT, the device can also:
- Abandon a message, which results in IoT Hub retaining the message in the device queue for future consumption.
- Reject a message, which permanently removes the message from the device queue.
If something happens that prevents the device from completing, abandoning, or rejecting the message, IoT Hub will, after a fixed timeout period, queue the message for delivery again. For this reason, the message processing logic in the device app must be idempotent, so that receiving the same message multiple times produces the same result.
For more information about the cloud-to-device message lifecycle and how IoT Hub processes cloud-to-device messages, see Send cloud-to-device messages from an IoT hub.
Note
If you use HTTPS instead of MQTT or AMQP as the transport, the Client instance checks for messages from IoT Hub infrequently (a minimum of every 25 minutes). For more information about the differences between MQTT, AMQP, and HTTPS support, see Cloud-to-device communications guidance and Choose a communication protocol.
Get the IoT hub connection string
In this article, you create a backend service to send cloud-to-device messages through your IoT Hub. To send cloud-to-device messages, your service needs the service connect permission. By default, every IoT Hub is created with a shared access policy named service that grants this permission.
To get the IoT Hub connection string for the service policy, follow these steps:
In the Azure portal, select Resource groups. Select the resource group where your hub is located, and then select your hub from the list of resources.
On the left-side pane of your IoT hub, select Shared access policies.
From the list of policies, select the service policy.
Copy the Primary connection string and save the value.

For more information about IoT Hub shared access policies and permissions, see Access control and permissions.
Send a cloud-to-device message
In this section, you create a Node.js console app that sends cloud-to-device messages to the simulated device app. You need the device ID from your device and your IoT hub connection string.
Create an empty folder called sendcloudtodevicemessage. Open a command prompt, navigate to the sendcloudtodevicemessage folder, and then run the following command to create a
package.jsonfile in that folder. Press Enter at each prompt presented by thenpmcommand to accept the default for that prompt:npm initAt your command prompt in the sendcloudtodevicemessage folder, run the following command to install the azure-iothub package:
npm install azure-iothub --saveUsing a text editor, create a SendCloudToDeviceMessage.js file in the sendcloudtodevicemessage folder.
Add the following
requirestatements at the start of the SendCloudToDeviceMessage.js file:'use strict'; var Client = require('azure-iothub').Client; var Message = require('azure-iot-common').Message;Add the following code to SendCloudToDeviceMessage.js file. Replace the "{iot hub connection string}" and "{device ID}" placeholder values with the IoT hub connection string and device ID you noted previously:
var connectionString = '{iot hub connection string}';
var targetDevice = '{device id}';

var serviceClient = Client.fromConnectionString(connectionString);
Add the following function to print operation results to the console:
function printResultFor(op) {
  return function printResult(err, res) {
    if (err) console.log(op + ' error: ' + err.toString());
    if (res) console.log(op + ' status: ' + res.constructor.name);
  };
}
Add the following function to print delivery feedback messages to the console:
function receiveFeedback(err, receiver){
  receiver.on('message', function (msg) {
    console.log('Feedback message:')
    console.log(msg.getData().toString('utf-8'));
  });
}
Add the following code to send a message to your device and handle the feedback message when the device acknowledges the cloud-to-device message:
serviceClient.open(function (err) {
  if (err) {
    console.error('Could not connect: ' + err.message);
  } else {
    console.log('Service client connected');
    serviceClient.getFeedbackReceiver(receiveFeedback);
    var message = new Message('Cloud to device message.');
    message.ack = 'full';
    message.messageId = "My Message ID";
    console.log('Sending message: ' + message.getData());
    serviceClient.send(targetDevice, message, printResultFor('send'));
  }
});
Save and close SendCloudToDeviceMessage.js file.
Run the applications
You're now ready to run the applications.
At the command prompt in the azure-iot-sdk-node\device\samples\javascript folder, run the following command to send telemetry to IoT Hub and to listen for cloud-to-device messages:
node simple_sample_device.js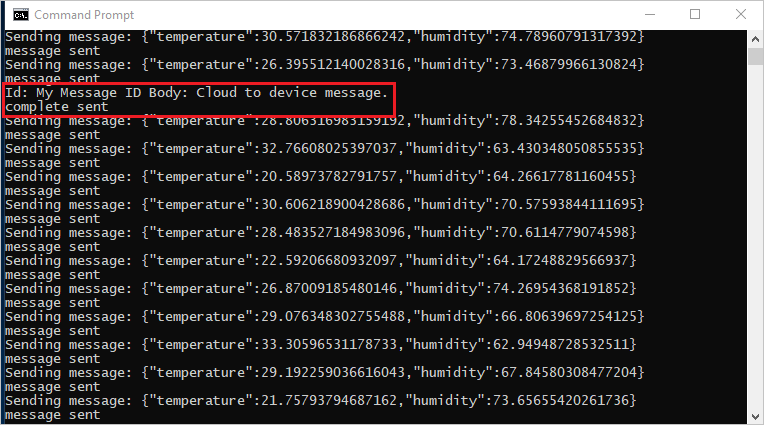
At a command prompt in the sendcloudtodevicemessage folder, run the following command to send a cloud-to-device message and wait for the acknowledgment feedback:
node SendCloudToDeviceMessage.js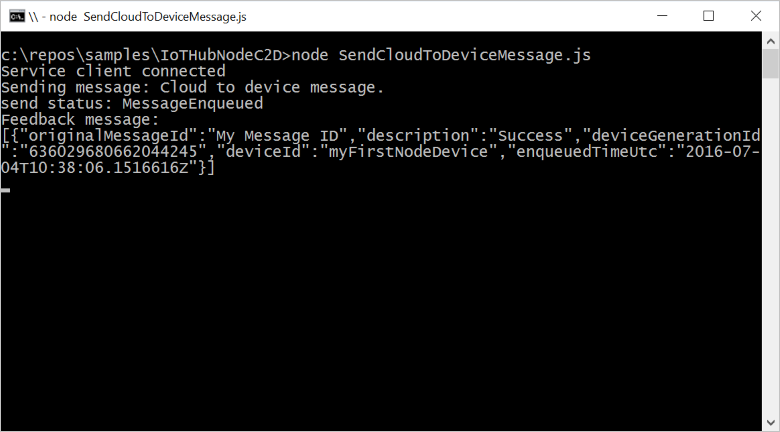
Note
For simplicity, this article does not implement any retry policy. In production code, you should implement retry policies (such as exponential backoff), as suggested in the article, Transient Fault Handling.
Next steps
In this article, you learned how to send and receive cloud-to-device messages.
To learn more about cloud-to-device messages, see Send cloud-to-device messages from an IoT hub.
To learn more about IoT Hub message formats, see Create and read IoT Hub messages.
Feedback
Coming soon: Throughout 2024 we will be phasing out GitHub Issues as the feedback mechanism for content and replacing it with a new feedback system. For more information see: https://aka.ms/ContentUserFeedback.
Submit and view feedback for