Create custom APIs you can call from Azure Logic Apps
Applies to: Azure Logic Apps (Consumption)
Although Azure Logic Apps offers hundreds of connectors that you can use in logic app workflows, you might want to call APIs, systems, and services that aren't available as connectors. You can create your own APIs that provide actions and triggers to use in workflows. Here are other reasons why you might want to create your own APIs that you can call from workflows:
- Extend your current system integration and data integration workflows.
- Help customers use your service to manage professional or personal tasks.
- Expand the reach, discoverability, and use for your service.
Basically, connectors are web APIs that use REST for pluggable interfaces, Swagger metadata format for documentation, and JSON as their data exchange format. Because connectors are REST APIs that communicate through HTTP endpoints, you can use any language to build connectors, such as .NET, Java, Python, or Node.js. You can also host your APIs on Azure App Service, a platform-as-a-service (PaaS) offering that provides one of the best, easiest, and most scalable ways for API hosting.
For custom APIs to work with logic app workflow, your API can provide actions that perform specific tasks in workflows. Your API can also act as a trigger that starts a workflow run when new data or an event meets a specified condition. This topic describes common patterns that you can follow for building actions and triggers in your API, based on the behavior that you want your API to provide.
You can host your APIs on Azure App Service, a platform-as-a-service (PaaS) offering that provides highly scalable, easy API hosting.
Tip
Although you can deploy your APIs as web apps, consider deploying your APIs as API apps, which can make your job easier when you build, host, and consume APIs in the cloud and on premises. You don't have to change any code in your APIs--just deploy your code to an API app. For example, learn how to build API apps created with these languages:
How do custom APIs differ from custom connectors?
Custom APIs and custom connectors are web APIs that use REST for pluggable interfaces, Swagger metadata format for documentation, and JSON as their data exchange format. And because these APIs and connectors are REST APIs that communicate through HTTP endpoints, you can use any language, like .NET, Java, Python, or Node.js, for building custom APIs and connectors.
Custom APIs let you call APIs that aren't connectors, and provide endpoints that you can call with HTTP + Swagger, Azure API Management, or App Services. Custom connectors work like custom APIs but also have these attributes:
- Registered as Logic Apps Connector resources in Azure.
- Appear with icons alongside Microsoft-managed connectors in the Logic Apps Designer.
- Available only to the connectors' authors and logic app resource users who have the same Microsoft Entra tenant and Azure subscription in the region where the logic apps are deployed.
You can also nominate registered connectors for Microsoft certification. This process verifies that registered connectors meet the criteria for public use and makes those connectors available for users in Power Automate and Microsoft Power Apps.
For more information, review the following documentation:
- Custom connectors overview
- Create custom connectors from Web APIs
- Register custom connectors in Azure Logic Apps
Helpful tools
A custom API works best with logic apps when the API also has a Swagger document that describes the API's operations and parameters. Many libraries, like Swashbuckle, can automatically generate the Swagger file for you. To annotate the Swagger file for display names, property types, and so on, you can also use TRex so that your Swagger file works well with logic apps.
Action patterns
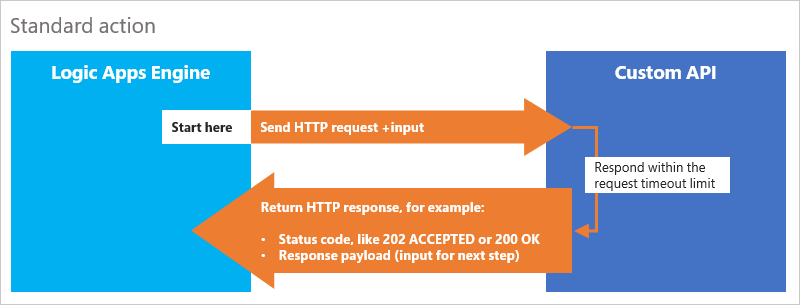
For logic apps to perform tasks, your custom API should provide actions. Each operation in your API maps to an action. A basic action is a controller that accepts HTTP requests and returns HTTP responses. So for example, a workflow sends an HTTP request to your web app or API app. Your app then returns an HTTP response, along with content that the workflow can process.
For a standard action, you can write an HTTP request method in your API and describe that method in a Swagger file. You can then call your API directly with an HTTP action or an HTTP + Swagger action. By default, responses must be returned within the request timeout limit.
To make a workflow wait while your API finishes longer-running tasks, your API can follow the asynchronous polling pattern or the asynchronous webhook pattern described in this topic. For an analogy that helps you visualize these patterns' different behaviors, imagine the process for ordering a custom cake from a bakery. The polling pattern mirrors the behavior where you call the bakery every 20 minutes to check whether the cake is ready. The webhook pattern mirrors the behavior where the bakery asks you for your phone number so they can call you when the cake is ready.
Perform long-running tasks with the polling action pattern
To have your API perform tasks that could run longer than the request timeout limit, you can use the asynchronous polling pattern. This pattern has your API do work in a separate thread, but keep an active connection to the Azure Logic Apps engine. That way, the workflow doesn't time out or continue with the next step in the workflow before your API finishes working.
Here's the general pattern:
- Make sure that the engine knows that your API accepted the request and started working.
- When the engine makes subsequent requests for job status, let the engine know when your API finishes the task.
- Return relevant data to the engine so that the workflow can continue.
Now apply the previous bakery analogy to the polling pattern, and imagine that you call a bakery and order a custom cake for delivery. The process for making the cake takes time, and you don't want to wait on the phone while the bakery works on the cake. The bakery confirms your order and has you call every 20 minutes for the cake's status. After 20 minutes pass, you call the bakery, but they tell you that your cake isn't done and that you should call in another 20 minutes. This back-and-forth process continues until you call, and the bakery tells you that your order is ready and delivers your cake.
So let's map this polling pattern back. The bakery represents your custom API, while you, the cake customer, represent the Azure Logic Apps engine. When the engine calls your API with a request, your API confirms the request and responds with the time interval when the engine can check job status. The engine continues checking job status until your API responds that the job is done and returns data to your logic app, which then continues workflow.
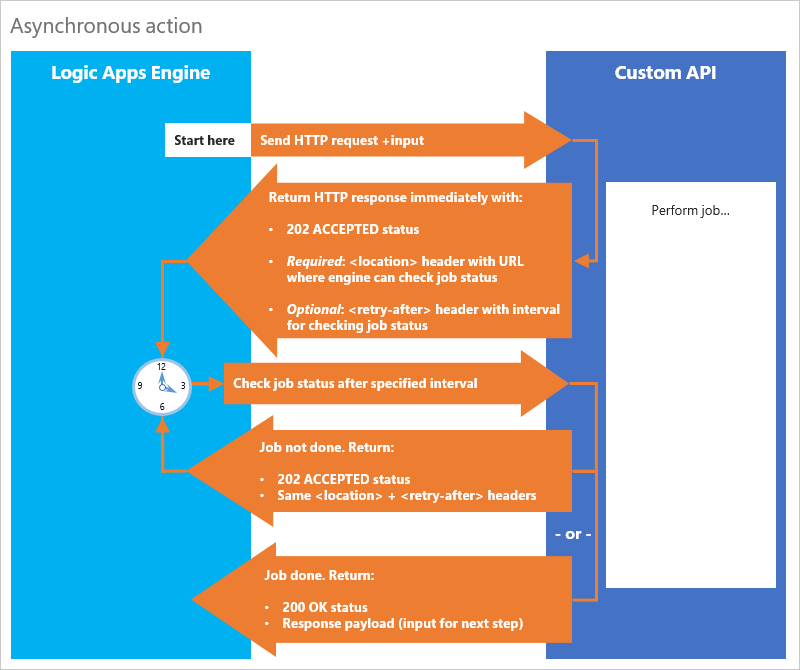
Here are the specific steps for your API to follow, described from the API's perspective:
When your API gets an HTTP request to start work, immediately return an HTTP
202 ACCEPTEDresponse with thelocationheader described later in this step. This response lets the Azure Logic Apps engine know that your API got the request, accepted the request payload (data input), and is now processing.The
202 ACCEPTEDresponse should include these headers:Required: A
locationheader that specifies the absolute path to a URL where the Azure Logic Apps engine can check your API's job statusOptional: A
retry-afterheader that specifies the number of seconds that the engine should wait before checking thelocationURL for job status.By default, the engine polls the
locationURL after one second. To specify a different interval, include theretry-afterheader and the number of seconds until the next poll.
After the specified time passes, the Azure Logic Apps engine polls the
locationURL to check job status. Your API should perform these checks and return these responses:If the job is done, return an HTTP
200 OKresponse, along with the response payload (input for the next step).If the job is still processing, return another HTTP
202 ACCEPTEDresponse, but with the same headers as the original response.
When your API follows this pattern, you don't have to do anything in the
workflow definition to continue checking job status.
When the engine gets an HTTP 202 ACCEPTED response and a
valid location header, the engine respects the asynchronous pattern,
and checks the location header until your API returns a non-202 response.
Tip
For an example asynchronous pattern, review this asynchronous controller response sample in GitHub.
Perform long-running tasks with the webhook action pattern
As an alternative, you can use the webhook pattern for long-running tasks and asynchronous processing. This pattern pauses the workflow and waits for a "callback" from your API to finish processing before continuing workflow. This callback is an HTTP POST that sends a message to a URL when an event happens.
Now apply the previous bakery analogy to the webhook pattern, and imagine that you call a bakery and order a custom cake for delivery. The process for making the cake takes time, and you don't want to wait on the phone while the bakery works on the cake. The bakery confirms your order, but this time, you give them your phone number so they can call you when the cake is done. This time, the bakery tells you when your order is ready and delivers your cake.
When we map this webhook pattern back, the bakery represents your custom API, while you, the cake customer, represent the Azure Logic Apps engine. The engine calls your API with a request and includes a "callback" URL. When the job is done, your API uses the URL to notify the engine and return data to your logic app, which then continues workflow.
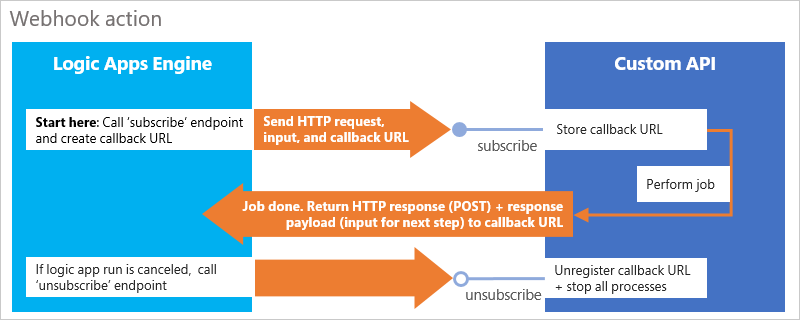
For this pattern, set up two endpoints on your controller: subscribe and unsubscribe
subscribeendpoint: When execution reaches your API's action in the workflow, the Azure Logic Apps engine calls thesubscribeendpoint. This step causes the workflow to create a callback URL that your API stores and then wait for the callback from your API when work is complete. Your API then calls back with an HTTP POST to the URL and passes any returned content and headers as input to the logic app.unsubscribeendpoint: If the workflow run is canceled, the Azure Logic Apps engine calls theunsubscribeendpoint. Your API can then unregister the callback URL and stop any processes as necessary.
Currently, the workflow designer doesn't support discovering webhook endpoints through Swagger. So for this pattern, you have to add a Webhook action and specify the URL, headers, and body for your request. See also Workflow actions and triggers. For an example webhook pattern, review this webhook trigger sample in GitHub.
Here are some other tips and notes:
To pass in the callback URL, you can use the
@listCallbackUrl()workflow function in any of the previous fields as necessary.If you own both the logic app resource and the subscribed service, you don't have to call the
unsubscribeendpoint after the callback URL is called. Otherwise, the Azure Logic Apps runtime needs to call theunsubscribeendpoint to signal that no more calls are expected and to allow resource cleanup on the server side.
Trigger patterns
Your custom API can act as a trigger that starts a workflow run when new data or an event meets a specified condition. This trigger can either check regularly, or wait and listen, for new data or events at your service endpoint. If new data or an event meets the specified condition, the trigger fires and starts the logic app, which is listening to that trigger. To start logic apps this way, your API can follow the polling trigger or the webhook trigger pattern. These patterns are similar to their counterparts for polling actions and webhook actions. Also, learn more about usage metering for triggers.
Check for new data or events regularly with the polling trigger pattern
A polling trigger acts much like the polling action previously described in this topic. The Azure Logic Apps engine periodically calls and checks the trigger endpoint for new data or events. If the engine finds new data or an event that meets your specified condition, the trigger fires. Then, the engine creates a workflow instance that processes the data as input.
Note
Each polling request counts as an action execution, even when no workflow instance is created. To prevent processing the same data multiple times, your trigger should clean up data that was already read and passed to the logic app.
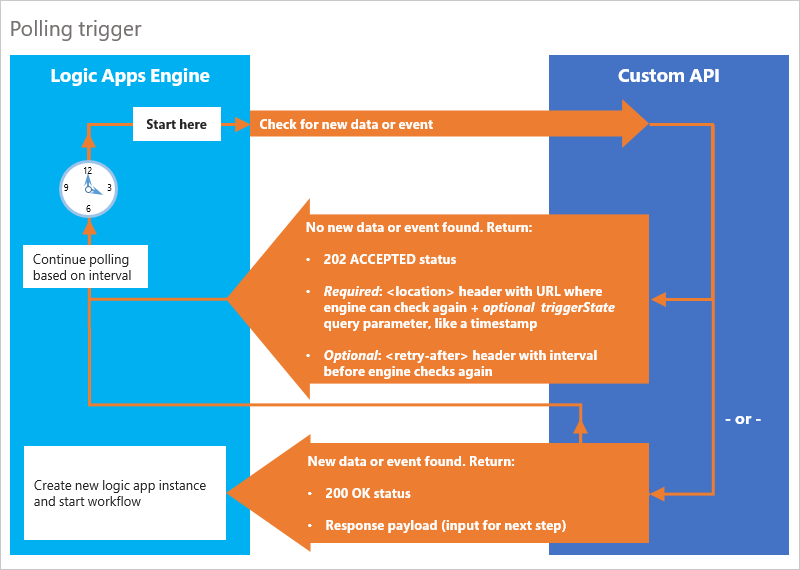
Here are specific steps for a polling trigger, described from the API's perspective:
| Found new data or event? | API response |
|---|---|
| Found | Return an HTTP 200 OK status with the response payload (input for next step). This response creates a workflow instance and starts the workflow. |
| Not found | Return an HTTP 202 ACCEPTED status with a location header and a retry-after header. For triggers, the location header should also contain a triggerState query parameter, which is usually a "timestamp." Your API can use this identifier to track the last time that the workflow was triggered. |
For example, to periodically check your service for new files, you might build a polling trigger that has these behaviors:
Request includes triggerState? |
API response |
|---|---|
| No | Return an HTTP 202 ACCEPTED status plus a location header with triggerState set to the current time and the retry-after interval to 15 seconds. |
| Yes | Check your service for files added after the DateTime for triggerState. |
| Number of files found | API response |
|---|---|
| Single file | Return an HTTP 200 OK status and the content payload, update triggerState to the DateTime for the returned file, and set retry-after interval to 15 seconds. |
| Multiple files | Return one file at a time and an HTTP 200 OK status, update triggerState, and set the retry-after interval to 0 seconds. These steps let the engine know that more data is available, and that the engine should immediately request the data from the URL in the location header. |
| No files | Return an HTTP 202 ACCEPTED status, don't change triggerState, and set the retry-after interval to 15 seconds. |
Tip
For an example polling trigger pattern, review this poll trigger controller sample in GitHub.
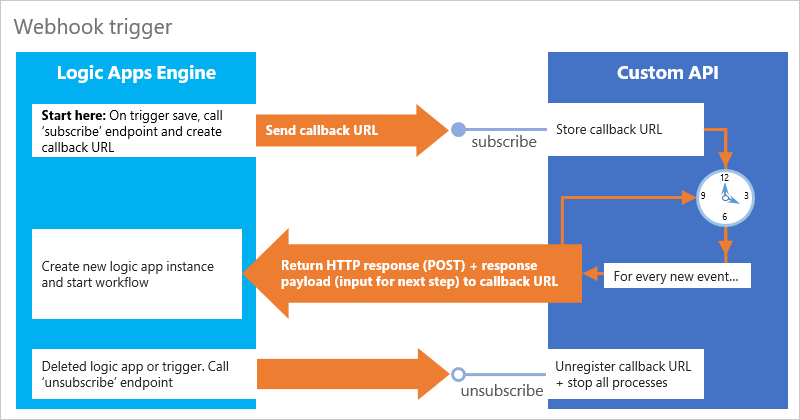
Wait and listen for new data or events with the webhook trigger pattern
A webhook trigger is a push trigger that waits and listens for new data or
events at your service endpoint. If new data or an event meets the specified condition,
the trigger fires and creates a workflow instance, which then processes the data as input.
Webhook triggers act much like the webhook actions previously
described in this topic, and are set up with subscribe and unsubscribe endpoints.
subscribeendpoint: When you add and save a webhook trigger in your logic app, the Azure Logic Apps engine calls thesubscribeendpoint. This step causes the workflow to create a callback URL that your API stores. When there's new data or an event that meets the specified condition, your API calls back with an HTTP POST to the URL. The content payload and headers pass as input to the logic app.unsubscribeendpoint: If the webhook trigger or entire logic app resource is deleted, the Azure Logic Apps engine calls theunsubscribeendpoint. Your API can then unregister the callback URL and stop any processes as necessary.
Currently, the workflow designer doesn't support discovering webhook endpoints through Swagger. So for this pattern, you have to add a Webhook trigger and specify the URL, headers, and body for your request. See also HTTPWebhook trigger. For an example webhook pattern, review this webhook trigger controller sample in GitHub.
Here are some other tips and notes:
To pass in the callback URL, you can use the
@listCallbackUrl()workflow function in any of the previous fields as necessary.To prevent processing the same data multiple times, your trigger should clean up data that was already read and passed to the logic app.
If you own both the logic app resource and the subscribed service, you don't have to call the
unsubscribeendpoint after the callback URL is called. Otherwise, the Logic Apps runtime needs to call theunsubscribeendpoint to signal that no more calls are expected and to allow resource cleanup on the server side.
Improve security for calls to your APIs from logic apps
After creating your custom APIs, set up authentication for your APIs so that you can call them securely from logic apps. Learn how to improve security for calls to custom APIs from logic apps.
Deploy and call your APIs
After you set up authentication, set up deployment for your APIs. Learn how to deploy and call custom APIs from logic apps.
Publish custom APIs to Azure
To make your custom APIs available for other Azure Logic Apps users, you must add security and register them as Azure Logic Apps connectors. For more information, see Custom connectors overview.
To make your custom APIs available to all users in Logic Apps, Power Automate, and Microsoft Power Apps, you must add security, register your APIs as Azure Logic Apps connectors, and nominate your connectors for the Microsoft Azure Certified program.
Get support
For specific help with custom APIs, contact customapishelp@microsoft.com.
For questions, visit the Microsoft Q&A question page for Azure Logic Apps.
Next steps
Feedback
Coming soon: Throughout 2024 we will be phasing out GitHub Issues as the feedback mechanism for content and replacing it with a new feedback system. For more information see: https://aka.ms/ContentUserFeedback.
Submit and view feedback for