Connect to and manage dedicated SQL pools in Microsoft Purview
This article outlines how to register dedicated SQL pools (formerly SQL DW), and how to authenticate and interact with dedicated SQL pools in Microsoft Purview. For more information about Microsoft Purview, read the introductory article.
Note
There are dedicated SQL pools (formerly SQL DW) and dedicated SQL pools in Azure Synapse workspace and you can refer to What is the difference between dedicated SQL pools (SQL DW) and dedicated SQL pools in Azure Synapse workspaces for the detail difference between the two. Currently Microsoft Purview provides separate data sources for dedicated SQL pools (formerly SQL DW) and dedicated SQL pools:
- if you are looking to register and scan a dedicated SQL pool (formerly SQL DW), you can follow instructions in Connect to and manage dedicated SQL pools in Microsoft Purview.
- if you are looking to register and scan a dedicated SQL pool (formerly SQL DW) which has enabled Azure Synapse workspace features as documented in Enable Azure Synapse workspace features for a dedicated SQL pool (formerly SQL DW), you can also follow instructions in Connect to and manage Azure Synapse Analytics workspaces in Microsoft Purview.
- if you are looking to register and scan a dedicated SQL pool or a serverless SQL pool in Azure Synapse workspace, you must follow instructions in Connect to and manage Azure Synapse Analytics workspaces in Microsoft Purview.
Supported capabilities
| Metadata Extraction | Full Scan | Incremental Scan | Scoped Scan | Classification | Labeling | Access Policy | Lineage | Data Sharing | Live view |
|---|---|---|---|---|---|---|---|---|---|
| Yes | Yes | Yes | Yes | Yes | Yes | No | Limited* | No | No |
* Lineage is supported if dataset is used as a source/sink in Data Factory or Synapse pipeline.
When scanning dedicated SQL pool (formerly SQL DW) source, Microsoft Purview supports extracting technical metadata including:
- Server
- Dedicated SQL pools
- Schemas
- Tables including columns
- Views including columns
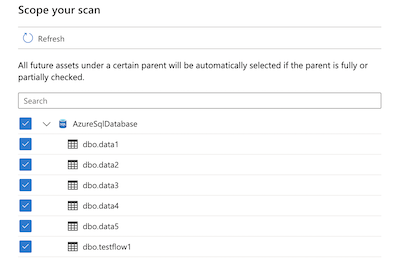
When setting up the scan, you can further scope it after providing the dedicated SQL pool name by selecting tables and views as needed.
Prerequisites
An Azure account with an active subscription. Create an account for free.
An active Microsoft Purview account.
You will need to be a Data Source Administrator and Data Reader to register a source and manage it in the Microsoft Purview governance portal. See our Microsoft Purview Permissions page for details.
Register
This section describes how to register dedicated SQL pools in Microsoft Purview using the Microsoft Purview governance portal.
Authentication for registration
There are three ways to set up authentication:
System or user assigned managed identity (Recommended)
-
Note
Only the server-level principal login (created by the provisioning process) or members of the
loginmanagerdatabase role in the master database can create new logins. It takes about 15 minutes after granting permission, the Microsoft Purview account should have the appropriate permissions to be able to scan the resource(s).
System or user assigned managed identity to register
You can use either your Microsoft Purview system-assigned managed identity (SAMI), or a User-assigned managed identity (UAMI) to authenticate. Both options allow you to assign authentication directly to Microsoft Purview, like you would for any other user, group, or service principal. The Microsoft Purview SAMI is created automatically when the account is created. A UAMI is a resource that can be created independently, and to create one you can follow our user-assigned managed identity guide. Create a Microsoft Entra user in the dedicated SQL pool using your managed identity object name by following the prerequisites and tutorial on Create Microsoft Entra users using Microsoft Entra applications.
Example SQL syntax to create user and grant permission:
CREATE USER [PurviewManagedIdentity] FROM EXTERNAL PROVIDER
GO

EXEC sp_addrolemember 'db_datareader', [PurviewManagedIdentity]
GO
The authentication must have permission to get metadata for the database, schemas, and tables. It must also be able to query the tables to sample for classification. The recommendation is to assign db_datareader permission to the identity.
Service Principal to register
To use service principal authentication for scans, you can use an existing one or create a new one.
If you need to create a new Service Principal, follow these steps:
- Navigate to the Azure portal.
- Select Microsoft Entra ID from the left-hand side menu.
-
- Select App registrations.
- Select + New application registration.
- Enter a name for the application (the service principal name).
- Select Accounts in this organizational directory only.
- For Redirect URI, select Web and enter any URL you want; it doesn't have to be real or work.
- Then select Register.
It is required to get the Service Principal's application ID and secret:
- Navigate to your Service Principal in the Azure portal
- Copy the values the Application (client) ID from Overview and Client secret from Certificates & secrets.
- Navigate to your key vault
- Select Settings > Secrets
- Select + Generate/Import and enter the Name of your choice and Value as the Client secret from your Service Principal
- Select Create to complete
- If your key vault is not connected to Microsoft Purview yet, you will need to create a new key vault connection
- Finally, create a new credential using the Service Principal to set up your scan.
Granting the Service Principal access
In addition, you must also create a Microsoft Entra user in the dedicated pool by following the prerequisites and tutorial on Create Microsoft Entra users using Microsoft Entra applications. Example SQL syntax to create user and grant permission:
CREATE USER [ServicePrincipalName] FROM EXTERNAL PROVIDER
GO

ALTER ROLE db_datareader ADD MEMBER [ServicePrincipalName]
GO
Note
Microsoft Purview will need the Application (client) ID and the client secret in order to scan.
SQL authentication to register
You can follow the instructions in CREATE LOGIN to create a login for your dedicated SQL pool (formerly SQL DW) if you don't already have one.
When authentication method selected is SQL Authentication, you need to get your password and store in the key vault:
- Get the password for your SQL login
- Navigate to your key vault
- Select Settings > Secrets
- Select + Generate/Import and enter the Name and Value as the password for your SQL login
- Select Create to complete
- If your key vault is not connected to Microsoft Purview yet, you will need to create a new key vault connection
- Finally, create a new credential using the key to set up your scan.
Steps to register
To register a new SQL dedicated pool in Microsoft Purview, complete the following steps:
Open the Microsoft Purview governance portal by:
- Browsing directly to https://web.purview.azure.com and selecting your Microsoft Purview account.
- Opening the Azure portal, searching for and selecting the Microsoft Purview account. Select the the Microsoft Purview governance portal button.
Select Data Map on the left navigation.
Select Register
On Register sources, select Azure Dedicated SQL Pool (formerly SQL DW).
Select Continue
On the Register sources screen, complete the following steps:
- Enter a Name that the data source will be listed with in the Catalog.
- Choose your Azure subscription to filter down dedicated SQL pools.
- Select your dedicated SQL pool.
- Select a collection from the list.
- Select Register to register the data source.
Scan
Follow the steps below to scan dedicated SQL pools to automatically identify assets and classify your data. For more information about scanning in general, see our introduction to scans and ingestion
Create and run scan
To create and run a new scan, complete the following steps:
Select the Data Map tab on the left pane in the Microsoft Purview governance portal.
Select the SQL dedicated pool source that you registered.
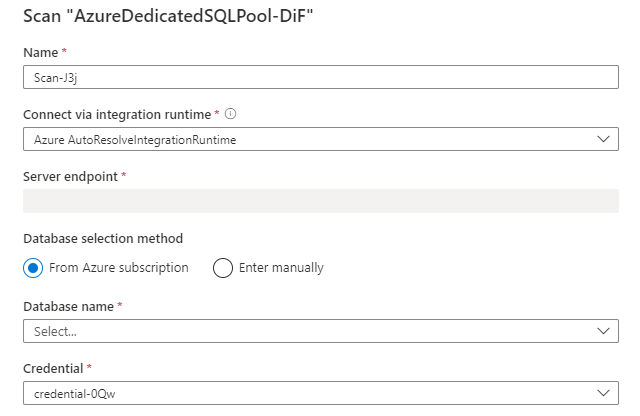
Select New scan
Choose either the Azure integration runtime if your source is publicly accessible, a managed virtual network integration runtime if using a managed virtual network, or a self-hosted integration runtime if your source is in a private virtual network. For more information about which integration runtime to use, see the choose the right integration runtime configuration article.
Select the credential to connect to your data source.
You can scope your scan to specific tables by choosing the appropriate items in the list.
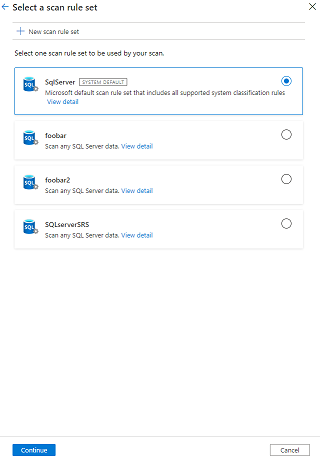
Then select a scan rule set. You can choose between the system default, existing custom rule sets, or create a new rule set inline.
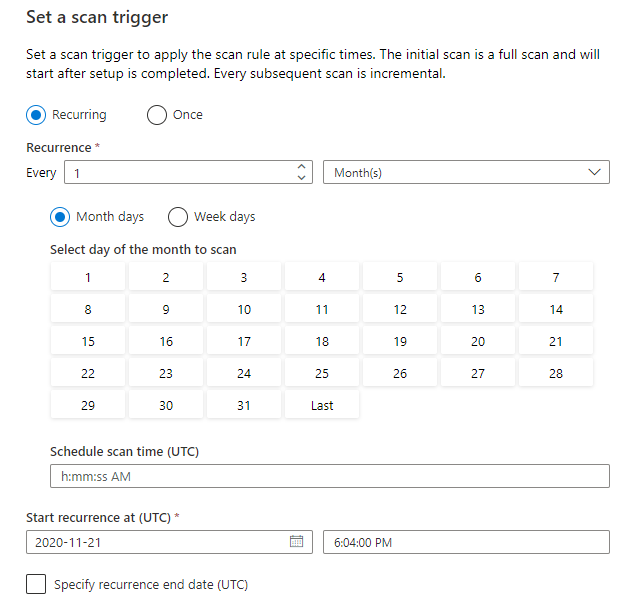
Choose your scan trigger. You can set up a schedule or run the scan once.
Review your scan and select Save and run.
View your scans and scan runs
To view existing scans:
- Go to the Microsoft Purview portal. On the left pane, select Data map.
- Select the data source. You can view a list of existing scans on that data source under Recent scans, or you can view all scans on the Scans tab.
- Select the scan that has results you want to view. The pane shows you all the previous scan runs, along with the status and metrics for each scan run.
- Select the run ID to check the scan run details.
Manage your scans
To edit, cancel, or delete a scan:
Go to the Microsoft Purview portal. On the left pane, select Data Map.
Select the data source. You can view a list of existing scans on that data source under Recent scans, or you can view all scans on the Scans tab.
Select the scan that you want to manage. You can then:
- Edit the scan by selecting Edit scan.
- Cancel an in-progress scan by selecting Cancel scan run.
- Delete your scan by selecting Delete scan.
Note
- Deleting your scan does not delete catalog assets created from previous scans.
Next steps
Now that you have registered your source, follow the below guides to learn more about Microsoft Purview and your data.
Feedback
Coming soon: Throughout 2024 we will be phasing out GitHub Issues as the feedback mechanism for content and replacing it with a new feedback system. For more information see: https://aka.ms/ContentUserFeedback.
Submit and view feedback for