Migrate data to Azure with Data Dynamics StorageX
This article helps you deploy Data Dynamics StorageX in Microsoft Azure. We introduce key concepts around how StorageX works, deployment prerequisites, installation process, and how-tos for operational guidance. For more in-depth information, visit Data Dynamics Customer Portal.
Data Dynamics StorageX is a Unified Unstructured Data Management platform that allows analyzing, managing, and moving data across heterogenous storage environments. Basic capabilities are:
- Data Movement capabilities
- NAS to NAS (with or without Analysis)
- NAS to Object replication
- NAS to Object archive
- Duplicate file check report
- Open shares report
- File Meta Data Analysis with custom tagging
You can find more functionalities on StorageX, and comparison with similar tools in our comparison table.
This document covers three major topics:
- Process for deploying the StorageX offering in Azure environment,
- Basic steps for adding file and cloud storage resources to StorageX,
- Creating Data Movement Policies.
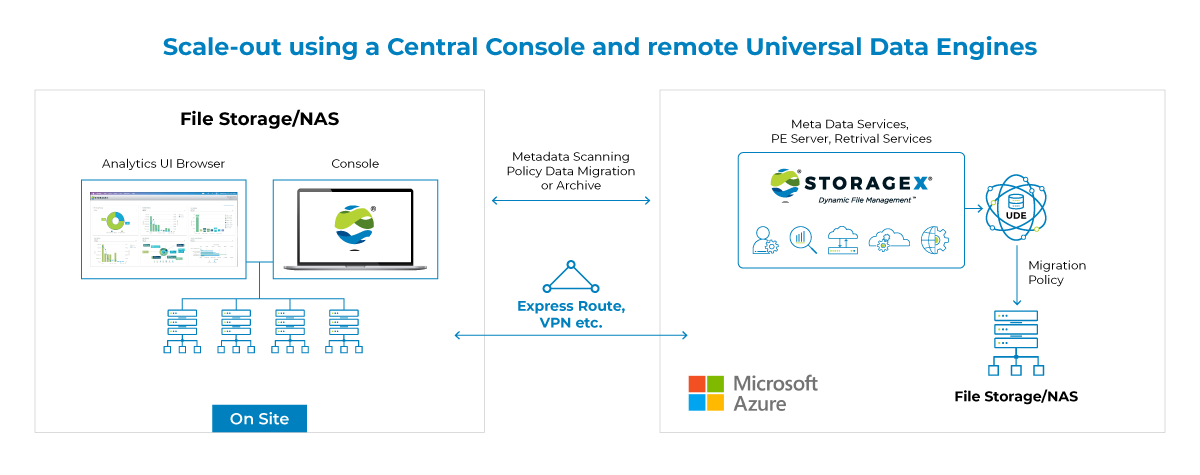
Reference architecture
The following diagram provides a reference architecture for on-premises to Azure and in-Azure deployments of StorageX.
StorageX interoperability matrix
| Feature | SMB | NFS | Notes |
|---|---|---|---|
| Migration | SMB to SMB | NFSv3 to NFSv3 | Can be combined for multi-protocol |
| File-to-object archive | SMB to Azure Blob Storage | NFSv3 to Azure Blob Storage | Archive data to optimize cost |
| File-to-object replication | SMB to Azure Blob Storage | NFSv3 to Azure Blob Storage | Replicate data to increase protection |
Before you begin
Upfront planning will ease the migration and reduce the risks. Some of tips to ease the migration are:
- Gather data on the source and targets services,
- Make sure you have a list of your connectivity points and all necessary network ports.
- Your StorageX server in Azure will need to be part of your Active Directory infrastructure. Ensure you engage an administrator with Active Directory privileges to add the server to Active Directory.
- For easier implementation use Azure Marketplace.
Get started with Azure
Microsoft offers a framework to follow to get you started with Azure. The Cloud Adoption Framework (CAF) is a detailed approach to enterprise digital transformation and comprehensive guide to planning a production grade cloud adoption. The CAF includes a step-by-step Azure setup guide to help you get up and running quickly and securely. You can find an interactive version in the Azure portal. You'll find sample architectures, specific best practices for deploying applications, and free training resources to put you on the path to Azure expertise.
Considerations for migrations
Several aspects are important when considering migrations of file data to Azure. Before proceeding learn more:
- Storage migration overview
- latest supported features by Data Dynamics StorageX in migration tools comparison matrix.
Remember, you'll require enough network capacity to support migrations without impacting production applications. This section outlines the tools and techniques that are available to assess your network needs.
Determine unutilized internet bandwidth
It's important to know how much typically unutilized bandwidth (or headroom) you have available on a day-to-day basis. To help you assess whether you can meet your goals for:
- initial time for migrations when you're not using Azure Data Box for offline method
- time required to do incremental resync before final switch-over to the target file service
Use the following methods to identify the bandwidth headroom to Azure that is free to consume.
- If you're an existing Azure ExpressRoute customer, view your circuit usage in the Azure portal.
- Contact your ISP and request reports to show your existing daily and monthly utilization.
- There are several tools that can measure utilization by monitoring your network traffic at the router/switch level:
Creating a StorageX service account
For SMB migrations, service account to run the StorageX services is recommended. Service account enables access to be traced for support reasons, while giving the proper privileges to grant full access.
The process that runs data movement policies on the StorageX universal data engines uses the StorageX service account. Account must have all necessary privileges assigned to it in the Active Directory domain.
You can create an account like domain administrator if allowed in your environment. Recommended approach is to grant permissions directly on the NAS server. To do the latter, place the service account in the Administrators and Backup operators groups.
The StorageX service account requires the following privileges:
- SeServiceLogonRight
- SeSecurityPrivilege
- SeBackupPrivilege
- SeRestorePrivilege
- SeAuditPrivilege
- SeInteractiveLogonRight
NFS access requires an export rule for the IP of the StorageX server, and grant access for RW and root. For example, "root=10.2.3.12, rw=10.2.3.12", where 10.2.3.12 is the StorageX server IP address.
Deployment guide
This section provides guidance on how to deploy a StorageX server, and other StorageX components in your Azure environment.
Before implementation starts, several prerequisites are important:
- Target storage service must be identified and created,
- Make sure you have the proper ports open to access the storage services. You can use Microsoft’s portqryui tool to verify necessary ports are open.
You can learn more here:
- How to create Azure File Share
- How to create an SMB volume or NFS export in Azure NetApp Files
Any SMB migrations require Active Directory to be properly set up before adding any resources. We will be using an existing Azure NetApp Files implementation with new volume for migration target. Before we can create a new Azure NetApp Files volume, we need to:
- Create Azure NetApp Files account
- Create Capacity Pool
- Join Azure NetApp Files account to Active Directory Domain
Once the configuration for Azure NetApp Files is done, we can create a share we will use for migration.
Navigate to existing Azure NetApp Files account, and select Volumes. Select Add volume. Give it a name, select capacity pool and networking setup.
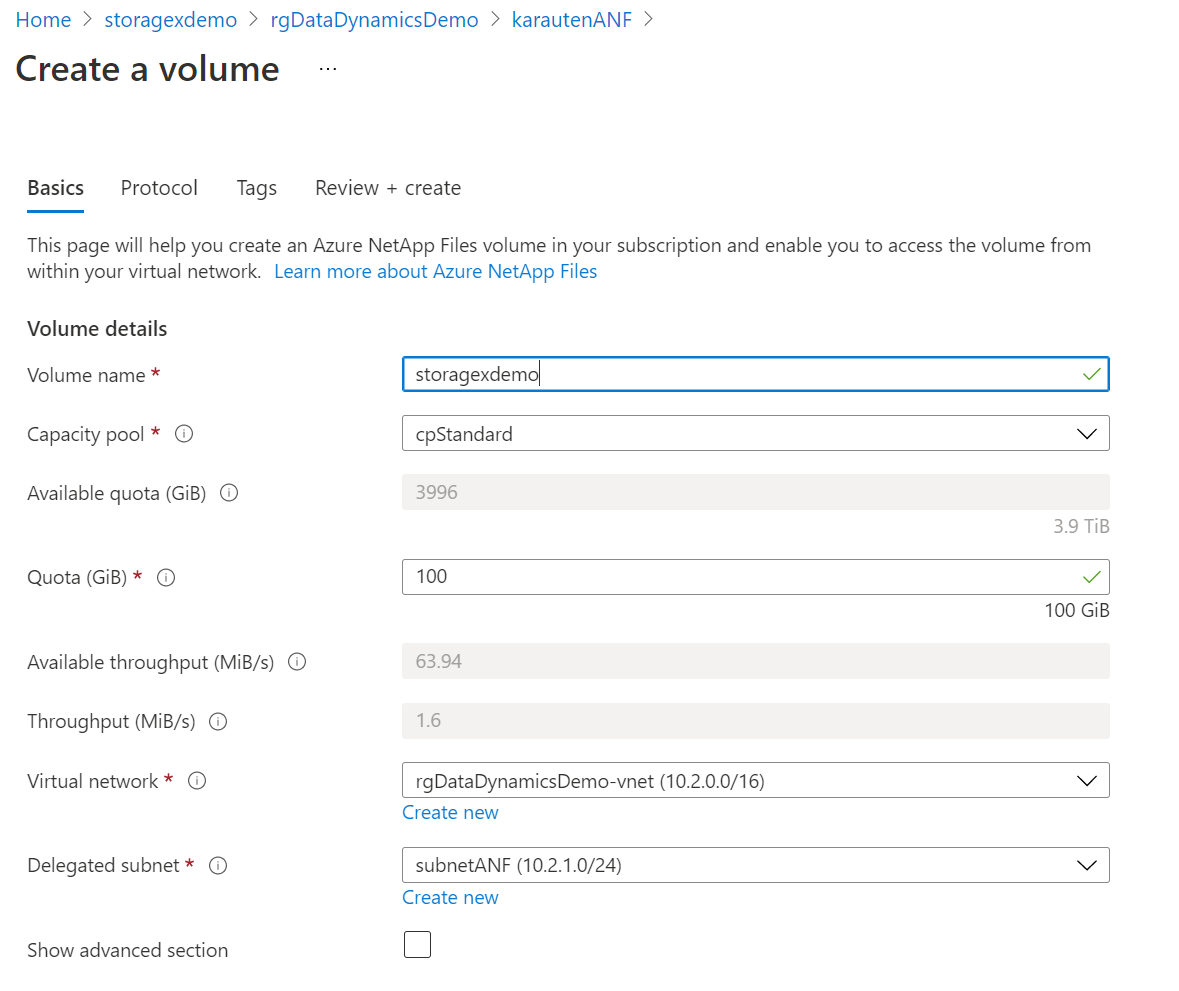
Select SMB protocol, select existing Active Directory connection, and provide a Share name.

Add Tags if you use them, and Create a share.
Once the volume has been created, we can proceed with StorageX deployment.
Deploy the Data Dynamics Data Movement and Mobility offering in Azure. Recommended approach is using Azure Marketplace. Add the deployed server into your Active Directory domain.
On the deployed server, verify that all required network ports are open.
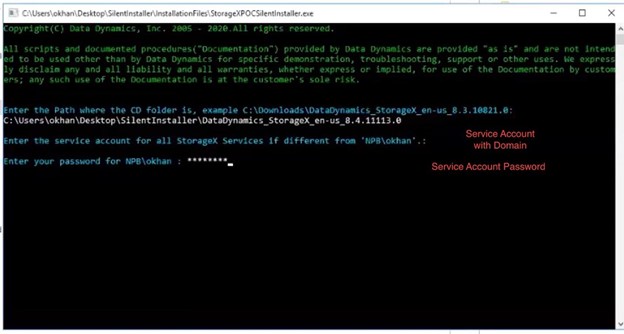
Run the StorageX installation script. Installation script is available on the desktop when you log in to your deployed server in Azure. All installation files and output logs are located in the folder C:\ProgramData\data Dynamics\StorageX. Within that folder, the InstallationFiles subfolder contains the zipped source installation files, while the SilentInstaller-DD folder contains the configuration XML files and installation logs.
By default, the installation script deploys the following services:
- StorageX
- StorageX API
- StorageX Processing Engine
- StorageX Universal Data Engine
- StorageX File Recovery
- Elasticsearch
- Microsoft SQL Express
- Microsoft SQL Management Studio
- Kibana
- Any supporting software (for example, Java)
The installation script has an XML configuration file where these different services can be customized, but we do not recommend manually modifying the configuration.
To install, right-click the StorageXPOCSilentInstaller - Shortcut on the Desktop and select Run as administrator. After the installation starts, you will be asked for the StorageX service account and the password for that account.
Installation script will continue installing all the services. When the installation process is finished, you will see the message on the command-line interface.
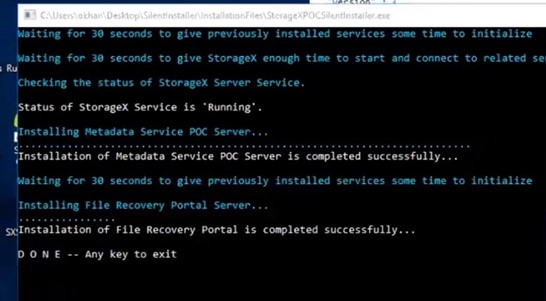
StorageX will start automatically.
Migration guide
Once the installation finishes, and all services are started, we can start migration process.
Open the StorageX Console.
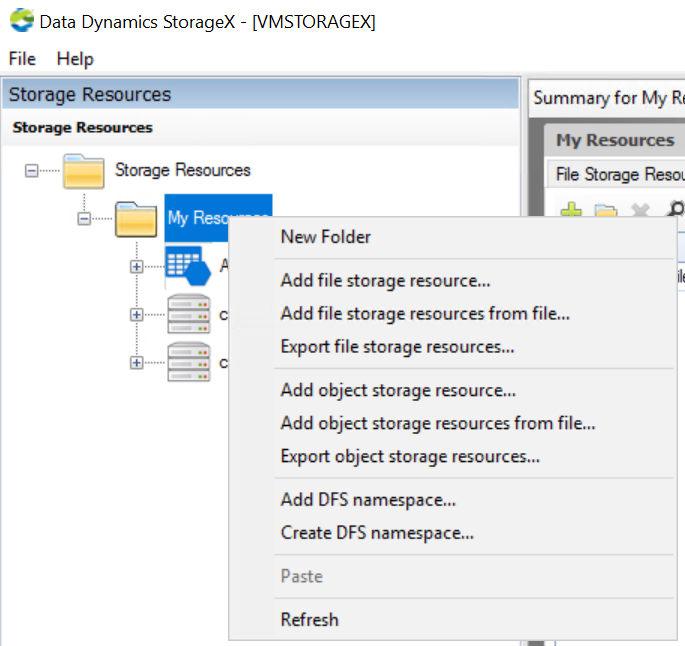
Click the Storage Resources tab.
In the My Resources view, add your NAS devices or storage services, called storage resources in StorageX. You can add different types:
- Add file storage resource for on-premises NAS devices, Windows file server, Azure NetApp Files, or generic file servers,
- Add object storage resource for S3 or Azure Blob Storage (including Azure Files service),
- Add DFS namespace for DFS file servers.
Select Add file storage resource to start the wizard of adding Azure NetApp Files migration target.
Select Generic CIFS for CIFS and SMB migrations.
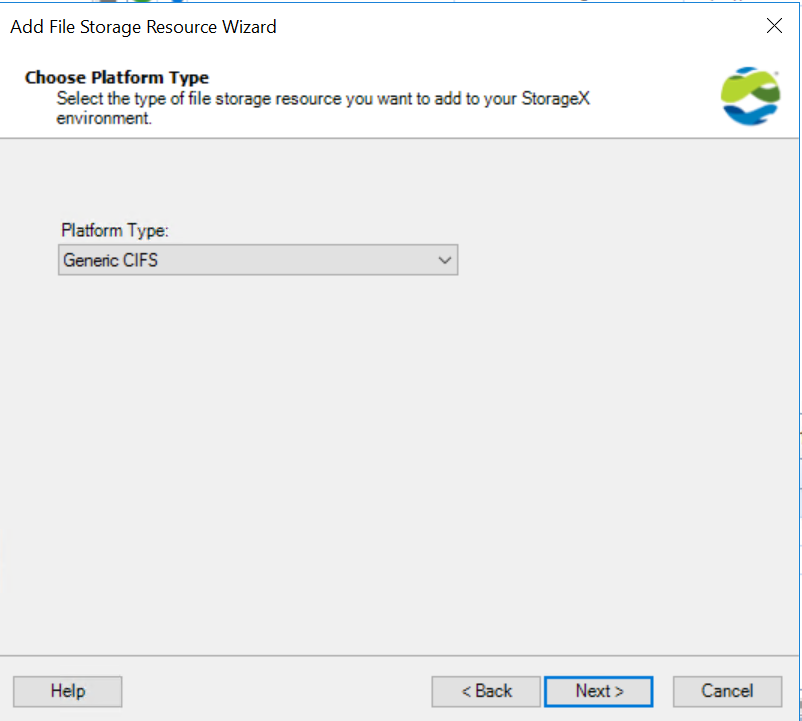
Browse to find Azure NetApp Files computer account. Azure NetApp Files computer account was created when it was added to Active Directory Domain.

Finish the wizard, and verify the account has been added, and contains the share we created.

Every source, and target must be added as a separate resource. Example shows adding Azure NetApp Files share, and it can be slightly different for other services.
Click the Data Movement tab.
In the tree pane, right-click the folder where you want to create the new policy and select Phased Migration Policy.
Follow the steps in the wizard to create a Phased Migration policy. Select appropriate Source and Destination targets.
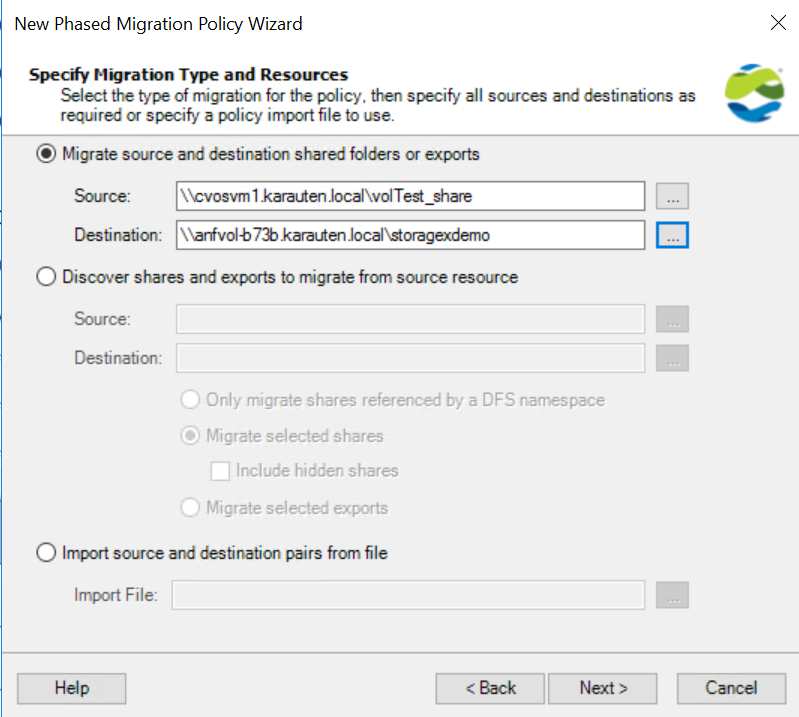
Provide a name and description for the policy and Finish the wizard.
Right-click the new policy and select Run to run a test migration. We recommend checking the security configuration on multiple files on the source resource to verify necessary permissions have been provided.
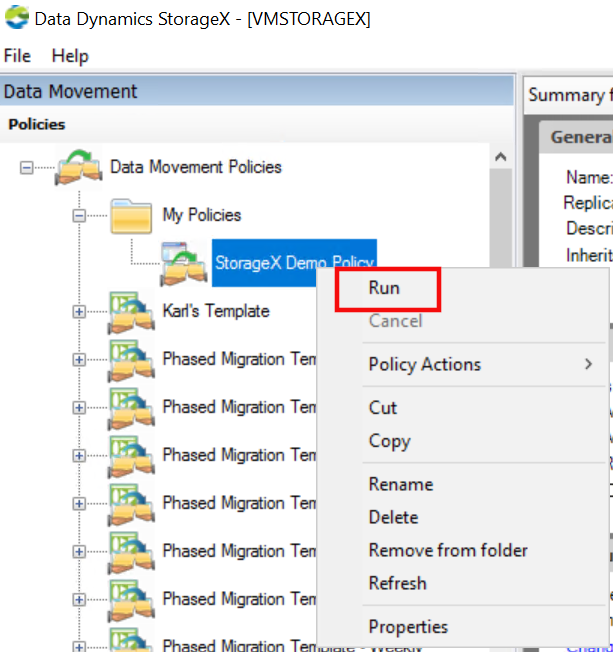
Check the status of the policy to make sure initial migration has run successfully.
Support
If issues occur, Microsoft and Data Dynamics can provide help using regular support channels. Contact Microsoft for infrastructure issues or with any Azure service. Contact Data Dynamics for issues tied to Data Dynamics StorageX installation.
How to open a case with Azure
In the Azure portal search for support in the search bar at the top. Select Help + support -> New Support Request.
How to open a case with Data Dynamics
Go to the Data Dynamics Support Portal. If you have not registered, provide your email address, and our Support team will create an account for you. Once you have signed in, open a user request. If you have already opened an Azure support case, note support request number when creating the request.
Next steps
Various resources are available to learn more:
- Storage migration overview
- Features supported by Data Dynamics StorageX in migration tools comparison matrix
- Data Dynamics
- Data Dynamics Customer Portal contains full documentation for StorageX
Feedback
Coming soon: Throughout 2024 we will be phasing out GitHub Issues as the feedback mechanism for content and replacing it with a new feedback system. For more information see: https://aka.ms/ContentUserFeedback.
Submit and view feedback for