Configure server settings for P2S VPN Gateway connections - certificate authentication - Azure portal
This article helps you configure the necessary VPN Gateway point-to-site (P2S) server settings to let you securely connect individual clients running Windows, Linux, or macOS to an Azure VNet. P2S VPN connections are useful when you want to connect to your VNet from a remote location, such as when you're telecommuting from home or a conference. You can also use P2S instead of a site-to-site (S2S) VPN when you have only a few clients that need to connect to a virtual network (VNet). P2S connections don't require a VPN device or a public-facing IP address.
There are various different configuration options available for P2S. For more information about point-to-site VPN, see About point-to-site VPN. This article helps you create a P2S configuration that uses certificate authentication and the Azure portal. To create this configuration using the Azure PowerShell, see the Configure P2S - Certificate - PowerShell article. For RADIUS authentication, see the P2S RADIUS article. For Microsoft Entra authentication, see the P2S Microsoft Entra ID article.
P2S Azure certificate authentication connections use the following items, which you'll configure in this exercise:
- A RouteBased VPN gateway.
- The public key (.cer file) for a root certificate, which is uploaded to Azure. Once the certificate is uploaded, it's considered a trusted certificate and is used for authentication.
- A client certificate that is generated from the root certificate. The client certificate installed on each client computer that will connect to the VNet. This certificate is used for client authentication.
- VPN client configuration files. The VPN client is configured using VPN client configuration files. These files contain the necessary information for the client to connect to the VNet. Each client that connects must be configured using the settings in the configuration files.
Prerequisites
Verify that you have an Azure subscription. If you don't already have an Azure subscription, you can activate your MSDN subscriber benefits or sign up for a free account.
Example values
You can use the following values to create a test environment, or refer to these values to better understand the examples in this article:
VNet
- VNet Name: VNet1
- Address space: 10.1.0.0/16
For this example, we use only one address space. You can have more than one address space for your VNet. - Subnet name: FrontEnd
- Subnet address range: 10.1.0.0/24
- Subscription: If you have more than one subscription, verify that you're using the correct one.
- Resource Group: TestRG1
- Location: East US
Virtual network gateway
- Virtual network gateway name: VNet1GW
- Gateway type: VPN
- VPN type: Route-based
- SKU: VpnGw2
- Generation: Generation2
- Gateway subnet address range: 10.1.255.0/27
- Public IP address name: VNet1GWpip
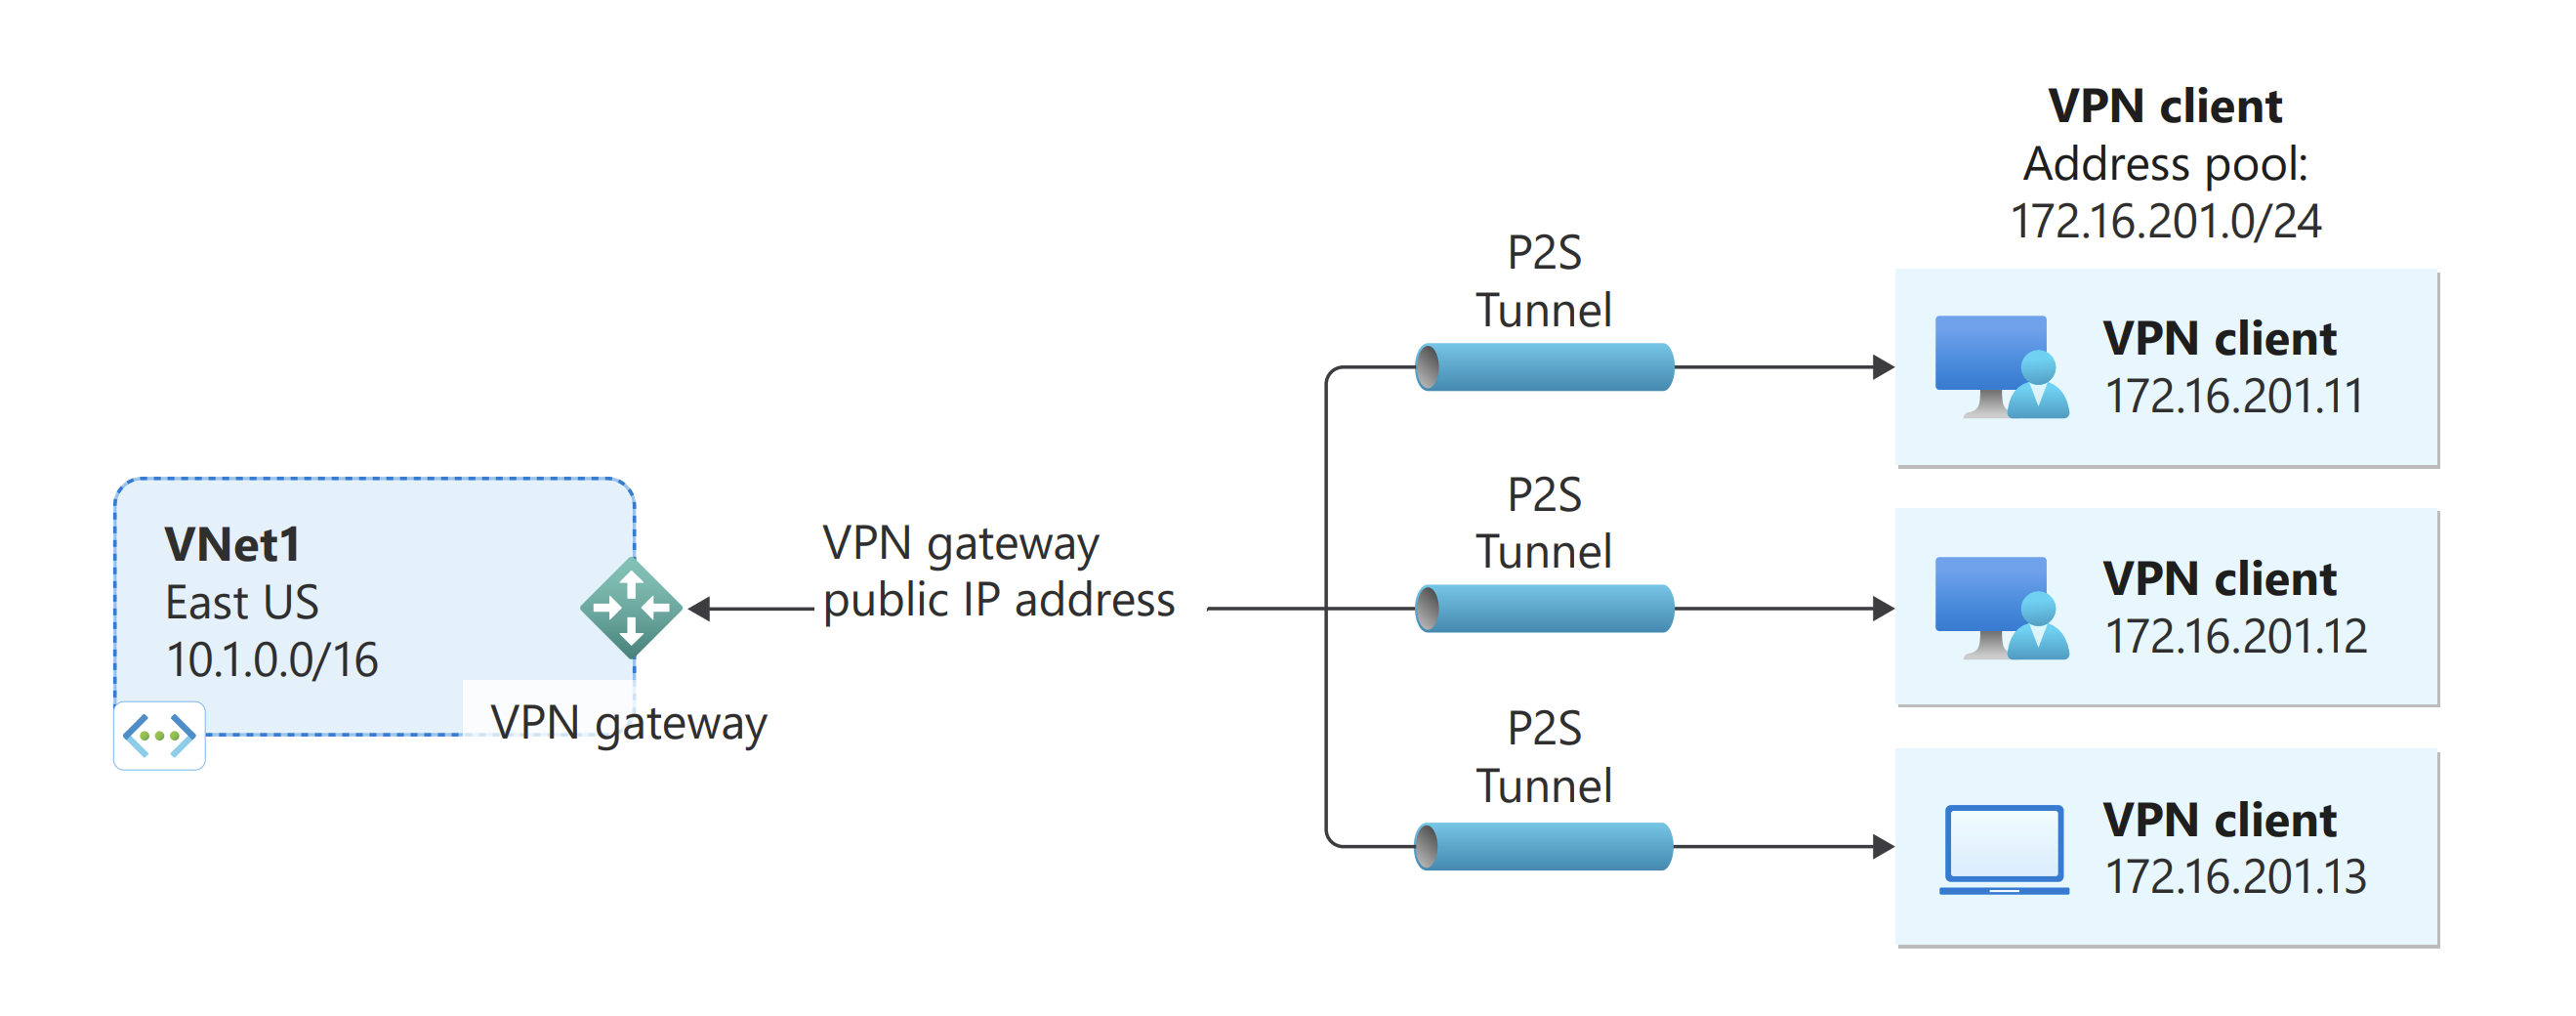
Connection type and client address pool
- Connection type: Point-to-site
- Client address pool: 172.16.201.0/24
VPN clients that connect to the VNet using this point-to-site connection receive an IP address from the client address pool.
Create a VNet
In this section, you create a VNet. Refer to the Example values section for the suggested values to use for this configuration.
Note
When you use a virtual network as part of a cross-premises architecture, be sure to coordinate with your on-premises network administrator to carve out an IP address range that you can use specifically for this virtual network. If a duplicate address range exists on both sides of the VPN connection, traffic will route in an unexpected way. Additionally, if you want to connect this virtual network to another virtual network, the address space can't overlap with the other virtual network. Plan your network configuration accordingly.
Sign in to the Azure portal.
In Search resources, service, and docs (G+/) at the top of the portal page, enter virtual network. Select Virtual network from the Marketplace search results to open the Virtual network page.
On the Virtual network page, select Create to open the Create virtual network page.
On the Basics tab, configure the virtual network settings for Project details and Instance details. You see a green check mark when the values you enter are validated. You can adjust the values shown in the example according to the settings that you require.
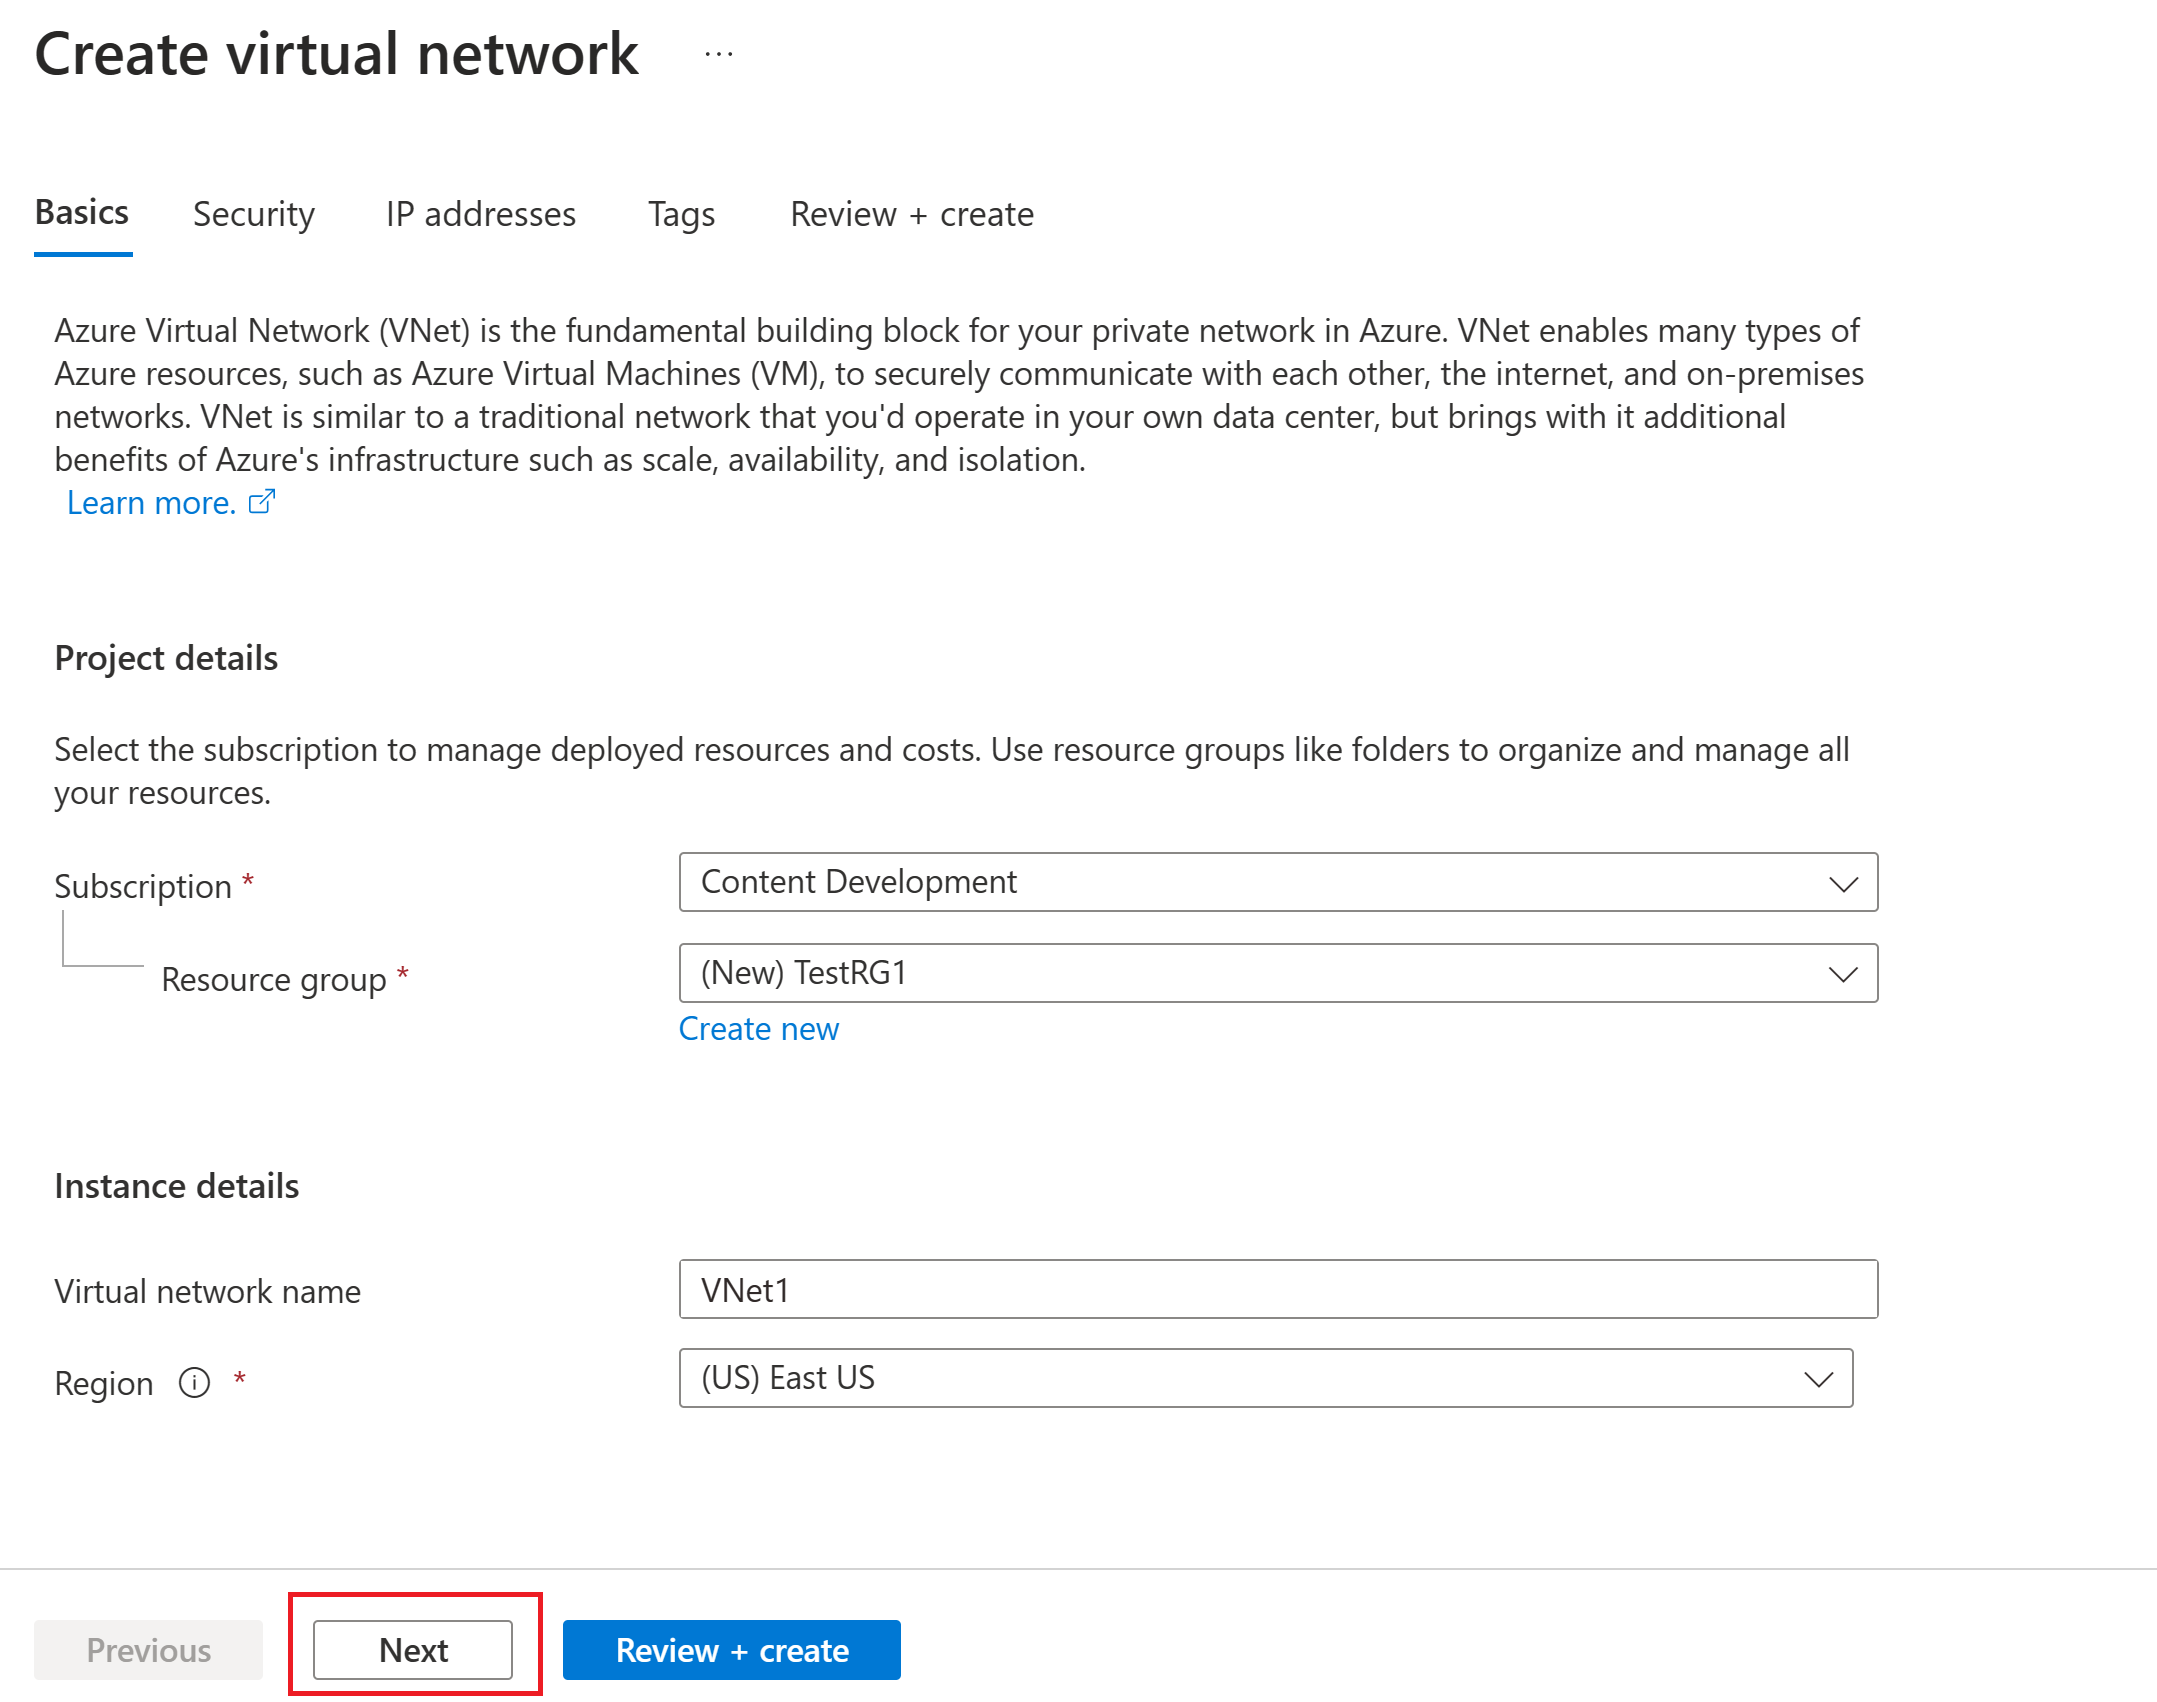
- Subscription: Verify that the subscription listed is the correct one. You can change subscriptions by using the dropdown box.
- Resource group: Select an existing resource group or select Create new to create a new one. For more information about resource groups, see Azure Resource Manager overview.
- Name: Enter the name for your virtual network.
- Region: Select the location for your virtual network. The location determines where the resources that you deploy to this virtual network will reside.
Select Next or Security to go to the Security tab. For this exercise, leave the default values for all the services on this page.
Select IP Addresses to go to the IP Addresses tab. On the IP Addresses tab, configure the settings.
IPv4 address space: By default, an address space is automatically created. You can select the address space and adjust it to reflect your own values. You can also add a different address space and remove the default that was automatically created. For example, you can specify the starting address as 10.1.0.0 and specify the address space size as /16. Then select Add to add that address space.
+ Add subnet: If you use the default address space, a default subnet is created automatically. If you change the address space, add a new subnet within that address space. Select + Add subnet to open the Add subnet window. Configure the following settings, and then select Add at the bottom of the page to add the values.
- Subnet name: An example is FrontEnd.
- Subnet address range: The address range for this subnet. Examples are 10.1.0.0 and /24.
Review the IP addresses page and remove any address spaces or subnets that you don't need.
Select Review + create to validate the virtual network settings.
After the settings are validated, select Create to create the virtual network.

Create the VPN gateway
In this step, you create the virtual network gateway for your VNet. Creating a gateway can often take 45 minutes or more, depending on the selected gateway SKU.
Note
The Basic gateway SKU does not support IKEv2 or RADIUS authentication. If you plan on having Mac clients connect to your VNet, do not use the Basic SKU.
The virtual network gateway requires a specific subnet named GatewaySubnet. The gateway subnet is part of the IP address range for your virtual network and contains the IP addresses that the virtual network gateway resources and services use.
When you create the gateway subnet, you specify the number of IP addresses that the subnet contains. The number of IP addresses needed depends on the VPN gateway configuration that you want to create. Some configurations require more IP addresses than others. It's best to specify /27 or larger (/26, /25, etc.) for your gateway subnet.
If you see an error that specifies that the address space overlaps with a subnet, or that the subnet isn't contained within the address space for your virtual network, check your virtual network address range. You might not have enough IP addresses available in the address range you created for your virtual network. For example, if your default subnet encompasses the entire address range, there are no IP addresses left to create more subnets. You can either adjust your subnets within the existing address space to free up IP addresses or specify another address range and create the gateway subnet there.
In Search resources, services, and docs (G+/), enter virtual network gateway. Locate Virtual network gateway in the Marketplace search results and select it to open the Create virtual network gateway page.
On the Basics tab, fill in the values for Project details and Instance details.
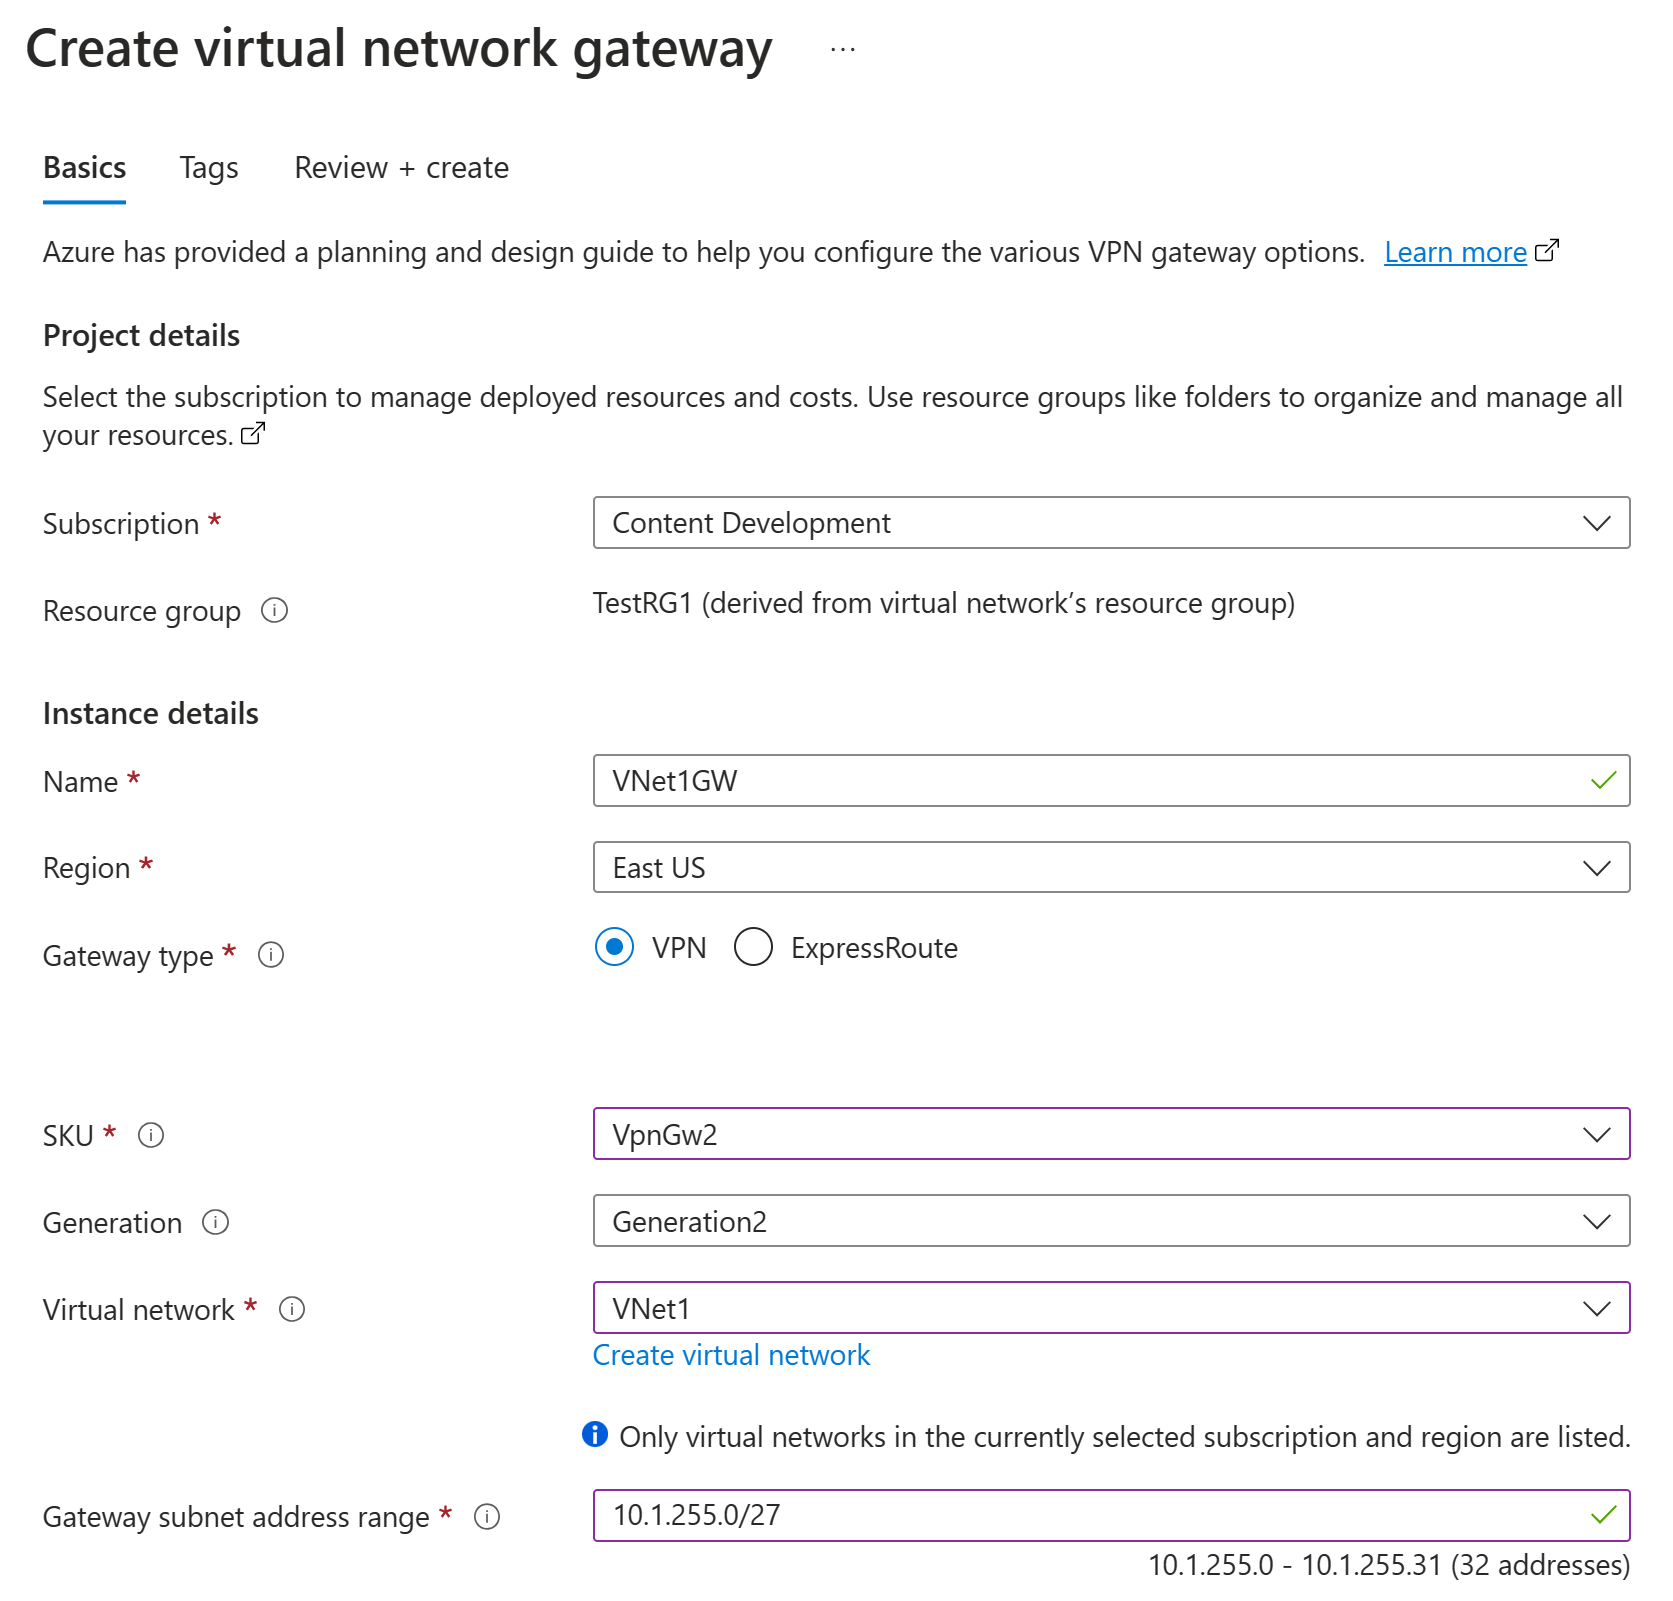
Subscription: Select the subscription you want to use from the dropdown list.
Resource group: This setting is autofilled when you select your virtual network on this page.
Name: Name your gateway. Naming your gateway isn't the same as naming a gateway subnet. It's the name of the gateway object you're creating.
Region: Select the region in which you want to create this resource. The region for the gateway must be the same as the virtual network.
Gateway type: Select VPN. VPN gateways use the virtual network gateway type VPN.
SKU: From the dropdown list, select the gateway SKU that supports the features you want to use. See Gateway SKUs. In the portal, the SKUs available in the dropdown list depend on the
VPN typeyou select. The Basic SKU can only be configured using Azure CLI or PowerShell. You can't configure the Basic SKU in the Azure portal.Generation: Select the generation you want to use. We recommend using a Generation2 SKU. For more information, see Gateway SKUs.
Virtual network: From the dropdown list, select the virtual network to which you want to add this gateway. If you can't see the virtual network for which you want to create a gateway, make sure you selected the correct subscription and region in the previous settings.
Gateway subnet address range or Subnet: The gateway subnet is required to create a VPN gateway.
At this time, this field can show various different settings options, depending on the virtual network address space and whether you already created a subnet named GatewaySubnet for your virtual network.
If you don't have a gateway subnet and you don't see the option to create one on this page, go back to your virtual network and create the gateway subnet. Then, return to this page and configure the VPN gateway.

Specify the values for Public IP address. These settings specify the public IP address object that gets associated to the VPN gateway. The public IP address is assigned to this object when the VPN gateway is created. The only time the primary public IP address changes is when the gateway is deleted and re-created. It doesn't change across resizing, resetting, or other internal maintenance/upgrades of your VPN gateway.
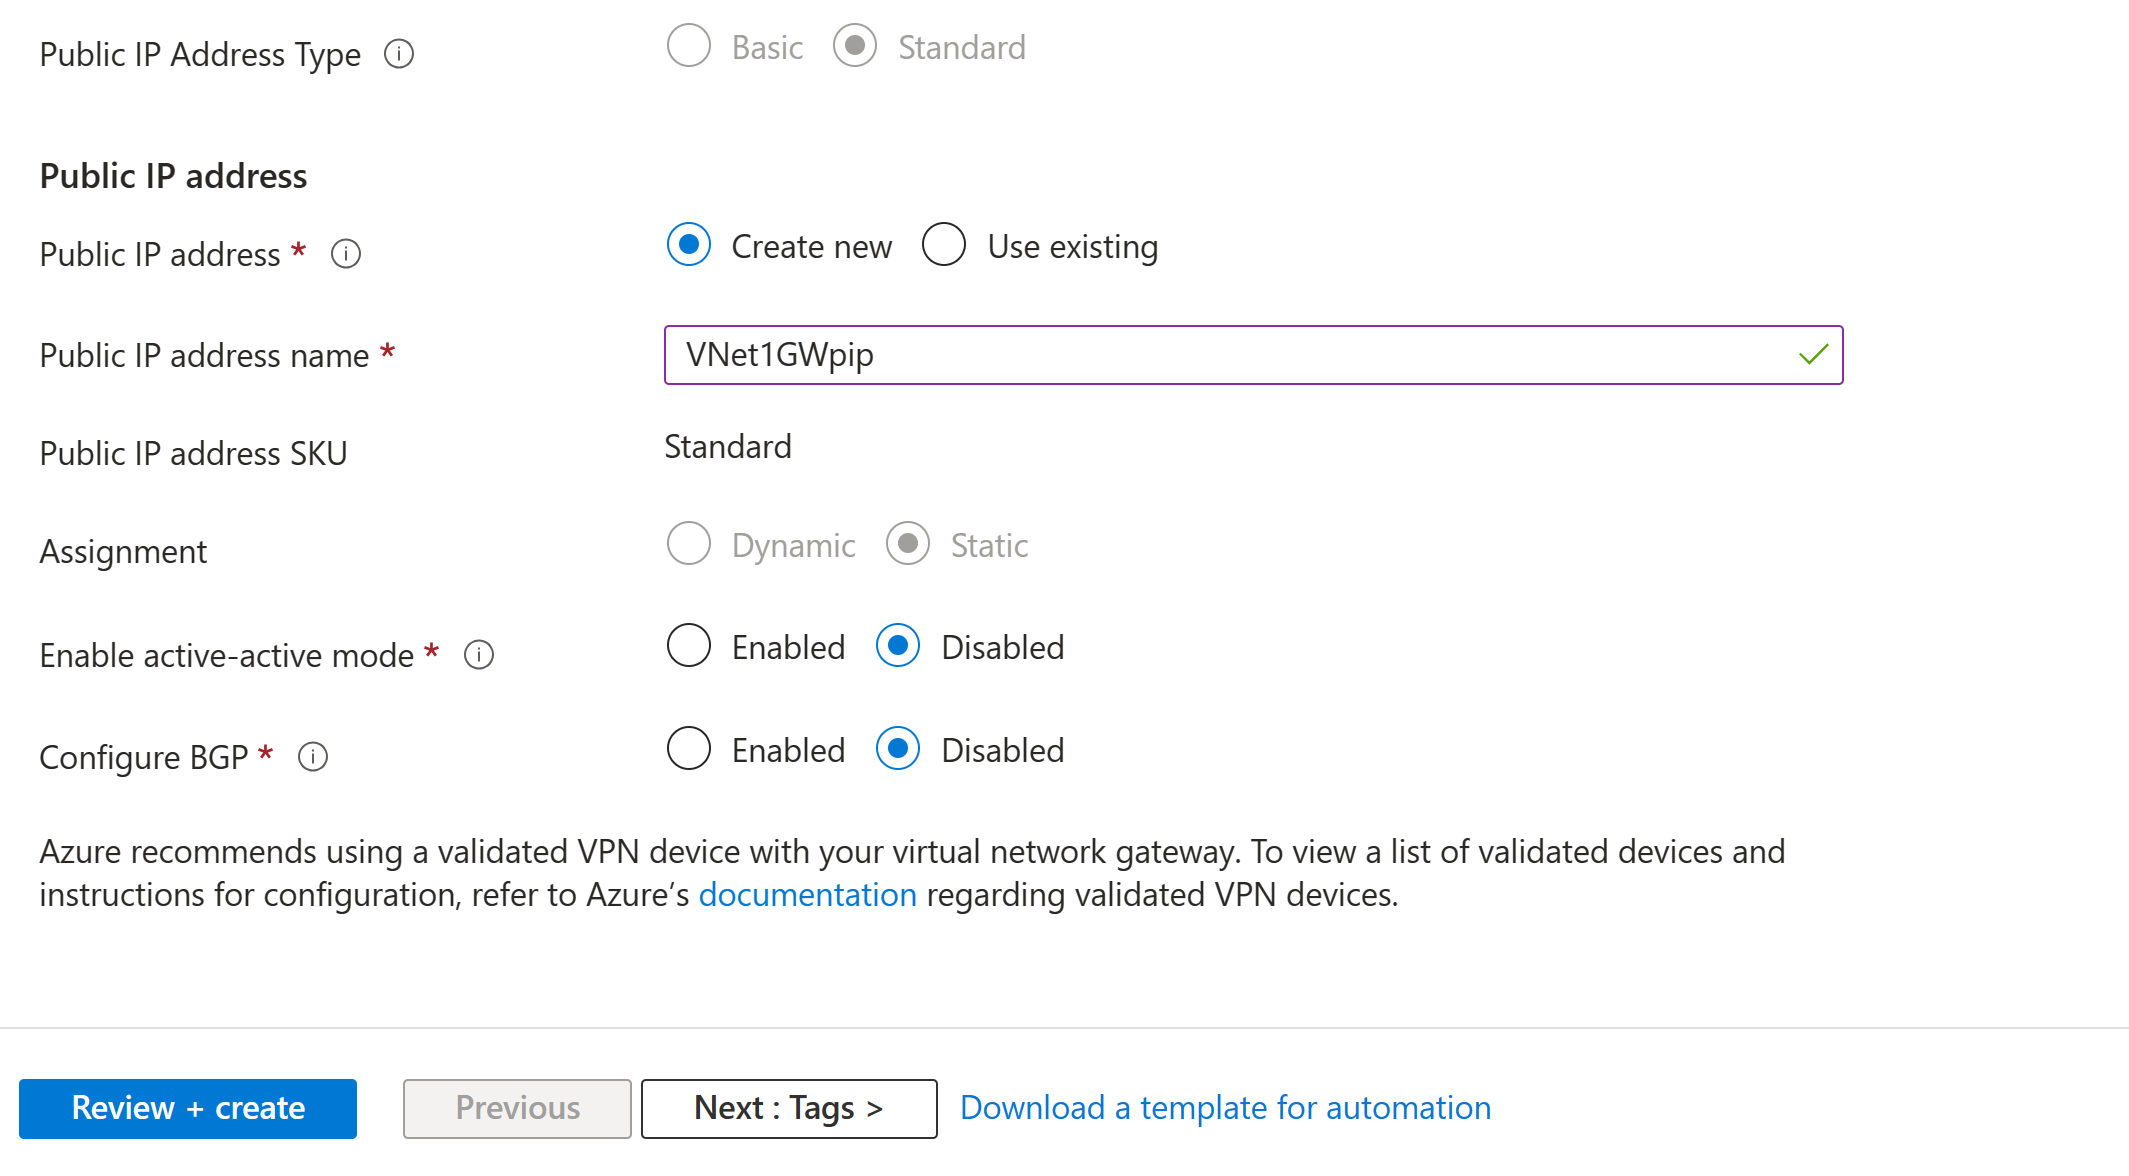
- Public IP address type: If you are presented with this option, select Standard. The Basic public IP address SKU is only supported for Basic SKU VPN gateways.
- Public IP address: Leave Create new selected.
- Public IP address name: In the text box, enter a name for your public IP address instance.
- Public IP address SKU: Setting is autoselected.
- Assignment: The assignment is typically autoselected. For the Standard SKU, assignment is always Static.
- Enable active-active mode: Select Disabled. Only enable this setting if you're creating an active-active gateway configuration.
- Configure BGP: Select Disabled, unless your configuration specifically requires this setting. If you do require this setting, the default ASN is 65515, although this value can be changed.
Select Review + create to run validation.
After validation passes, select Create to deploy the VPN gateway.

You can see the deployment status on the Overview page for your gateway. After the gateway is created, you can view the IP address that has been assigned to it by looking at the VNet in the portal. The gateway appears as a connected device.
Important
When you work with gateway subnets, avoid associating a network security group (NSG) to the gateway subnet. Associating a network security group to this subnet might cause your virtual network gateway (VPN and ExpressRoute gateways) to stop functioning as expected. For more information about network security groups, see What is a network security group?.
Generate certificates
Certificates are used by Azure to authenticate clients connecting to a VNet over a point-to-site VPN connection. Once you obtain a root certificate, you upload the public key information to Azure. The root certificate is then considered 'trusted' by Azure for connection over P2S to the VNet.
You also generate client certificates from the trusted root certificate, and then install them on each client computer. The client certificate is used to authenticate the client when it initiates a connection to the VNet.
The root certificate must be generated and extracted prior to creating your point-to-site configuration in the next sections.
Generate a root certificate
Obtain the .cer file for the root certificate. You can use either a root certificate that was generated with an enterprise solution (recommended), or generate a self-signed certificate. After you create the root certificate, export the public certificate data (not the private key) as a Base64 encoded X.509 .cer file. You upload this file later to Azure.
Enterprise certificate: If you're using an enterprise solution, you can use your existing certificate chain. Acquire the .cer file for the root certificate that you want to use.
Self-signed root certificate: If you aren't using an enterprise certificate solution, create a self-signed root certificate. Otherwise, the certificates you create won't be compatible with your P2S connections and clients receive a connection error when they try to connect. You can use Azure PowerShell, MakeCert, or OpenSSL. The steps in the following articles describe how to generate a compatible self-signed root certificate:
- PowerShell instructions for Windows 10 or later: These instructions require PowerShell on a computer running Windows 10 or later. Client certificates that are generated from the root certificate can be installed on any supported P2S client.
- MakeCert instructions: Use MakeCert to generate certificates if you don't have access to a computer running Windows 10 or later. Although MakeCert is deprecated, you can still use it to generate certificates. Client certificates that you generate from the root certificate can be installed on any supported P2S client.
- Linux - OpenSSL instructions
- Linux - strongSwan instructions
Generate client certificates
Each client computer that you connect to a VNet with a point-to-site connection must have a client certificate installed. You generate it from the root certificate and install it on each client computer. If you don't install a valid client certificate, authentication will fail when the client tries to connect to the VNet.
You can either generate a unique certificate for each client, or you can use the same certificate for multiple clients. The advantage to generating unique client certificates is the ability to revoke a single certificate. Otherwise, if multiple clients use the same client certificate to authenticate and you revoke it, you'll need to generate and install new certificates for every client that uses that certificate.
You can generate client certificates by using the following methods:
Enterprise certificate:
If you're using an enterprise certificate solution, generate a client certificate with the common name value format name@yourdomain.com. Use this format instead of the domain name\username format.
Make sure the client certificate is based on a user certificate template that has Client Authentication listed as the first item in the user list. Check the certificate by double-clicking it and viewing Enhanced Key Usage in the Details tab.
Self-signed root certificate: Follow the steps in one of the following P2S certificate articles so that the client certificates you create will be compatible with your P2S connections.
When you generate a client certificate from a self-signed root certificate, it's automatically installed on the computer that you used to generate it. If you want to install a client certificate on another client computer, export it as a .pfx file, along with the entire certificate chain. Doing so will create a .pfx file that contains the root certificate information required for the client to authenticate.
The steps in these articles generate a compatible client certificate, which you can then export and distribute.
Windows 10 or later PowerShell instructions: These instructions require Windows 10 or later, and PowerShell to generate certificates. The generated certificates can be installed on any supported P2S client.
MakeCert instructions: Use MakeCert if you don't have access to a Windows 10 or later computer for generating certificates. Although MakeCert is deprecated, you can still use it to generate certificates. You can install the generated certificates on any supported P2S client.
Add the address pool
The Point-to-site configuration page contains the configuration information that's needed for the P2S VPN. Once all the P2S settings have been configured and the gateway has been updated, the Point-to-site configuration page is used to view or change P2S VPN settings.
- Go to the gateway you created in the previous section.
- In the left pane, select Point-to-site configuration.
- Click Configure now to open the configuration page.
The client address pool is a range of private IP addresses that you specify. The clients that connect over a point-to-site VPN dynamically receive an IP address from this range. Use a private IP address range that doesn't overlap with the on-premises location that you connect from, or the VNet that you want to connect to. If you configure multiple protocols and SSTP is one of the protocols, then the configured address pool is split between the configured protocols equally.

On the Point-to-site configuration page, in the Address pool box, add the private IP address range that you want to use. VPN clients dynamically receive an IP address from the range that you specify. The minimum subnet mask is 29 bit for active/passive and 28 bit for active/active configuration.
Next, configure tunnel and authentication type.
Specify tunnel and authentication type
Note
If you don't see tunnel type or authentication type on the Point-to-site configuration page, your gateway is using the Basic SKU. The Basic SKU doesn't support IKEv2 or RADIUS authentication. If you want to use these settings, you need to delete and recreate the gateway using a different gateway SKU.
In this section, you specify the tunnel type and the authentication type. These settings can become complex, depending on the tunnel type you require and the VPN client software that will be used to make the connection from the user's operating system. The steps in this article will walk you through basic configuration settings and choices.
You can select options that contain multiple tunnel types from the dropdown - such as IKEv2 and OpenVPN(SSL) or IKEv2 and SSTP (SSL), however, only certain combinations of tunnel types and authentication types are supported. For example, Microsoft Entra authentication can only be used when you select OpenVPN (SSL) from the tunnel type dropdown, and not IKEv2 and OpenVPN(SSL).
Additionally, the tunnel type and the authentication type you choose impact the VPN client software that can be used to connect to Azure. Some VPN client software can only connect via IKEv2, others can only connect via OpenVPN. And some client software, while it supports a certain tunnel type, may not support the authentication type you choose.
As you can tell, planning the tunnel type and authentication type is important when you have a variety of VPN clients connecting from different operating systems. Consider the following criteria when you choose your tunnel type in combination with Azure certificate authentication. Other authentication types have different considerations.
Windows:
- Windows computers connecting via the native VPN client already installed in the operating system will try IKEv2 first and, if that doesn't connect, they fall back to SSTP (if you selected both IKEv2 and SSTP from the tunnel type dropdown).
- If you select the OpenVPN tunnel type, you can connect using an OpenVPN Client or the Azure VPN Client.
- The Azure VPN Client can support additional optional configuration settings such as custom routes and forced tunneling.
macOS and iOS:
- The native VPN client for iOS and macOS can only use the IKEv2 tunnel type to connect to Azure.
- The Azure VPN Client isn't supported for certificate authentication at this time, even if you select the OpenVPN tunnel type.
- If you want to use the OpenVPN tunnel type with certificate authentication, you can use an OpenVPN client.
- For macOS, you can use the Azure VPN Client with the OpenVPN tunnel type and Microsoft Entra authentication (not certificate authentication).
Android and Linux:
- The strongSwan client on Android and Linux can use only the IKEv2 tunnel type to connect. If you want to use the OpenVPN tunnel type, use a different VPN client.
Tunnel type
On the Point-to-site configuration page, select the Tunnel type. For this exercise, from the dropdown, select IKEv2 and OpenVPN(SSL).

Authentication type
For this exercise, select Azure certificate for the authentication type. If you're interested in other authentication types, see the articles for Microsoft Entra ID and RADIUS.

Upload root certificate public key information
In this section, you upload public root certificate data to Azure. Once the public certificate data is uploaded, Azure can use it to authenticate clients that have installed a client certificate generated from the trusted root certificate.
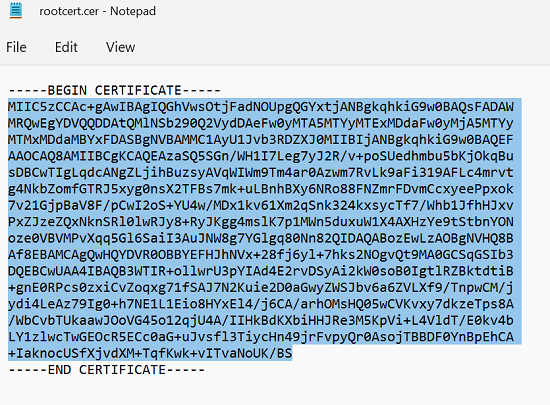
Make sure that you exported the root certificate as a Base-64 encoded X.509 (.CER) file in the previous steps. You need to export the certificate in this format so you can open the certificate with text editor. You don't need to export the private key.
Open the certificate with a text editor, such as Notepad. When copying the certificate data, make sure that you copy the text as one continuous line without carriage returns or line feeds. You may need to modify your view in the text editor to 'Show Symbol/Show all characters' to see the carriage returns and line feeds. Copy only the following section as one continuous line:
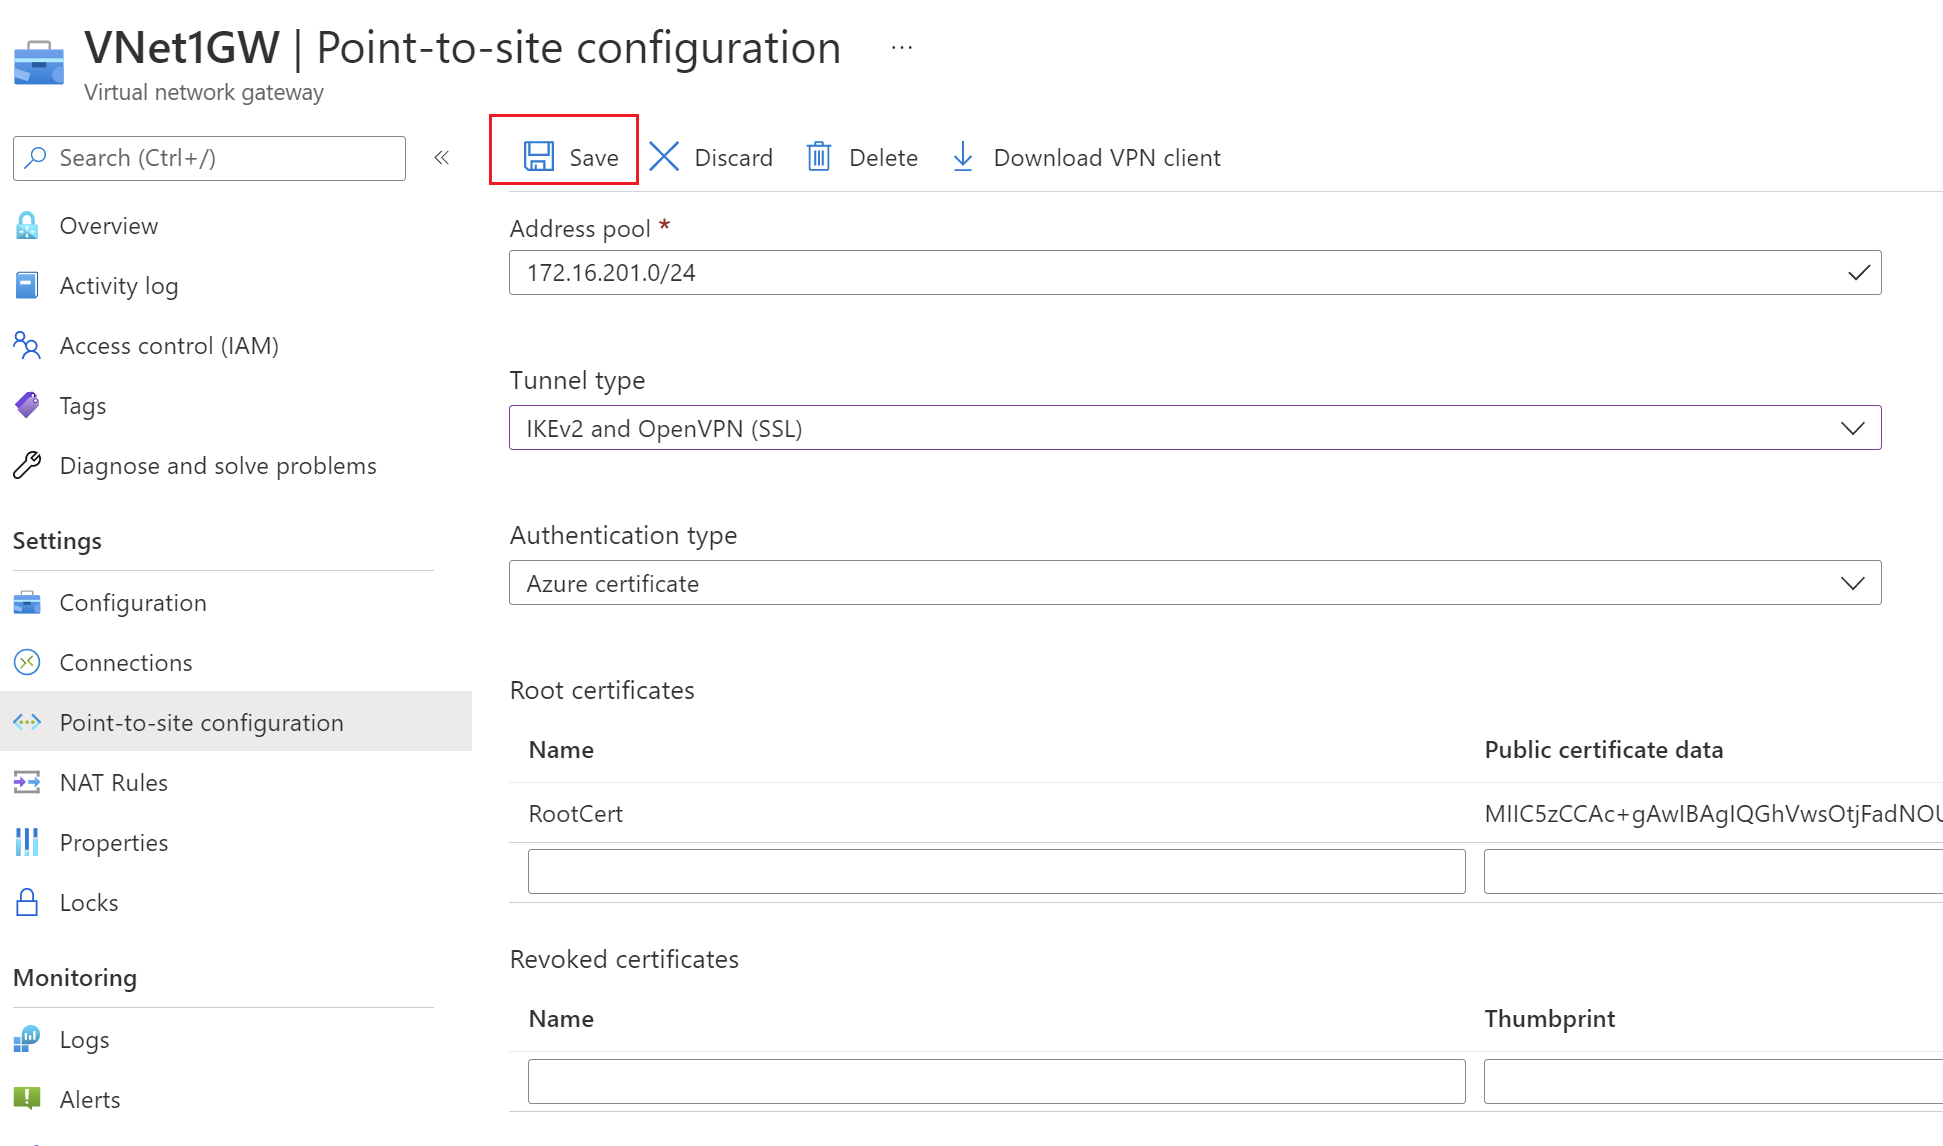
Navigate to your Virtual network gateway -> Point-to-site configuration page in the Root certificate section. This section is only visible if you have selected Azure certificate for the authentication type.
In the Root certificate section, you can add up to 20 trusted root certificates.
- Paste the certificate data into the Public certificate data field.
- Name the certificate.

Additional routes aren't necessary for this exercise. For more information about the custom routing feature, see Advertise custom routes.
Select Save at the top of the page to save all of the configuration settings.


Install exported client certificate
Each VPN client that wants to connect needs to have a client certificate. When you generate a client certificate, the computer you used will typically automatically install the client certificate for you. If you want to create a P2S connection from another computer, you need to install a client certificate on the computer that wants to connect. When installing a client certificate, you need the password that was created when the client certificate was exported.
Make sure the client certificate was exported as a .pfx along with the entire certificate chain (which is the default). Otherwise, the root certificate information isn't present on the client computer and the client won't be able to authenticate properly.
For install steps, see Install a client certificate.
Configure VPN clients and connect to Azure
Each VPN client is configured using the files in a VPN client profile configuration package that you generate and download. The configuration package contains settings that are specific to the VPN gateway that you created. If you make changes to the gateway, such as changing a tunnel type, certificate, or authentication type, you'll need to generate another VPN client profile configuration package and install it on each client. Otherwise, your VPN clients may not be able to connect.
For steps to generate a VPN client profile configuration package, configure your VPN clients, and connect to Azure, see the following articles:
To verify your connection
These instructions apply to Windows clients.
To verify that your VPN connection is active, open an elevated command prompt, and run ipconfig/all.
View the results. Notice that the IP address you received is one of the addresses within the point-to-site VPN Client Address Pool that you specified in your configuration. The results are similar to this example:
PPP adapter VNet1:
   Connection-specific DNS Suffix .:
   Description.....................: VNet1
   Physical Address................:
   DHCP Enabled....................: No
   Autoconfiguration Enabled.......: Yes
   IPv4 Address....................: 172.16.201.3(Preferred)
   Subnet Mask.....................: 255.255.255.255
   Default Gateway.................:
   NetBIOS over Tcpip..............: Enabled
To connect to a virtual machine
These instructions apply to Windows clients.
You can connect to a VM that's deployed to your virtual network by creating a Remote Desktop Connection to your VM. The best way to initially verify that you can connect to your VM is to connect by using its private IP address, rather than computer name. That way, you're testing to see if you can connect, not whether name resolution is configured properly.
Locate the private IP address. You can find the private IP address of a VM by either looking at the properties for the VM in the Azure portal or by using PowerShell.
Azure portal: Locate your VM in the Azure portal. View the properties for the VM. The private IP address is listed.
PowerShell: Use the example to view a list of VMs and private IP addresses from your resource groups. You don't need to modify this example before using it.
$VMs = Get-AzVM
$Nics = Get-AzNetworkInterface | Where-Object VirtualMachine -ne $null

foreach ($Nic in $Nics) {
$VM = $VMs | Where-Object -Property Id -eq $Nic.VirtualMachine.Id
$Prv = $Nic.IpConfigurations | Select-Object -ExpandProperty PrivateIpAddress
$Alloc = $Nic.IpConfigurations | Select-Object -ExpandProperty PrivateIpAllocationMethod
Write-Output "$($VM.Name): $Prv,$Alloc"
}
Verify that you're connected to your virtual network.
Open Remote Desktop Connection by entering RDP or Remote Desktop Connection in the search box on the taskbar. Then select Remote Desktop Connection. You can also open Remote Desktop Connection by using the
mstsccommand in PowerShell.In Remote Desktop Connection, enter the private IP address of the VM. You can select Show Options to adjust other settings and then connect.
If you're having trouble connecting to a VM over your VPN connection, check the following points:
- Verify that your VPN connection is successful.
- Verify that you're connecting to the private IP address for the VM.
- If you can connect to the VM by using the private IP address but not the computer name, verify that you've configured DNS properly. For more information about how name resolution works for VMs, see Name resolution for VMs.
For more information about RDP connections, see Troubleshoot Remote Desktop connections to a VM.
Verify that the VPN client configuration package was generated after the DNS server IP addresses were specified for the VNet. If you updated the DNS server IP addresses, generate and install a new VPN client configuration package.
Use 'ipconfig' to check the IPv4 address assigned to the Ethernet adapter on the computer from which you're connecting. If the IP address is within the address range of the VNet that you're connecting to, or within the address range of your VPNClientAddressPool, this is referred to as an overlapping address space. When your address space overlaps in this way, the network traffic doesn't reach Azure, it stays on the local network.
To add or remove trusted root certificates
You can add and remove trusted root certificates from Azure. When you remove a root certificate, clients that have a certificate generated from that root won't be able to authenticate, and thus won't be able to connect. If you want a client to authenticate and connect, you need to install a new client certificate generated from a root certificate that is trusted (uploaded) to Azure.
You can add up to 20 trusted root certificate .cer files to Azure. For instructions, see the section Upload a trusted root certificate.
To remove a trusted root certificate:
- Navigate to the Point-to-site configuration page for your virtual network gateway.
- In the Root certificate section of the page, locate the certificate that you want to remove.
- Select the ellipsis next to the certificate, and then select Remove.
To revoke a client certificate
You can revoke client certificates. The certificate revocation list allows you to selectively deny P2S connectivity based on individual client certificates. This is different than removing a trusted root certificate. If you remove a trusted root certificate .cer from Azure, it revokes the access for all client certificates generated/signed by the revoked root certificate. Revoking a client certificate, rather than the root certificate, allows the other certificates that were generated from the root certificate to continue to be used for authentication.
The common practice is to use the root certificate to manage access at team or organization levels, while using revoked client certificates for fine-grained access control on individual users.
You can revoke a client certificate by adding the thumbprint to the revocation list.
- Retrieve the client certificate thumbprint. For more information, see How to retrieve the Thumbprint of a Certificate.
- Copy the information to a text editor and remove all spaces so that it's a continuous string.
- Navigate to the virtual network gateway Point-to-site-configuration page. This is the same page that you used to upload a trusted root certificate.
- In the Revoked certificates section, input a friendly name for the certificate (it doesn't have to be the certificate CN).
- Copy and paste the thumbprint string to the Thumbprint field.
- The thumbprint validates and is automatically added to the revocation list. A message appears on the screen that the list is updating.
- After updating has completed, the certificate can no longer be used to connect. Clients that try to connect using this certificate receive a message saying that the certificate is no longer valid.
Point-to-site FAQ
For frequently asked questions, see the FAQ.
Next steps
Once your connection is complete, you can add virtual machines to your VNets. For more information, see Virtual Machines. To understand more about networking and virtual machines, see Azure and Linux VM network overview.
For P2S troubleshooting information, Troubleshooting Azure point-to-site connections.
Feedback
Coming soon: Throughout 2024 we will be phasing out GitHub Issues as the feedback mechanism for content and replacing it with a new feedback system. For more information see: https://aka.ms/ContentUserFeedback.
Submit and view feedback for