Tutorial: Create a site-to-site VPN connection in the Azure portal
In this tutorial, you use the Azure portal to create a site-to-site (S2S) VPN gateway connection between your on-premises network and a virtual network. You can also create this configuration by using Azure PowerShell or the Azure CLI.

In this tutorial, you:
- Create a virtual network.
- Create a VPN gateway.
- Create a local network gateway.
- Create a VPN connection.
- Verify the connection.
- Connect to a virtual machine.
Prerequisites
- You need an Azure account with an active subscription. If you don't have one, you can create one for free.
- Make sure you have a compatible VPN device and someone who can configure it. For more information about compatible VPN devices and device configuration, see About VPN devices.
- Verify that you have an externally facing public IPv4 address for your VPN device.
- If you're unfamiliar with the IP address ranges located in your on-premises network configuration, you need to coordinate with someone who can provide those details for you. When you create this configuration, you must specify the IP address range prefixes that Azure will route to your on-premises location. None of the subnets of your on-premises network can overlap with the virtual network subnets that you want to connect to.
Create a virtual network
In this section, you create a virtual network by using the following values:
- Resource group: TestRG1
- Name: VNet1
- Region: (US) East US
- IPv4 address space: 10.1.0.0/16
- Subnet name: FrontEnd
- Subnet address space: 10.1.0.0/24
Note
When you use a virtual network as part of a cross-premises architecture, be sure to coordinate with your on-premises network administrator to carve out an IP address range that you can use specifically for this virtual network. If a duplicate address range exists on both sides of the VPN connection, traffic will route in an unexpected way. Additionally, if you want to connect this virtual network to another virtual network, the address space can't overlap with the other virtual network. Plan your network configuration accordingly.
Sign in to the Azure portal.
In Search resources, service, and docs (G+/) at the top of the portal page, enter virtual network. Select Virtual network from the Marketplace search results to open the Virtual network page.
On the Virtual network page, select Create to open the Create virtual network page.
On the Basics tab, configure the virtual network settings for Project details and Instance details. You see a green check mark when the values you enter are validated. You can adjust the values shown in the example according to the settings that you require.
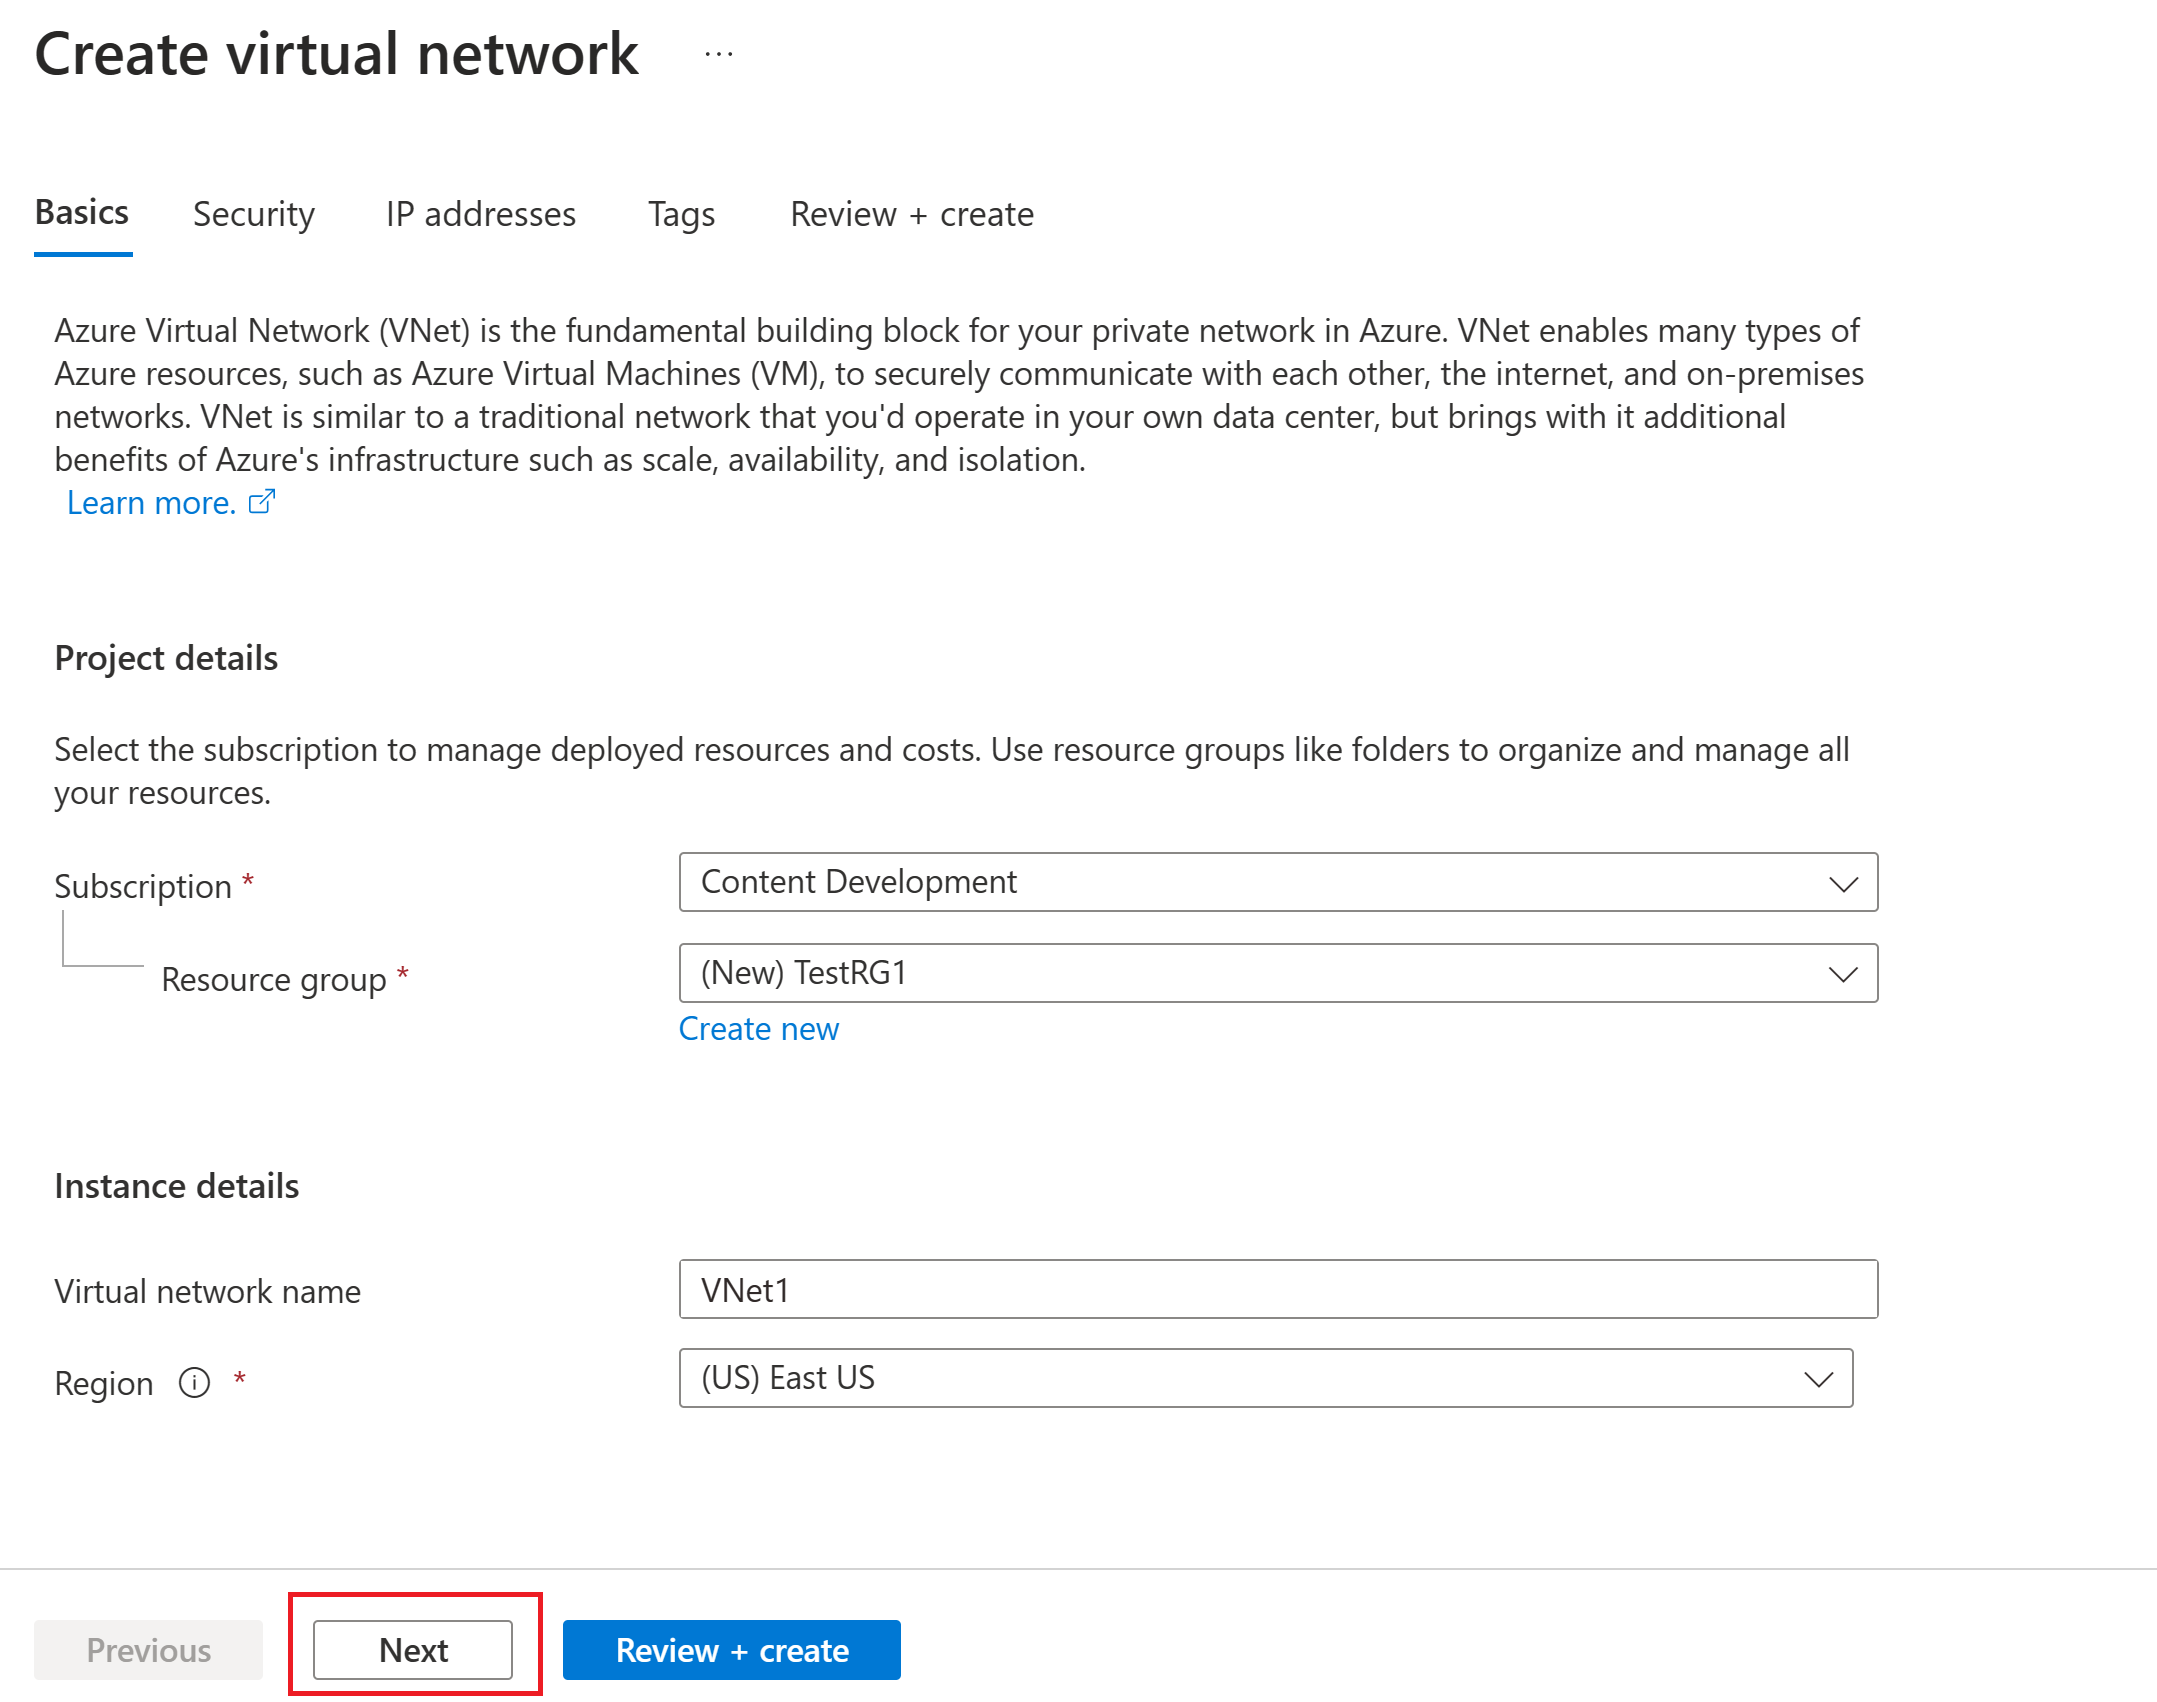
- Subscription: Verify that the subscription listed is the correct one. You can change subscriptions by using the dropdown box.
- Resource group: Select an existing resource group or select Create new to create a new one. For more information about resource groups, see Azure Resource Manager overview.
- Name: Enter the name for your virtual network.
- Region: Select the location for your virtual network. The location determines where the resources that you deploy to this virtual network will reside.
Select Next or Security to go to the Security tab. For this exercise, leave the default values for all the services on this page.
Select IP Addresses to go to the IP Addresses tab. On the IP Addresses tab, configure the settings.
IPv4 address space: By default, an address space is automatically created. You can select the address space and adjust it to reflect your own values. You can also add a different address space and remove the default that was automatically created. For example, you can specify the starting address as 10.1.0.0 and specify the address space size as /16. Then select Add to add that address space.
+ Add subnet: If you use the default address space, a default subnet is created automatically. If you change the address space, add a new subnet within that address space. Select + Add subnet to open the Add subnet window. Configure the following settings, and then select Add at the bottom of the page to add the values.
- Subnet name: An example is FrontEnd.
- Subnet address range: The address range for this subnet. Examples are 10.1.0.0 and /24.
Review the IP addresses page and remove any address spaces or subnets that you don't need.
Select Review + create to validate the virtual network settings.
After the settings are validated, select Create to create the virtual network.

After you create your virtual network, you can optionally configure Azure DDoS Protection. Azure DDoS Protection is simple to enable on any new or existing virtual network, and it requires no application or resource changes. For more information about Azure DDoS Protection, see What is Azure DDoS Protection?.
Create a gateway subnet
The virtual network gateway requires a specific subnet named GatewaySubnet. The gateway subnet is part of the IP address range for your virtual network and contains the IP addresses that the virtual network gateway resources and services use.
When you create the gateway subnet, you specify the number of IP addresses that the subnet contains. The number of IP addresses needed depends on the VPN gateway configuration that you want to create. Some configurations require more IP addresses than others. It's best to specify /27 or larger (/26, /25, etc.) for your gateway subnet.
If you see an error that specifies that the address space overlaps with a subnet, or that the subnet isn't contained within the address space for your virtual network, check your virtual network address range. You might not have enough IP addresses available in the address range you created for your virtual network. For example, if your default subnet encompasses the entire address range, there are no IP addresses left to create more subnets. You can either adjust your subnets within the existing address space to free up IP addresses or specify another address range and create the gateway subnet there.
- On the page for your virtual network, on the left pane, select Subnets to open the Subnets page.
- At the top of the page, select + Gateway subnet to open the Add subnet pane.
- The name is automatically entered as GatewaySubnet. Adjust the IP address range value, if necessary. An example is 10.1.255.0/27.
- Don't adjust the other values on the page. Select Save at the bottom of the page to save the subnet.
Create a VPN gateway
In this step, you create the virtual network gateway for your virtual network. Creating a gateway can often take 45 minutes or more, depending on the selected gateway SKU.
Create the gateway
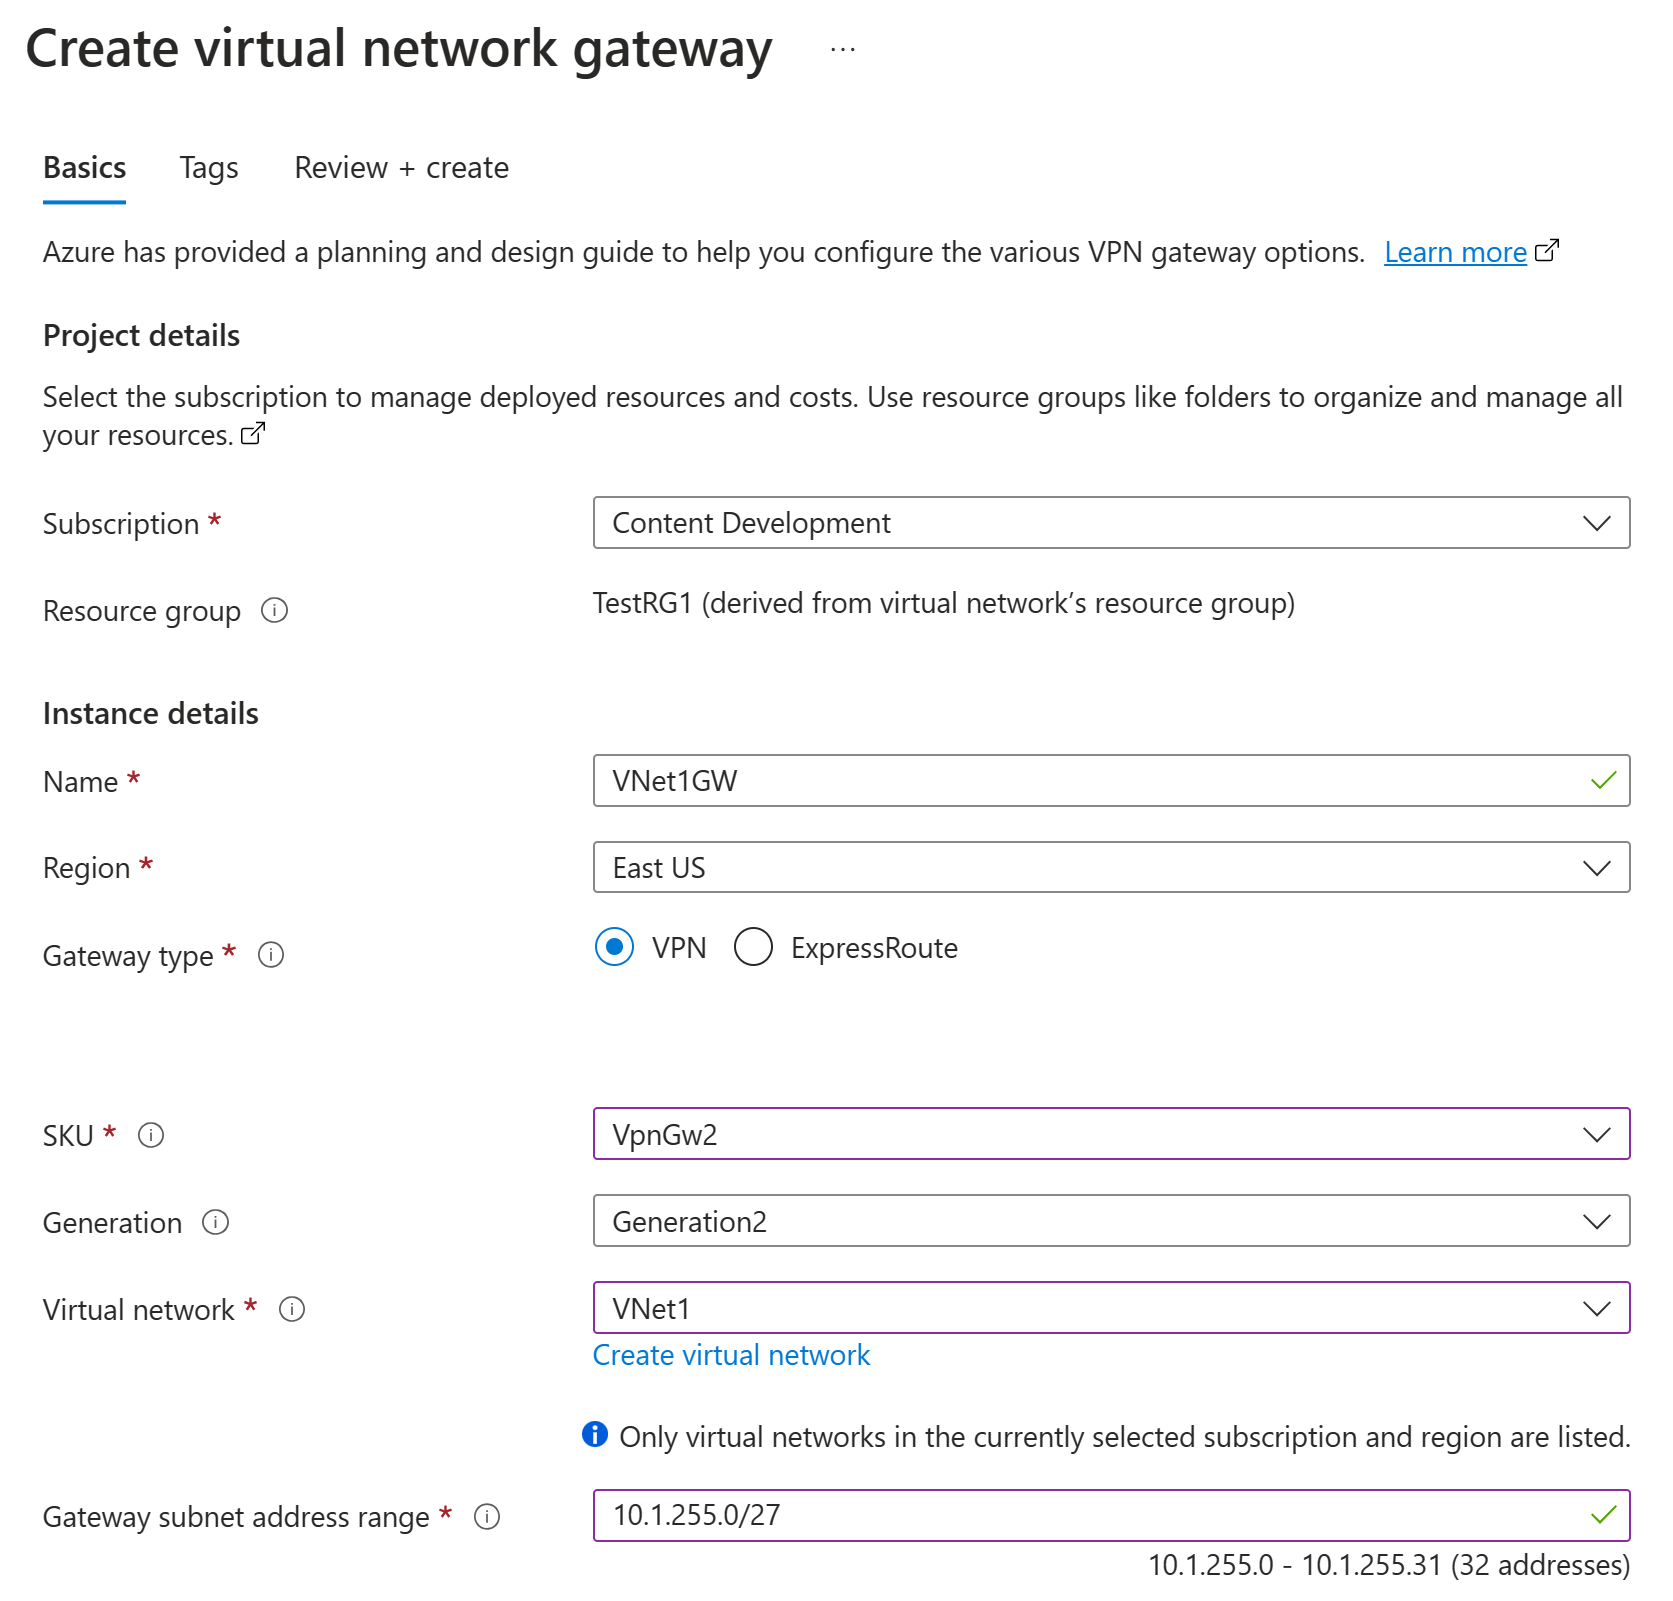
Create a virtual network gateway (VPN gateway) by using the following values:
- Name: VNet1GW
- Region: East US
- Gateway type: VPN
- SKU: VpnGw2
- Generation: Generation 2
- Virtual network: VNet1
- Gateway subnet address range: 10.1.255.0/27
- Public IP address: Create new
- Public IP address name: VNet1GWpip
- Enable active-active mode: Disabled
- Configure BGP: Disabled
In Search resources, services, and docs (G+/), enter virtual network gateway. Locate Virtual network gateway in the Marketplace search results and select it to open the Create virtual network gateway page.
On the Basics tab, fill in the values for Project details and Instance details.
Subscription: Select the subscription you want to use from the dropdown list.
Resource group: This setting is autofilled when you select your virtual network on this page.
Name: Name your gateway. Naming your gateway isn't the same as naming a gateway subnet. It's the name of the gateway object you're creating.
Region: Select the region in which you want to create this resource. The region for the gateway must be the same as the virtual network.
Gateway type: Select VPN. VPN gateways use the virtual network gateway type VPN.
SKU: From the dropdown list, select the gateway SKU that supports the features you want to use. See Gateway SKUs. In the portal, the SKUs available in the dropdown list depend on the
VPN typeyou select. The Basic SKU can only be configured using Azure CLI or PowerShell. You can't configure the Basic SKU in the Azure portal.Generation: Select the generation you want to use. We recommend using a Generation2 SKU. For more information, see Gateway SKUs.
Virtual network: From the dropdown list, select the virtual network to which you want to add this gateway. If you can't see the virtual network for which you want to create a gateway, make sure you selected the correct subscription and region in the previous settings.
Gateway subnet address range or Subnet: The gateway subnet is required to create a VPN gateway.
At this time, this field can show various different settings options, depending on the virtual network address space and whether you already created a subnet named GatewaySubnet for your virtual network.
If you don't have a gateway subnet and you don't see the option to create one on this page, go back to your virtual network and create the gateway subnet. Then, return to this page and configure the VPN gateway.

Specify the values for Public IP address. These settings specify the public IP address object that gets associated to the VPN gateway. The public IP address is assigned to this object when the VPN gateway is created. The only time the primary public IP address changes is when the gateway is deleted and re-created. It doesn't change across resizing, resetting, or other internal maintenance/upgrades of your VPN gateway.
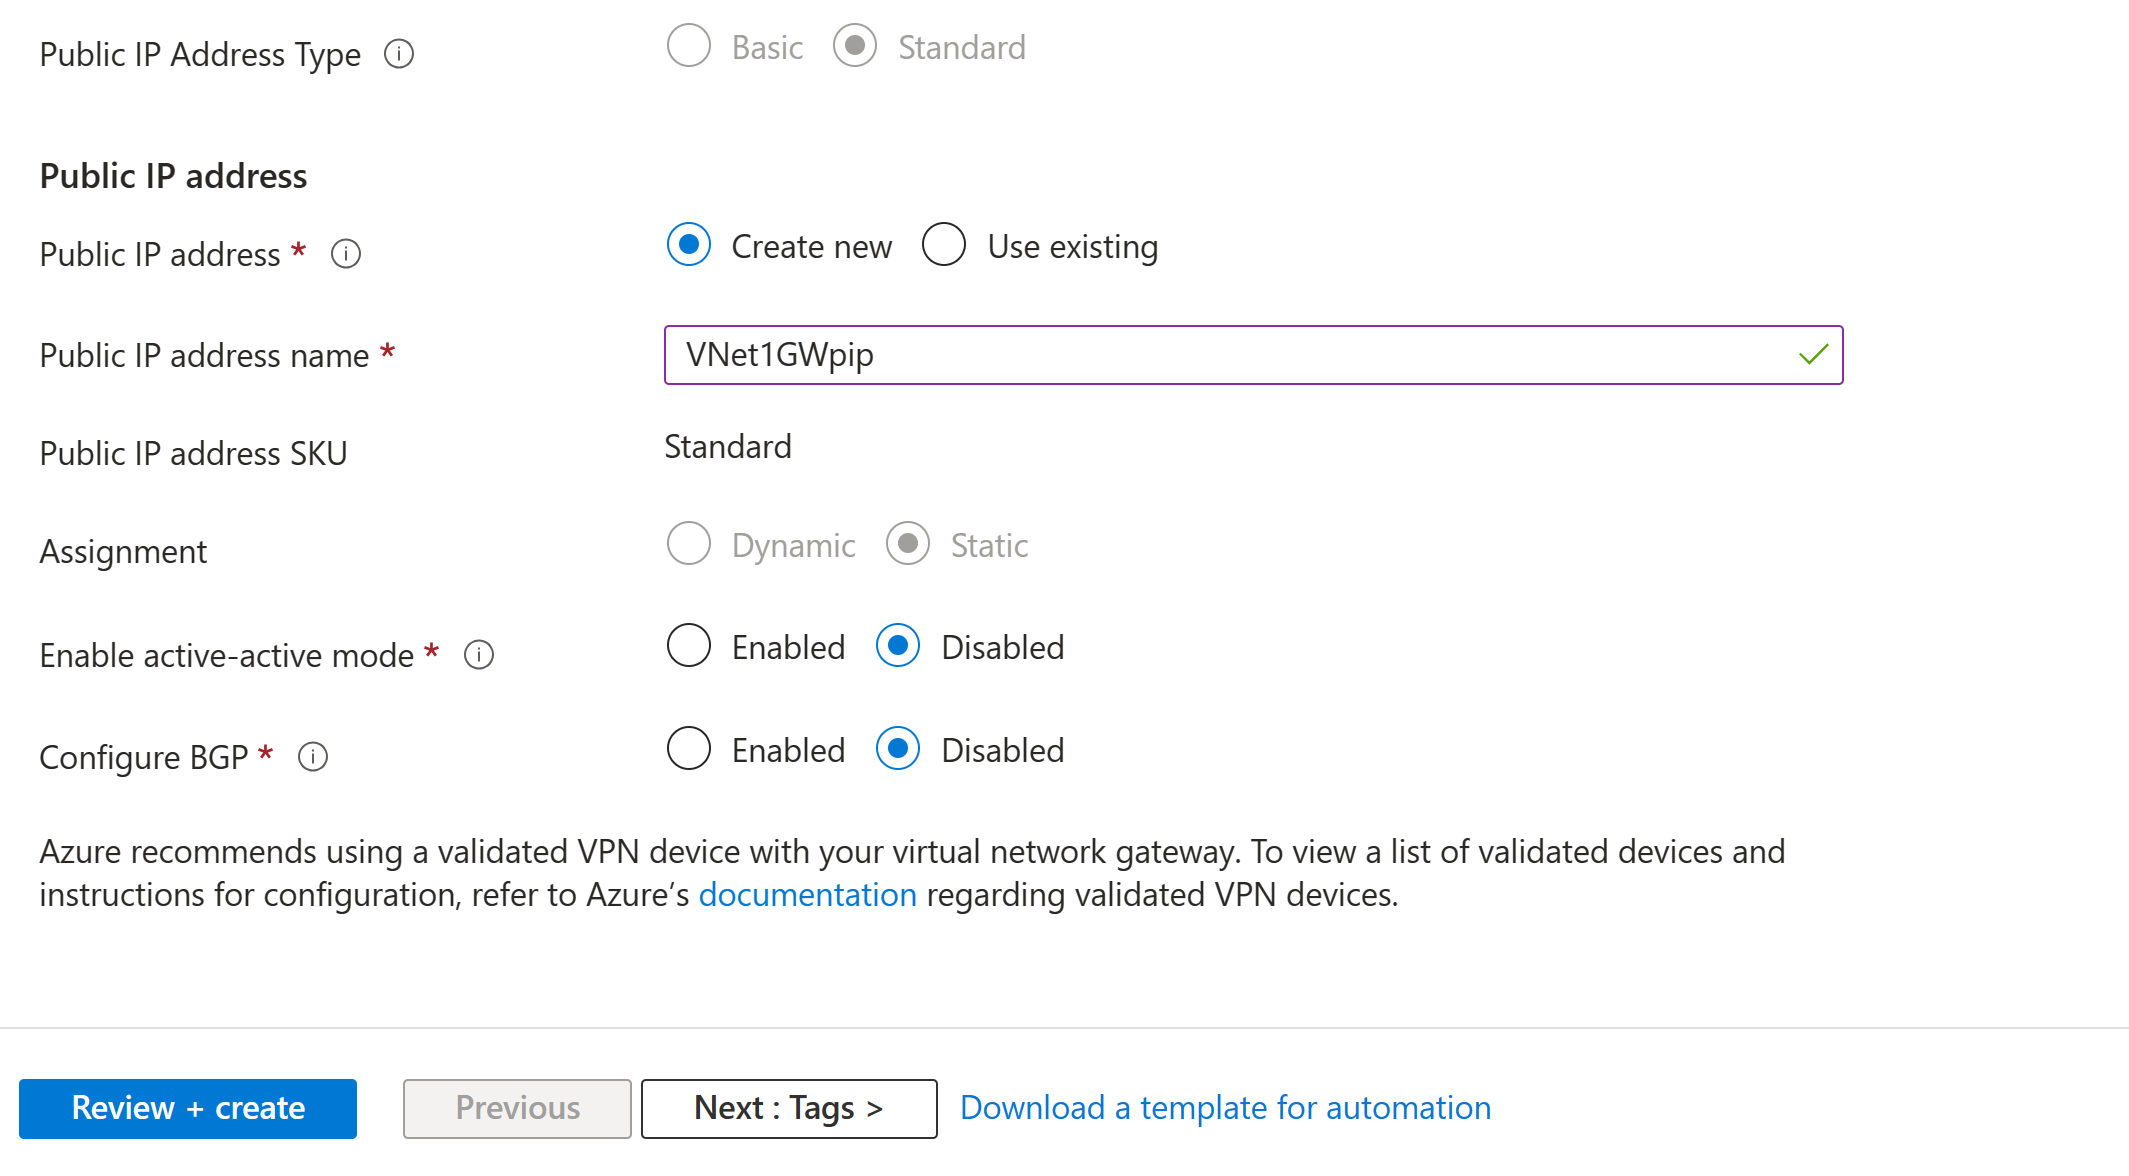
- Public IP address type: If you are presented with this option, select Standard. The Basic public IP address SKU is only supported for Basic SKU VPN gateways.
- Public IP address: Leave Create new selected.
- Public IP address name: In the text box, enter a name for your public IP address instance.
- Public IP address SKU: Setting is autoselected.
- Assignment: The assignment is typically autoselected. For the Standard SKU, assignment is always Static.
- Enable active-active mode: Select Disabled. Only enable this setting if you're creating an active-active gateway configuration.
- Configure BGP: Select Disabled, unless your configuration specifically requires this setting. If you do require this setting, the default ASN is 65515, although this value can be changed.
Select Review + create to run validation.
After validation passes, select Create to deploy the VPN gateway.

You can see the deployment status on the Overview page for your gateway. A gateway can take up to 45 minutes to fully create and deploy. After the gateway is created, you can view the IP address that was assigned to it by looking at the virtual network in the portal. The gateway appears as a connected device.
Important
When you work with gateway subnets, avoid associating a network security group (NSG) to the gateway subnet. Associating a network security group to this subnet might cause your virtual network gateway (VPN and ExpressRoute gateways) to stop functioning as expected. For more information about network security groups, see What is a network security group?.
View the public IP address
You can view the gateway public IP address on the Overview page for your gateway.

To see more information about the public IP address object, select the name/IP address link next to Public IP address.
Create a local network gateway
The local network gateway is a specific object that represents your on-premises location (the site) for routing purposes. You give the site a name by which Azure can refer to it, and then specify the IP address of the on-premises VPN device to which you create a connection. You also specify the IP address prefixes that are routed through the VPN gateway to the VPN device. The address prefixes you specify are the prefixes located on your on-premises network. If your on-premises network changes or you need to change the public IP address for the VPN device, you can easily update the values later.
Create a local network gateway by using the following values:
- Name: Site1
- Resource Group: TestRG1
- Location: East US
In the Azure portal, in Search resources, services, and docs (G+/), enter local network gateway. Locate local network gateway under Marketplace in the search results and select it to open the Create local network gateway page.
On the Create local network gateway page, on the Basics tab, specify the values for your local network gateway.
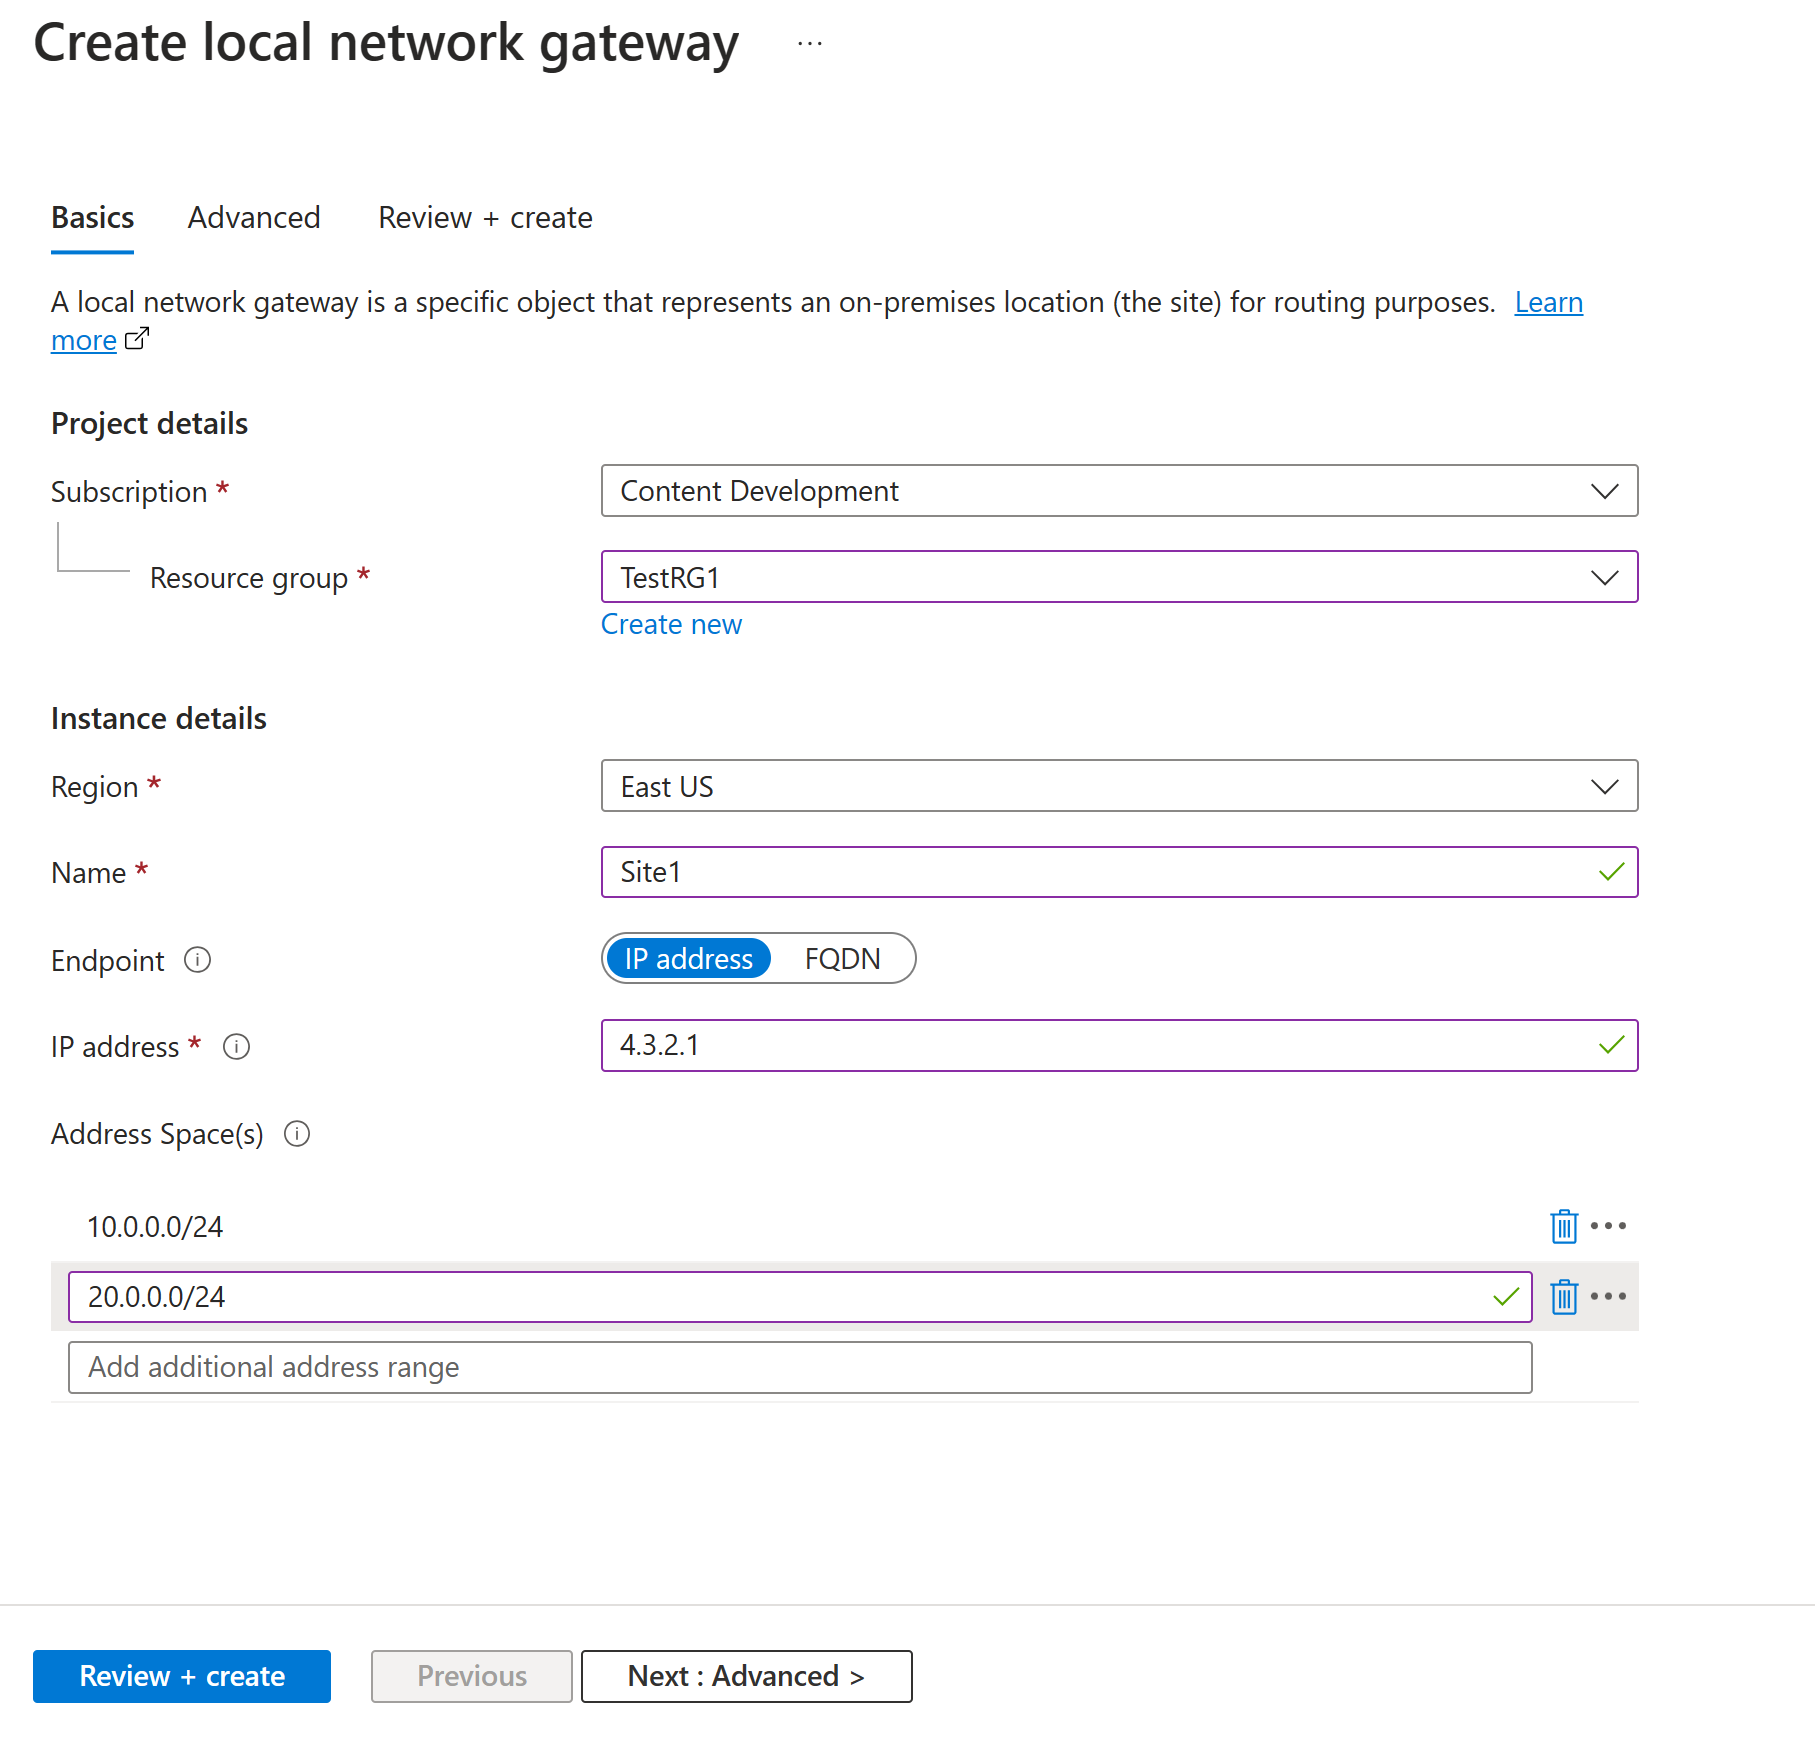
- Subscription: Verify that the correct subscription is showing.
- Resource group: Select the resource group that you want to use. You can either create a new resource group or select one that you've already created.
- Region: Select the region where this object will be created. You might want to select the same location where your virtual network resides, but you aren't required to do so.
- Name: Specify a name for your local network gateway object.
- Endpoint: Select the endpoint type for the on-premises VPN device as IP address or FQDN (Fully Qualified Domain Name).
- IP address: If you have a static public IP address allocated from your internet service provider (ISP) for your VPN device, select the IP address option. Fill in the IP address as shown in the example. This address is the public IP address of the VPN device that you want Azure VPN Gateway to connect to. If you don't have the IP address right now, you can use the values shown in the example. Later, you must go back and replace your placeholder IP address with the public IP address of your VPN device. Otherwise, Azure can't connect.
- FQDN: If you have a dynamic public IP address that could change after a certain period of time, often determined by your ISP, you can use a constant DNS name with a Dynamic DNS service to point to your current public IP address of your VPN device. Your Azure VPN gateway resolves the FQDN to determine the public IP address to connect to.
- Address space: The address space refers to the address ranges for the network that this local network represents. You can add multiple address space ranges. Make sure that the ranges you specify here don't overlap with ranges of other networks that you want to connect to. Azure routes the address range that you specify to the on-premises VPN device IP address. Use your own values here if you want to connect to your on-premises site, not the values shown in the example.
Note
- Azure VPN Gateway supports only one IPv4 address for each FQDN. If the domain name resolves to multiple IP addresses, VPN Gateway uses the first IP address returned by the DNS servers. To eliminate the uncertainty, we recommend that your FQDN always resolve to a single IPv4 address. IPv6 isn't supported.
- VPN Gateway maintains a DNS cache that's refreshed every 5 minutes. The gateway tries to resolve the FQDNs for disconnected tunnels only. Resetting the gateway also triggers FQDN resolution.
- Although the Azure VPN Gateway supports multiple connections to different Local Network Gateways with different FQDNs, all FQDNs must resolve to different IP addresses.
On the Advanced tab, you can configure BGP settings, if needed.
After you specify the values, select Review + create at the bottom of the page to validate the page.
Select Create to create the local network gateway object.

Configure your VPN device
Site-to-site connections to an on-premises network require a VPN device. In this step, you configure your VPN device. When you configure your VPN device, you need the following values:
- Shared key: This shared key is the same one that you specify when you create your site-to-site VPN connection. In our examples, we use a very simple shared key. We recommend that you generate a more complex key to use.
- Public IP address of your virtual network gateway: You can view the public IP address by using the Azure portal, PowerShell, or the Azure CLI. To find the public IP address of your VPN gateway by using the Azure portal, go to Virtual network gateways and then select the name of your gateway.
Depending on the VPN device that you have, you might be able to download a VPN device configuration script. For more information, see Download VPN device configuration scripts.
For more configuration information, see the following links:
- For information about compatible VPN devices, see VPN devices.
- Before you configure your VPN device, check for any Known device compatibility issues for the VPN device that you want to use.
- For links to device configuration settings, see Validated VPN devices. The device configuration links are provided on a best-effort basis. It's always best to check with your device manufacturer for the latest configuration information. The list shows the versions we've tested. If your OS isn't on that list, it's still possible that the version is compatible. Check with your device manufacturer to verify that the OS version for your VPN device is compatible.
- For an overview of VPN device configuration, see Overview of third-party VPN device configurations.
- For information about editing device configuration samples, see Editing samples.
- For cryptographic requirements, see About cryptographic requirements and Azure VPN gateways.
- For information about IPsec/IKE parameters, see About VPN devices and IPsec/IKE parameters for site-to-site VPN gateway connections. This link shows information about IKE version, Diffie-Hellman Group, authentication method, encryption and hashing algorithms, SA lifetime, PFS, and DPD, in addition to other parameter information that you need to complete your configuration.
- For IPsec/IKE policy configuration steps, see Configure IPsec/IKE policy for site-to-site VPN or VNet-to-VNet connections.
- To connect multiple policy-based VPN devices, see Connect Azure VPN gateways to multiple on-premises policy-based VPN devices using PowerShell.
Create VPN connections
Create a site-to-site VPN connection between your virtual network gateway and your on-premises VPN device.
Create a connection by using the following values:
- Local network gateway name: Site1
- Connection name: VNet1toSite1
- Shared key: For this example, you use abc123. But you can use whatever is compatible with your VPN hardware. The important thing is that the values match on both sides of the connection.
Go to your virtual network. On your virtual network page, in the left pane, select Connected devices. Locate your VPN gateway and select it to open it.
On the page for the gateway, select Connections.
At the top of the Connections page, select + Add to open the Create connection page.
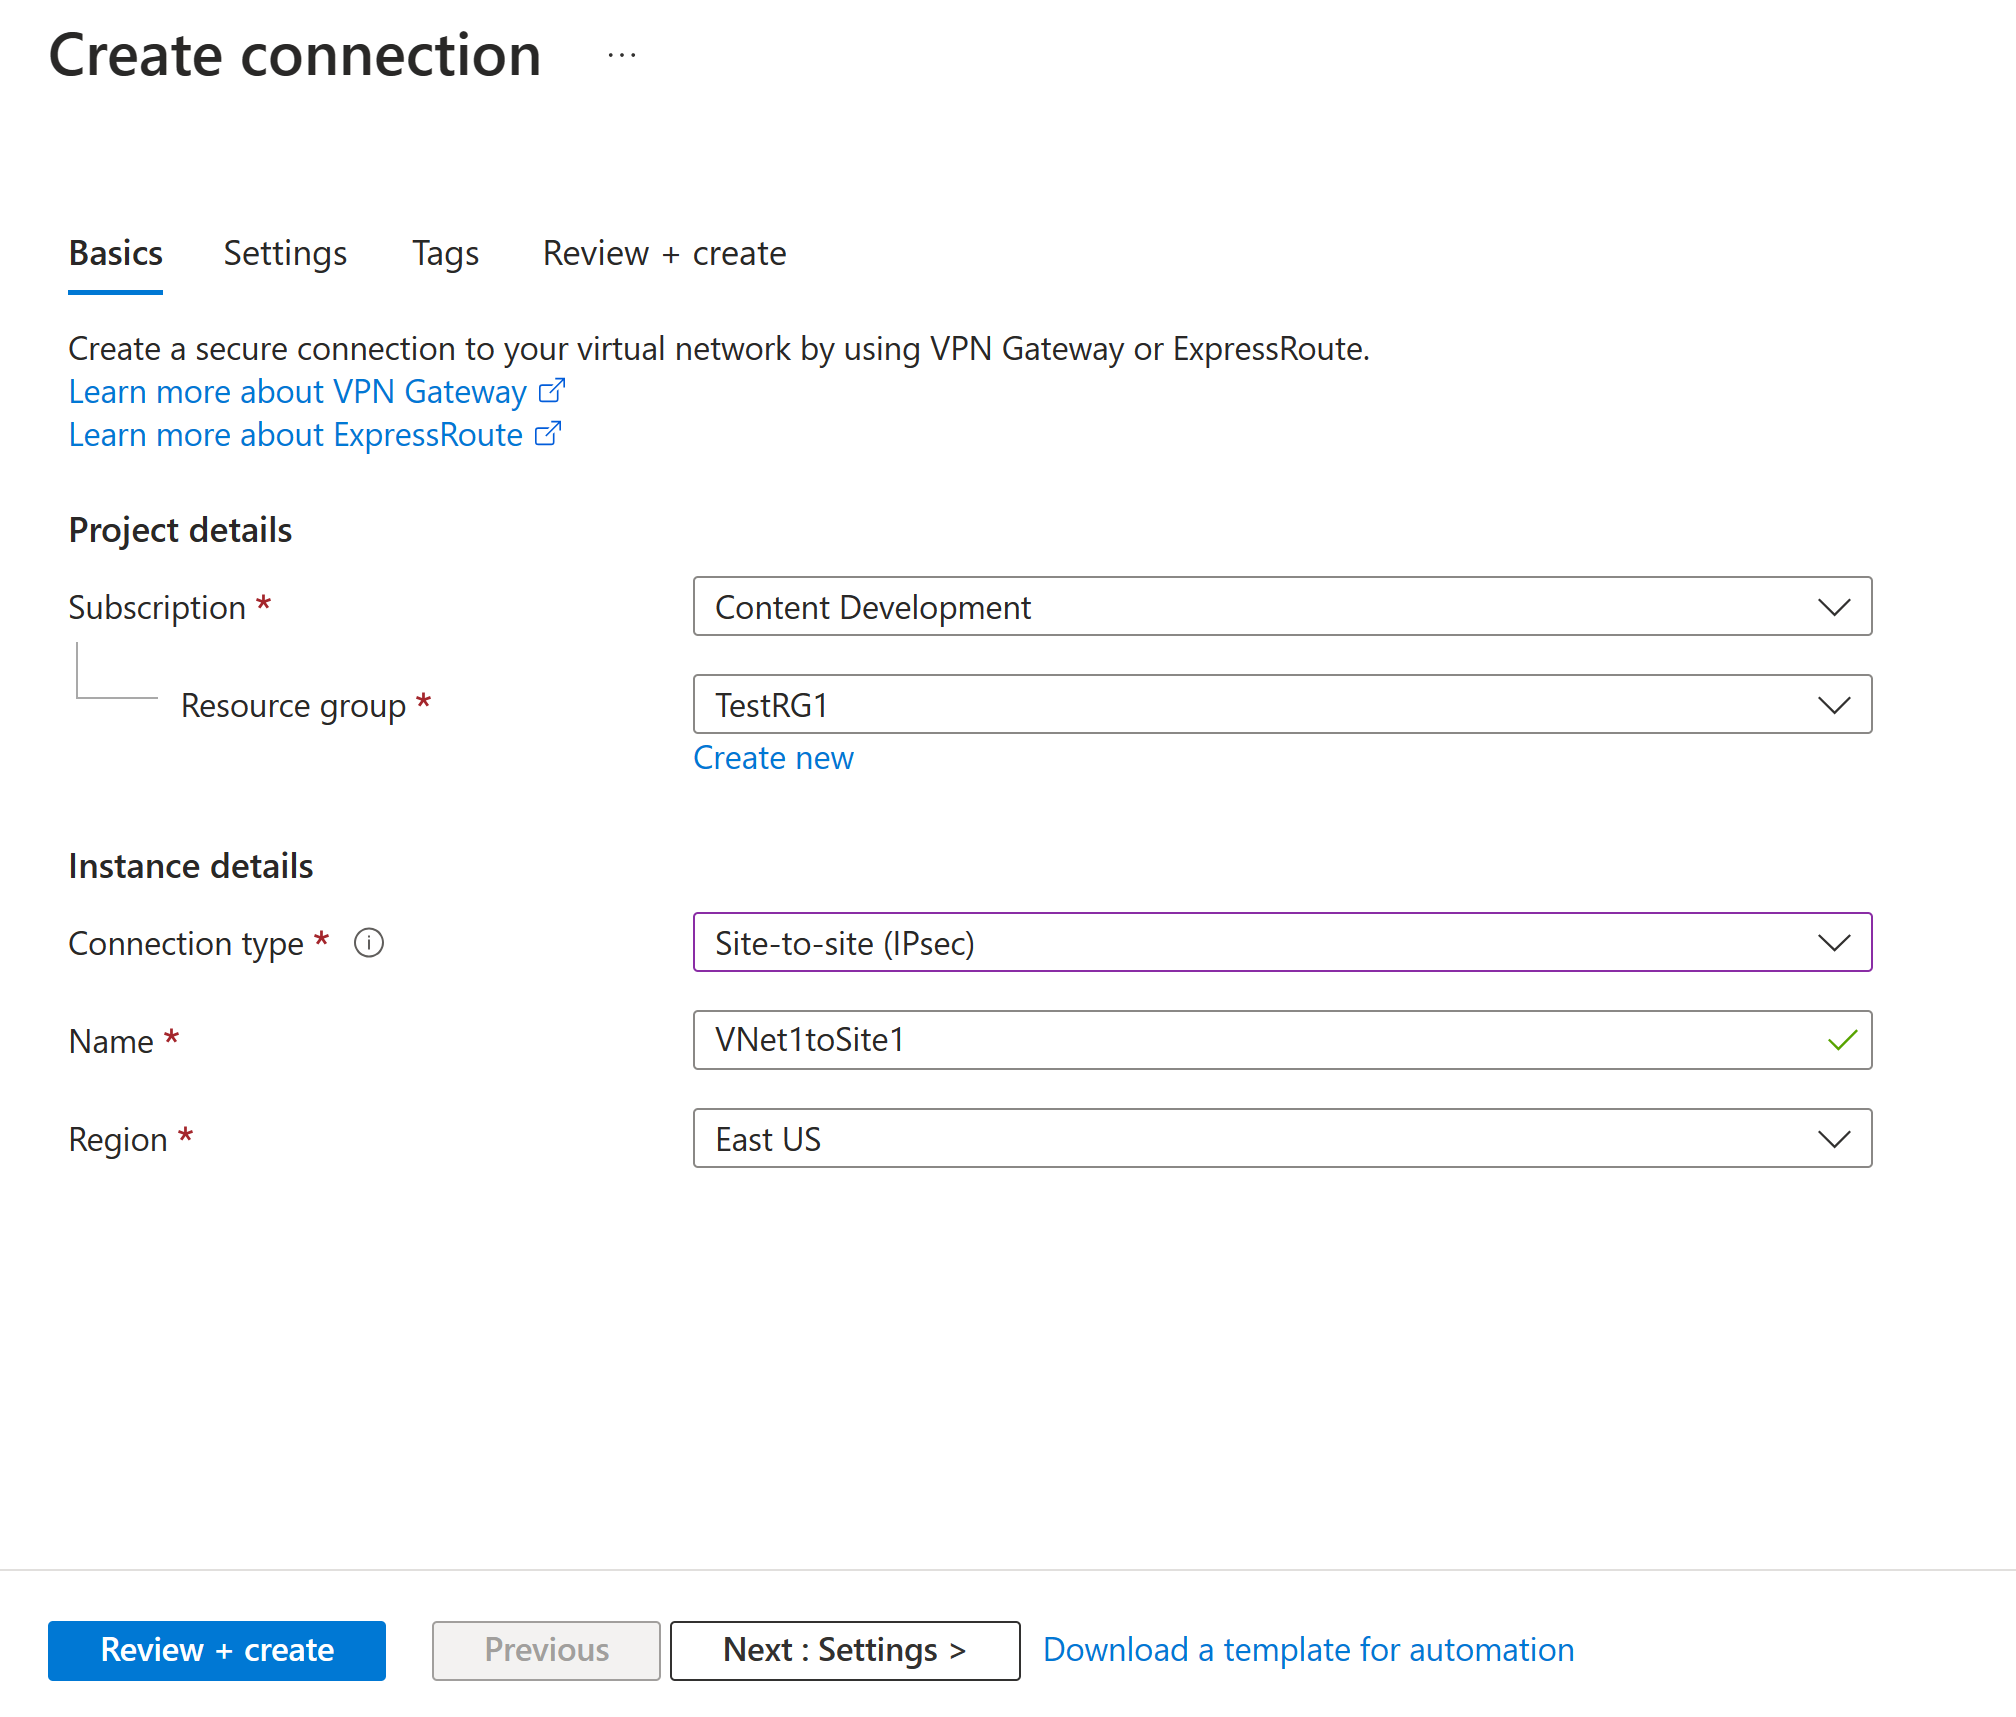
On the Create connection page, on the Basics tab, configure the values for your connection:
Under Project details, select the subscription and the resource group where your resources are located.
Under Instance details, configure the following settings:
- Connection type: Select Site-to-site (IPSec).
- Name: Name your connection.
- Region: Select the region for this connection.
Select the Settings tab and configure the following values:
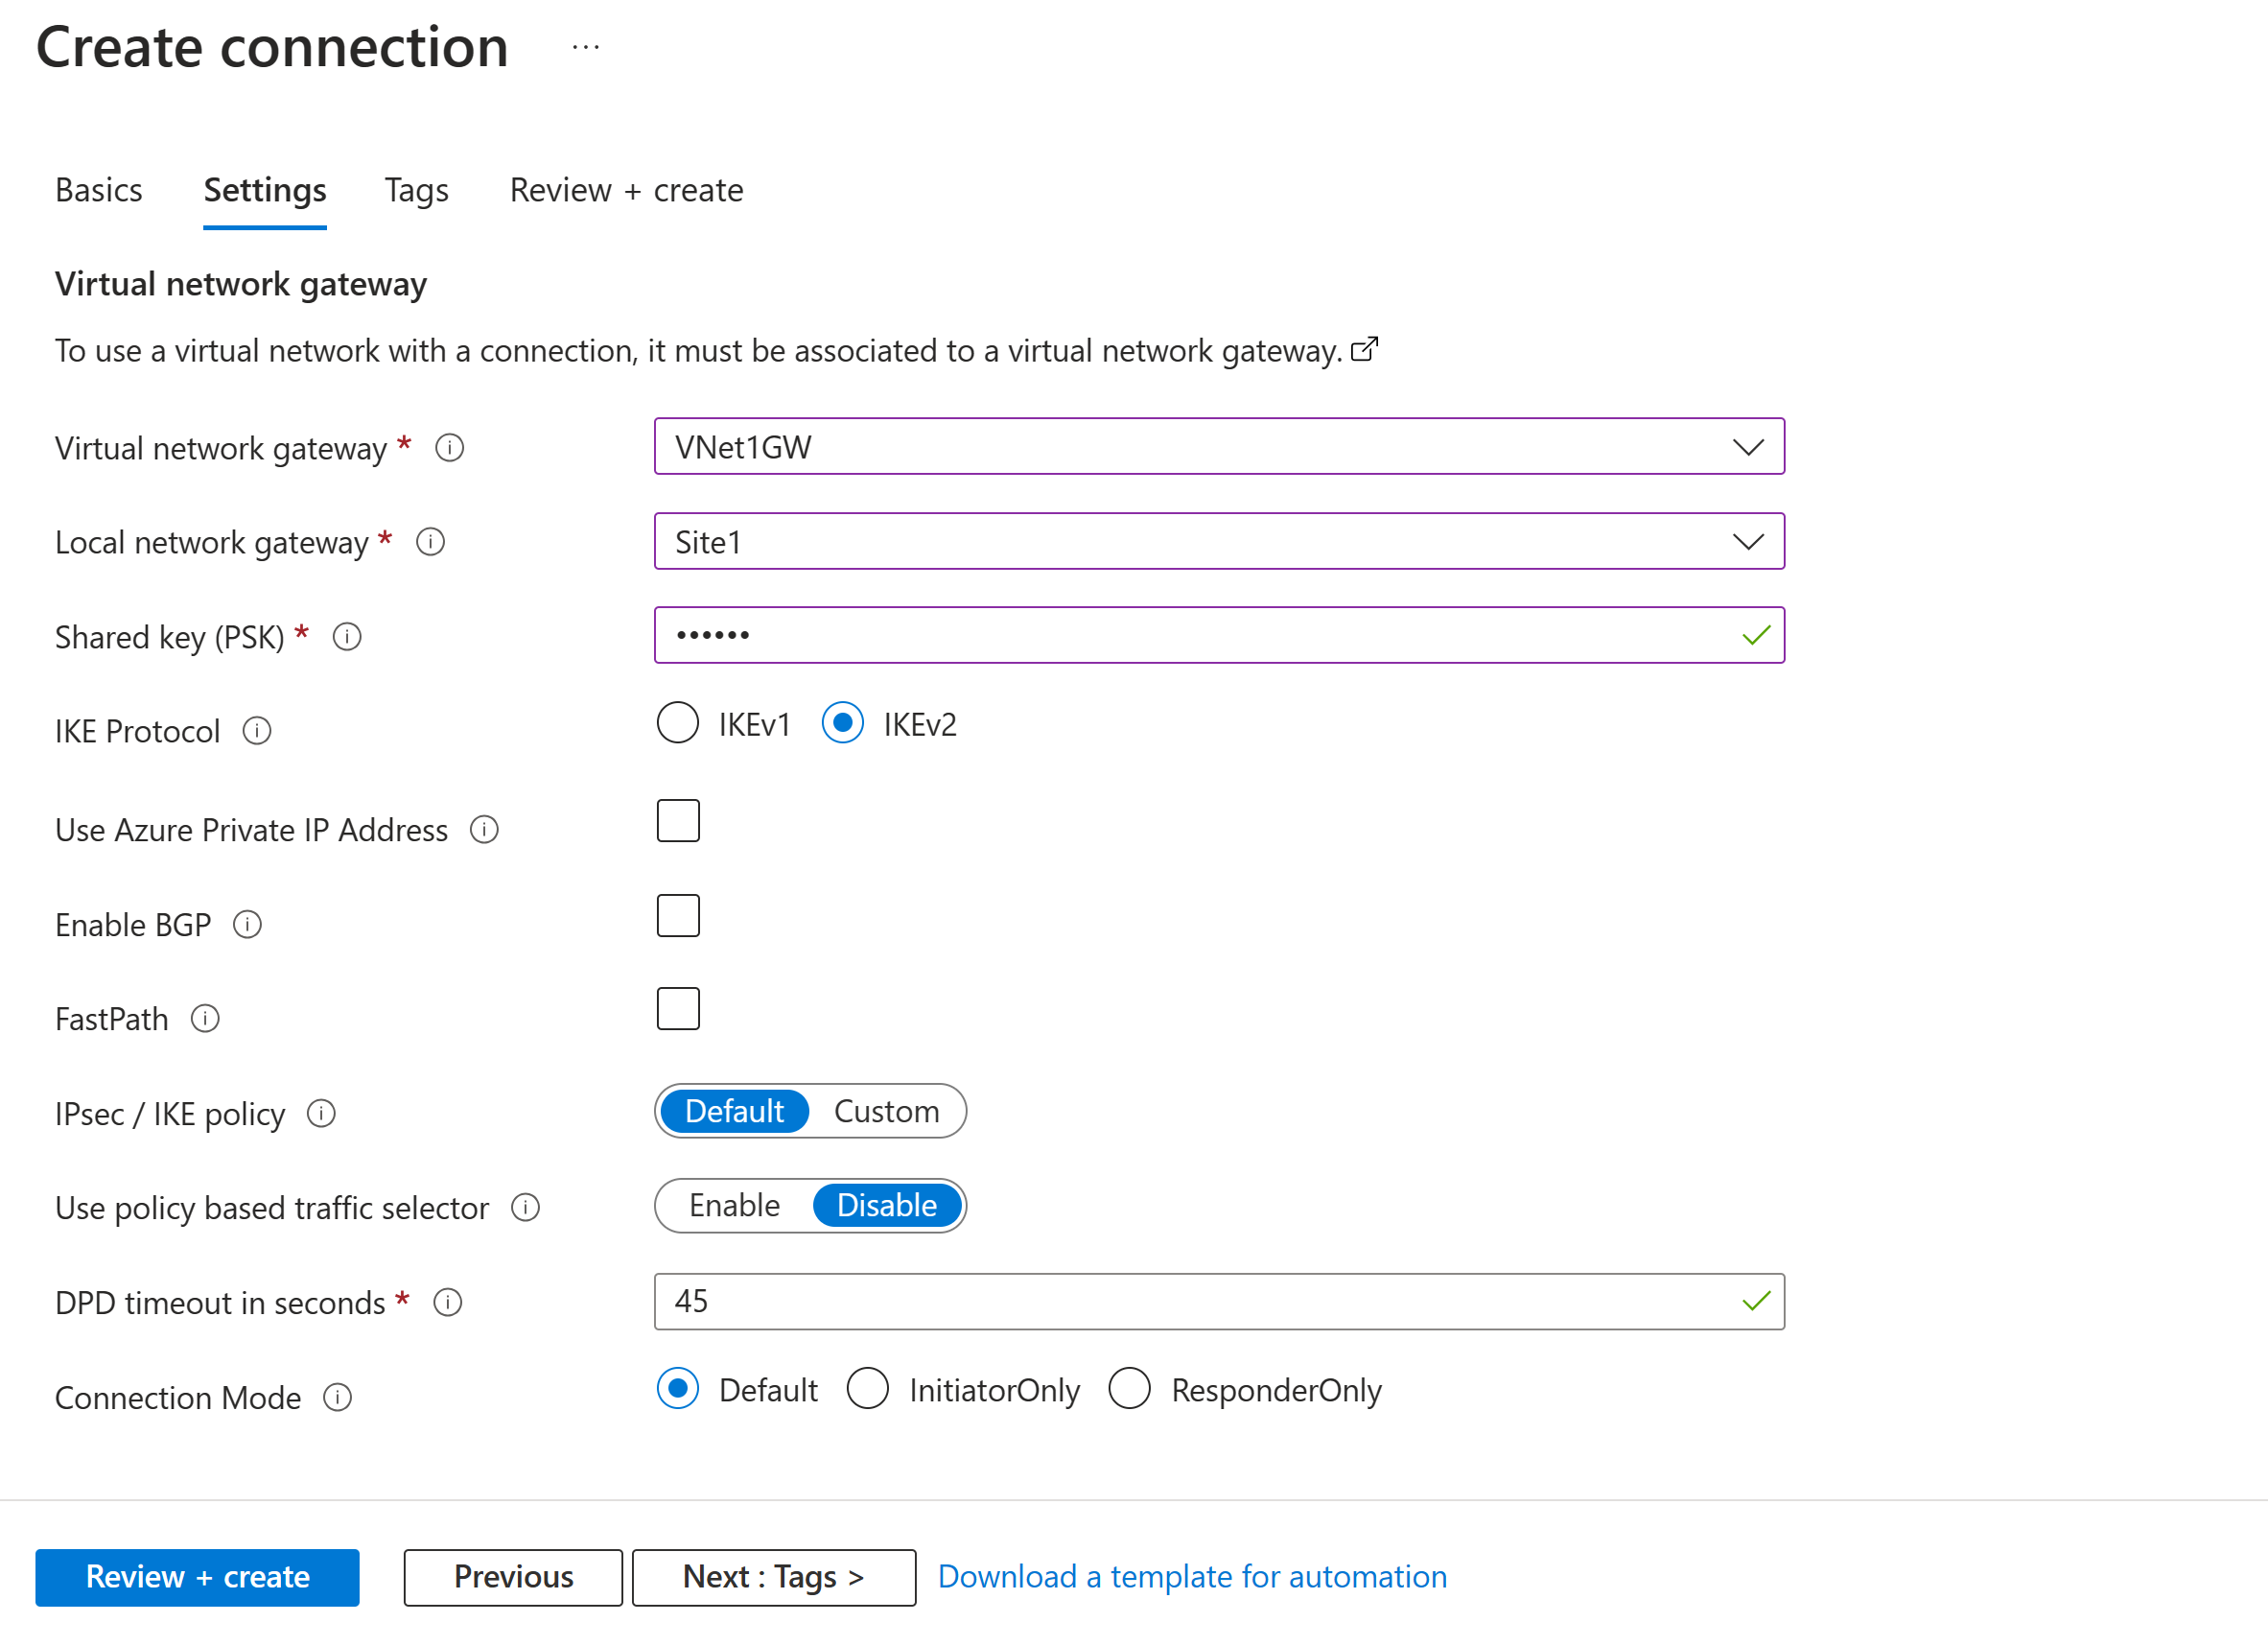
- Virtual network gateway: Select the virtual network gateway from the dropdown list.
- Local network gateway: Select the local network gateway from the dropdown list.
- Shared key: The value here must match the value that you're using for your local on-premises VPN device. If this field doesn't appear on your portal page, or you want to later update this key, you can do so once the connection object is created. Go to the connection object you created (example name: VNet1toSite1) and update the key on the Authentication page.
- IKE Protocol: Select IKEv2.
- Use Azure Private IP Address: Don't select.
- Enable BGP: Don't select.
- FastPath: Don't select.
- IPsec/IKE policy: Select Default.
- Use policy based traffic selector: Select Disable.
- DPD timeout in seconds: Select 45.
- Connection Mode: Select Default. This setting is used to specify which gateway can initiate the connection. For more information, see VPN Gateway settings - Connection modes.
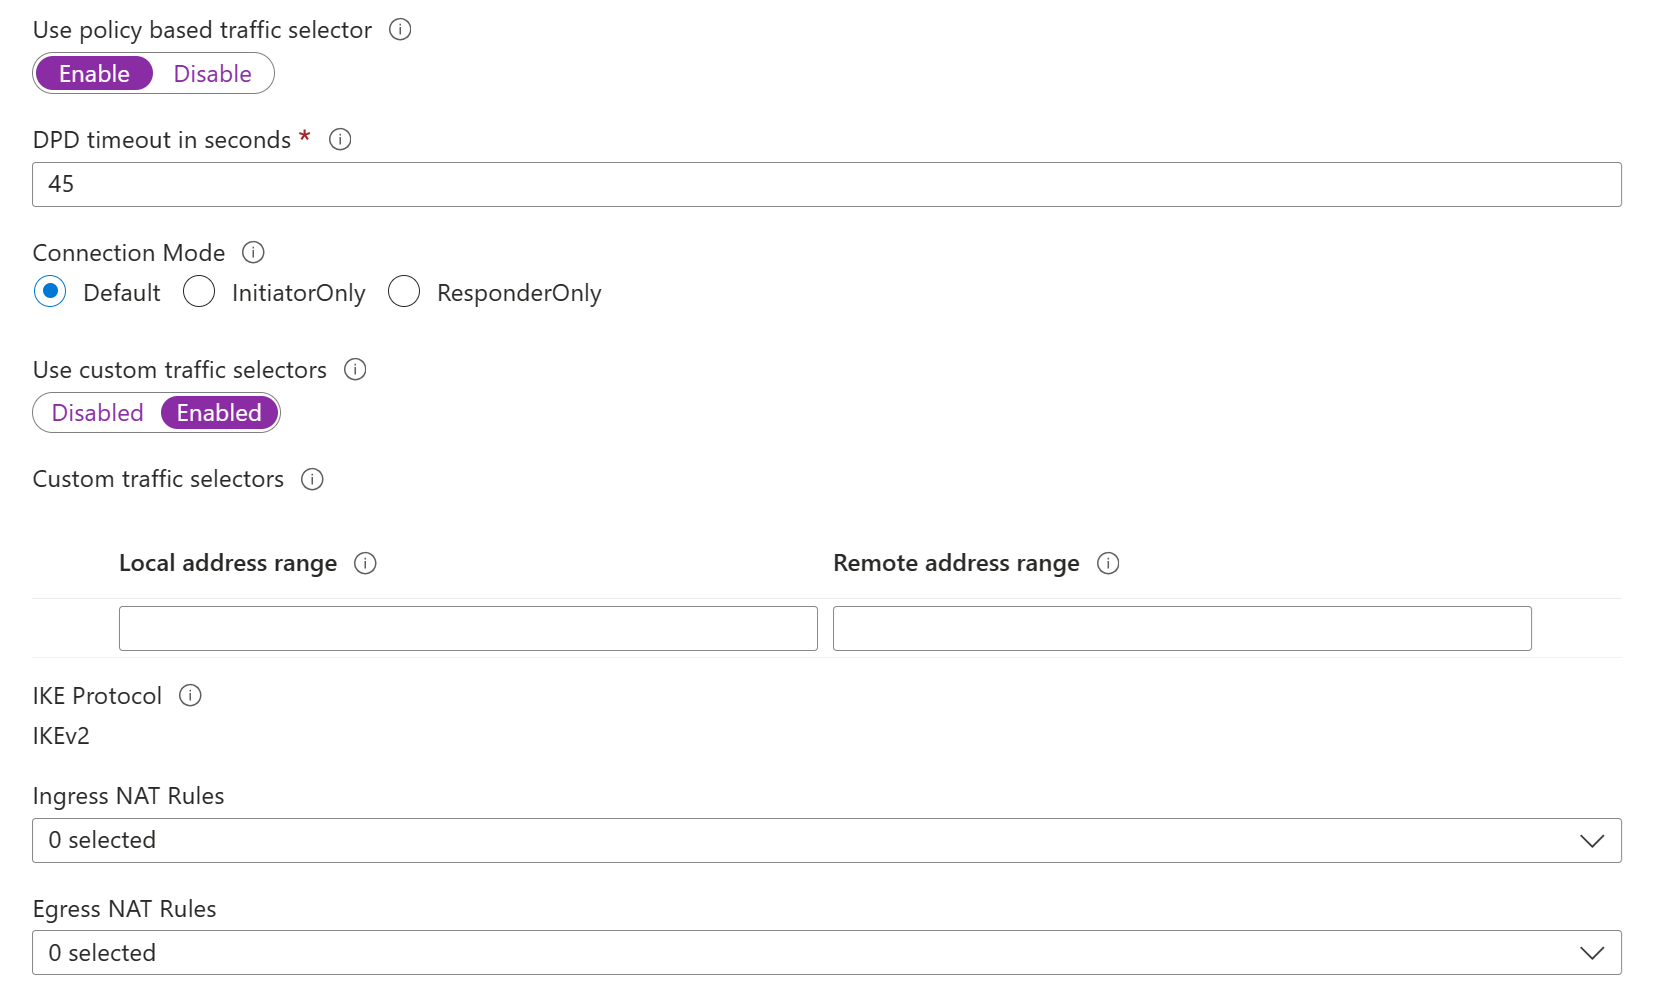
For NAT Rules Associations, leave both Ingress and Egress as 0 selected.
Select Review + create to validate your connection settings.
Select Create to create the connection.
After the deployment is finished, you can view the connection on the Connections page of the virtual network gateway. The status changes from Unknown to Connecting and then to Succeeded.


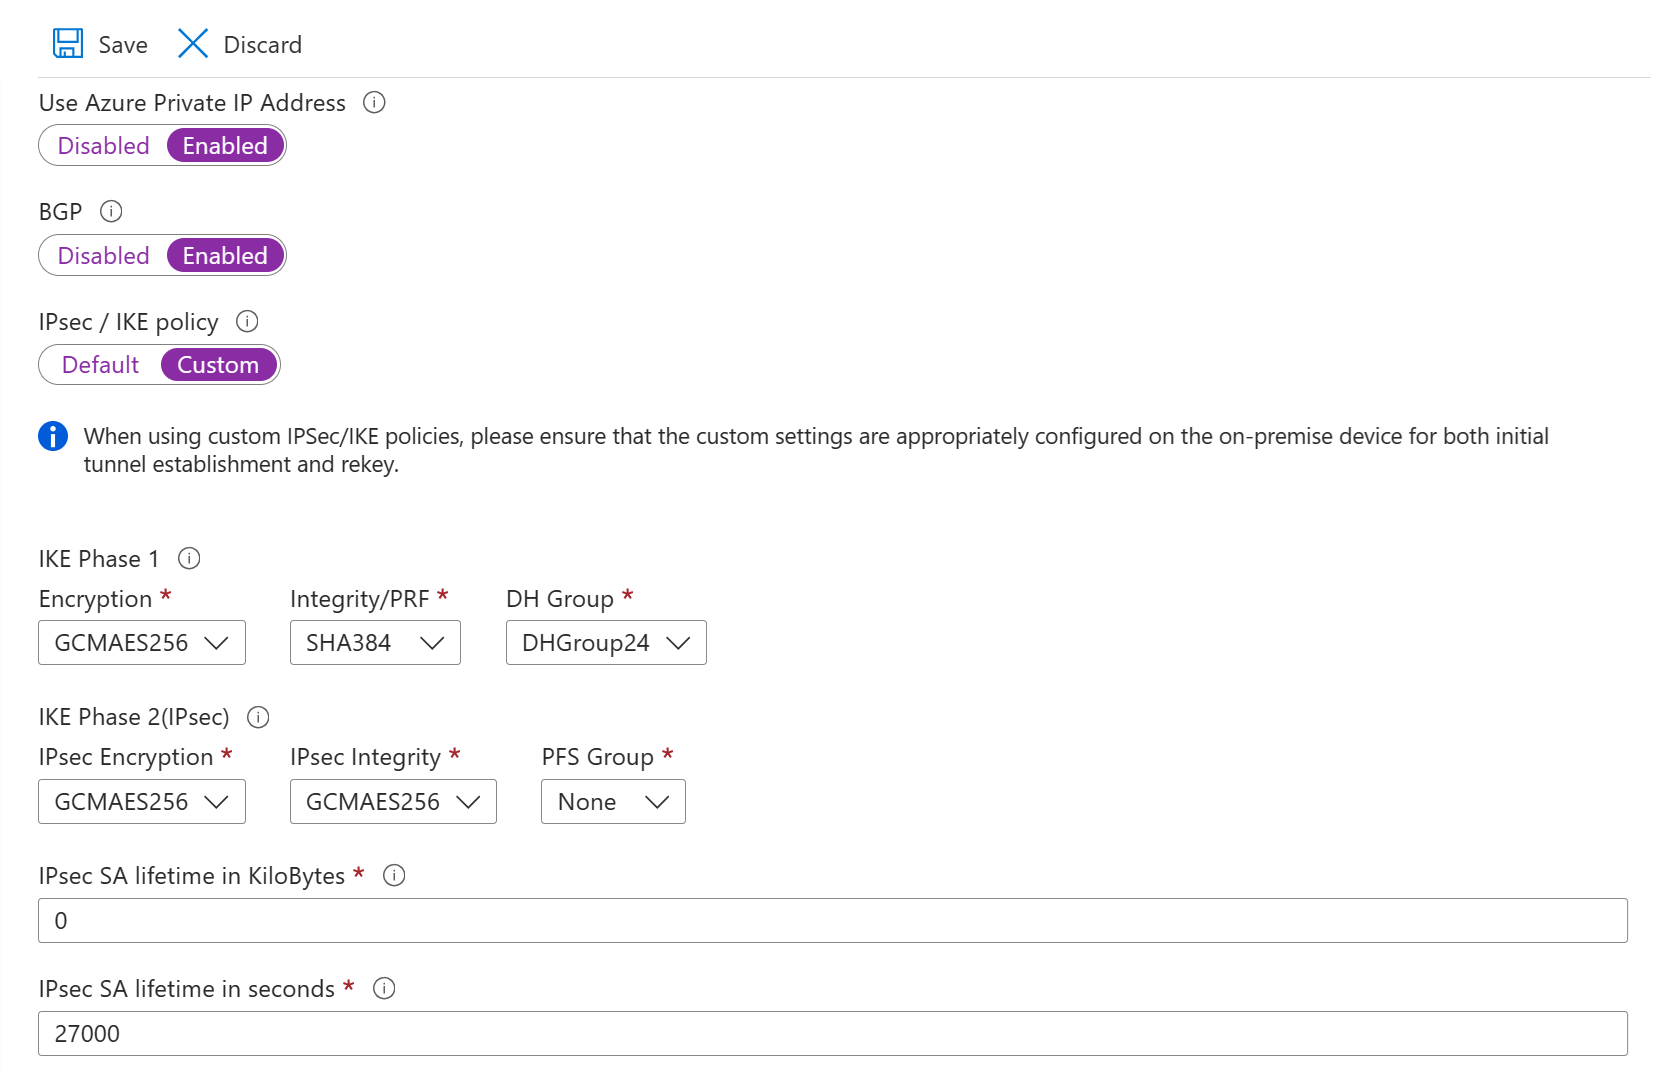
Configure more connection settings (optional)
You can configure more settings for your connection, if necessary. Otherwise, skip this section and leave the defaults in place. For more information, see Configure custom IPsec/IKE connection policies.
Go to your virtual network gateway and select Connections to open the Connections page.
Select the name of the connection you want to configure to open the Connection page.
On the left side of the Connection page, select Configuration to open the Configuration page. Make any necessary changes and then select Save.
In the following screenshots, the settings are enabled so that you can see the configuration settings that are available in the portal. Select the screenshot to see the expanded view. When you configure your connections, only configure the settings that you require. Otherwise, leave the default settings in place.


Verify the VPN connection
In the Azure portal, you can view the connection status of a VPN gateway by going to the connection. The following steps show one way to go to your connection and verify.
- On the Azure portal menu, select All resources or search for and select All resources from any page.
- Select your virtual network gateway.
- On the pane for your virtual network gateway, select Connections. You can see the status of each connection.
- Select the name of the connection that you want to verify to open Essentials. On the Essentials pane, you can view more information about your connection. The status is Succeeded and Connected after you make a successful connection.
Connect to a virtual machine
You can connect to a VM that's deployed to your virtual network by creating a Remote Desktop Connection to your VM. The best way to initially verify that you can connect to your VM is to connect by using its private IP address, rather than computer name. That way, you're testing to see if you can connect, not whether name resolution is configured properly.
Locate the private IP address. You can find the private IP address of a VM by either looking at the properties for the VM in the Azure portal or by using PowerShell.
Azure portal: Locate your VM in the Azure portal. View the properties for the VM. The private IP address is listed.
PowerShell: Use the example to view a list of VMs and private IP addresses from your resource groups. You don't need to modify this example before using it.
$VMs = Get-AzVM
$Nics = Get-AzNetworkInterface | Where-Object VirtualMachine -ne $null

foreach ($Nic in $Nics) {
$VM = $VMs | Where-Object -Property Id -eq $Nic.VirtualMachine.Id
$Prv = $Nic.IpConfigurations | Select-Object -ExpandProperty PrivateIpAddress
$Alloc = $Nic.IpConfigurations | Select-Object -ExpandProperty PrivateIpAllocationMethod
Write-Output "$($VM.Name): $Prv,$Alloc"
}
Verify that you're connected to your virtual network.
Open Remote Desktop Connection by entering RDP or Remote Desktop Connection in the search box on the taskbar. Then select Remote Desktop Connection. You can also open Remote Desktop Connection by using the
mstsccommand in PowerShell.In Remote Desktop Connection, enter the private IP address of the VM. You can select Show Options to adjust other settings and then connect.
If you're having trouble connecting to a VM over your VPN connection, check the following points:
- Verify that your VPN connection is successful.
- Verify that you're connecting to the private IP address for the VM.
- If you can connect to the VM by using the private IP address but not the computer name, verify that you've configured DNS properly. For more information about how name resolution works for VMs, see Name resolution for VMs.
For more information about RDP connections, see Troubleshoot Remote Desktop connections to a VM.
Optional steps
This section describes options that are available to you.
Resize a gateway SKU
There are specific rules about resizing versus changing a gateway SKU. In this section, you resize the SKU. For more information, see Resize or change gateway SKUs.
Go to the Configuration page for your virtual network gateway.
On the right side of the page, select the dropdown arrow to show a list of available SKUs.
Notice that the list only populates SKUs that you're able to use to resize your current SKU. If you don't see the SKU you want to use, instead of resizing, you have to change to a new SKU.
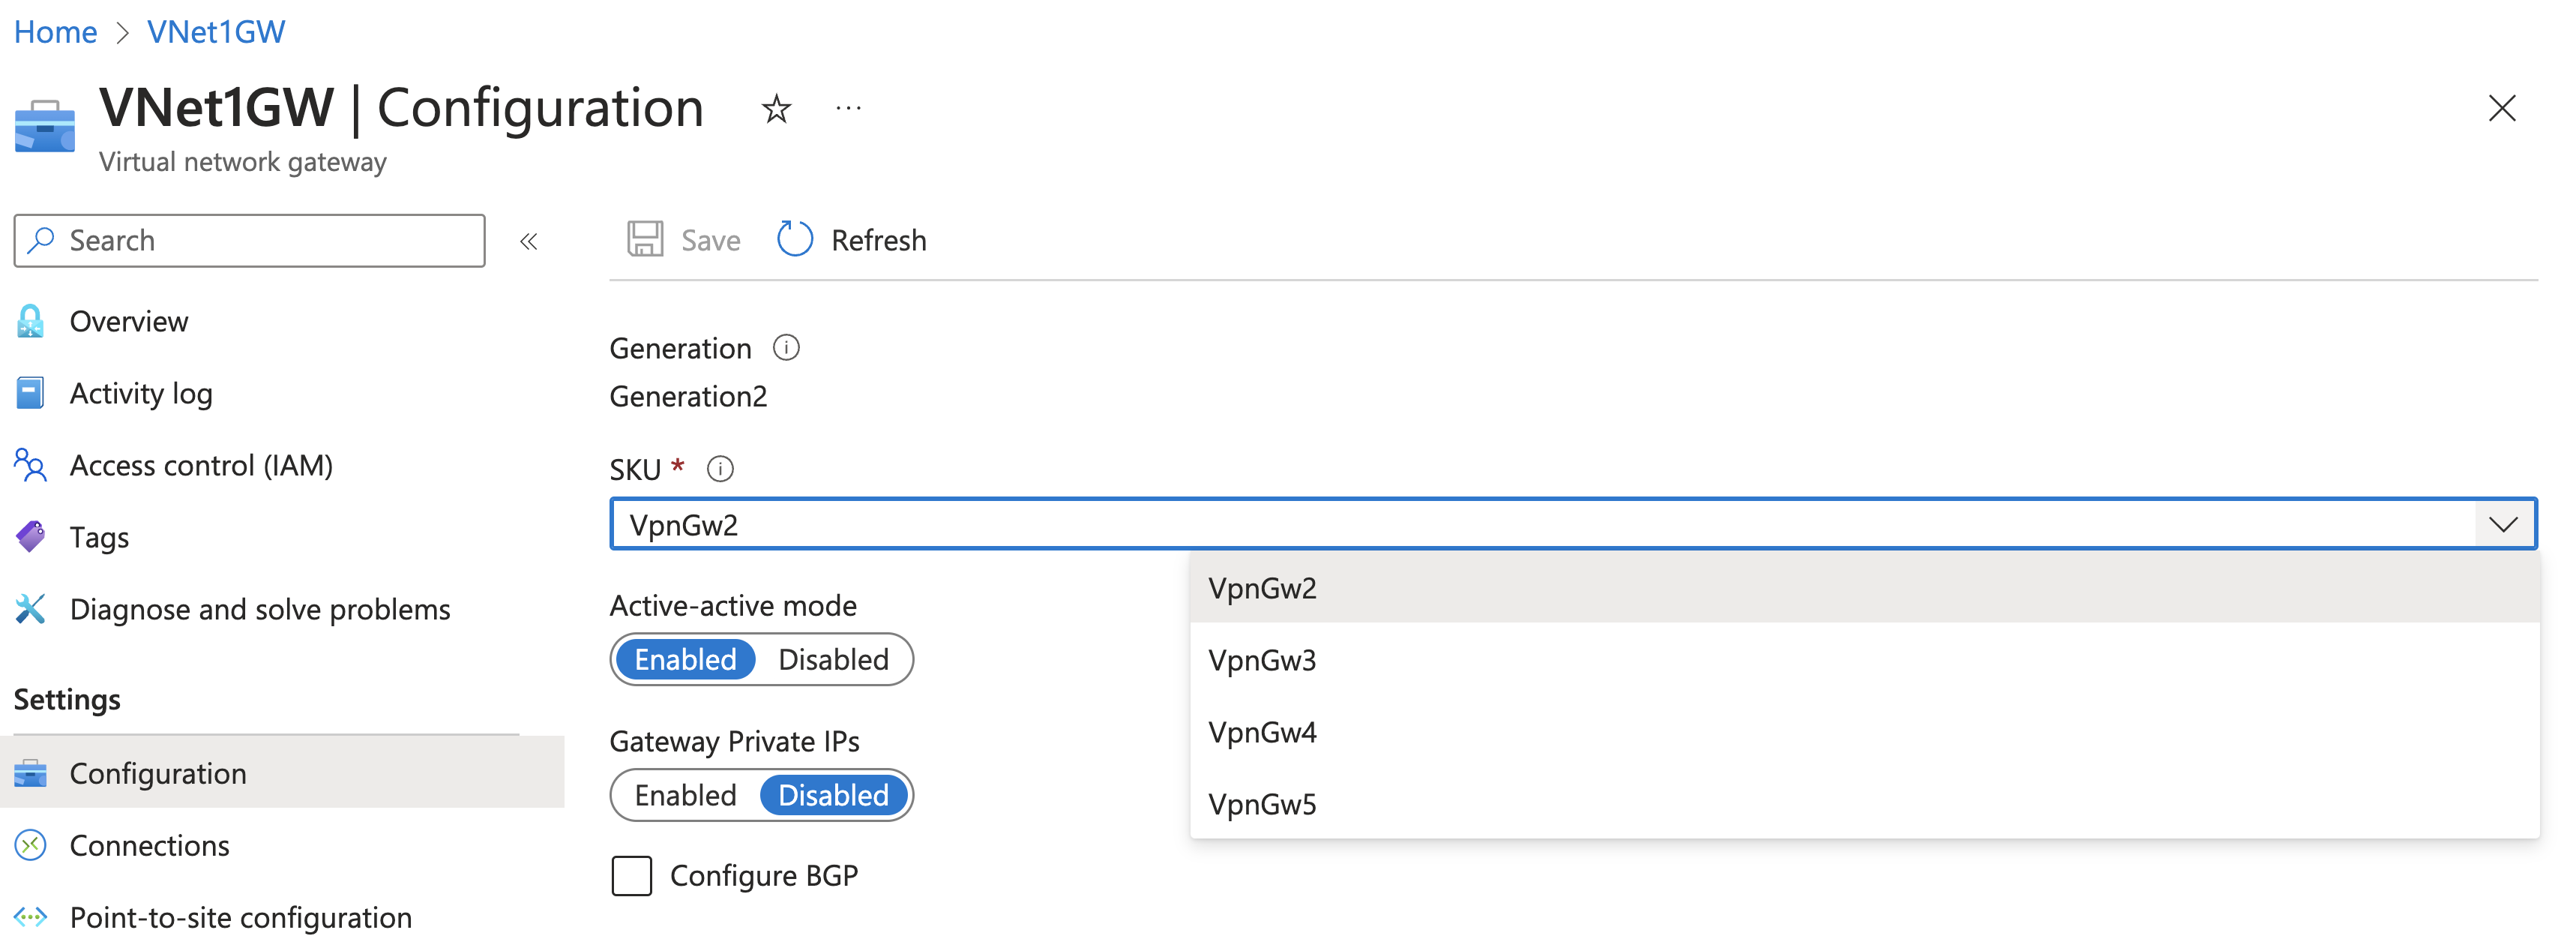
Select the SKU from the dropdown list.

Reset a gateway
Resetting an Azure VPN gateway is helpful if you lose cross-premises VPN connectivity on one or more site-to-site VPN tunnels. In this situation, your on-premises VPN devices are all working correctly but aren't able to establish IPsec tunnels with the Azure VPN gateways.
- In the portal, go to the virtual network gateway that you want to reset.
- On the Virtual network gateway page, in the left pane, scroll down to Reset.
- On the Reset page, select Reset. After the command is issued, the current active instance of Azure VPN Gateway is rebooted immediately. Resetting the gateway causes a gap in VPN connectivity and might limit future root cause analysis of the issue.
Add another connection
You can create a connection to multiple on-premises sites from the same VPN gateway. If you want to configure multiple connections, the address spaces can't overlap between any of the connections.
- To add another connection, go to the VPN gateway and then select Connections to open the Connections page.
- Select + Add to add your connection. Adjust the connection type to reflect either network-to-network (if connecting to another virtual network gateway) or site-to-site.
- If you're connecting by using site-to-site and you haven't already created a local network gateway for the site you want to connect to, you can create a new one.
- Specify the shared key that you want to use and then select OK to create the connection.
Update a connection shared key
You can specify a different shared key for your connection. In the portal, go to the connection. Change the shared key on the Authentication page.
More configuration considerations
You can customize site-to-site configurations in various ways. For more information, see the following articles:
- For information about BGP, see the BGP overview and How to configure BGP.
- For information about forced tunneling, see About forced tunneling.
- For information about highly available active-active connections, see Highly available cross-premises and VNet-to-VNet connectivity.
- For information about how to limit network traffic to resources in a virtual network, see Network security.
- For information about how Azure routes traffic between Azure, on-premises, and internet resources, see Virtual network traffic routing.
Clean up resources
If you're not going to continue to use this application or go to the next tutorial, delete these resources.
- Enter the name of your resource group in the Search box at the top of the portal and select it from the search results.
- Select Delete resource group.
- Enter your resource group for TYPE THE RESOURCE GROUP NAME and select Delete.
Next steps
After you configure a site-to-site connection, you can add a point-to-site connection to the same gateway.
Feedback
Coming soon: Throughout 2024 we will be phasing out GitHub Issues as the feedback mechanism for content and replacing it with a new feedback system. For more information see: https://aka.ms/ContentUserFeedback.
Submit and view feedback for