Wait for approval in Power Automate
Create a cloud flow that, if you create an item in SharePoint, sends approval email and then notifies you whether the item was approved or rejected. To follow this tutorial, create a SharePoint list as a trigger action. You can alternatively use another data source such as Dropbox or OneDrive.
Prerequisites
Create a SharePoint list that's named Project Tracker, add a column named Title, and then add a person or group column named Assigned To.
![]()
Tip
For detailed information about using SharePoint with Power Automate, go to the SharePoint documentation.
Add an event to trigger the flow
Sign in to Power Automate.
Select My flows in the top navigation bar, and then select Create from blank.
Select the Search hundreds of connectors and triggers box, enter new item, and then navigate to SharePoint - when an item is created.
If prompted, sign into SharePoint.
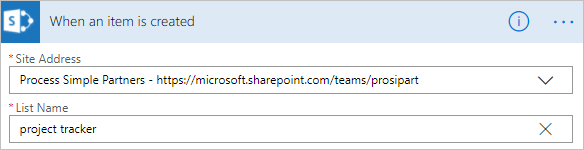
Under Site Address, enter the URL of the SharePoint site that contains your list.
Under List Name, select the list you created earlier. If you're following along, the name is Project Tracker.
Add the resulting action
Select the New step button, and then select Add an action.
In the Search all connectors and actions box, type or paste send email, and then select Office 365 Outlook - Send email with options.
If prompted, sign into Office 365 Outlook.
Select the To field, and then select the Assigned to Email token.
The user in the Assigned To column receives the email to approve or reject items. When you create an item to test the flow, specify yourself in this field. That way, you not only approve or reject the item, but also receive the notification email.
You can customize the Subject and User Options fields to suit your needs.

Add a condition
Select the New step button, and then select Add a condition.
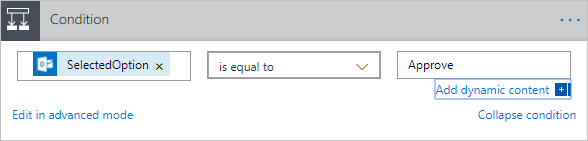
Select the first box, and then select the SelectedOption token.
Select the last box, and then type Approve.
In the If yes area, select Add an action.
In the Search all connectors and actions box, type or paste send email, and then select Office 365 Outlook - Send an email.
In the To field, enter a recipient such as Created by Email.
In the Subject box, specify a subject.
For example, select Assigned To DisplayName, type has approved with a space on each side, and then select Title.
In the Body box, specify an email body such as Ready to proceed with the next phase of the project.
The person who created the item in the SharePoint list will be notified whether the project was approved or rejected.
In the If no area, repeat the previous steps, except change the Subject and Body to reflect that the project was rejected.
Finish and test your flow
Give your flow a name, and then select Create flow.
An approval email is sent to the recipient that you specified. When the recipient selects Approve or Reject in that email, you receive email that indicates the response.
See also
Feedback
Coming soon: Throughout 2024 we will be phasing out GitHub Issues as the feedback mechanism for content and replacing it with a new feedback system. For more information see: https://aka.ms/ContentUserFeedback.
Submit and view feedback for