Exercise - Classify an Azure SQL Database
In this exercise, you'll create your resource group and an Azure SQL Database single database containing the AdventureWorksLT sample data.
Sign in to the Azure portal using the same account you used to activate the Azure Sandbox. Make sure you are in the Microsoft Learn Sandbox directory.
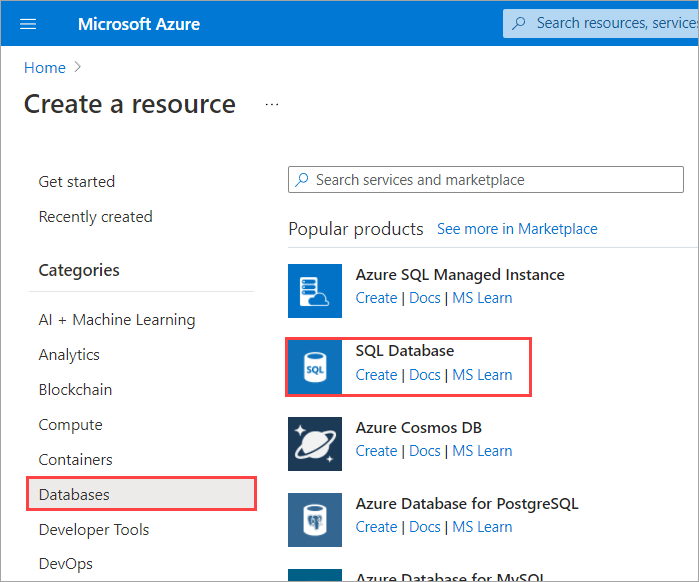
On the home page, under Azure services, select Create a resource. The Create a resource pane appears.
In the left menu pane, select Databases, and then select SQL Database. The Create SQL Database pane appears.
On the Basics tab, enter the following values for each setting.
Setting Value Project details Subscription Concierge Subscription Resource group Use the existing group [sandbox resource group name] Database details Database name Enter LearnDataPolicy. Server Under the dropdown list, select Create new link. The Create SQL Database Server pane appears. Server name Enter a globally unique server name. Location Select any valid location from the following list. Authentication method Select Use SQL authentication. Server admin login A database identifier that serves as your primary administrator login name. Password Enter a valid password that has at least eight characters and contains characters from three of these categories: uppercase characters, lowercase characters, numbers, and non-alphanumeric characters. The free sandbox allows you to create resources in a subset of the Azure global regions. Select a region from the following list when you create resources:
- West US 2
- South Central US
- Central US
- East US
- West Europe
- Southeast Asia
- Japan East
- Brazil South
- Australia Southeast
- Central India
Select OK. The Create SQL Database pane reappears.
Continuing on the Basics tab, enter the following values for each setting.
Setting Value Database details Want to use SQL elastic pool? Select No. Select the Security tab near the top of the window.
Enter the following value for the setting.
Setting Value Microsoft Defender for SQL Enable Microsoft Defender for SQL, verify Start free trial is selected. Select the Additional settings tab near the top of the window.
Enter the following value for the setting.
Setting Value Data source Use existing data Select Sample. Leave the rest of the values as default and select Review + create at the bottom of the screen.
Review the final settings, and select Create at the bottom of the screen.
It takes a few minutes to deploy the server with sample data. Once it's complete, select Go to resource to go to the Overview pane of your new SQL database.
SQL Information Protection (SQL IP)
SQL IP brings a set of advanced services and SQL capabilities, forming a new information-protection paradigm in SQL aimed at protecting the data, not just the database:
- Azure SQL Auditing: Azure SQL Auditing tracks database events and writes them to an audit log in your Azure storage account, Log Analytics workspace or Event Hubs.
- Data Discovery & Classification: Data Discovery & Classification is built into Azure SQL Database, Azure SQL Managed Instance, and Azure Synapse Analytics. It provides advanced capabilities for discovering, classifying, labeling, and reporting the sensitive data in your databases.
- Dynamic data masking: Azure SQL Database, Azure SQL Managed Instance, and Azure Synapse Analytics support dynamic data masking. Dynamic data masking limits sensitive data exposure by masking it to non-privileged users.
- Microsoft Defender for Cloud: Scans your database and makes recommendations to improve security. Also allows you to set up and monitor Security Alerts.
- Transparent data encryption: Transparent data encryption encrypts your databases, backups, and logs at rest without any changes to your application. To enable encryption, go to each database.
Classify your SQL DB
Let's classify the data in this sample Azure SQL database. On your SQL database pane:
In the left menu pane, under Security, select Microsoft Defender for Cloud. The Microsoft Defender for Cloud pane appears for your SQL database.
If Microsoft Defender for SQL isn't enabled, select the (Configure) link. The Server settings pane appears.
Ensure that Microsoft Defender for SQL is turned on, and then select Save. As noted in the previous instructions, you can turn this on as part of the DB creation. This takes a minute to activate.
In the left menu pane, under Security, select Data Discovery & Classification. The Data Discovery & Classification pane appears.
The initial state has 15 columns with classification recommendations. Select that link to review the recommendations. If you have not yet run the check, do so now.

Select all the columns and then Accept selected recommendations.

In the top menu bar, select Save to save the recommendations, and then switch back to the Data Discovery & Classification pane.
Review the Data Discovery & Classification. Notice that it includes a summary of the current classification state of the database, including a detailed list of all classified columns. You can also filter this view to only see specific schema parts, information types, and labels.

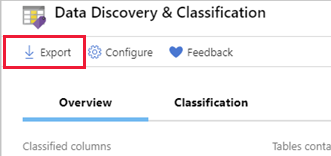
On the Overview tab, in the top menu bar, select Export to download a report in Excel format. Select Download.


Customize the classification
The Classification tab lists the columns and how the data is classified.

As you saw earlier, the classification engine scans your database for columns containing potentially sensitive data and provides a list of recommended column classifications.
You can either take the suggested classifications as we did earlier, or manually classify columns as an alternative to or in addition to the recommendation-based classification.
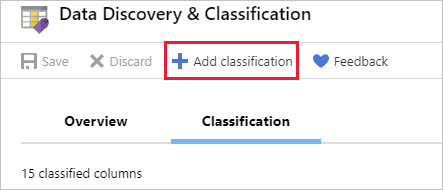
In the top menu bar, select Add classification. The Add classification pane appears.
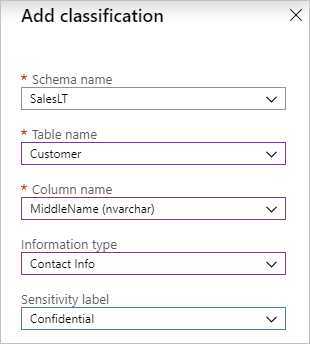
Configure the five fields:
- Schema name
- Table name
- Column name
- Information type
- Sensitivity label
Select Add classification.
To complete your classification and persistently label (tag) the database columns with the new classification metadata, in the top menu bar, select Save.
You should now see Overview and Classification tabs at the top of the pane.
Select the Classification tab, and change some of the classifications for identified columns (for example, setting the PasswordHash to Highly Confidential in the Sensitivity label columns).
You can also filter the data being viewed through the filter boxes right below the graphs on the Overview tab.
Monitor access to sensitive data
An important aspect of the IP paradigm is the ability to monitor access to sensitive data. Azure SQL Database Auditing has been enhanced to include a new field in the audit log. The data_sensitivity_information field logs the sensitivity classifications (labels) of the actual data that was returned by the query.

Consider configuring Azure SQL Database Auditing for monitoring and auditing access to your classified sensitive data.