Connect your device to the remote monitoring preconfigured solution (Windows)
Scenario overview
In this scenario, you create a device that sends the following telemetry to the remote monitoring preconfigured solution:
- External temperature
- Internal temperature
- Humidity
For simplicity, the code on the device generates sample values, but we encourage you to extend the sample by connecting real sensors to your device and sending real telemetry.
The device is also able to respond to methods invoked from the solution dashboard and desired property values set in the solution dashboard.
To complete this tutorial, you need an active Azure account. If you don't have an account, you can create a free trial account in just a couple of minutes. For details, see Azure Free Trial.
Before you start
Before you write any code for your device, you must provision your remote monitoring preconfigured solution and provision a new custom device in that solution.
Provision your remote monitoring preconfigured solution
The device you create in this tutorial sends data to an instance of the remote monitoring preconfigured solution. If you haven't already provisioned the remote monitoring preconfigured solution in your Azure account, use the following steps:
- On the https://www.azureiotsolutions.com/ page, click + to create a solution.
- Click Select on the Remote monitoring panel to create your solution.
- On the Create Remote monitoring solution page, enter a Solution name of your choice, select the Region you want to deploy to, and select the Azure subscription to want to use. Then click Create solution.
- Wait until the provisioning process completes.
Warning
The preconfigured solutions use billable Azure services. Be sure to remove the preconfigured solution from your subscription when you are done with it to avoid any unnecessary charges. You can completely remove a preconfigured solution from your subscription by visiting the https://www.azureiotsolutions.com/ page.
When the provisioning process for the remote monitoring solution finishes, click Launch to open the solution dashboard in your browser.
Provision your device in the remote monitoring solution
Note
If you have already provisioned a device in your solution, you can skip this step. You need to know the device credentials when you create the client application.
For a device to connect to the preconfigured solution, it must identify itself to IoT Hub using valid credentials. You can retrieve the device credentials from the solution dashboard. You include the device credentials in your client application later in this tutorial.
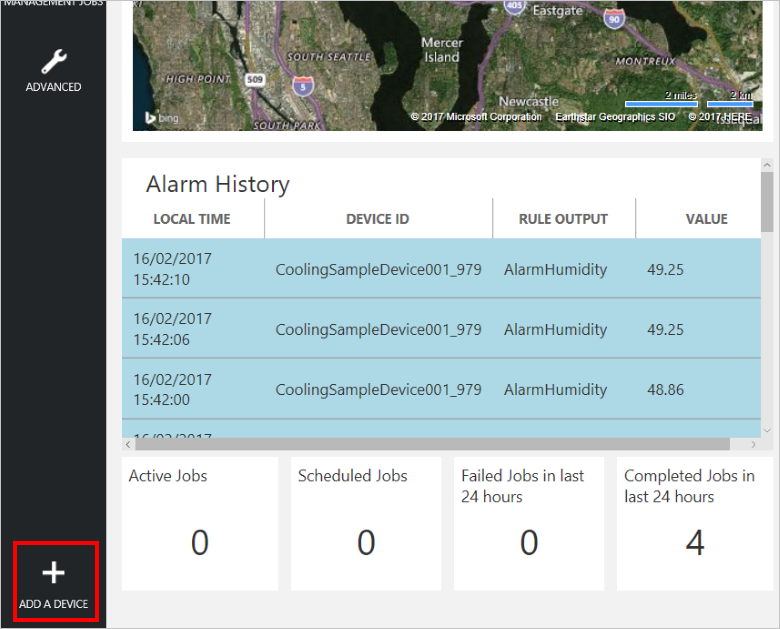
To add a device to your remote monitoring solution, complete the following steps in the solution dashboard:
In the lower left-hand corner of the dashboard, click Add a device.
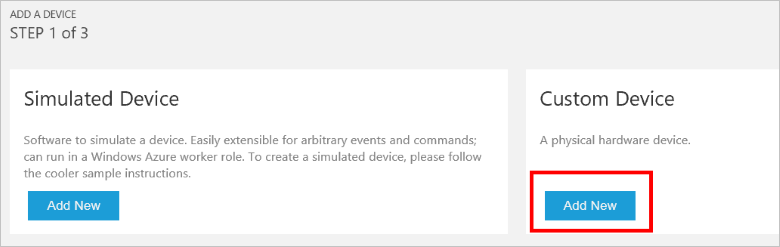
In the Custom Device panel, click Add new.
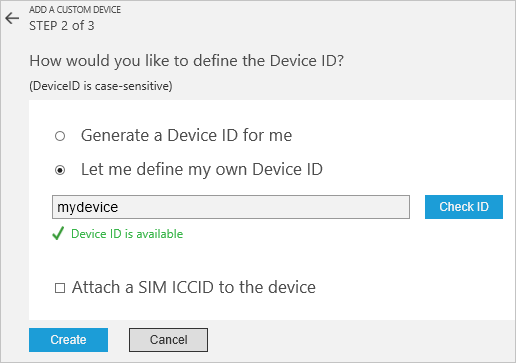
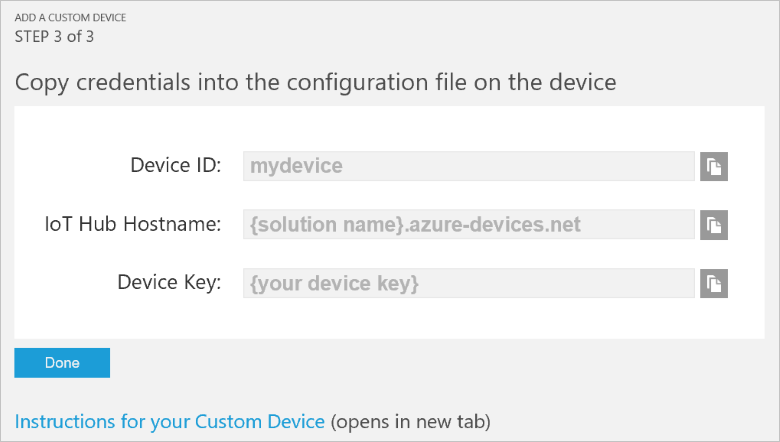
Choose Let me define my own Device ID. Enter a Device ID such as mydevice, click Check ID to verify that name isn't already in use, and then click Create to provision the device.
Make a note the device credentials (Device ID, IoT Hub Hostname, and Device Key). Your client application needs these values to connect to the remote monitoring solution. Then click Done.
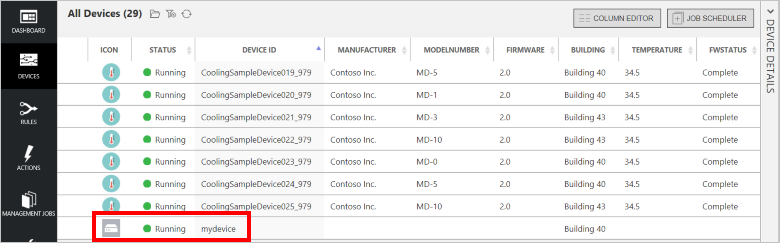
Select your device in the device list in the solution dashboard. Then, in the Device Details panel, click Enable Device. The status of your device is now Running. The remote monitoring solution can now receive telemetry from your device and invoke methods on the device.
Create a C sample solution on Windows
The following steps show you how to create a client application that communicates with the remote monitoring preconfigured solution. This application is written in C and built and run on Windows.
Create a starter project in Visual Studio 2015 or Visual Studio 2017 and add the IoT Hub device client NuGet packages:
In Visual Studio, create a C console application using the Visual C++ Win32 Console Application template. Name the project RMDevice.
On the Application Settings page in the Win32 Application Wizard, ensure that Console application is selected, and uncheck Precompiled header and Security Development Lifecycle (SDL) checks.
In Solution Explorer, delete the files stdafx.h, targetver.h, and stdafx.cpp.
In Solution Explorer, rename the file RMDevice.cpp to RMDevice.c.
In Solution Explorer, right-click on the RMDevice project and then click Manage NuGet packages. Click Browse, then search for and install the following NuGet packages:
- Microsoft.Azure.IoTHub.Serializer
- Microsoft.Azure.IoTHub.IoTHubClient
- Microsoft.Azure.IoTHub.MqttTransport
In Solution Explorer, right-click on the RMDevice project and then click Properties to open the project's Property Pages dialog box. For details, see Setting Visual C++ Project Properties.
Click the Linker folder, then click the Input property page.
Add crypt32.lib to the Additional Dependencies property. Click OK and then OK again to save the project property values.
Add the Parson JSON library to the RMDevice project and add the required #include statements:
In a suitable folder on your computer, clone the Parson GitHub repository using the following command:
git clone https://github.com/kgabis/parson.gitCopy the parson.h and parson.c files from the local copy of the Parson repository to your RMDevice project folder.
In Visual Studio, right-click the RMDevice project, click Add, and then click Existing Item.
In the Add Existing Item dialog, select the parson.h and parson.c files in the RMDevice project folder. Then click Add to add these two files to your project.
In Visual Studio, open the RMDevice.c file. Replace the existing
#includestatements with the following code:#include "iothubtransportmqtt.h" #include "schemalib.h" #include "iothub_client.h" #include "serializer_devicetwin.h" #include "schemaserializer.h" #include "azure_c_shared_utility/threadapi.h" #include "azure_c_shared_utility/platform.h" #include "parson.h"Note
Now you can verify that your project has the correct dependencies set up by building it.
Specify the behavior of the IoT device
The IoT Hub serializer client library uses a model to specify the format of the messages the device exchanges with IoT Hub.
Add the following variable declarations after the
#includestatements. Replace the placeholder values [Device ID] and [Device Key] with values you noted for your device in the remote monitoring solution dashboard. Use the IoT Hub Hostname from the solution dashboard to replace [IoTHub Name]. For example, if your IoT Hub Hostname is contoso.azure-devices.net, replace [IoTHub Name] with contoso:static const char* deviceId = "[Device Id]"; static const char* connectionString = "HostName=[IoTHub Name].azure-devices.net;DeviceId=[Device Id];SharedAccessKey=[Device Key]";Add the following code to define the model that enables the device to communicate with IoT Hub. This model specifies that the device:
- Can send temperature, external temperature, humidity, and a device ID as telemetry.
- Can send metadata about the device to IoT Hub. The device sends basic metadata in a DeviceInfo object at startup.
- Can send reported properties, to the device twin in IoT Hub. These reported properties are grouped into configuration, device, and system properties.
- Can receive and act on desired properties set in the device twin in IoT Hub.
- Can respond to the Reboot and InitiateFirmwareUpdate direct methods invoked through the solution portal. The device sends information about the direct methods it supports using reported properties.
// Define the Model
BEGIN_NAMESPACE(Contoso);

/* Reported properties */
DECLARE_STRUCT(SystemProperties,
  ascii_char_ptr, Manufacturer,
  ascii_char_ptr, FirmwareVersion,
  ascii_char_ptr, InstalledRAM,
  ascii_char_ptr, ModelNumber,
  ascii_char_ptr, Platform,
  ascii_char_ptr, Processor,
  ascii_char_ptr, SerialNumber
);

DECLARE_STRUCT(LocationProperties,
  double, Latitude,
  double, Longitude
);

DECLARE_STRUCT(ReportedDeviceProperties,
  ascii_char_ptr, DeviceState,
  LocationProperties, Location
);

DECLARE_MODEL(ConfigProperties,
  WITH_REPORTED_PROPERTY(double, TemperatureMeanValue),
  WITH_REPORTED_PROPERTY(uint8_t, TelemetryInterval)
);

/* Part of DeviceInfo */
DECLARE_STRUCT(DeviceProperties,
  ascii_char_ptr, DeviceID,
  _Bool, HubEnabledState
);

DECLARE_DEVICETWIN_MODEL(Thermostat,
  /* Telemetry (temperature, external temperature and humidity) */
  WITH_DATA(double, Temperature),
  WITH_DATA(double, ExternalTemperature),
  WITH_DATA(double, Humidity),
  WITH_DATA(ascii_char_ptr, DeviceId),

  /* DeviceInfo */
  WITH_DATA(ascii_char_ptr, ObjectType),
  WITH_DATA(_Bool, IsSimulatedDevice),
  WITH_DATA(ascii_char_ptr, Version),
  WITH_DATA(DeviceProperties, DeviceProperties),

  /* Device twin properties */
  WITH_REPORTED_PROPERTY(ReportedDeviceProperties, Device),
  WITH_REPORTED_PROPERTY(ConfigProperties, Config),
  WITH_REPORTED_PROPERTY(SystemProperties, System),

  WITH_DESIRED_PROPERTY(double, TemperatureMeanValue, onDesiredTemperatureMeanValue),
  WITH_DESIRED_PROPERTY(uint8_t, TelemetryInterval, onDesiredTelemetryInterval),

  /* Direct methods implemented by the device */
  WITH_METHOD(Reboot),
  WITH_METHOD(InitiateFirmwareUpdate, ascii_char_ptr, FwPackageURI),

  /* Register direct methods with solution portal */
  WITH_REPORTED_PROPERTY(ascii_char_ptr_no_quotes, SupportedMethods)
);

END_NAMESPACE(Contoso);
Implement the behavior of the device
Now add code that implements the behavior defined in the model.
Add the following functions that handle the desired properties set in the solution dashboard. These desired properties are defined in the model:
void onDesiredTemperatureMeanValue(void* argument)
{
  /* By convention 'argument' is of the type of the MODEL */
  Thermostat* thermostat = argument;
  printf("Received a new desired_TemperatureMeanValue = %f\r\n", thermostat->TemperatureMeanValue);

}

void onDesiredTelemetryInterval(void* argument)
{
  /* By convention 'argument' is of the type of the MODEL */
  Thermostat* thermostat = argument;
  printf("Received a new desired_TelemetryInterval = %d\r\n", thermostat->TelemetryInterval);
}
Add the following functions that handle the direct methods invoked through the IoT hub. These direct methods are defined in the model:
/* Handlers for direct methods */
METHODRETURN_HANDLE Reboot(Thermostat* thermostat)
{
  (void)(thermostat);

  METHODRETURN_HANDLE result = MethodReturn_Create(201, "\"Rebooting\"");
  printf("Received reboot request\r\n");
  return result;
}

METHODRETURN_HANDLE InitiateFirmwareUpdate(Thermostat* thermostat, ascii_char_ptr FwPackageURI)
{
  (void)(thermostat);

  METHODRETURN_HANDLE result = MethodReturn_Create(201, "\"Initiating Firmware Update\"");
  printf("Recieved firmware update request. Use package at: %s\r\n", FwPackageURI);
  return result;
}
Add the following function that sends a message to the preconfigured solution:
/* Send data to IoT Hub */
static void sendMessage(IOTHUB_CLIENT_HANDLE iotHubClientHandle, const unsigned char* buffer, size_t size)
{
  IOTHUB_MESSAGE_HANDLE messageHandle = IoTHubMessage_CreateFromByteArray(buffer, size);
  if (messageHandle == NULL)
  {
    printf("unable to create a new IoTHubMessage\r\n");
  }
  else
  {
    if (IoTHubClient_SendEventAsync(iotHubClientHandle, messageHandle, NULL, NULL) != IOTHUB_CLIENT_OK)
    {
      printf("failed to hand over the message to IoTHubClient");
    }
    else
    {
      printf("IoTHubClient accepted the message for delivery\r\n");
    }

    IoTHubMessage_Destroy(messageHandle);
  }
  free((void*)buffer);
}
Add the following callback handler that runs when the device has sent new reported property values to the preconfigured solution:
/* Callback after sending reported properties */
void deviceTwinCallback(int status_code, void* userContextCallback)
{
  (void)(userContextCallback);
  printf("IoTHub: reported properties delivered with status_code = %u\n", status_code);
}
Add the following function to connect your device to the preconfigured solution in the cloud, and exchange data. This function performs the following steps:
- Initializes the platform.
- Registers the Contoso namespace with the serialization library.
- Initializes the client with the device connection string.
- Create an instance of the Thermostat model.
- Creates and sends reported property values.
- Sends a DeviceInfo object.
- Creates a loop to send telemetry every second.
- Deinitializes all resources.
void remote_monitoring_run(void)
{
  if (platform_init() != 0)
  {
    printf("Failed to initialize the platform.\n");
  }
  else
  {
    if (SERIALIZER_REGISTER_NAMESPACE(Contoso) == NULL)
    {
      printf("Unable to SERIALIZER_REGISTER_NAMESPACE\n");
    }
    else
    {
      IOTHUB_CLIENT_HANDLE iotHubClientHandle = IoTHubClient_CreateFromConnectionString(connectionString, MQTT_Protocol);
      if (iotHubClientHandle == NULL)
      {
        printf("Failure in IoTHubClient_CreateFromConnectionString\n");
      }
      else
      {
#ifdef MBED_BUILD_TIMESTAMP
        // For mbed add the certificate information
        if (IoTHubClient_SetOption(iotHubClientHandle, "TrustedCerts", certificates) != IOTHUB_CLIENT_OK)
        {
            printf("Failed to set option \"TrustedCerts\"\n");
        }
#endif // MBED_BUILD_TIMESTAMP
        Thermostat* thermostat = IoTHubDeviceTwin_CreateThermostat(iotHubClientHandle);
        if (thermostat == NULL)
        {
          printf("Failure in IoTHubDeviceTwin_CreateThermostat\n");
        }
        else
        {
          /* Set values for reported properties */
          thermostat->Config.TemperatureMeanValue = 55.5;
          thermostat->Config.TelemetryInterval = 3;
          thermostat->Device.DeviceState = "normal";
          thermostat->Device.Location.Latitude = 47.642877;
          thermostat->Device.Location.Longitude = -122.125497;
          thermostat->System.Manufacturer = "Contoso Inc.";
          thermostat->System.FirmwareVersion = "2.22";
          thermostat->System.InstalledRAM = "8 MB";
          thermostat->System.ModelNumber = "DB-14";
          thermostat->System.Platform = "Plat 9.75";
          thermostat->System.Processor = "i3-7";
          thermostat->System.SerialNumber = "SER21";
          /* Specify the signatures of the supported direct methods */
          thermostat->SupportedMethods = "{\"Reboot\": \"Reboot the device\", \"InitiateFirmwareUpdate--FwPackageURI-string\": \"Updates device Firmware. Use parameter FwPackageURI to specify the URI of the firmware file\"}";

          /* Send reported properties to IoT Hub */
          if (IoTHubDeviceTwin_SendReportedStateThermostat(thermostat, deviceTwinCallback, NULL) != IOTHUB_CLIENT_OK)
          {
            printf("Failed sending serialized reported state\n");
          }
          else
          {
            printf("Send DeviceInfo object to IoT Hub at startup\n");

            thermostat->ObjectType = "DeviceInfo";
            thermostat->IsSimulatedDevice = 0;
            thermostat->Version = "1.0";
            thermostat->DeviceProperties.HubEnabledState = 1;
            thermostat->DeviceProperties.DeviceID = (char*)deviceId;

            unsigned char* buffer;
            size_t bufferSize;

            if (SERIALIZE(&buffer, &bufferSize, thermostat->ObjectType, thermostat->Version, thermostat->IsSimulatedDevice, thermostat->DeviceProperties) != CODEFIRST_OK)
            {
              (void)printf("Failed serializing DeviceInfo\n");
            }
            else
            {
              sendMessage(iotHubClientHandle, buffer, bufferSize);
            }

            /* Send telemetry */
            thermostat->Temperature = 50;
            thermostat->ExternalTemperature = 55;
            thermostat->Humidity = 50;
            thermostat->DeviceId = (char*)deviceId;

            while (1)
            {
              unsigned char*buffer;
              size_t bufferSize;

              (void)printf("Sending sensor value Temperature = %f, Humidity = %f\n", thermostat->Temperature, thermostat->Humidity);

              if (SERIALIZE(&buffer, &bufferSize, thermostat->DeviceId, thermostat->Temperature, thermostat->Humidity, thermostat->ExternalTemperature) != CODEFIRST_OK)
              {
                (void)printf("Failed sending sensor value\r\n");
              }
              else
              {
                sendMessage(iotHubClientHandle, buffer, bufferSize);
              }

              ThreadAPI_Sleep(1000);
            }

            IoTHubDeviceTwin_DestroyThermostat(thermostat);
          }
        }
        IoTHubClient_Destroy(iotHubClientHandle);
      }
      serializer_deinit();
    }
  }
  platform_deinit();
}
For reference, here is a sample Telemetry message sent to the preconfigured solution:
{"DeviceId":"mydevice01", "Temperature":50, "Humidity":50, "ExternalTemperature":55}
Build and run the sample
Add code to invoke the remote_monitoring_run function and then build and run the device application.
Replace the main function with following code to invoke the remote_monitoring_run function:
int main()
{
  remote_monitoring_run();
  return 0;
}
Click Build and then Build Solution to build the device application.
In Solution Explorer, right-click the RMDevice project, click Debug, and then click Start new instance to run the sample. The console displays messages as the application sends sample telemetry to the preconfigured solution, receives desired property values set in the solution dashboard, and responds to methods invoked from the solution dashboard.
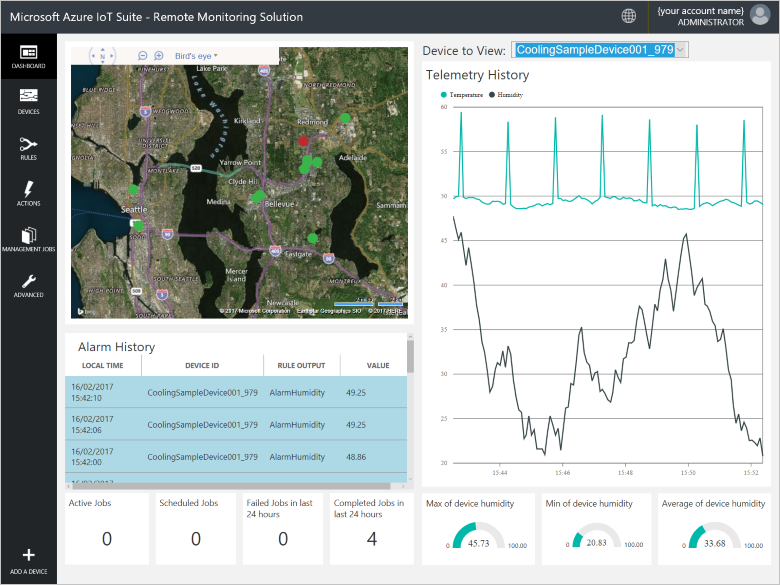
View device telemetry in the dashboard
The dashboard in the remote monitoring solution enables you to view the telemetry your devices send to IoT Hub.
In your browser, return to the remote monitoring solution dashboard, click Devices in the left-hand panel to navigate to the Devices list.
In the Devices list, you should see that the status of your device is Running. If not, click Enable Device in the Device Details panel.
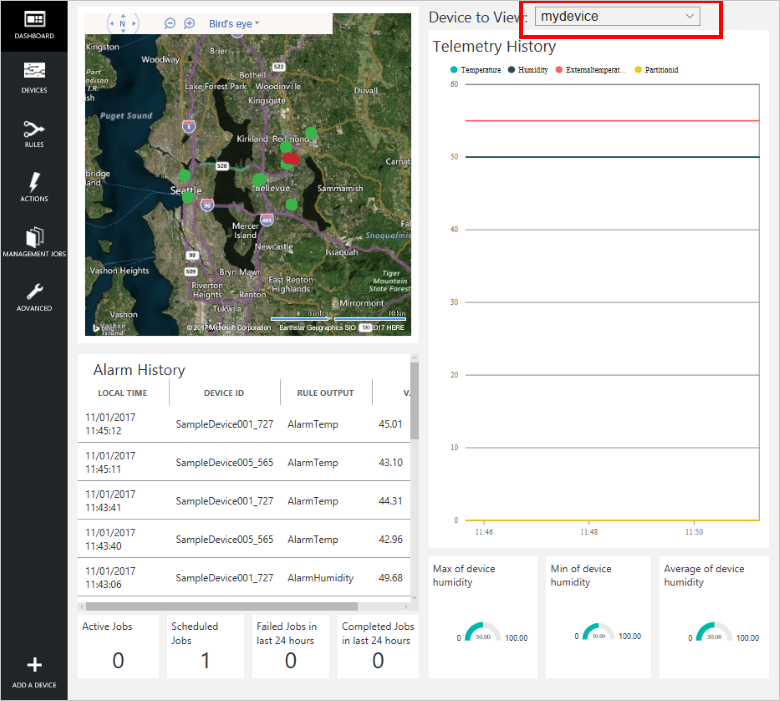
Click Dashboard to return to the dashboard, select your device in the Device to View drop-down to view its telemetry. The telemetry from the sample application is 50 units for internal temperature, 55 units for external temperature, and 50 units for humidity.
Invoke a method on your device
The dashboard in the remote monitoring solution enables you to invoke methods on your devices through IoT Hub. For example, in the remote monitoring solution you can invoke a method to simulate rebooting a device.
In the remote monitoring solution dashboard, click Devices in the left-hand panel to navigate to the Devices list.
Click Device ID for your device in the Devices list.
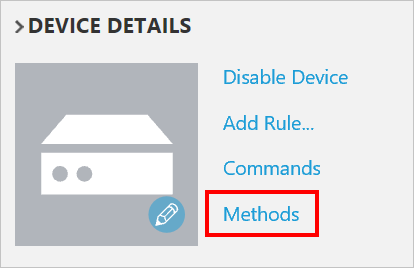
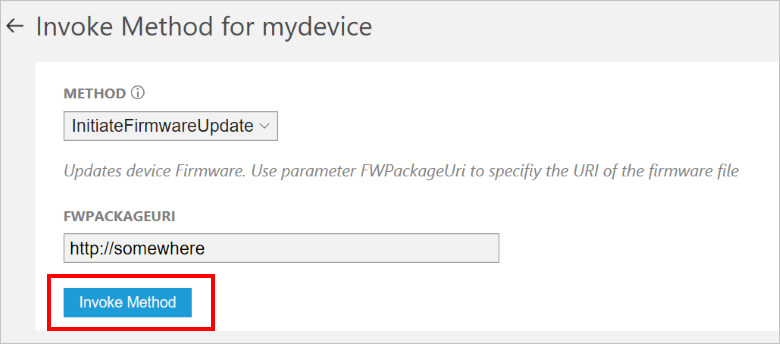
In the Device details panel, click Methods.
In the Method drop-down, select InitiateFirmwareUpdate, and then in FWPACKAGEURI enter a dummy URL. Click Invoke Method to call the method on the device.
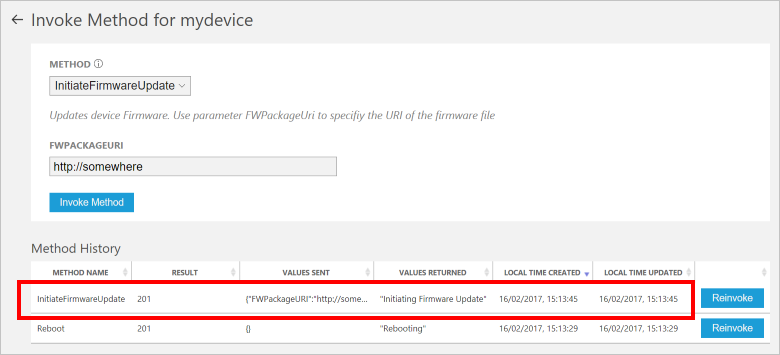
You see a message in the console running your device code when the device handles the method. The results of the method are added to the history in the solution portal:
Next steps
The article Customizing preconfigured solutions describes some ways you can extend this sample. Possible extensions include using real sensors and implementing additional commands.
You can learn more about the permissions on the azureiotsuite.com site.