Windows Workflow Tutorial: Introduction to Sequential Workflows
Ken Getz
MCW Technologies LLC
Published: November, 2008
Articles in this series
- Building a Sequential Workflow
- Building a State Machine Workflow
- Flow Control: Basics
- Flow Control: Replicator
- Fault Handling
- Communication: Calling Methods within the Host Process
- Communication: Handling an Event From the Host in a Workflow
- Rules-Driven .NET Applications
- Rules-Driven WCF Services
Download the code for this article
Introduction
Windows Workflow Foundation (WF), originally introduced as part of the .NET Framework 3.0 with extensions for Visual Studio 2005’s designers, has continued to be enhanced for the .NET Framework 3.5 and Visual Studio 2008. WF makes it possible, and for many workflow scenarios, even easy to create robust, manageable workflow-based applications. WF is actually many things: It’s a programming model, and runtime engine, and a set of tools that help you create workflow-enabled applications hosted by Windows. (For more information on WF, drop by the portal site).
In this series of tutorials, you’ll work through several different examples, showing off various important features of WF, and the corresponding tools and techniques using Visual Studio 2008. Because workflows generally deal with specific business-oriented processes, and these tutorials can’t begin to emulate your specific processes, you’ll find that the specific examples shown here tend to focus on either scenarios that you can control in order to demonstrate the specific workflow features (such as working with files in the file system), or they focus on business processes with “holes” left for your imagination to insert real-world behaviors.
This first tutorial introduces the basics of creating Workflow applications, using a console application as the workflow’s host. Along the way, you’ll investigate the various workflow-focused templates that Visual Studio 2008 provides, and you’ll learn what happens when you create and run a workflow application. You’ll try out a few of the many different workflow activities, as well. (These tutorials assume that you have Visual Studio 2008 installed, along with the .NET Framework 3.5. You can choose to work in either Visual Basic or C#--the steps listed here call out specific differences between the languages, when necessary.
There’s a lot to cover in this first tutorial, so fire up Visual Studio 2008, and get started!
Investigate the Workflow Templates
To get started, in Visual Studio 2008 select File | New | Project to display the New Project dialog box. In the list of project types, select Workflow, displaying the list of templates shown in Figure 1.
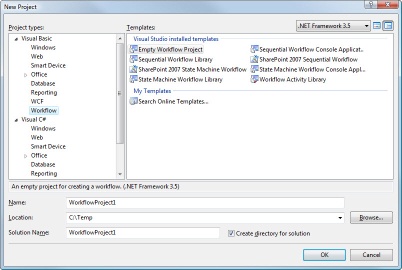
Figure 1. Visual Studio 2008 provides these workflow templates.
In general, WF allows you to create two different types of workflows: sequential, and state machine. Sequential workflows provide a structured series of steps in which one activity leads to another, and steps generally occur immediately one after another. A step might wait for some event (an email to arrive, for example), but sequential workflows are often appropriate for tasks that operate without human intervention. State machine workflows provide a set of states; transitions between the states define the behavior. In general, state machine workflows react to events which move the workflow’s current activity from one state to another. Each workflow that you design is simply a class that inherits from one or the other of the System.Workflow.Activities.SequentialWorkflowActivity or System.Workflow.Activities.StateMachineWorkflowActivity classes, and most of the Visual Studio 2008 workflow project templates create a class that inherits from one or the other of these base classes for you. (In addition, each of these templates includes assembly references to the various assemblies required in order to design and run workflows.) If you want to create a sequential workflow, you can select any of the following templates:
- Sequential Workflow Console Application, which includes a Console application host application that helps run your workflow. You’ll investigate this specific template in this tutorial.
- Sequential Workflow Library, which creates a .NET library containing only a sequential workflow class. This project template does not include a host application, so you will need to supply your own in order to execute a workflow.
- Sharepoint 2007 Sequential Workflow, which creates a sequential workflow suitable for use with SharePoint 2007. (For more information on SharePoint 2007 and workflows, visit this site.)
If you want to create a state machine workflow (the topic of another tutorial in this series), you can select any of the following templates, which correspond to the similarly named templates previously listed:
- SharePoint 2007 State Machine Workflow
- State Machine Workflow Console Application
- State Machine Workflow Library
In addition, you can select the Empty Workflow Project template to create an empty project, with just the necessary references set; or you can select the Workflow Activity Library template to create a library in which you could create custom workflow activities.
Create a Workflow Project
For this demonstration, select the Sequential Workflow Console Application template, name your application WorkflowDemo1, and select an appropriate folder for the project. Click OK to create the project. (Note that every workflow must be hosted by some application—something has to create an instance of the workflow runtime, which, in turn, creates an instance of the workflow you want to execute. In this example, you’ll create a Console application that hosts the workflow.)
At this point, the workflow project contains a single workflow class, named Workflow1. This blank template should be opened for you (if not, double-click the corresponding code file in the Solution Explorer window to open it), and the workflow designer is ready for you to add your own activities (see Figure 2).

Figure 2. The workflow designer is ready for you to add activities.
In the Solution Explorer window, right-click the Workflow1 file, and select View Code from the context menu. You’ll find code like the following, clearly pointing out that the workflow that you’re designing is really just a class that inherits from the SequentialWorkflowActivity class:
Public class Workflow1
    Inherits SequentialWorkflowActivity
End Class
public sealed partial class Workflow1: SequentialWorkflowActivity
{
  public Workflow1()
  {
  InitializeComponent();
  }
}
Just as a Windows Form that you design within Visual Studio becomes an instance of a class that inherits from the System.Windows.Forms.Form class when you run the application, the workflow that you design within Visual Studio becomes an instance of a class that inherits from either the SequentialWorkflowActivity or StateMachineWorkflowActivity class when you run the application. Later, you’ll add code to this partial class in order to add behavior to your workflow. (Actually, there’s more of a similarity than just that—in Visual Studio, when you load a file that contains a class that inherits from the Form class, Visual Studio displays the form using the Windows Forms designer. The same thing happens with a workflow class—when you ask Visual Studio to load a file that contains a class that inherits from one of the two base activity classes, it displays the class using the appropriate workflow designer.)
Select View | Designer to return to design view.
Look in the Toolbox window (if it’s not visible, select View | Toolbox to display it). You’ll see two tabs that deal with Workflow: the tab labeled Windows Workflow v3.0 contains most of the built-in workflow activities you’ll use, and the tab labeled Windows Workflow v3.5 contains the new workflow activities added in the .NET Framework 3.5 (this tab contains only two activities dealing with WCF and workflow, and you won’t need these items for these tutorials). For now, select the Windows Workflow 3.0 tab, and expand it (see Figure 3).

Figure 3. The Windows Workflow v3.0 tab in the Toolbox window contains most of the built-in workflow activities.
Some of the activities you see in the Toolbox window have obvious behavior—the Code activity allows you to execute code, the IfElse activity allows you to make choices, and the While activity executes an activity while some condition remains true. Other activities, such as the SynchronizationScope activity, require a bit more study to determine their purpose. In this tutorial, you’ll work with the simple Code and IfElse activities—later tutorials will walk you through using some of the more complex activities, such as the Replicator, While, Listen, and HandleExternalEvent activities.
Add Activities to the Workflow
To get started, from the toolbox, drag a Code activity onto the design surface, so that the designer looks like Figure 4 just before you drop the activity. Once you drop the activity, the designer looks like Figure 5. (Note that as you drag activities onto the designer, you see one or more green “dots” indicating where, on the workflow, you can drop your activity.)

Figure 4. Before dropping the activity, you see an icon representing where it will finally appear within the workflow.

Figure 5. After dropping the activity, it appears within the workflow design.
At this point, the Code activity indicates an error—you haven’t yet told it what to do when the workflow attempts to execute it! You’ll add the code soon. (Although this tutorial doesn’t walk you through the steps, you should get in the habit of providing meaningful names for your workflow activities—otherwise, it gets difficult to manage all the activities in your workflow. Setting the Name property for each activity is a good habit to get into, but it’s not necessary for this simple workflow.)
At runtime, the sequential workflow starts at the green arrow, and executes activities, one at a time, in turn, until it reaches the red circle at the conclusion of the workflow. In your sample workflow, you have included only a single Code activity. Executing the workflow will cause it to run any code that you have placed in the activity’s ExecuteCode event handler.
To create the code for your activity, double-click CodeActivity1. This creates an associated procedure, ready for you to edit in the code editor. Modify the procedure, adding the following code:
Console.WriteLine("Hello, World!")
Console.WriteLine("Hello, World!");
Select View | Designer, and verify that the error indicator disappears, because you have provided code for the Code activity to run. Select the Code activity, and examine the Properties window (see Figure 6). You’ll see that by adding the event handler, you’ve set the activity’s ExecuteCode property, so that the activity “knows” what to do when it becomes the active activity within the workflow.

Figure 6. Adding code for the Code activity sets the activity’s ExecuteCode property.
Just to verify that you’ve created a working workflow, save and press Ctrl+F5 to run your project. (If you use any other means to run the project, the console window will disappear immediately, once the message appears on the screen.) After a few seconds, the console window displays your message awaits a key press.
So far, you’ve created the world’s simplest working workflow, and it really only proved that workflow works at all—clearly, you would never use WF for a simple application like this. Next, you’ll investigate how WF loads and runs your workflow design.
Debugging a Workflow
Although this simple application certainly doesn’t require any debugging capabilities, you’ll often need to step through your workflows. As you might expect, you can easily place a breakpoint in the ExecuteCode handler for a Code activity, and step through the code. But what if you want to debug at a higher level, stepping through activities as they execute? You can, and Visual Studio makes the process feel much like debugging at the code level.
In the workflow designer, right-click CodeActivity1. From the context menu, select BreakPoint | Insert Breakpoint. At this point, the designer places a red dot on the activity, indicating that the workflow will drop into Debug mode when it begins to execute the activity (see Figure 7).

Figure 7. Set a breakpoint on an activity.
Press F5 to start running the application. When the workflow reaches codeActivity1, it pauses execution and highlights the activity in yellow, as shown in Figure 8.

Figure 8. At runtime, Visual Studio stops at the activity’s breakpoint.
Select Debug | Step Over (or the corresponding keystroke), and Visual Studio steps to the next activity, executing the previous Code activity’s ExecuteCode procedure. Select Debug | Step Into, and Visual Studio steps into the second Code activity’s ExecuteCode procedure, as you might expect. Visual Studio 2008 makes debugging a workflow no more difficult than debugging any other type of application. (In order to step through your workflow, the startup project within Visual Studio must be a workflow project. That is certainly the case in this simple example, but might not be the case in a “real-world” scenario in which the workflow exists in a library, and the host project is separate. In that case, you’ll need to configure Visual Studio so that it starts the host application when you start debugging.)
Investigate the Startup Code
The project template created a simple console application for you, and the project automatically loaded and ran your workflow. It’s important to understand exactly how the project does its work, because you’ll often want to host workflows from other types of applications (from Windows or Web applications, or perhaps from a Windows Service)—in those cases, you’ll need to provide your own code to get the workflow running.
To investigate the code that actually does the work starting up your workflow, in the Solution Explorer window, double-click Module1.vb or Program.cs. There, you’ll find the following code:
Class Program
  Shared WaitHandle As New AutoResetEvent(False)
  Shared Sub Main()
    Using workflowRuntime As New WorkflowRuntime()
      AddHandler workflowRuntime.WorkflowCompleted, _
        AddressOf OnWorkflowCompleted
      AddHandler workflowRuntime.WorkflowTerminated, _
        AddressOf OnWorkflowTerminated
      Dim workflowInstance As WorkflowInstance
      workflowInstance = _
        workflowRuntime.CreateWorkflow(GetType(Workflow1))
      workflowInstance.Start()
      WaitHandle.WaitOne()
    End Using
  End Sub
  Shared Sub OnWorkflowCompleted(ByVal sender As Object, _
    ByVal e As WorkflowCompletedEventArgs)
    WaitHandle.Set()
  End Sub
  Shared Sub OnWorkflowTerminated(ByVal sender As Object, _
    ByVal e As WorkflowTerminatedEventArgs)
    Console.WriteLine(e.Exception.Message)
    WaitHandle.Set()
  End Sub
End Class
class Program
{
  static void Main(string[] args)
  {
    using (WorkflowRuntime workflowRuntime = new WorkflowRuntime())
    {
      AutoResetEvent waitHandle = new AutoResetEvent(false);
      workflowRuntime.WorkflowCompleted +=
        delegate(object sender, WorkflowCompletedEventArgs e)
          { waitHandle.Set(); };
      workflowRuntime.WorkflowTerminated +=
        delegate(object sender, WorkflowTerminatedEventArgs e)
        {
          Console.WriteLine(e.Exception.Message);
          waitHandle.Set();
      };
      WorkflowInstance instance = workflowRuntime.CreateWorkflow(
        typeof(WorkflowDemo1.Workflow1));
      instance.Start();
      waitHandle.WaitOne();
    }
  }
}
This code, which runs as your application loads, starts by creating a new instance of the WorkflowRuntime class, which provides a execution environment for workflows. Every application you create that hosts one or more workflows must create and instantiate an instance of this class. The WorkflowRuntime instance later creates workflow instances:
Using workflowRuntime As New WorkflowRuntime()
  ' Code removed here…
End Using
using (WorkflowRuntime workflowRuntime =
  new WorkflowRuntime())
{
// Code removed here…
}
On its own, a Console application simply quits when the code in its Main procedure completes. In this case, however, you must keep the application “alive” as long as the workflow is still running. The project template includes an AutoResetEvent variable that helps keep that application running until the workflow has completed:
Shared WaitHandle As New AutoResetEvent(False)
AutoResetEvent waitHandle = new AutoResetEvent(false);
The AutoResetEvent class allows threads to communicate with each other by signaling. In this case, the Console application runs in one thread, and the workflow runs in a separate thread. The main thread—in this case, the console application—calls the wait handle’s WaitOne method, which blocks the console application’s thread until the workflow’s thread calls the wait handle’s Set method, which allows the main thread to complete.
How does this all happen? Given the WorkflowRuntime instance, the code adds event handlers for the runtime’s WorkflowCompleted and WorkflowTerminated events. The WorkflowCompleted event occurs when the workflow completes normally, and the WorkflowTerminated event occurs if the workflow completes abnormally (because of an unhandled exception, for example):
AddHandler workflowRuntime.WorkflowCompleted, _
  AddressOf OnWorkflowCompleted
AddHandler workflowRuntime.WorkflowTerminated, _
  AddressOf OnWorkflowTerminated
' Later in the class:
Shared Sub OnWorkflowCompleted(ByVal sender As Object, _
  ByVal e As WorkflowCompletedEventArgs)
  WaitHandle.Set()
End Sub
Shared Sub OnWorkflowTerminated(ByVal sender As Object, _
  ByVal e As WorkflowTerminatedEventArgs)
  Console.WriteLine(e.Exception.Message)
  WaitHandle.Set()
End Sub
workflowRuntime.WorkflowCompleted +=
  delegate(object sender, WorkflowCompletedEventArgs e) {
    waitHandle.Set(); };
workflowRuntime.WorkflowTerminated +=
  delegate(object sender, WorkflowTerminatedEventArgs e)
  {
    Console.WriteLine(e.Exception.Message);
    waitHandle.Set();
  };
When either event occurs, the code calls the wait handle’s Set method, which allows the console application’s thread to continue running (in effect, completing the application and allowing the console window to close). If the workflow terminates abnormally, the WorkflowTerminated event handler writes the exception to the console window before calling the Set method. (This is, as you can probably surmise, not terribly helpful—because the message appears in the window immediately before the window closes, you’ll never actually see the message if the workflow throws an unhandled exception!)
You’ve investigated all the code provided in the project template, except the code that actually starts your workflow running. This code appears between the code that sets up the event handlers, and the code that calls the wait handle’s WaitOne method:
Dim workflowInstance As WorkflowInstance
workflowInstance = _
  workflowRuntime.CreateWorkflow(GetType(Workflow1))
workflowInstance.Start()
WorkflowInstance instance = workflowRuntime.CreateWorkflow(
  typeof(WorkflowDemo1.Workflow1));
instance.Start();
This code starts by creating a WorkflowInstance object, assigning to it the return value of calling the WorkflowRuntime object’s CreateWorkflow method. By passing the type of the workflow to be created as a parameter to the CreateWorkflow method, the workflow runtime can determine exactly which type of workflow to create. Finally, the code calls the Start method of the workflow instance, which begins executing the workflow at its first activity. (Sequential workflows have an initial activity; state machine workflows have an initial state. It’s a subtly different concept, and you’ll understand it better once you try out a state machine workflow.)
Although you’ll probably want to spend the most time fixating on the mechanics of the AutoResetEvent object and the wait handle, please don’t—these features are only necessary for workflows hosted by a Console application, to keep the application running as long as the workflow hasn’t completed. When you host a workflow in any other type of application (a Windows Forms application, for example), you needn’t worry about keeping the application alive.
Build a Slightly More Useful Workflow
Although it’s important to work through the obligatory “Hello, World” example as you’ve done, the workflow you built really didn’t do much. For the remainder of this tutorial, you’ll build a workflow application with the following features for backing up files in a folder:
- When the workflow starts up, it creates the required backup folder, if necessary, using a Code activity.
- Using a While activity, it loops through all the files in the “from” folder.
- Within the activity inside the While activity, a Code activity performs the file copy.
- The workflow receives its “from” and “to” folders passed as parameters from the host application.
In setting up this simple workflow, you’ll learn how to use the While activity, and also how to pass parameters to a workflow from the host.
In Visual Studio 2008, create a new project, again selecting Sequential Workflow Console Application as the template. Name the project BackupWorkflow.
In the workflow designer, drag a Code activity, then a While activity, and finally, another Code activity into the designer. When you’re done, the designer should look like Figure 9. Note that each of the activities displays an error condition: the two Code activities require code to execute, and the While activity requires you to supply a condition so that it can determine when to stop executing.
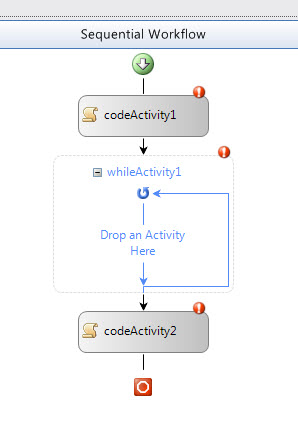
Figure 9. Create this simple workflow.
The While activity allows you to drop a single activity within it (note the “Drop and Activity” prompt inside the activity). What if you want to execute multiple activities in a loop? Although you cannot drop multiple activities inside the While activity, for this very purpose, WF supplies a Sequence activity. The Sequence activity acts as a container for other activities, and as far as the While activity is concerned, it contains only a single activity once you place a Sequence activity inside it. Although this workflow only requires a single activity within the While activity, iif you were to add more than a single activity, you would need the Sequence activity. On the other hand, adding the Sequence activity adds significant overhead to the workflow’s execution—therefore, only add a Sequence activity if you need multiple activities within the While activity. As a “best practice”, consider minimizing the number of activities within the While activity, if at all possible..
Drag a Sequence activity inside the While activity. When you’re done, the workflow should resemble Figure 10.

Figure 11. The completed layout should look like this.
Configure Code Activities
Double-click codeActivity1, creating the activity’s ExecuteCode handler. At the top of the code file, add the following statement:
Imports System.IO
using System.IO;
Outside the procedure you just created, but inside the Workflow1 class, add the following declarations. You’ll use these declarations to keep track of the “from” and “to” folders, as well as the current file and total number of files as you’re copying files:
Private currentFile As Integer
Private files As FileInfo()
Private _totalFiles As Integer
Public Property TotalFiles() As Integer
  Get
    Return _totalFiles
  End Get
  Set(ByVal value As Integer)
    _totalFiles = value
  End Set
End Property
Private _toFolder As String
Public Property toFolder() As String
  Get
    Return _toFolder
  End Get
  Set(ByVal value As String)
    _toFolder = value
  End Set
End Property
Private _fromFolder As String
Public Property fromFolder() As String
  Get
    Return _fromFolder
  End Get
  Set(ByVal value As String)
    _fromFolder = value
  End Set
End Property
public string toFolder { get; set; }
public string fromFolder { get; set; }
public int totalFiles ( get; set; }
private int currentFile;
private FileInfo[] files;
In the codeActivity1_ExecuteCode procedure, add the following code, which initializes the variables:
currentFile = 0
files = New DirectoryInfo(fromFolder).GetFiles
totalFiles = files.Count
' Create the backup folder.
Directory.CreateDirectory(toFolder)
currentFile = 0;
files = new DirectoryInfo(fromFolder).GetFiles();
totalFiles = new DirectoryInfo(fromFolder).GetFiles().Count();
// Create the backup folder:
Directory.CreateDirectory(toFolder);
Select View | Designer to switch back to the workflow designer. Double-click codeActivity2, and add the following code to the activity’s ExecuteCode handler. This code retrieves the name of the current file to be copied, copies it to the “to” folder (overwriting existing files), and increments the current file counter:
Dim currentFileName As String = _
  Path.GetFileName(files(currentFile).Name)
files(currentFile).CopyTo( _
  Path.Combine(toFolder, currentFileName), True)
currentFile += 1
string currentFileName =
  Path.GetFileName(files[currentFile].Name);
files[currentFile].CopyTo(
  Path.Combine(toFolder, currentFileName), true);
currentFile++;
At this point, you’ve set up the Code activities and their ExecuteCode handlers, but you’re not done: You still need to configure the While activity, and you need to pass the fromFolder and toFolder values from the host application. In addition, you need to add code in the host that reports on the results of executing the workflow.
Configure the While Activity
The While activity in this workflow needs to execute as many times as there are files in the “from” folder. The code includes the currentFile and totalFiles variables—you simply need to expose that information to the While activity.
Select View | Designer. In the designer, select the While activity. In the Properties window, find the Condition property, select the drop-down arrow to the right of the property’s value, and select Declarative Rule Condition (see Figure 11). You have the option of either defining a rule in the Properties window (Declarative Rule Condition) or creating a condition in code (Code Condition). For this demonstration, you’ll create the condition in the Properties window.

Figure 12. Set up the declarative rule condition.
Click the tiny “+” sign to the left of the Condition property, expanding the property. Set the ConditionName property to filesLeft. (Naming the condition allows you to use the same condition in a different place within your workflow.) Select the Expression property, and then select the ellipsis to the right of the property. Enter the condition shown in Figure 12. As you type, note the IntelliSense support. Clearly, the Rule Condition Editor window is able to retrieve information about the properties exposed by your workflow as you type. Although Visual Basic developers can enter the expression using Visual Basic syntax (using the Me keyword instead of this), the editor converts the syntax to C# syntax before it closes. Click OK to close the editor.

Figure 13. Create the While activity’s rule condition.
The rule condition specifies that your workflow should loop inside the While activity as long as the currentFile value is less than the total number of files. In effect, you’ve created a simple For loop using the While activity and a little bit of code. (You might be wondering if there’s some way to create a For Each loop using an activity. There is, in fact. The Replicator activity can accomplish this same goal, with less code. You can learn more about that activity in a later tutorial.)
Configuring Input Parameters
You still need to be able to specify the fromFolder and toFolder values from the host application. Because you’ll often need to pass parameters to a workflow, as you start it up, WF provides a standardized mechanism for passing parameters from the host to a workflow.
As you did earlier, open the Module1.vb or Program.cs file in the code editor. Currently, the Main procedure creates the workflow instance using the following code:
workflowInstance =
  workflowRuntime.CreateWorkflow(GetType(Workflow1))
WorkflowInstance instance =
  workflowRuntime.CreateWorkflow(typeof(BackupWorkflow.Workflow1));
In order to pass parameters to the workflow, you must create a generic dictionary, using a String type as the key, and an Object type as the value. Add property name and value pairs to the dictionary, and pass it as a second parameter in the call to the CreateWorkflow method. The workflow runtime engine passes the parameters by name to the workflow as it creates the instance.
Because the workflow you created exposes public fromFolder and toFolder properties, you can easily pass these parameters from the host application. To finish your workflow, add the following code to the Main procedure, replacing the existing line of code that calls the CreateWorkflow method (feel free to alter the specific folders to match your own situation.):
Dim parameters As New Dictionary(Of String, Object)
parameters.Add("fromFolder", "C:\test")
parameters.Add("toFolder", "C:\backup")
workflowInstance =
  workflowRuntime.CreateWorkflow(GetType(Workflow1), parameters)
var parameters = new Dictionary<string, object>();
parameters.Add("fromFolder", @"C:\test");
parameters.Add("toFolder", @"C:\backup");
WorkflowInstance instance =
  workflowRuntime.CreateWorkflow(
  typeof(BackupWorkflow.Workflow1), parameters);
This technique has its own set of tricks. First of all, the parameter names must match public properties (not fields) in the workflow’s class. If you add an invalid property name to the dictionary, you won’t get a compile-time error—instead, you’ll find out at runtime that your property name is incorrect. In addition, the property names are case-sensitive, even when you’re writing code in Visual Basic.
Display Workflow Results
As you’ve seen earlier, the workflow runtime’s WorkflowCompleted executes once the workflow completes successfully. In addition, you’ve seen how to pass parameters to the workflow, using a custom dictionary. You can also retrieve values back from the workflow, in the WorkflowCompleted event handler: the WorkflowCompletedEventArgs that the .NET Runtime passes to this event handler exposes its OutputParameters collection. You can use the name of any public property within the workflow as a string index into this collection to retrieve the value of the property. To verify this behavior, in Module1.vb or Program.cs, modify the OnWorkflowCompleted event handler so that it includes the following code (in C#, the event handler appears at the end of a long line of code, which hooks up the WorkflowCompleted event handler using an anonymous method. You’ll find it easier to add this code if you reformat the existing code so that it looks similar to the WorkflowTerminated event handler):
Console.WriteLine("Copied {0} file(s)", _
  e.OutputParameters("TotalFiles"))
Console.WriteLine("Press any key to continue...")
Console.ReadKey()
WaitHandle.Set()
Console.WriteLine("Copied {0} file(s)",
  e.OutputParameters["TotalFiles"]);
Console.WriteLine("Press any key to continue...");
Console.ReadKey();
waitHandle.Set();
Save and run your project. If you’ve followed the directions carefully, the workflow should copy all the files from the “from” folder to the “to” folder, and you should see the results of the workflow in the Console window.
Conclusion
In this tutorial, you’ve learned many of the basic concepts involved in creating and executing workflows, using the Windows Workflow Foundation. Of course, the workflows you created are contrived, and exist simply to demonstrate specific features of WF—you’ll need to consider, as you begin thinking about incorporating WF into your own environment, what kinds of tasks lend themselves to running as workflows. Consider this: because WF supports features like persistence, which allows the workflow to persist its state to a data store (SQL Server, by default), WF is best suited for applications in which you have a long-running task that must survive even if the host machine needs to be rebooted during the task’s execution. For simple applications like you’ve seen here, WF is truly overkill. For enterprise solutions in which you have tasks that might not complete for days, or months, WF provides a perfect solution.
Now that you’ve gotten a taste for what you can do using WF, take the time to try out the remaining tutorials in this series, and then start building your own workflows. You’ll be amazed at the power in this rich framework.
About the Author
Ken Getz is a developer, writer, and trainer, working as a senior consultant with MCW Technologies, LLC. In addition to writing hundreds of technical articles over the past fifteen years, he is lead courseware author for AppDev (http://www.appdev.com). Ken has co-authored several technical books for developers, including the best-selling ASP.NET Developer’s Jumpstart, Access Developer’s Handbook series, and VBA Developer’s Handbook series, and he’s a columnist for both MSDN Magazine and CoDe magazine. Ken is a member of the INETA Speakers Bureau, and speaks regularly at a large number of industry events, including 1105 Media’s VSLive, and Microsoft’s Tech-Ed.