Windows Workflow Tutorial: Introduction to State Machine Workflows
Rob Green
MCW Technologies LLC
Published: November, 2008
Articles in this series
- Building a Sequential Workflow
- Building a State Machine Workflow
- Flow Control: Basics
- Flow Control: Replicator
- Fault Handling
- Communication: Calling Methods within the Host Process
- Communication: Handling an Event From the Host in a Workflow
- Rules-Driven .NET Applications
- Rules-Driven WCF Services
Download the code for this article
Introduction
Workflows model business processes. When you design a workflow, your first task is to identify the steps that occur during the business process. That is true whether the business process is the processing of an order, the calculation of a bonus payment or the processing of a loan application. The business process consists of steps and your job is to define those. Once you have the steps defined, you can use Windows Workflow Foundation (WF) to build a workflow that models the business process.
You can build two types of workflows with WF: sequential and state machine workflows. A sequential workflow provides a structured series of steps in which one activity leads to another, and steps generally occur immediately one after another. A step might wait for some event (an email to arrive, for example), but sequential workflows are often used to model processes that operate without human intervention.
A state machine workflow provides a set of states. The workflow begins in an initial state and ends when it reaches the completed state. Transitions between the states define the behavior. In general, state machine workflows react to events. The occurrence of an event causes the workflow to transition to another state.
Whether you build a workflow as a sequential or state machine workflow depends on how the business manages the process. For example, suppose you need to build a workflow that models processing an order. You determine the following steps are involved:
- The business receives the order, including all necessary information (customer, product, quantity, credit card information, shipping address, etc).
- The business checks if the customer has sufficient credit. If so, the workflow continues. If not, the order is canceled and the workflow ends.
- The business checks if there is sufficient inventory to fulfill the order. If so, the process continues. If not, the order is canceled and the process ends.
- The business asks the credit card company for payment. If the credit card company approves, the process continues. If not, the order is canceled and the process ends.
- The item ships to the customer. The order is marked as fulfilled and the process ends.
A sequential workflow is likely the appropriate type of workflow here. The workflow starts when the company receives an order. It then continues through a number of steps until the order is either canceled as fulfilled. The workflow runs from start to finish with no delays.
As an alternative, suppose you determine the following steps are involved in processing an order:
- The business receives the order, including all necessary information (customer, product, quantity, credit card information, shipping address, etc).
- The business checks if the customer has sufficient credit. If so, the process continues. If not, the order is canceled and the workflow ends.
- The business checks if there is sufficient inventory to fulfill the order. If so, the process continues. If not, the order is canceled and the process ends.
- If the product is in stock, the process waits for shipping to ship the product.
- Just before shipping the product, the business asks the credit card company for payment. If the credit card company approves, the process continues. If not, the order is canceled and the process ends.
- After the product ships, the process waits for the customer to acknowledge receiving it. If the product arrives, the process ends. If the customer does not receive the product, the process waits for shipping to resend it. At this point, either the business or the customer can cancel the order, ending the process.
You can successfully implement this business process either as a sequential workflow or as a state machine workflow. To decide, think about what makes it different from the previous scenario. There are several places in the business process where the process needs to pause and wait for some other process to begin. The pause may be short. It may also be long. It could take weeks or months for new inventory to arrive if the product is out of stock. It hopefully only takes days, not weeks, for shipping to send the product. It will take anywhere from one day to ten days for the product to arrive to the customer. During these periods, there is nothing for the business process to do except wait.
One of the main benefits of the state machine workflow is the ability to define states and to define how the workflow moves from state to state. You can define multiple paths through the workflow. If the product is in stock, the workflow can take the following path:
Waiting For Shipping -> Waiting For Acknowledgement -> Completed
If the product does not arrive, the workflow can take the following path:
Waiting For Shipping -> Waiting For Acknowledgement -> Waiting For Shipping -> Waiting For Acknowledgement -> Completed
You can easily include looping and re-execution of states in a state machine workflow. It is difficult, and potentially not possible, to do this in a sequential workflow.
A sequential workflow moves to the next activity when it is finished executing the previous activity. A state machine workflow typically moves to a different state when an external action occurs. This external action can be the host application raising an event handled by the workflow. The action can also be the host application programmatically setting the next state. You can also use the SetState activity in the workflow to move to a new state.
Create a State Machine Workflow
To get started, in Visual Studio 2008 select File | New | Project to display the New Project dialog box. In the list of project types, select Workflow, displaying the list of templates shown in Figure 1.
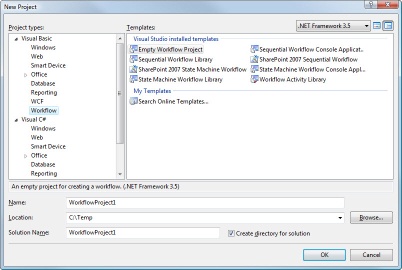
Figure 1. Visual Studio 2008 provides these workflow templates.
For this demonstration, select the State Machine Workflow Console Application template, name your application StateMachineDemo1, and select an appropriate folder for the project. Click OK to create the project.
At this point, the workflow contains a single activity, named Workflow1InitialState, as shown in Figure 2.
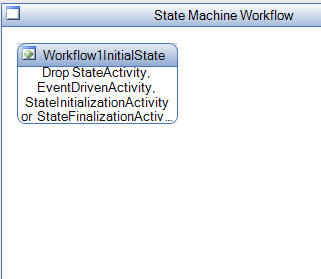
Figure 2. A new state machine workflow contains a single activity.
A state machine workflow contains workflow activities, as does a sequential workflow. You will find that you use workflow activities such as Code, While, IfElse and Sequence in the same manner regardless of the type of workflow you build. There are four activities unique to state machine workflows. These are the State, SetState, StateInitialization and StateFinalization activities (see Figure 3).
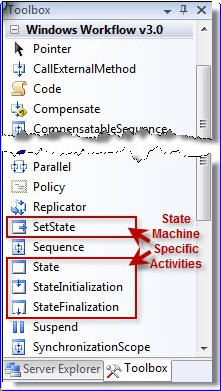
Figure 3. These activities are specific to state machine workflows.
The State activity is the main activity you will use in a state machine workflow. Each State activity in a workflow represents a point where the business process waits for something to happen.
WF requires that your state machine workflows have one state marked as the initial state. Although it is not required, you should also mark one state as the completed state. When the workflow starts, the workflow starts with the state marked as the initial state. You can visually identify the initial state by a green circle in the activity’s title bar. When the workflow reaches the completed state, the workflow will end. You can visually identify the completed state by a red circle in the activity’s title bar.
Define the Workflow States
Select the Workflow1InitialState activity and change its name to Started. Notice that the green circle disappears from the title bar. To mark this activity as the initial state, right click on it and select Set as Initial State. The green circle reappears. Note that you can also set the InitialStateName property of the workflow to Started.
To add another state to the workflow, drag a State activity from the toolbox onto the design surface. Name the activity Working.
Now add the final state to the workflow, naming it Finished. To mark it as the completed state, right click on it and select Set as Completed State. You should now see a red circle in the activity’s title bar. Note that you can also set the CompletedStateName property of the workflow to Finished.
The workflow designer now looks like Figure 4. (The Started activity has been widened to see all of the text.)
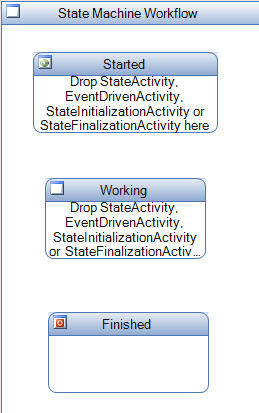
Figure 4. The state machine workflow contains an initial state, a completed state and an additional state.
The next step in building this workflow is to specify, for each state, what state or states the workflow can move to next and what happens while the workflow is in that state, including what happens to move it to another state.
State Transitions: Moving from State to State
If this were a sequential workflow, the workflow would execute the activity at the top of the workflow (Started) and then move to the next activity (Working) and then move to the final activity (Finished) and then end. Sequential workflows execute from top to bottom.
You set Started as the initial state so when this workflow starts, it will start in the Started state. You set Finished as the completed state so when the workflow gets to the Finished state it will end.
How does the workflow move off the Started state? Does it go to Working or Finished next? If it goes to the Working state, how does it move off Started? When it moves off Working, can it go back to Started or can it only go to Finished?
To move the workflow to a new state, you use the SetState activity. To specify the next state, you set the TargetStateName property of the SetState activity to that state.
Define the Activities that Occur in Each State
State machine workflows move from state to state. While they are in each state (except for the completed state), they can perform actions, wait for an external event to occur and transition to another state.
You can add four activities to a State activity:
- The StateInitialization activity, if it exists, is the first activity the workflow executes when it enters a state. This is a Sequence activity, so you can add to it all of the activities you want to execute when the workflow enters that state. You might log the date and time. You might query a database. You could add a SetState activity to a StateInitialization activity if you want the workflow to move to a new state after performing the logging and querying.
- In a state machine workflow, the workflow will enter a state and stay there until something happens. This is the essence of a state machine workflow. That something could be internal to the workflow or it could be an external event. You handle external events using an EventDriven activity. It is also a Sequence activity, so you can add to it all of the activities you want to execute when the host raises the event. One of these activities can be a SetState activity.
- The StateFinalization activity, if it exists, is the last activity the workflow executes as it leaves a state. It is also a Sequence activity, so you can add to it all of the activities you want to execute before the workflow moves to a new state. You might log the date and time, query a database or clean up resources.
- You can add a State activity within a State activity. This creates a hierarchical state machine workflow. You might do this if you had a number of states and each of them reacted to the same events. Rather than set up the events for each state, you could set up the event for one state and then add the other states to that state. The child states would inherit the event driven behavior of the parent state. This is beyond the scope of this tutorial.
Complete the Workflow
You will now finish this workflow. You will define what happens in each state and how the workflow moves from state to state.
From the toolbox, drag a StateInitialization activity into the Started activity. stateInitializationActivity1 is a Sequence activity. To add activities to it, double click on it. The workflow designer looks like Figure 5.
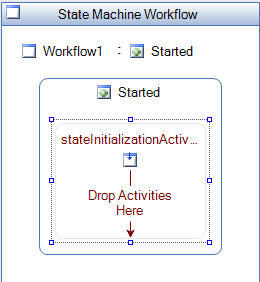
Figure 5. The StateInitialization activity is a Sequence activity.
Notice the navigation list, or “breadcrumb” at the top left in the designer. This will enable you to return to the main workflow view when you are finished adding activities to the StateInitialization activity.
Drag a Code activity from the toolbox into stateInitializationActivity1. Double-click codeActivity1, creating the activity’s ExecuteCode event handler. In the codeActivity1_ExecuteCode method, add the following code to display the order details:
Console.WriteLine("The workflow has started" & vbCrLf)
Console.WriteLine("The workflow has started\n");
Select View | Designer to return to the workflow designer. Drag a SetState activity from the toolbox into stateInitializationActivity1 below codeActivity1. Select Working from the drop-down list associated with the TargetStateName property. The workflow now looks like Figure 6.
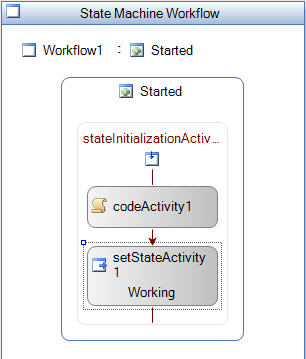
Figure 6. The SetState activity transitions the workflow to another state.
Select the link for Started or Workflow1 in the navigation menu. This returns you to the main workflow view (see Figure 7). Notice that there is now a line connecting Started to Working. This shows you the flow of the workflow from the initial state to the next state.
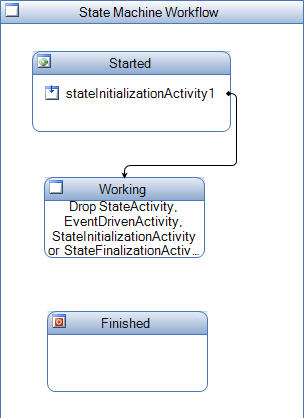
Figure 7. The line indicates the flow of the workflow from state to state.
Handle External Events
So far, this workflow executes in a relatively sequential fashion. The workflow starts and then, after displaying a message, moves to the next state. That scenario doesn’t appear very stateful, does it?
As mentioned previously, the typical scenario for a state machine workflow it enters a state and waits for the host application to raise an event. You handle external events using an EventDriven activity. You will then decide what actions the workflow takes, including what state it moves to next.
From the toolbox, drag an EventDriven activity into Working. Select eventDrivenActivity1. Hover the mouse over the middle square on the left or right border of the activity. The cursor should change to a crosshair (see Figure 8). Hold down the mouse button. Drag the crosshair and drop it on Finished (see Figure 9). There will then be a line connecting the two states.
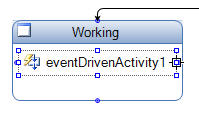
Figure 8. Hover the mouse over the activity and wait for the cursor to change to a crosshair.

Figure 9. Drag an EventDriven activity from one state to another to define a transition.
Double click eventDrivenActivity1. You can see that it is a container activity and already includes a SetState activity. When you dragged the crosshair from Working to Finished, Visual Studio added a SetState activity to eventDrivenActivity1 and set its TargetStateName property to Finished (see Figure 10).
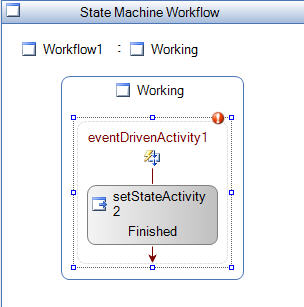
Figure 10. The EventDriven activity contains a SetState activity.
At this point, the EventDriven activity indicates an error. The first activity in an EventDriven activity must implement the IEventActivity interface. This interface enables activities to subscribe to events. The HandleExternalEvent and Delay activities implement this interface.
Use the HandleExternalEvent activity when the host application raises an event. To do this, you first need to create an interface that defines the events the host can raise. You also need to create a class that defines the information the host will pass to the workflow when it raises events. You then associate the HandleExternalEvent activity with an event.
This is too advanced for this tutorial, but it will be covered in a later tutorial. For this workflow, you will use a Delay activity and simply pause the workflow for a few seconds. Although this is not a realistic scenario, it serves the purpose here.
From the toolbox, drag a Delay activity into eventDrivenActivity1 above setStateActivity2. Set the TimeoutDuration property of delayActivity1 to five seconds.
Drag a Code activity from the toolbox into eventDrivenActivity1 between the two activities currently in there. Double-click codeActivity2 and add the following code to the activity’s ExecuteCode event handler:
Console.WriteLine("Moving on now" & vbCrLf)
Console.WriteLine("Moving on now\n");
Select View | Designer to return to the workflow designer. Select the link for Workflow1 or Working in the upper left of the workflow designer.
From the toolbox, drag a StateFinalization activity into Working below eventDrivenActivity1. To add activities to stateFinalizationActivity1, double click on it.
Drag a Code activity from the toolbox into stateFinalizationActivity1. Double-click codeActivity3, creating the activity’s ExecuteCode event handler. In the codeActivity3_ExecuteCode method, add the following code:
Console.WriteLine("Transitioning to Finished" & vbCrLf)
Console.WriteLine("Transitioning to Finished\n");
Select View | Designer to return to the workflow designer. Select the link for Workflow1 or Working in the upper left of the workflow designer. The workflow should look like Figure 11.
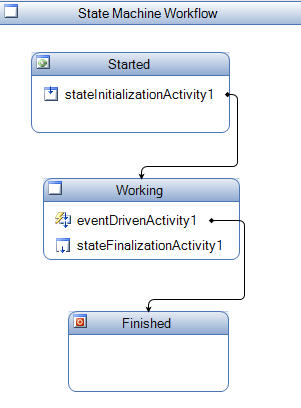
Figure 11. The workflow with three states and the transitions between them.
Call the Workflow from the Console Application
To review the code that actually does the work starting up your workflow, in the Solution Explorer window, double-click Module1.vb or Program.cs. There, you’ll find the following code:
Using workflowRuntime As New WorkflowRuntime()
  ' Code removed here…
  Dim workflowInstance As WorkflowInstance
  workflowInstance = _
    workflowRuntime.CreateWorkflow(GetType(Workflow1))
  workflowInstance.Start()
  ' Code removed here…
End Using
using (WorkflowRuntime workflowRuntime = new WorkflowRuntime())
{
  // Code removed here…
  WorkflowInstance instance = workflowRuntime.CreateWorkflow(
    typeof(StateMachineDemo1.Workflow1));
  instance.Start();
  // Code removed here…
}
This code, which runs as your application loads, starts by creating a new instance of the WorkflowRuntime class. This class provides an execution environment for workflows. The WorkflowRuntime instance creates an instance of the state machine workflow.
Save and press Ctrl + F5 to run your project. If you’ve followed the directions carefully, you should first see the following output:
The workflow has started
There should then be a five second delay before you see the following output:
Moving on now
Transitioning to Finished
Press any key to continue...
Press any key to exit the application.
Build a More Useful Workflow
This workflow demonstrates the basics of building a state machine workflow, but it doesn’t really do much. For the remainder of this tutorial, you’ll modify the workflow to model an order processing workflow.
When the business receives an order, the host application will start the workflow, passing to it the order information. The workflow will check if there is sufficient inventory to process the order. If not, the order is canceled. If the item is in stock, the workflow will wait for the order to ship. After the order ships, the workflow ends.
Change the name of the Working state to WaitingForShipping. The workflow enters this state and waits for something, so why not identify what it is waiting for in the name?
Next, you will add properties to the workflow so it can receive order information. Select View | Code. Outside the methods, but inside the Workflow1 class, add the following properties. You’ll use these to keep track of order details, as well as the status of the inventory check:
Private productIDValue As Integer
Public Property ProductID() As Integer
  Get
    Return productIDValue
  End Get
  Set(ByVal value As Integer)
    productIDValue = value
  End Set
End Property
Private quantityValue As Integer
Public Property Quantity() As Integer
  Get
    Return quantityValue
  End Get
  Set(ByVal value As Integer)
    quantityValue = value
  End Set
End Property
Public inStock As Boolean = False
public int ProductID { get; set; }
public int Quantity { get; set; }
public bool inStock = false;
Change the code in the codeActivity1_ExecuteCode method to display the order details and check if the item is in stock:
Console.WriteLine("Order received")
Console.WriteLine("  Product ID: {0}", Me.ProductID)
Console.WriteLine("  Quantity: {0}" & vbCrLf, Me.Quantity)
inStock = Me.Quantity <= 10
Console.WriteLine("Order received");
Console.WriteLine("  Product ID: {0}", this.ProductID);
Console.WriteLine("  Quantity: {0}\n", this.Quantity);
inStock = (this.Quantity <= 10);
In a production workflow, you would likely query a database to see if the item is in stock. For this tutorial, a quantity of greater than ten will exceed the amount of the item in stock.
Select View | Designer to return to the workflow designer. Double click stateInitializationActivity1 to add additional activities.
Notice that setStateActivity1 indicates an error. This is because you changed the name of the state to which it transitions. To fix this, change the TargetStateName property to WaitingForShipping.
Drag an IfElse activity from the toolbox into the stateInitializationActivity1activity below codeActivity1 but above setStateActivity1. The workflow should now look like Figure 12.
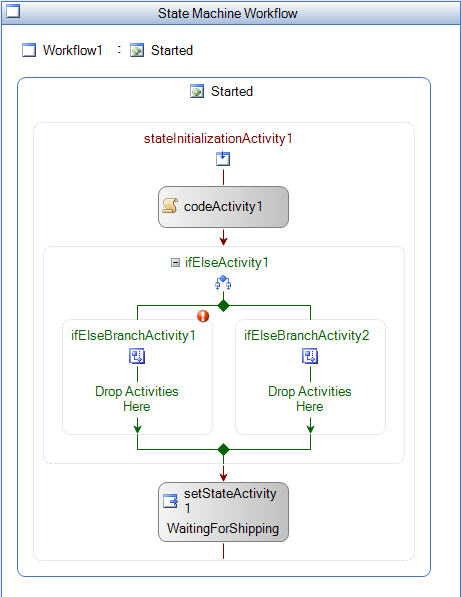
Figure 12. The stateInitializationActivity1activity should now contain these activities.
The IfElse activity enables branching in a workflow. It contains one or more IfElseBranch activities. At runtime, the workflow evaluates the Condition property of the first branch. If the condition evaluates to true, the activities in that branch execute. If the condition evaluates to false, the workflow evaluates the condition of the next branch, if there is one. If none of the branch conditions evaluates to true, the activities in the final branch execute (unless that activity has a condition that evaluates to false).
At this point, the first IfElseBranch activity indicates an error. You haven’t told it yet what condition to evaluate. To do that, select ifElseBranchActivity1. In the Properties window, find the Condition property, select the drop-down arrow to the right of the property’s value, and select Declarative Rule Condition (see Figure 13). You have the option of either defining a rule in the Properties window (Declarative Rule Condition) or creating a condition in code (Code Condition). For this tutorial, you’ll create the condition in the Properties window.
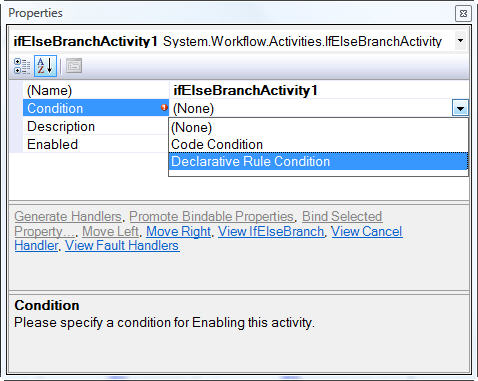
Figure 13. Choose the type of condition you want to use.
Click the “+” sign to the left of the Condition property, expanding the property. Set the ConditionName property to itemIsInStock. (Naming the condition allows you to use the same condition in a different place within your workflow.) Click the Expression property and then click the ellipsis to the right of that property. Enter the condition shown in Figure 14. Click OK to close the editor.

Figure 14. Create the IfElseBranch activity’s rule condition.
Drag setStateActivity1 into ifElseBranchActivity1. You have now set up the workflow to transition to the WaitingForShipping state if the item is in stock. You will next tell the workflow what to do if the item is not in stock.
Drag a Code activity from the toolbox into the ifElseBranchActivity2 activity. Double-click codeActivity4 and add the following code to the activity’s ExecuteCode event handler:
Console.WriteLine("The item is not in stock")
Console.WriteLine("The order is canceled" & vbCrLf)
Console.WriteLine("The item is not in stock");
Console.WriteLine("The order is canceled\n");
Select View | Designer to return to the workflow designer. Drag a SetState activity from the toolbox into ifElseBranchActivity2 below codeActivity4. Set the TargetStateName property of setStateActivity3 to Finished. The workflow should now look like Figure 15.
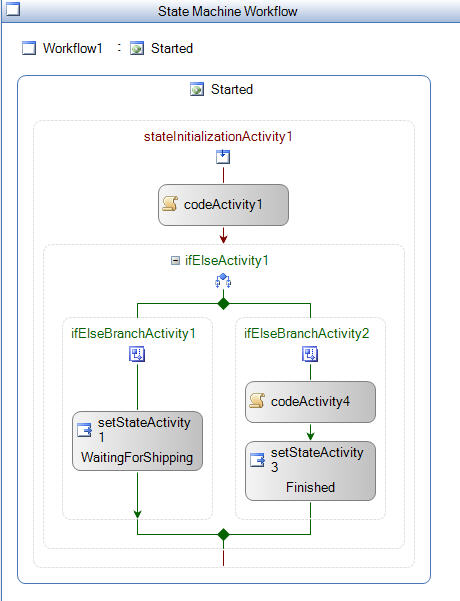
Figure 15. The workflow executes these activities when it starts.
To recap, if the item is in stock, the workflow transitions to the WaitingForShipping state. If the item is not in stock, the workflow transitions to the Finished state and ends.
Select the link for Workflow1 or Started in the upper left of the workflow designer. Notice that there is now a line from Started to Finished (see Figure 16). The workflow takes this path if the item is not in stock.
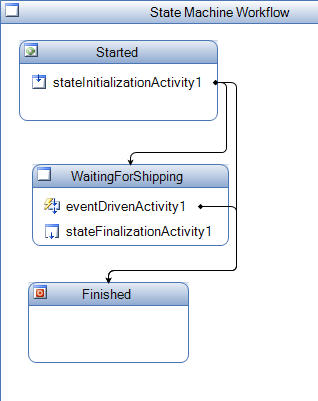
Figure 16. The lines indicate the updated flow of the workflow from state to state.
Next, change the messages the workflow displays. Select View | Code.
Change the code in the codeActivity2_ExecuteCode method to indicate the workflow is waiting for the item to ship:
Console.WriteLine("The item has shipped" & vbCrLf)
Console.WriteLine("The item has shipped\n");
Change the code in the codeActivity3_ExecuteCode method to indicate the item has shipped:
Console.WriteLine("The order is complete" & vbCrLf)
Console.WriteLine("The order is complete\n");
Your final step will be to modify the console host application to pass order information to the workflow. In the Solution Explorer, double click Module1.vb or Program.cs. Add the following code to the Main method, replacing the existing line of code that calls the CreateWorkflow method:
Dim parameters As New Dictionary(Of String, Object)
parameters.Add("ProductID", 1)
parameters.Add("Quantity", 10)
workflowInstance = workflowRuntime.CreateWorkflow( _
  GetType(Workflow1), parameters)
var parameters = new Dictionary<string, object>();
parameters.Add("ProductID", 1);
parameters.Add("Quantity", 10);
WorkflowInstance instance = workflowRuntime.CreateWorkflow(
  typeof(StateMachineDemo1.Workflow1), parameters);
Save and press Ctrl + F5 to run your project. You should first see the following output:
Order received
  Product ID: 1
  Quantity: 10
There should then be a five second delay before you see the following output:
The item has shipped
The order is complete
Press any key to continue...
Press any key to exit the application.
To see what happens if the item is not in stock, make the following modification to the Main method:
parameters.Add("Quantity", 15)
parameters.Add("Quantity", 15);
Save and press Ctrl + F5 to run your project. You should see the following output:
Order received
  Product ID: 1
  Quantity: 15
The item is not in stock
The order is canceled
Press any key to continue...
Press any key to exit the application.
Conclusion
In this tutorial, you learned the basic concepts involved in creating and executing a state machine workflow. You saw that the first step in designing a workflow is to get an accurate view of the business process you are modeling. You can then decide whether to build a sequential or state machine workflow. Can you identify discrete states, places where the workflow waits for an action it does not control? If so, you will likely create a state machine workflow.
The State, SetState, StateInitialization and StateFinalization activites are specific to state machine workflows. As you saw, you can use those and other activities to build a state machine workflow. Your use of these other activities will usually be the same regardless of the type of workflow you build.
In this tutorial, you did not see how a host application raises events. That is obviously an important thing to learn, and you are encouraged to learn about this in a later tutorial in this series.
About the Author
Robert Green is a developer, writer, and trainer. He is a senior consultant with MCW Technologies. Robert is a Visual Studio Tools for the Office system MVP and is a co-author of AppDev courseware for Microsoft Visual Basic, Microsoft Visual C#, LINQ and Microsoft Windows Workflow Foundation. Before joining MCW, Robert worked at Microsoft as a Product Manager and also a Program Manager.