Windows Workflow Tutorial: Introduction to Fault Handling
Rob Green
MCW Technologies LLC
Published: January, 2009
Articles in this series
- Building a Sequential Workflow
- Building a State Machine Workflow
- Flow Control: Basics
- Flow Control: Replicator
- Fault Handling
- Communication: Calling Methods within the Host Process
- Communication: Handling an Event From the Host in a Workflow
- Rules-Driven .NET Applications
- Rules-Driven WCF Services
Download the code for this article
Introduction
In all applications you write, you need to trap for errors. This includes data entry errors, such as a user entering no or invalid information in a text box. You also need to trap for exceptions, which are unexpected errors that cause execution to stop. For example, if you have code to read a file and that file does not exist, the .NET Runtime will throw an exception.
In code, your primary means of handling exceptions is the try-catch block. Windows Workflow Foundation provides an additional means of handling exceptions. In this tutorial, you will see how to use the FaultHandler activity to handle exceptions in workflows.
Review the Sample Workflow
In this tutorial, you will use an existing sequential workflow that models checking the inventory for a list of items and if necessary restocking items. In the Basic Control Flow in Workflows tutorial in this series, you saw how to build this workflow. Rather that rebuild it, you will use this workflow as the starting point for this tutorial.
To get started, in Visual Studio 2008 select File | Open | Project/Solution to display the Open Project dialog box. Navigate to the folder when you downloaded this tutorial’s sample project. Select FaultHandlingDemo.sln and click OK to open the project.
In the Solution Explorer, double click Inventory.xml. This file contains inventory data for three products and contains the following XML.
<Products>
  <Product>
    <ProductID>1</ProductID>
    <OnHand>100</OnHand>
    <Available>50</Available>
  </Product>
  <Product>
    <ProductID>2</ProductID>
    <OnHand>10</OnHand>
    <Available>250</Available>
  </Product>
  <Product>
    <ProductID>3</ProductID>
    <OnHand>25</OnHand>
    <Available>50</Available>
  </Product>
</Products>
In the Solution Explorer, double click Workflow1 in the Solution Explorer to open the workflow designer. The workflow looks like Figure 1.

Figure 1. You will use this workflow in this tutorial.
When the workflow starts, it executes the following code in the WorkflowInitialized event handler:
Dim xmlFile = XDocument.Load(IO.Path.Combine( _
  AppDomain.CurrentDomain.BaseDirectory, "Inventory.xml"))
inventory = From product In xmlFile.Descendants("Product")
itemCount = _
  (From product In xmlFile.Descendants("Product") _
  Select product.Element("ProductID").Value).Count
var xmlFile = System.Xml.Linq.XDocument.Load(
  System.IO.Path.Combine(
  AppDomain.CurrentDomain.BaseDirectory, "Inventory.xml"));
inventory =
  from product in xmlFile.Descendants("Product")
    select product;
itemCount =
  (from product in xmlFile.Descendants("Product")
   select product.Element("ProductID").Value).Count();
This code uses a LINQ To Xml query to read the contents of the XML file and determine how many items exist.
The workflow then starts executing the ProcessItems While activity. The activities in ProcessItems will execute as long as the KeepProcessing rule condition evaluates to true. This condition is the following:
this.moreToProcess
The LookupProduct activity retrieves the next item in the inventory list. The activity’s ExecuteCode event handler contains the following code:
productID = Convert.ToInt32( _
  inventory(nextItemNumber).Element("ProductID").Value)
onHand = Convert.ToInt32( _
  inventory(nextItemNumber).Element("OnHand").Value)
available = Convert.ToInt32( _
  inventory(nextItemNumber).Element("Available").Value)
nextItemNumber += 1
If nextItemNumber >= itemCount Then
  moreToProcess = False
End If
productID = Convert.ToInt32(
  inventory.ElementAt(nextItemNumber).Element("ProductID").Value);
onHand = Convert.ToInt32(
  inventory.ElementAt(nextItemNumber).Element("OnHand").Value);
available = Convert.ToInt32(
  inventory.ElementAt(nextItemNumber).Element("Available").Value);
nextItemNumber += 1;
if (nextItemNumber >= itemCount)
{
  moreToProcess = false;
}
The workflow next checks if there is sufficient inventory on hand. The SufficientOnHand code condition checks if the amount on hand is greater than 100.
If there is sufficient inventory, the ReportOnHand activity displays a message to that effect. If there is not sufficient inventory, the workflow executes the Reorder activity.
The workflow next checks if it was able to reorder the product. The IfReordered branch of the CheckReorderStatus IfElse activity uses a code condition to execute the PlaceReorder method. For the purposes of this tutorial, a reorder is successful if there is enough of the product available to have at least 100 units in stock.
If the reorder succeeds, the ReportReorder activity displays a message to that effect. If the reorder fails, the ReportFailure activity displays a message to that effect. The final activity reports that the workflow is finished.
To review the workflow, press Ctrl + F5 to run the project. You should see the following output:
There are 100 units of product 1 on hand.
There are only 10 units of product 2 on hand.
It is time to reorder.
90 units of product 2 will be ordered.
There are only 25 units of product 3 on hand.
It is time to reorder.
You need 75 units of product 3 but only 50 are available.
The product has not been reordered.
The workflow has finished executing.
Press any key to continue . . .
Press any key to exit the application.
Use the WorkflowTerminated Event Handler to Handle Faults
This workflow currently works and successfully evaluates each item in the list. You will now see what happens when faults occur in the workflow and you will see how you can handle faults.
To introduce an error in the workflow, modify the WorkflowInitialized method so that it fails to load the XML file. The easiest way to do this is to misspell the name of the file.
Dim xmlFile = XDocument.Load(IO.Path.Combine( _
  AppDomain.CurrentDomain.BaseDirectory, "NotFound.xml"))
var xmlFile = System.Xml.Linq.XDocument.Load(
  System.IO.Path.Combine(
  AppDomain.CurrentDomain.BaseDirectory, "NotFound.xml"));
Save and press Ctrl + F5 to run your project. You should see the following output:
Could not find file 'D:\FaultHandlingDemo\bin\NotFound.xml'.
Press any key to continue . . .
Press any key to exit the application.
To see the code that handles the error, in the Solution Explorer window, double-click Module1.vb or Program.cs. There, you’ll find the following code:
AddHandler workflowRuntime.WorkflowTerminated, _
  AddressOf OnWorkflowTerminated
Shared Sub OnWorkflowTerminated(ByVal sender As Object, _
  ByVal e As WorkflowTerminatedEventArgs)
  Console.WriteLine(e.Exception.Message)
  WaitHandle.Set()
End Sub
workflowRuntime.WorkflowTerminated +=
  delegate(object sender, WorkflowTerminatedEventArgs e)
  {
    Console.WriteLine(e.Exception.Message);
    waitHandle.Set();
  };
The workflow attempted to open a file that doesn’t exist. This caused an exception, which caused the workflow to terminate. The WorkflowTerminated event handler takes as an argument an instance of the WorkflowTerminatedEventArgs class. The Exception property of this class contains the exception and the Message property of the Exception class contains the actual message, which the code displays.
When you create a workflow project and choose the Sequential Workflow Console Application or State Machine Workflow Console Application template, Visual Studio creates the code above. So by default, you have code to handle exceptions. If you choose any of the other templates, you will have to add this code yourself.
Exception Handling in Workflows
The WorkflowTerminated event occurs if an unhandled exception occurs anywhere in the workflow. You should use this as a last resort because you have no opportunity to take an action specific to the error and you have no opportunity to recover from an error because the workflow terminated. A better practice is for you to handle exceptions as close to the source as possible.
Activities take actions in a workflow and therefore activities throw exceptions. If the activity that threw the exception doesn’t handle it, the workflow runtime transfers the exception to the parent activity (if there is one). If that activity doesn’t handle the exception, it gets passed to the next activity in the workflow hierarchy. If no activities handle the workflow and the workflow itself doesn’t handle it, the workflow terminates.
When you ran the sample application, the workflow started and immediately attempted to load the XML file. The workflow then threw the exception, but did not handle it. So the workflow terminated.
Use the FaultHandler Activity to Handle Exceptions
There are two ways you can handle exceptions in a workflow. The first is to use a try-catch block in your code. The try-catch block enables you to handle exceptions in the code that caused the exception. You can then write additional code to take an action. The second way to handle exceptions is to use the FaultHandler activity. This activity handles a specific fault type and enables you to execute workflow activities in response to an exception. You can use these activities to perform cleanup and recovery.
You can associate a FaultHandler activity with the workflow itself or with any container activity in the workflow (with the exception of the TransactionScope and CompensatableTransactionScope activities). . You will now add a FaultHandler activity to the workflow to handle the file not found exception. There are multiple ways to do this, including:
- Right-click on the workflow and select View Fault Handlers.
- Select View Fault Handlers from the workflow’s popup menu (see Figure 2).
- Select Workflow | View Fault Handlers.
- Select the View Fault Handlers link in the Properties window.
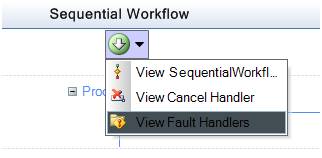
Figure 2. Use this menu item to add a fault handler to the workflow.
After you select the View Fault Handlers option, the workflow designer changes to show you the FaultHandlersActivity designer (see Figure 3). The FaultHandlersActivity is a container activity. You can add one or more FaultHandler activities to it.
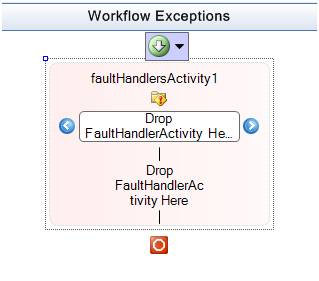
Figure 3. Use this menu item to add a fault handler to this activity.
From the Toolbox, drag a FaultHandler activity into faultHandlersActivity1. Name this activity HandleFileNotFound. At this point, HandleFileNotFound indicates an error. You have not specified what fault type you are handling. To do that, click the FaultType property in the Properties window and then click the ellipsis to the right of that property. This displays the Browse and Select a .NET Type dialog box. In the Type list, expand the mscorlib node. Then select System.IO. In the right hand pane, select FileNotFoundException (see Figure 4) and click OK. Additionally, if you know the fault type, you can type it directly in the FaultType property’s text box.

Figure 4. This fault handler activity will handle FileNotFound exceptions.
The FaultHandler activity is also a container. You can add to it one or more activities you want to execute when a FileNotFound exception occurs. From the Toolbox, drag a Code activity into HandleFileNotFound. Name this activity ReportFileNotFound. The workflow designer should now look like Figure 5.

Figure 5. This fault handler activity will handle FileNotFound exceptions.
Double click ReportFileNotFound and add the following code to the activity’s ExecuteCode event handler:
Console.WriteLine( _
  "The inventory information can not be found." & vbCrLf & _
  "The workflow will stop executing." & vbCrLf)
Console.WriteLine(
  "The inventory information can not be found.\n" +
  "The workflow will stop executing.\n");
Save and press Ctrl + F5 to run your project. You should see the following output:
The inventory information can not be found.
The workflow will stop executing.
Press any key to continue . . .
Press any key to exit the application.
The workflow handles the exception and displays the information you specified. Before you move on, fix the existing error. Modify the WorkflowInitialized method so that it correctly loads the XML file.
Dim xmlFile = XDocument.Load(IO.Path.Combine( _
  AppDomain.CurrentDomain.BaseDirectory, "Inventory.xml"))
var xmlFile = System.Xml.Linq.XDocument.Load(
  System.IO.Path.Combine(
  AppDomain.CurrentDomain.BaseDirectory, "Inventory.xml"));
Next, you will introduce and handle an exception later on in the workflow. Modify the LookupProduct_ExecuteCode method so that it attempts to read an element that does not exist.
productID = Convert.ToInt32( _
  inventory(nextItemNumber).Element("Product").Value)
productID = Convert.ToInt32(
  inventory.ElementAt(nextItemNumber).Element("Product").Value);
Return to the workflow designer. Return to the view of the workflow itself by taking any of the following actions:
- Right-click on the workflow and select View SequentialWorkflow.
- Select View SequentialWorkflow from the workflow’s popup menu.
- Select Workflow | View SequentialWorkflow.
Save and press Ctrl + F5 to run your project. You should see the following output:
Object reference not set to an instance of an object.
Press any key to continue . . .
Press any key to exit the application.
Figure 6 shows the first few activities in the workflow. The exception occurred in the code in the LookupProduct activity’s Execute event handler. LookupProduct threw the exception, but did not handle it. The workflow runtime then checked if sequenceActivity1 handled the exception. It did not, so the workflow runtime checked if ProcessItems handled it. It did not, so the workflow runtime checked if the workflow handled it. The workflow would handle a FileNotFound exception, but LookupProduct threw a different exception. So the workflow terminated.

Figure 6. These are the first few activities in the workflow.
As mentioned before, you can associate a FaultHandler activity with any container activity in the workflow (except the TransactionScope and CompensatableTransactionScope activities). In the workflow, the LookupProduct activity throws the exception. This is a Code activity, so you cannot associate a FaultHandler activity with it. LookupProduct’s parent activity is a Sequence activity (sequenceActivity1) and that activity’s parent activity is a While activity (ProcessItems). You can associate a FaultHandler activity with either sequenceActivity1 or ProcessItems or both.
Before you add a FaultHandler activity you should know the exception type it will handle. The easiest way to know is to have Visual Studio tell you. Press F5 to run your project. When the exception occurs, Visual Studio will display the exception in the Exception Assistant (see Figure 7 for Visual Basic and Figure 8 for C#). Press Shift + F5 to stop the application.
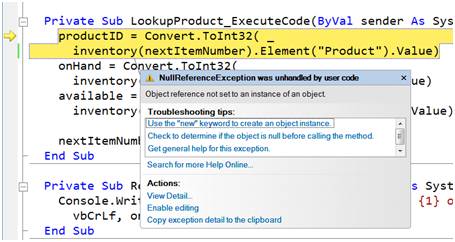
Figure 7. The Exception Assistant displays the fault type.
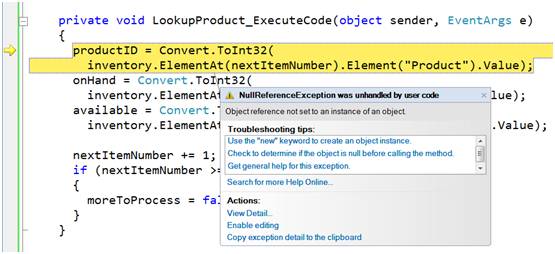
Figure 8. The Exception Assistant displays the fault type.
Return to the workflow designer. You will now add a FaultHandler activity to sequenceActivity1 to handle the exception. Select View Fault Handlers from the activity’s popup menu (see Figure 9).
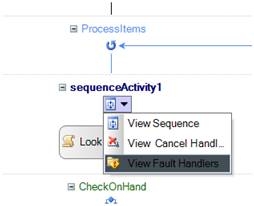
Figure 9. Use this menu item to add a fault handler to this activity.
From the Toolbox, drag a FaultHandler activity into faultHandlersActivity2. Name this activity HandleReadError. Click the FaultType property in the Properties window and then click the ellipsis to the right of that property to display the Browse and Select a .NET Type dialog box. In the Type list, select mscorlib. In the right hand pane, select NullReferenceException and click OK.
From the Toolbox, drag a Code activity into HandleFileNotFound. Name this activity ReportReadError. Double click ReportReadError and add the following code to the activity’s ExecuteCode event handler:
Console.WriteLine( _
  "The inventory information cannot be read." & vbCrLf & _
  "The workflow will stop processing items." & vbCrLf)
moreToProcess = False
Console.WriteLine(
  "The inventory information can not be read.\n" +
  "The workflow will stop processing items.\n");
moreToProcess = false;
Setting the moreToProcess field to false ensures the workflow will stop executing the While loop. Save and press Ctrl + F5 to run your project. You should see the following output:
The inventory information can not be read.
The workflow will stop processing items.
The workflow has finished executing.
Press any key to continue . . .
Press any key to exit the application.
As you have just seen, if you properly handle exceptions that occur in activities, the workflow does not need to terminate. The HandleReadError FaultHandler activity handled the null reference exception and the workflow continued. The While activity ended and the Cleanup activity displayed the message that the workflow finished executing.
Use the Throw Activity to Throw a Fault
A common programming pattern is to catch an exception in a try-catch block, perform some action and then rethrow the exception using the Throw statement in Visual Basic or the throw keyword in C#. This enables you to take some action where the exception occurred and then take additional action at a higher level in the program stack.
You can apply a similar pattern in your workflows. Suppose you want to log errors that occur in the workflow and further suppose there are five places in the workflow where a particular error can occur. You could handle this in code and call a logging method from the five locations.
Another option is to use the Throw activity. This activity enables you to throw an exception. More specifically, it enables you to handle an exception using a FaultHandler activity, perform an action and then rethrow the exception. This will cause the workflow runtime to pass the exception up the workflow hierarchy. You could then handle the exception in either a parent activity or at the workflow level. You can also handle the exception in the application that calls the workflow.
To see how to do this, return to faultHandlersActivity2. From the Toolbox, drag a Throw activity into faultHandlersActivity2 below ReportReadError. The workflow designer should now look like Figure 10.
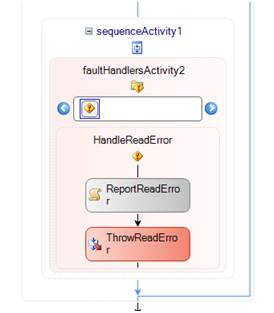
Figure 10. Add a Throw activity to the FaultHandler activity.
You now need to specify what fault you are throwing. You have three options, including:
- Throw any .NET fault. You could handle a specific fault and then throw a more general fault.
- Throw a custom exception. You could create a custom exception class in code and throw an instance of that class.
- Rethrow the exception handled by the FaultHandler activity.
To rethrow the exception, click the Fault property in the Properties window and then click the ellipsis to the right of that property. This displays the Bind ‘Fault’ to an activity’s property dialog box. Expand the ProcessItems node, then expand the sequenceActivity1 node, then expand the faultHandlersActivity2 node, then expand the HandleReadError node. Finally, select Fault (see Figure 11). Click OK.
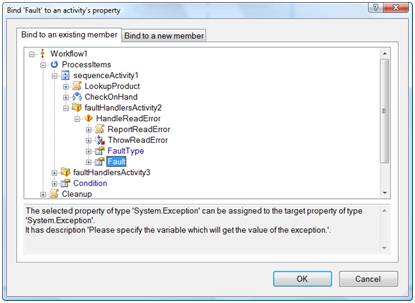
Figure 11. Specify the fault you want to rethrow.
The Fault property specifies the exception object. You also need to specify the type of exception. To do that, double click the small icon to the right of the FaultType property name (see Figure 12). This displays the Bind ‘FaultType’ to an activity’s property dialog box. Drill down to HandleReadError as you did before and select FaultType. Click OK.
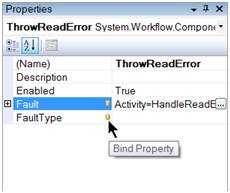
Figure 12. Double click this icon to specify the type of exception to throw.
At runtime, when the null reference exception occurs, the workflow will display the message that the inventory information cannot be read. It will then rethrow the null reference exception.
The final step is to handle the exception the second time it occurs. To do that, return to the workflow level fault handlers, and either select View Fault Handlers from the workflow’s popup menu (see Figure 2) or right-click on the workflow and select View Fault Handlers.
From the Toolbox, drag a FaultHandler activity into faultHandlersActivity1. Name this activity RehandleReadError. Set the Fault Type property to System.NullReferenceException. You can enter this directly or use the ‘Browse and Select a .NET Type’ dialog box as you did previously. From the Toolbox, drag a Code activity into RehandleReadError. Name this activity LogReadError. The workflow designer should now look like Figure 13.

Figure 13. The workflow will handle the null reference exception.
Double click LogReadError and add the following code to the activity’s ExecuteCode event handler:
Console.WriteLine( _
  "The workflow will log the read error. " & vbCrLf)
Console.WriteLine(
  "The workflow will log the read error.\n");
Save and press Ctrl + F5 to run your project. You should see the following output:
The inventory information cannot be read.
The workflow will stop processing items.
The workflow will log the read error.
Press any key to continue . . .
Press any key to exit the application.
The FaultHandler activity associated with the Sequence activity handles the null reference exception first and the first message displays. The exception is rethrown and the workflow’s FaultHandler activity handles it. The second message displays and the workflow terminates. The Cleanup activity does not execute in this case.
Handling Multiple Faults with a FaultHandlers Activity
As you just saw, you can include multiple fault handlers in a single FaultHandlers activity. This is similar to how you can handle multiple exceptions in a try-catch block. In both scenarios, you need to be mindful of the exception hierarchy. For example, the FileNotFoundException class in the System.IO namespace inherits from the IOException class in the same namespace. IOException inherits from the SystemException class in the System namespace and SystemException inherits from the Exception class.
If you were handling these exceptions in a try-catch block, you would need to place the more specific handlers above the more general handlers, as shown in the following code:
Try
  ' Code that reads a file
Catch _fileNotFoundException as FileNotFoundException
  ' Code to handle this exception
Catch _ioException as IOException
  ' Code to handle this exception
Catch _systemException as SystemException
  ' Code to handle this exception
Catch _exception as Exception
  ' Code to handle this exception
End Try
try
{ // Code that reads a file }
catch (FileNotFoundException fileNotFoundException)
{ // Code to handle this exception }
catch (IOException ioException)
{ // Code to handle this exception }
catch (SystemException systemException)
{ // Code to handle this exception }
catch (Exception exception)
{ // Code to handle this exception }
If you have multiple fault handlers in a FaultHandlers activity, you need to follow the same rule regarding the exception hierarchy. The workflow evaluates FaultHandler activities from left to right so you must put more specific fault handles to the left of less specific ones. Suppose you add handlers for both the FileNotFoundException and IOException exception to a FaultHandlers activity. The FileNotFoundException fault handler must be to the left of the IOException fault handler.
Conclusion
The FaultHandler and Throw activities provide a declarative way to handle exceptions in a workflow. Handling an exception is an activity and therefore it becomes part of the workflow’s flow of execution. This provides you with a good deal of control over not only how but also where and when you handle exceptions.
The FaultHandler activity does not replace the try-catch block in code. Rather, you can use these two methods together. As you design exception handling, you will decide where you want to handle the exception. Do you want to handle it at the line of code where it occurred? Do you want to handle it at the activity that caused the exception (or the activity that contains that activity in the case of the Code activity)? Do you want to handle it at the workflow level? You can decide which combination of these provides you the most flexible and most reliable workflows.
About the Author
Robert Green is a developer, writer, and trainer. He is a senior consultant with MCW Technologies. Robert is a Visual Studio Tools for the Office system MVP and is a co-author of AppDev courseware for Microsoft Visual Basic, Microsoft Visual C#, LINQ and Microsoft Windows Workflow Foundation. Before joining MCW, Robert worked at Microsoft as a Product Manager and also a Program Manager.