Features in Configuration Manager technical preview version 1909
Applies to: Configuration Manager (technical preview branch)
This article introduces the features that are available in the technical preview for Configuration Manager, version 1909. Install this version to update and add new features to your technical preview site.
Review the technical preview article before installing this update. That article familiarizes you with the general requirements and limitations for using a technical preview, how to update between versions, and how to provide feedback.
The following sections describe the new features to try out in this version:
Orchestration Groups
Create an orchestration group to better control the deployment of software updates to devices. Many server administrators need to carefully manage updates for specific workloads, and automate behaviors in between. For example:
- As the software updates administrator, you manage all updates for your organization.
- You have one large collection for all servers and one large collection for all clients. You deploy all updates to these collections.
- The SQL Server administrators want to control all the software installed on the SQL Servers. They want to patch five servers in a specific order. Their current process is to manually stop specific services before installing updates, and then restart the services afterwards.
- You create an orchestration group and add all five SQL Servers. You also add pre- and post-scripts, using the PowerShell scripts provided by the SQL Server administrators.
- During the next update cycle, you create and deploy the software updates as normal to the large collection of servers. The SQL Server administrators run the deployment, and the orchestration group automates the order and services.
An orchestration group gives you the flexibility to update devices based on a percentage, a specific number, or an explicit order. You can also run a PowerShell script before and after the devices run the update deployment.
Members of an orchestration group can be any Configuration Manager client, not just servers. The orchestration group rules apply to the devices for all software update deployments to any collection that contains an orchestration group member. Other deployment behaviors still apply. For example, maintenance windows and deployment schedules.
Note
The Orchestration Groups feature is the evolution of the Server Groups feature. An orchestration group is a new object in Configuration Manager.
Prerequisites
Enable the Orchestration Groups feature. For more information, see Enable optional features.
Note
When you enable Orchestration Groups, the site disables the Server Groups feature. This behavior avoids any conflicts between the two features.
To see all of the orchestration groups and updates for those groups, your account needs to be a Full Administrator.
Try it out!
Try to complete the tasks. Then send Feedback with your thoughts on the feature.
In the Configuration Manager console, go to the Assets and Compliance workspace, and select the Orchestration Group node.
In the ribbon, select Create Orchestration Group to open the Create Orchestration Group Wizard.
On the General page, give your orchestration group a Name and optionally a Description.
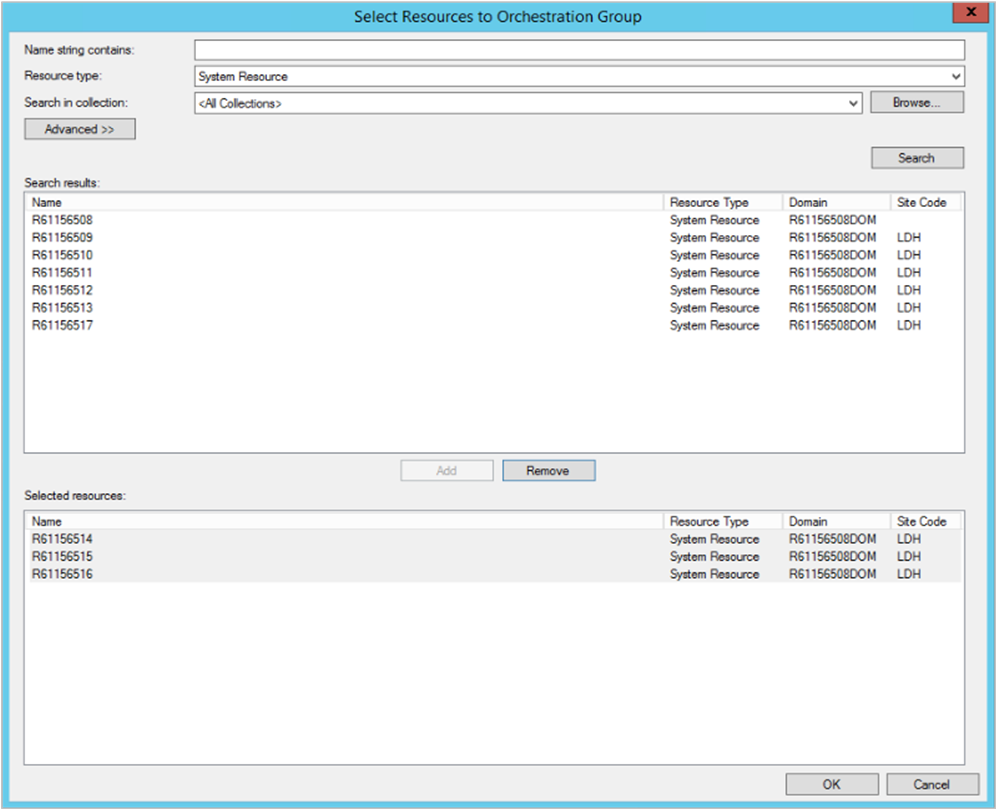
On the Member Selection page, first specify the current Site code. Then select Browse to add device resources as members of this orchestration group. Search for devices by name, and then Add them. Select OK when you finish adding devices to the selected resources list.
On the Rule Selection page, select one of the following options:
Allow a percentage of the machines to be updated at the same time, then select or enter a number for this percentage. Use this setting to allow for future flexibility of the size of the orchestration group. For example, your orchestration group contains 50 devices, and you set this value to 10. During a software update deployment, Configuration Manager allows five devices to simultaneously run the deployment. If you later increase the size of the orchestration group to 100 devices, then 10 devices update at once.
Allow a number of the machines to be updated at the same time, then select or enter a number for this specific count. Use this setting to always limit to a specific number of devices, whatever the overall size of the orchestration group.
Specify the maintenance sequence, then sort the selected resources in the proper order. Use this setting to explicitly define the order in which devices run the software update deployment.
On the PreScript page, enter a PowerShell script to run on each device before the deployment runs. The script should return a value of
0for success, or3010for success with restart. You can also specify a Script timeout value, which fails the script if it doesn't complete in the specified time.On the PostScript page, enter a PowerShell script to run on each device after the deployment runs. The behavior is otherwise the same as the PreScript.
Complete the wizard.
In the Orchestration Group node, select an orchestration group. In the ribbon, select Show Members. You can see the members of the group, and their orchestration status.
To test the behavior of the orchestration group, deploy software updates to a collection that contains the members of the orchestration group. Orchestration starts when any client in the group tries to install any software update at deadline or during a maintenance window. It starts for the entire group, and makes sure that the devices update by following the orchestration group rules.
Tip
Orchestration groups only apply to software update deployments. They don't apply to other deployments.
Monitor
Use the following log files on the site server to help monitor and troubleshoot:
- Policypv.log: shows that the site targets the orchestration group to the clients
- SMS_OrchestrationGroup.log: shows the behaviors of the orchestration group
Orchestration group known issues
Don't add a machine to more than one orchestration group.
When searching a collection to select resources for an orchestration group, only choose All Desktop and Server Clients.
There are several actions currently available on an orchestration group, but only the default Show Members action works. This action currently doesn't show the name of the device, only the resource ID.
The Orchestration Type values correspond to the following types:
Value Orchestration Type 1 Number 2 Percentage 3 Sequence The Current State values correspond to the following states:
Value Current State 1 Idle 2 Waiting, the device is waiting its turn 3 In progress, installing an update 4 Failed 5 Reboot pending
Improvements to BitLocker management
Starting in technical preview version 1905, you could use Configuration Manager to install and manage the Microsoft BitLocker Administration and Monitoring (MBAM) client. This release now adds support for integrated reports, a helpdesk portal for administration and monitoring, and a self-service portal for users. For more information about these capabilities, see the following articles:
Prerequisites
Install the reporting services point site system role. For more information, see Configure reporting.
A web server to host the MBAM components
The user account that runs the MBAM installer script needs SQL Server sysadmin rights on the site database server. During the MBAM setup process, the script sets login, user, and SQL Server role rights for the web server machine account. You can remove this user account from the sysadmin role after you complete MBAM setup.
Script usage
This process uses a PowerShell script, MBAMWebSiteInstaller.ps1, to install the MBAM components on the web server. It accepts the following parameters:
-SqlServerName <ServerName>(required): The name of the site database server-SqlInstanceName <InstanceName>: The SQL Server instance name for the site database. This parameter is optional if SQL Server uses the default instance.-SqlDatabaseName <DatabaseName>(required): The name of the site database, for exampleCM_ABC.-ReportWebServiceUrl <ReportWebServiceUrl>: The web service URL of the reporting service point. It's the Web Service URL value in Reporting Services Configuration Manager.-HelpdeskUsersGroupName <DomainUserGroup>: For example,contoso\mbamusers. A domain user group whose members have access to the Manage TPM and Drive Recovery areas of the MBAM administration and monitoring website. When using these options, this role needs to fill in all fields, including the user's domain and account name.-HelpdeskAdminsGroupName <DomainUserGroup>: For example,contoso\mbamadmin. A domain user group whose members have access to all recovery areas of the administration and monitoring website. When helping users recover their drives, this role only has to enter the recovery key.-MbamReportUsersGroupName <DomainUserGroup>: For example,contoso\mbamreports. A domain user group whose members have read-only access to the Reports area of the administration and monitoring website.-SiteInstall Both: Specify which of the components to install. Valid options include:Both: Install both componentsHelpDesk: Install only the helpdesk portalSSP: Install only the self-service portal
IISWebSite: The website where the script installs the MBAM web applications. By default, it uses the IIS default website.InstallDirectory: The path where the script installs the web application files. By default, this path isC:\inetpub.
Try it out!
Try to complete the tasks. Then send Feedback with your thoughts on the feature.
On the web server that hosts the MBAM components, do the following actions:
Copy the following files from
SMSSETUP\BIN\X64to a local folder:MBAMWebSite.cabMBAMWebSiteInstaller.ps1
Run PowerShell as an administrator, and then run the script similar to the following command line:
.\MBAMWebSiteInstaller.ps1 -SqlServerName <ServerName> -SqlInstanceName <InstanceName> -SqlDatabaseName <DatabaseName> -ReportWebServiceUrl <ReportWebServiceUrl> -HelpdeskUsersGroupName <DomainUserGroup> -HelpdeskAdminsGroupName <DomainUserGroup> -MbamReportUsersGroupName <DomainUserGroup> -SiteInstall Both
After installation, access the portals via the following URLs:
- Self-service portal:
https://webserver/SelfService - Helpdesk portal:
https://webserver/HelpDesk
Note
Microsoft recommends but doesn't require the use of HTTPS. For more information, see How to Set Up SSL on IIS.
Verify
Monitor and troubleshoot using the following logs:
Windows Event logs under Microsoft-Windows-MBAM-Server/Operational and Microsoft-Windows-MBAM-Server/Admin. For more information, see Server event logs.
Trace logs for each component:
Self-service portal:
<InstallDirectory>\Microsoft BitLocker Management Solution\Logs\Self Service WebsiteHelpdesk portal:
<InstallDirectory>\Microsoft BitLocker Management Solution\Logs\Help Desk Website
Note
By default, the
<InstallDirectory>isC:\inetpub.
Extend and migrate an on-premises site to Microsoft Azure
This new tool helps you to programmatically create Azure virtual machines (VMs) for Configuration Manager. It can install with default settings site roles like a passive site server, management points, and distribution points. Once you validate the new roles, use them as additional site systems for high availability. You can also remove the on-premises site system role and only keep the Azure VM role.
Prerequisites
An Azure subscription
Azure virtual network with ExpressRoute gateway
Your user account needs to be a Configuration Manager Full Administrator and have administrator rights on the primary site server.
To add a passive server, the primary site must meet the site server high availability requirements. For example, it requires a remote content library.
Try it out!
Try to complete the tasks. Then send Feedback with your thoughts on the feature.
Sign on to the primary site server and run the following tool in the Configuration Manager installation directory:
Cd.Latest\SMSSETUP\TOOLS\ExtendMigrateToAzure\ExtendMigrateToAzure.exeReview the information on the General tab, and then switch to the Azure Information tab.
On the Azure Information tab, choose your Azure environment, and then Sign in.
Tip
You may need to add
https://*.microsoft.comto your trusted websites list to correctly sign in.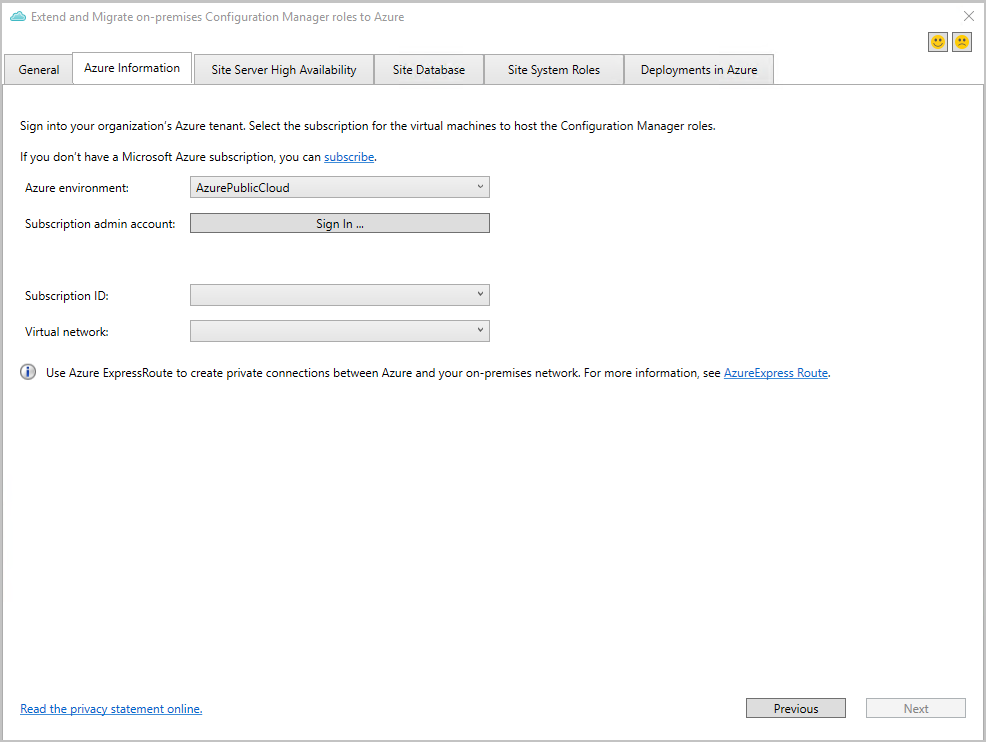
After you sign in, select your Subscription ID and Virtual network. The tool only lists networks with an ExpressRoute gateway.
Site Server High Availability
On the Site Server High Availability tab, select Check to evaluate your site's readiness.
If any of the checks fail, select More detail to determine how to remediate the problem. For more information about these prerequisites, see Site server high availability.
If you want to extend or migrate your site server to Azure, select Create a site server in Azure. Then fill in the following fields:
Name Description Subscription Read only. Shows the subscription name and ID. Resource group Lists available resource groups. If you need to create a new resource group, use the Azure portal, and then rerun this tool. Location Read only. Determined by your virtual network's location VM Size Choose a size to fit your workload. Microsoft recommends the Standard_DS3_v2. Operating system Read only. The tool uses Windows Server 2019. Disk type Read only. The tool uses Premium SSD for best performance. Virtual network Read only. Subnet Select the subnet to use. If you need to create a new subnet, use the Azure portal. Machine name Enter the name of the passive site server VM in Azure. It's the same name shown in the Azure portal. Local admin username Enter the name of the local administrative user that the Azure VM creates before it joins the domain. Local admin password The password of the local administrative user. To protect the password during Azure deployment, store the password as a secret in Azure Key Vault. Then, use the reference here. If needed, create a new one from the Azure portal. Domain FQDN The fully qualified domain name for the Active Directory domain to join. By default, the tool gets this value from your current machine. Domain username The name of the domain user allowed to join the domain. By default, the tool uses the name of the currently signed in user. Domain password The password of the domain user to join the domain. The tool verifies it after you select Start. To protect the password during Azure deployment, store the password as a secret in Azure Key Vault. Then, use the reference here. If needed, create a new one from the Azure portal. Domain DNS IP Used for joining the domain. By default, the tool uses the current DNS from your current machine. Type Read only. It shows Passive Site Server as the type. To start provisioning the Azure VM, select Start. To monitor the deployment status, switch to the Deployments in Azure tab in the tool. To get the latest status, select Refresh deployment status.
Tip
You can also use the Azure portal to check the status, find errors, and determine potential fixes.
When the deployment finishes, go to your SQL Servers, and grant permissions for the new Azure VM. For more information, see Site server high availability - Prerequisites.
To add the Azure VM as a site server in passive mode, select Add site server in passive mode.
Once the site adds the site server in passive mode, the Site Server High Availability tab shows the status.

Next, go to the Deployments in Azure tab to finish the deployment.
Site database
The tool doesn't currently have any tasks to migrate the database from on-premises to Azure. You can choose to move the database from an on-premises SQL Server to an Azure SQL Server VM. The tool lists the following articles on the Site Database tab to help:
- Backup and restore the database
- Configure a SQL Server Always On availability group and allow the data to replicate
- Migrate a SQL Server database to an Azure SQL Server VM
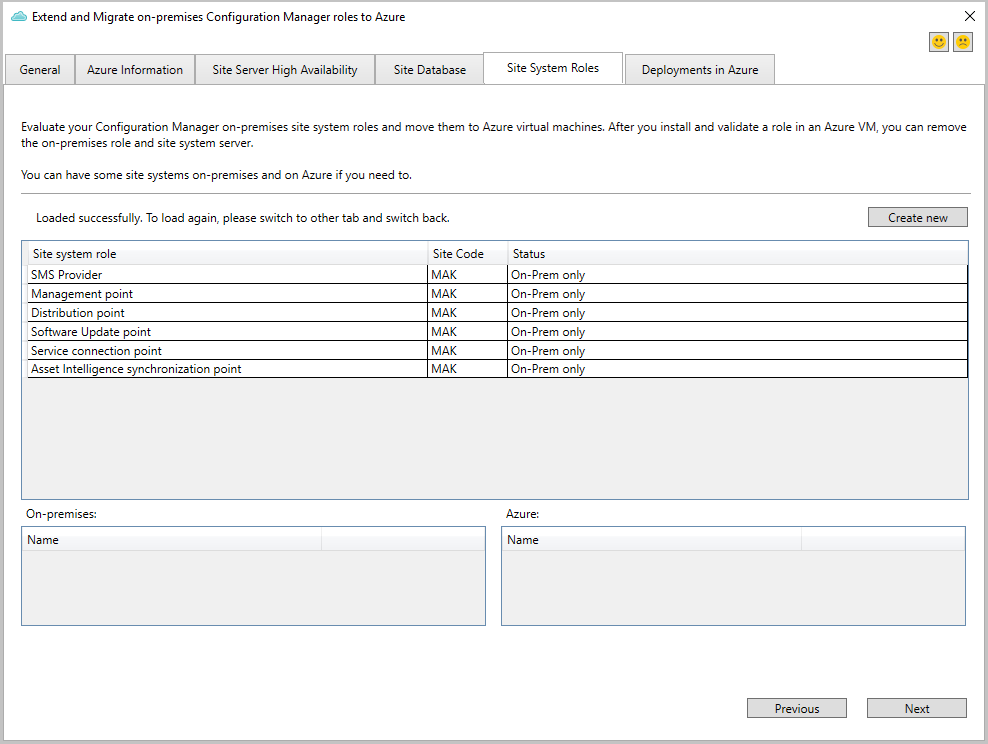
Site system roles
Switch to the Site System Roles tab. To provision a new site system role with the default settings, select Create new. You can provision roles such as the management point, distribution point, and software update point. Not all roles are currently available in the tool.
In the provisioning window, fill in the fields to provision the site role's VM in Azure. These details are similar to the above list for the site server.
To start provisioning the Azure VM, select Start. To monitor the deployment status, switch to the Deployments in Azure tab in the tool. To get the latest status, select Refresh deployment status.
Tip
You can also use the Azure portal to check the status, find errors, and determine potential fixes.
Repeat this process to add more site system roles.
Next, go to the Deployments in Azure tab to finish the deployment.
When the deployment finishes, go to the Configuration Manager console to make additional changes to the site role.
Deployments in Azure
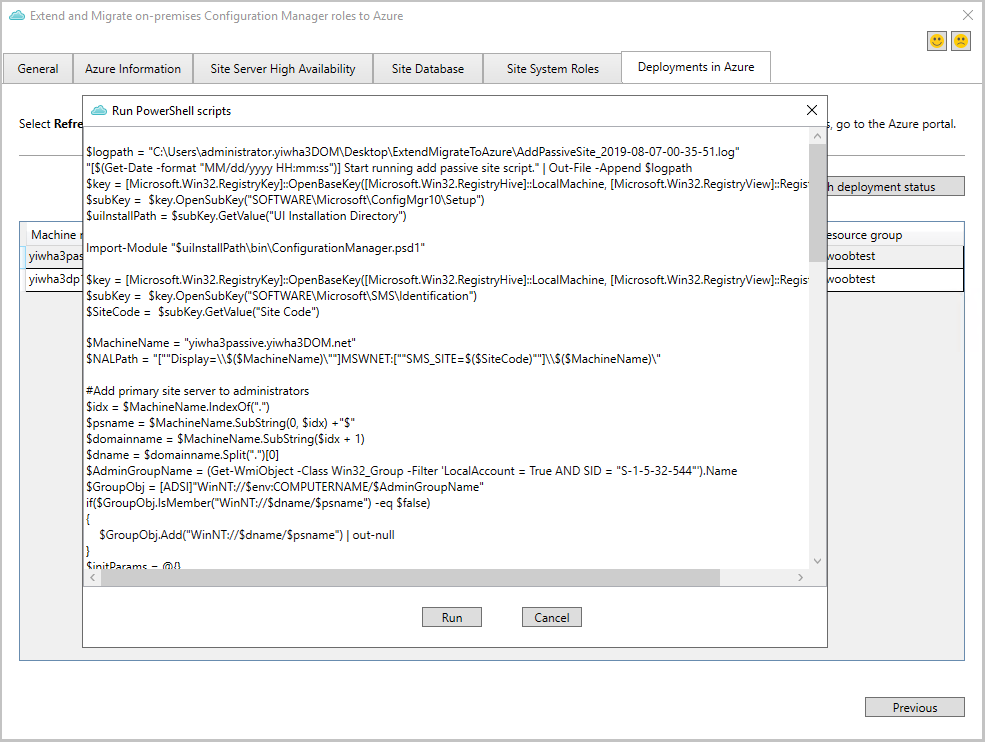
Once Azure creates the VM, switch to the Deployments in Azure tab in the tool. Select Deploy to configure the role with the default settings.
Select Run to start the PowerShell script.
Repeat this process to configure more roles.
Additional CMPivot entities and enhancements
Based on user-voice feedback, we've added many new CMPivot entities and entity enhancements to aid in troubleshooting and hunting. We've included entities to query:
- Windows event logs (WinEvent)
- File content (FileContent)
- Dlls loaded by processes (ProcessModule)
- Microsoft Entra information (AADStatus)
- Endpoint protection status (EPStatus)
This release also includes several other enhancements to CMPivot.
WinEvent(<logname>,[<timespan>])
This entity is used to get events from event logs and event tracing log files. The entity gets data from event logs that are generated by the Windows Event Log technology. The entity also gets events in log files generated by Event Tracing for Windows (ETW). WinEvent looks at events that have occurred within the last 24 hours by default. However, the 24-hour default can be overridden by including a timespan.
WinEvent('Microsoft-Windows-HelloForBusiness/Operational', 1d)
| where LevelDisplayName =='Error'
| summarize count() by Device
FileContent(<filename>)
FileContent is used to get the contents of a text file.
FileContent('c:\\windows\\SMSCFG.ini')
| where Content startswith  'SMS Unique Identifier='
| project Device, SMSId= substring(Content,22)
ProcessModule(<processname>)
This entity is used to enumerate the modules (dlls) loaded by a given process. ProcessModule is useful when hunting for malware that hides in legitimate processes.
ProcessModule('powershell')
| summarize count() by ModuleName
| order by count_ desc
AadStatus
This entity can be used to get the current Microsoft Entra identity information from a device.
AadStatus
| project Device, IsAADJoined=iif( isnull(DeviceId),'No','Yes')
| summarize DeviceCount=count() by IsAADJoined
| render piechart
EPStatus
EPStatus is used to get the status of antimalware software installed on the computer.
EPStatus
| project Device, QuickScanAge=datetime_diff('day',now(),QuickScanEndTime)
| summarize DeviceCount=count() by QuickScanAge
| order by QuickScanAge
| render barchart
Other enhancements
We've updated the CcmLog() and EventLog() entities to only look at messages in the last 24 hours by default. This behavior can be overridden by passing in an optional timespan. For example, the following example looks at events in the last 1 hour:
CcmLog('Scripts',1h)The File() entity has been updated to collect information about Hidden and System files, and include the MD5 hash. While an MD5 hash isn't as accurate as the SHA256 hash, it tends to be the commonly reported hash in most malware bulletins.
You can add comments in queries. This behavior is useful when sharing queries. For example:
//Get the top ten devices sorted by user
Device
| top 10 by UserName
CMPivot automatically connects to the last site. After you start CMPivot, you can connect to a new site if necessary.
From the Export menu, select the new option to Query link to clipboard. This action copies a link to the clipboard that you can share with others. For example:
cmpivot:Ly8gU2FtcGxlIHF1ZXJ5DQpPcGVyYXRpbmdTeXN0ZW0NCnwgc3VtbWFyaXplIGNvdW50KCkgYnkgQ2FwdGlvbg0KfCBvcmRlciBieSBjb3VudF8gYXNjDQp8IHJlbmRlciBiYXJjaGFydA==This link opens CMPivot standalone with the following query:
// Sample query
OperatingSystem
| summarize count() by Caption
| order by count_ asc
| render barchart
Tip
For this link to work, install CMPivot standalone.
In query results, if the device is enrolled in Microsoft Defender for Endpoint, right-click the device to launch the Microsoft Defender Security Center online portal.
Task sequence download on demand over the internet
Since Configuration Manager version 1802, you can use the task sequence to deploy Windows 10 in-place upgrade via cloud management gateway (CMG). However, it requires the deployment to download all content locally before starting the task sequence.
Starting in this release, the task sequence engine can download packages on-demand from a content-enabled CMG or a cloud distribution point. This change provides additional flexibility with your Windows 10 in-place upgrade deployments to internet-based devices.
Prerequisites
Distribute the packages for the task sequence to the content-enabled CMG or a cloud distribution point.
- When using a content enabled CMG:
- Enable the CMG setting: Allow CMG to function as a cloud distribution point and serve content from Azure storage.
- Configure client settings for Cloud Services to use CMG and get content from the internet.
- When using a content enabled CMG:
Start the task sequence from Software Center. This scenario doesn't support Windows PE, PXE, or task sequence media.
Try it out!
Try to complete the tasks. Then send Feedback with your thoughts on the feature.
When you deploy the task sequence, use the following settings:
Allow task sequence to run for client on the Internet, on the User Experience tab of the deployment.
Download content locally when needed by the running task sequence, on the Distribution Points tab of the deployment.
Support for Windows Insider
You can now service and update devices running Windows Insider Preview builds with Configuration Manager. This change means you can manage these devices without changing your normal processes or enabling Windows Update for Business. You can download feature updates and cumulative updates for Windows Insider Preview builds into Configuration Manager just like any other Windows 10 update or upgrade.
For more information, see the following articles:
Improved language support in task sequence
Starting in technical preview version 1908.2, you could specify the default keyboard layout (Input locale) during OS deployment. This release adds further control over language configuration during this process. If you're already applying these language settings, this change can help you simplify your OS deployment task sequence. Instead of using multiple steps per language or separate scripts, use one instance per language of the built-in Apply Windows Settings step with a condition for that language.
Use the Apply Windows Settings task sequence step to configure the following new settings:
- System locale
- UI language
- UI language fallback
- User locale
For more information on these Windows setup answer file values, see Microsoft-Windows-International-Core.
Use the following task sequence variables to control these international settings in the Apply Windows Settings step:
- OSDWindowsSettingsInputLocaleOverride
- OSDWindowsSettingsSystemLocaleOverride
- OSDWindowsSettingsUserLocaleOverride
- OSDWindowsSettingsUILanguageOverride
- OSDWindowsSettingsUILanguageFallbackOverride
- OSDTimeZoneOverride
For more information, see the following articles:
Office 365 ProPlus health dashboard
As you plan your Microsoft 365 deployments, use the new Office 365 ProPlus health dashboard. It provides health insights for devices with Office 365 ProPlus to help identify issues.
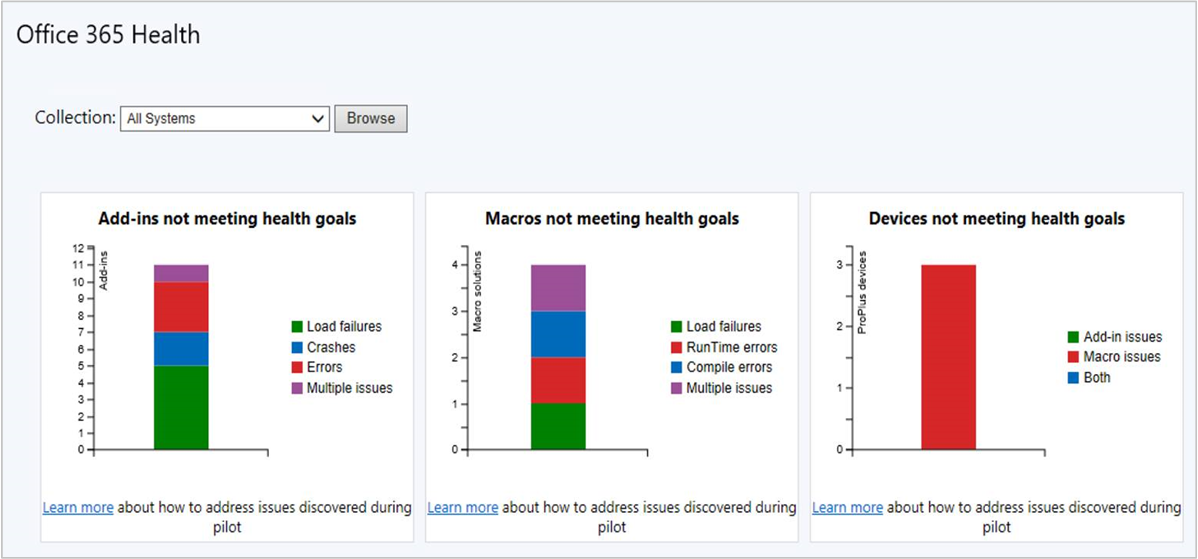
The dashboard shows three main areas of insight:
- Add-in issues
- Macro issues
- Device overall issues
Prerequisites
Client versions
- Microsoft 365 Apps for enterprise
- The latest version of the Configuration Manager client
Enable data collection
To enable data collection on clients, set the EnableLogging DWORD value to 1 in the following registry key:
HKEY_CURRENT_USER\Software\Policies\Microsoft\Office\16.0\OSM
You may need to create this registry key. You don't need to set any other values.
You can also use a group policy template to apply this setting. For more information, see Office Telemetry Agent. This Configuration Manager feature uses the same settings, but doesn't use the Office Telemetry Agent.
Important
Configuration Manager only collects Office data for this health dashboard. It's stored in the Configuration Manager site database controlled by your organization. It's not sent to Microsoft. This data is different than Office diagnostic data, which can be sent to Microsoft. For more information, see Deploy Office Telemetry Dashboard.
Try it out!
Try to complete the tasks. Then send Feedback with your thoughts on the feature.
In the Configuration Manager console, go to the Software Library workspace. Expand the Office 365 Client Management node, and select the Office 365 Health dashboard.
Note
The health goals aren't configurable.
Add-ins not meeting health goals
- Load failures: The add-in failed to start.
- Crashes: The add-in failed while it was running.
- Error: The add-in reported an error.
- Multiple issues: The add-in has more than one of the above issues.
Macros not meeting health goals
- Load failures: The document failed to load.
- Runtime errors: An error happened while the macro was running. These errors can be dependent on the inputs so may not always occur.
- Compile errors: The macro didn't compile correctly so it won't attempt to run.
- Multiple issues: The macro has more than one of the above issues.
Devices not meeting health goals
This tile summarizes devices that have issues with add-ins, macros, or both.
Improvements to task sequence debugger
This release includes the following improvements to the task sequence debugger:
Use the new task sequence variable TSDebugOnError to automatically start the debugger when the task sequence returns an error. Set this variable using the Set Task Sequence Variable step, or as a collection variable. For more information, see How to set variables.
If you create a breakpoint in the debugger, and then the task sequence restarts the computer, the debugger keeps the breakpoints after restart.
General known issues
Hardware inventory reports
If you try to run a report that relies upon hardware inventory, it returns an error. For example, a BitLocker report returns an error similar to the following message:
Microsoft.Reporting.WinForms.ReportServerException
An error has occurred during report processing. (rsProcessingAborted)
You may also see the following error in the dataldr.log file:
[42S22][207][Microsoft][SQL Server Native Client 11.0][SQL Server]Invalid column name 'FileTimeStamp00'. : pOFFICE_ADDIN_DATA
Console dashboards that rely on hardware inventory may also be affected.
This issue is because of a database schema change on specific hardware inventory tables.
Workaround
The workaround is to drop the pre-existing attribute from the database. The dataloader site component can then create a new attribute. Run the following SQL script on the site database server to fix the table schema:
IF NOT EXISTS (SELECT * FROM SYS.columns WHERE name = 'FileTimestamp00' AND object_id = OBJECT_ID('OFFICE_ADDIN_DATA'))
BEGIN
       DELETE am
       FROM AttributeMap am
       INNER JOIN GroupMap gm ON am.GroupKey=gm.GroupKey
       WHERE gm.GroupClass='MICROSOFT|OFFICE_ADDIN|1.0'
       AND am.AttributeName='FileTimeStamp'

       PRINT 'Fix OFFICE_ADDIN_DATA schema'
END
Next steps
For more information about installing or updating the technical preview branch, see Technical preview.
For more information about the different branches of Configuration Manager, see Which branch of Configuration Manager should I use?
Feedback
Coming soon: Throughout 2024 we will be phasing out GitHub Issues as the feedback mechanism for content and replacing it with a new feedback system. For more information see: https://aka.ms/ContentUserFeedback.
Submit and view feedback for