How to deploy School Data Sync (Classic) using SDS V2.1 CSV files
Important
School Data Sync (Classic) experience will be replaced by the new School Data Sync experience by the end of 2024. We advise that you start planning your transition to the new experience for your next year Back to School.
You can use Comma Separated Value (CSV) files with School Data Sync (SDS) to import and synchronize your Student Information System (SIS) data to Office 365. SDS can sync students, teachers, schools, sections, and roster information from your SIS to Microsoft Entra ID and Office 365. Using this method, you'll export or create CSV files for School Data Sync from your SIS data, set up a synchronization profile, and upload the CSVs into SDS to process.
Note
Current customers of CSV V2 format may continue to use until May, 2022. We recommend using the CSV V2.1 format with its additional capabilities.
Using SDS V2.1 CSV file format
In this article:
Before you get started
Make sure you meet the following prerequisites:
An Office 365 for Education tenant
Global Administrator Account
School Data Sync (Plan 1) enabled
Note
The data that provided through SDS may be accessible via MS Graph to third-party applications within your tenant. Sync only the data that you want to make available to these third parties.
Create a Sync Profile and Import your CSV files
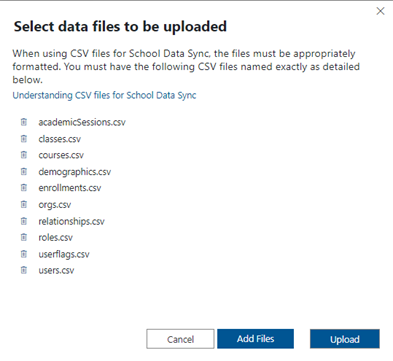
Export or create your five required CSV files and if you wish, all or some of the optional five CSV files and ensure they're ready to use.
Note
If you are syncing Guardians (Contacts), you will need to also include a record for them in the users.csv. The fields of familyName, givenName, and email are required for users that have guardian roles, however phone number is optional. To support the relationship between the guardian and student you will need to include a record for each relationship and relationship role in relationships.csv.
Follow these steps to create your sync profile and import the files. A sync profile is a group of options and settings used by SDS to sync the CSV data you plan to upload. You can create up to three sync profiles within a single Office 365 tenant.
SDS sign-in
- To access SDS, launch a private web browser, navigate to sds.microsoft.com, select sign-in, and enter your Office 365 Global Admin account credentials when prompted.
Create a Sync Profile and Upload your CSV Files
- After logging in, select + Add Profile in the left-hand navigation pane to create a sync profile.

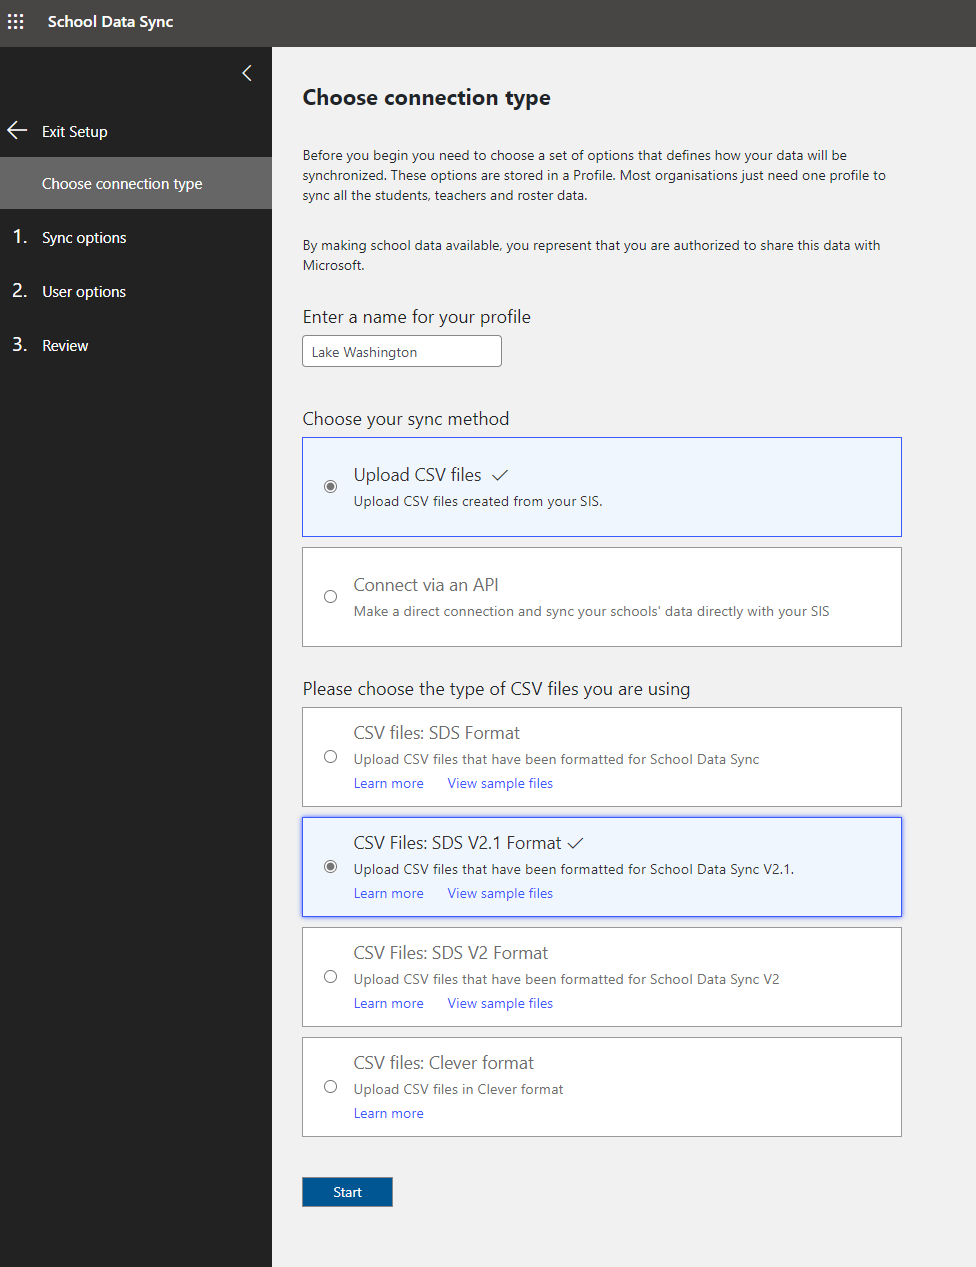
- On the Choose Connection Type page, enter a name for the sync profile and select Upload CSV files and CSV files: SDS V2.1 Format. Once complete, select Start.
- On the Sync Options page, select the appropriate option to create new users or sync existing users. Then select Upload Files to upload your four SDS V2.1 CSV files. Once uploaded, complete your selections on the page as appropriate and select Next.
Note
If you are running SDS to create users using the SDS v1 CSV format, Clever CSV format, OneRoster API, or PowerSchool API, you must first create a "Sync existing users" profile to update the anchor ID to the new V2.1 schema on all of the previously created users. Once the initial sync is complete, you can create a SDS V2.1 sync profile and include those same users that SDS previously created.
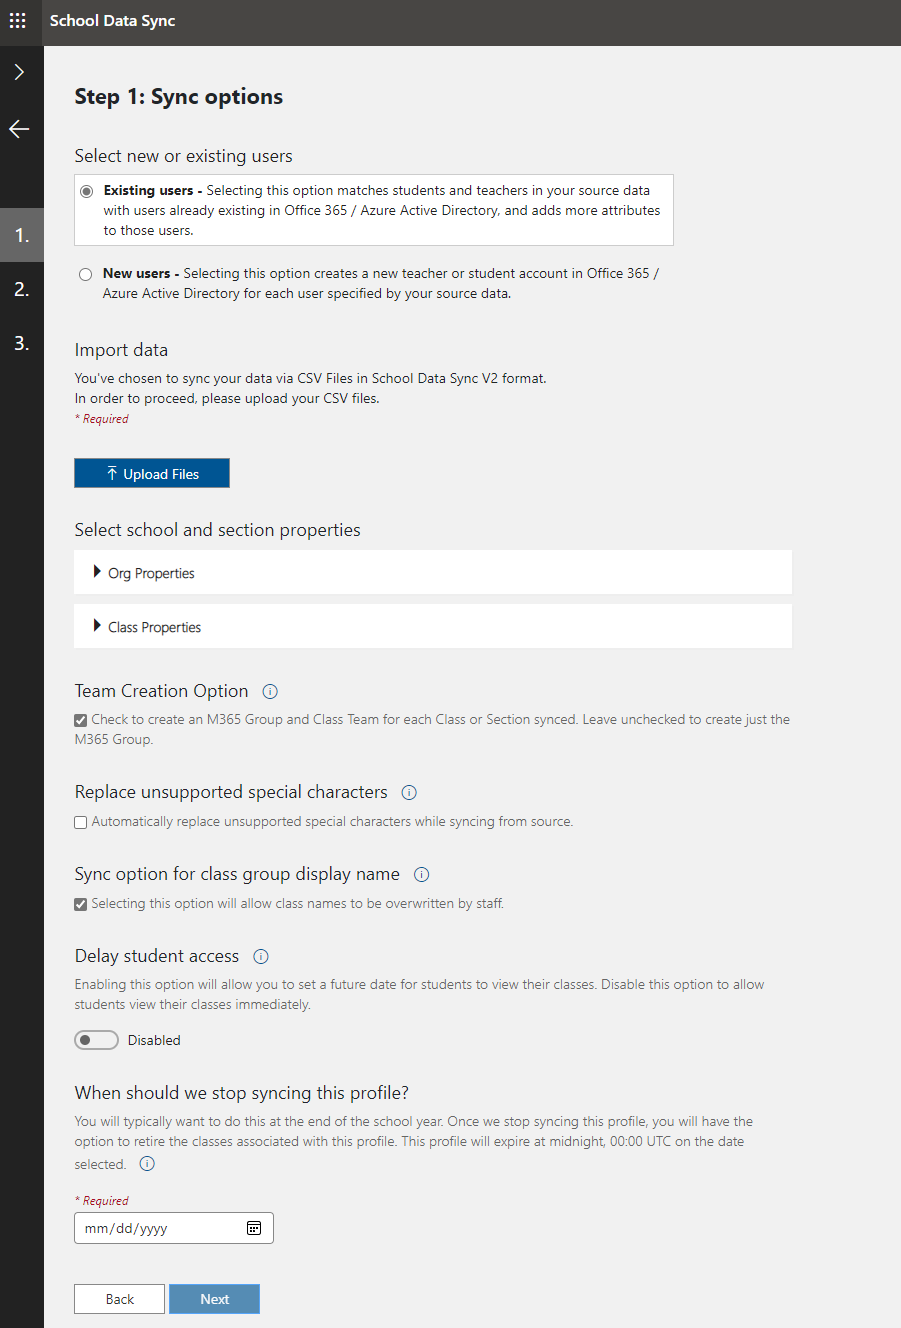
When you select the upload button on this screen, you'll be asked to upload all required files, and have the option to upload other files.

Once you add your files, select the Upload button, and then continue to make your selections on the Sync options screen.
Team Creation Option – Checking this box will ensure SDS creates both the Microsoft 365 Group and Class Team for each class synced. If you leave the box unchecked, SDS will only create the Microsoft 365 Groups.
Replace unsupported special characters- Checking this box will allow SDS to automatically replace unsupported special characters while the sync is running. Special characters will be replaced with an "_", and no longer result in an error during the sync process for that object.
Sync option for class group display name - Checking this box will allow teachers to control the section display name after the first sync, and prevents SDS from overwriting Section DisplayName changes made by teachers.
Delay Student Access - Enabling this option will allow you to set a date for SDS to synchronize memberships and enabled students to view their classes. Disable this option to sync students immediately.
When should we stop syncing? - You'll typically want to do this at the end of the school year or term. Once SDS stops syncing the profile, you'll have the option to clean up the classes associated with this profile, as appropriate.
Note
At this time, single tenant with mixed formats (i.e. having V1 and V2 sync profiles actively running and both set to 'Sync to Insights') will not work.
- On the User options page, select the appropriate identity matching options, and then select Next.
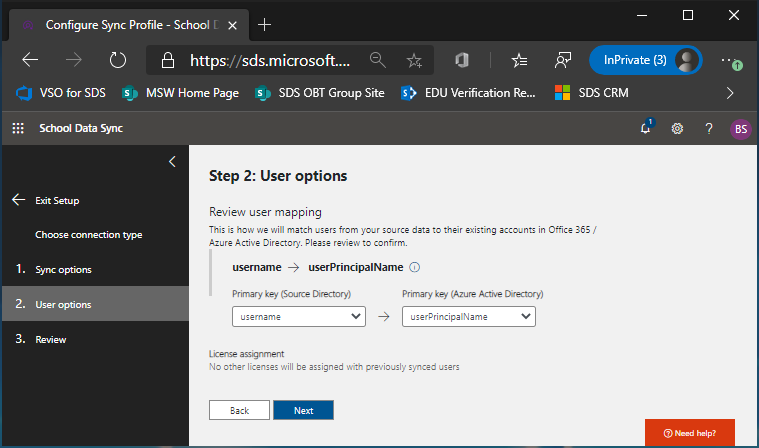
Primary Key (Source Directory) - This is the attribute in the CSV file used for SDS Identity Matching. Watch the Identity Matching video for additional information on how to select the appropriate source directory attribute, and properly configure the identity matching setting.
Primary Key (Microsoft Entra ID) - This is the User attribute in Microsoft Entra ID used for SDS Identity Matching. Watch the Identity Matching video for additional information on how to select the appropriate target directory attribute, and properly configure the identity matching settings for the teacher.
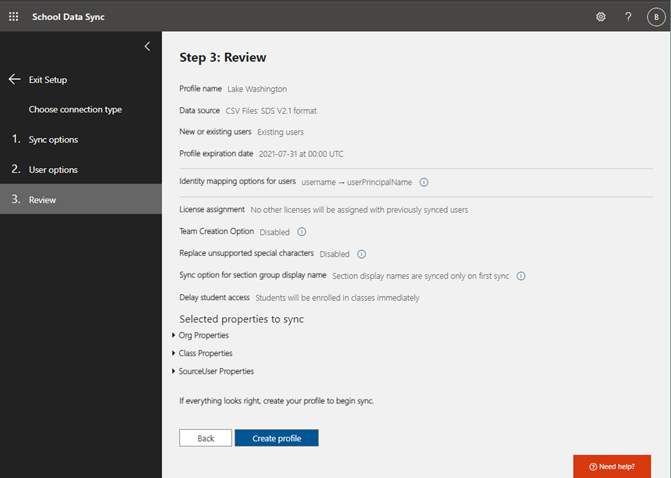
- On the Review page, ensure you've made the appropriate selections. If no other changes are needed, select Create Profile. Once you create a sync profile, SDS will begin a pre-sync validation process. If any errors are found during this process, you'll have the option to fix them and re-upload files before clicking the resume sync button and starting the real synchronization process. If you receive errors and choose not to update them, you can still choose to resume sync without addressing the errors.
To help automate the sync process after setting up your sync profile Use Microsoft Flow to upload CSV files to SDS. This allows you to configure automated CSV uploads.
Related articles
How to deploy School Data Sync by using CSV files in the Clever format
How to deploy School Data Sync by using OneRoster CSV files
How to deploy School Data Sync using CSV files in the V1 format