Agregar notificaciones push a la aplicación de Xamarin.Android
Información general
En este tutorial, agregará notificaciones push al proyecto de inicio rápido de Xamarin.Android para que se inserte un registro cada vez que se envíe una notificación push al dispositivo.
Si no usa el proyecto de servidor de inicio rápido descargado, necesitará el paquete de extensión de notificaciones push. Para más información, consulte Trabajar con el SDK del servidor back-end de .NET para Azure Mobile Apps.
Requisitos previos
Este tutorial requiere la configuración:
- Una cuenta de Google activa. Puede registrarse para obtener una cuenta de Google en accounts.google.com.
- Componente Google Cloud Messaging Client.
Configurar un centro de notificaciones
La característica Mobile Apps de Azure App Service usa Azure Notification Hubs para enviar notificaciones push; por lo tanto, necesita un centro de notificaciones para su aplicación móvil.
En Azure Portal, vaya a App Services y seleccione el back-end de la aplicación. En Configuración, seleccione Insertar.
Seleccione Conectar para agregar un recurso de Centro de notificaciones a la aplicación. Puede crear un centro o conectarse a uno existente.
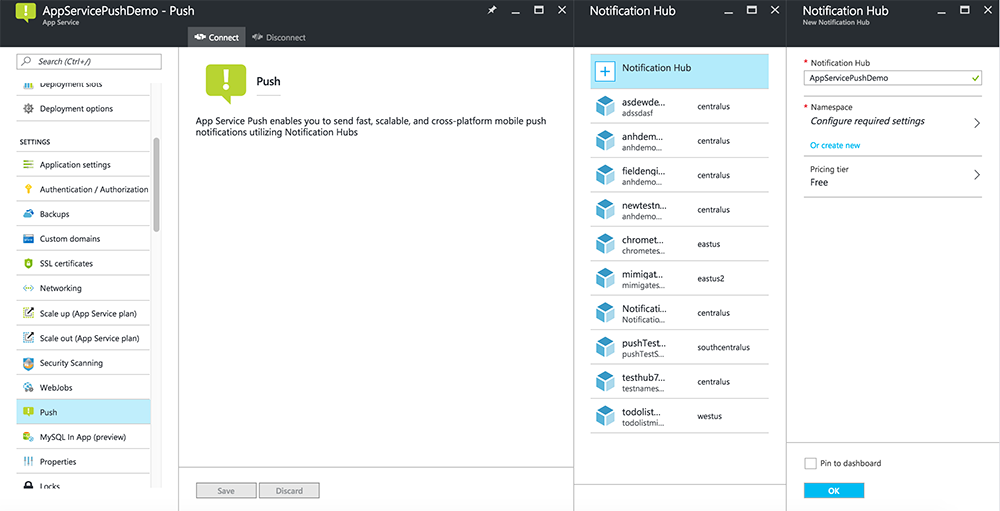
Ya ha conectado un centro de notificaciones al proyecto de back-end de Mobile Apps. Más adelante configure este centro de notificaciones para que se conecte a un sistema de notificación de plataforma (PNS) que envíe notificaciones push a los dispositivos.
Habilitación de Firebase Cloud Messaging
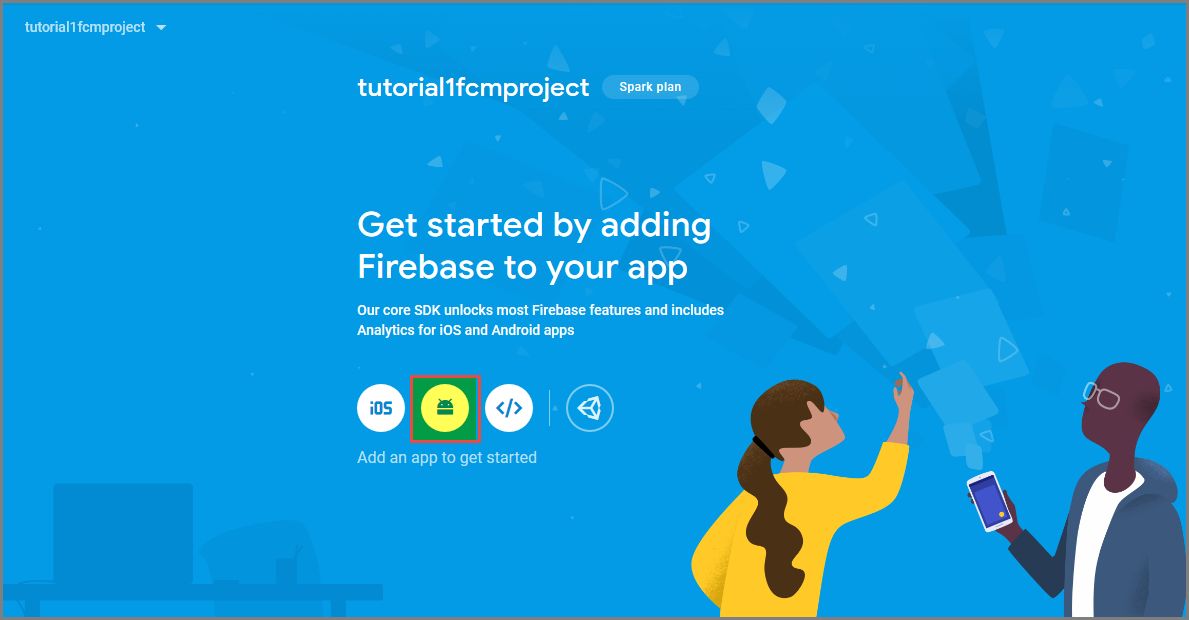
Inicie sesión en la consola Firebase. Si aún no tiene uno, cree un nuevo proyecto de Firebase.
Después de crear el proyecto, seleccione Add Firebase to your Android app (Añade Firebase a tu aplicación de Android).
En la página Add Firebase to your Android app (Agregar Firebase a la aplicación Android), haga lo siguiente:
En Nombre del paquete de Android, copie el valor de su applicationId en el archivo build.gradle de la aplicación. En este ejemplo, es
com.fabrikam.fcmtutorial1app.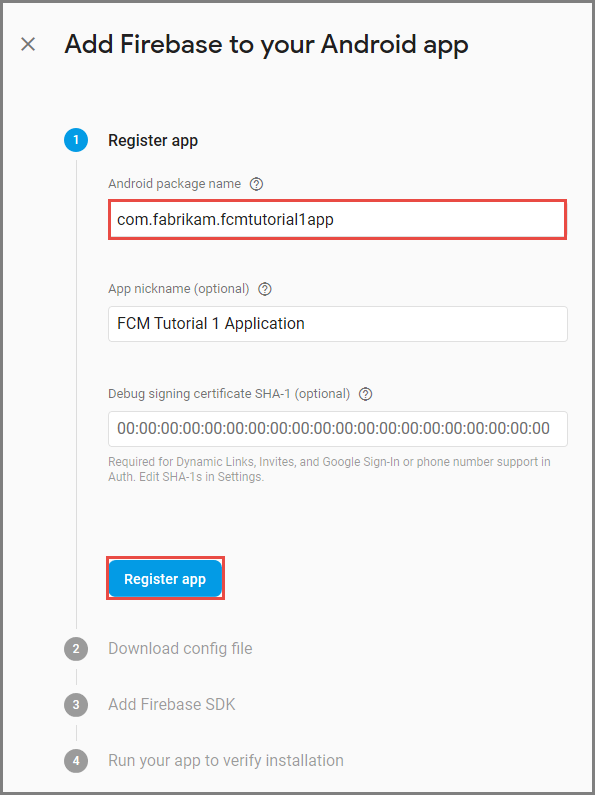
Seleccione Registrar aplicación.
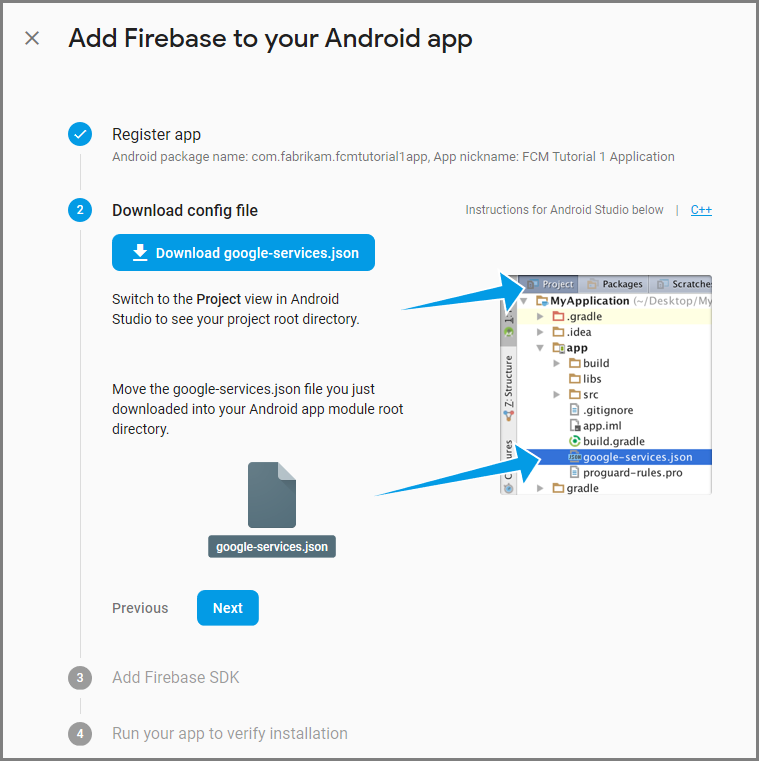
Seleccione Descargar google-services.json, guarde el archivo en la carpeta app del proyecto y, a continuación, seleccione Siguiente.
Haga que los siguientes cambios de configuración en el proyecto en Android Studio.
En el archivoproject-level build.gradle (<project>/build.gradle), agregue la siguiente instrucción a la sección de dependencias.
classpath 'com.google.gms:google-services:4.0.1'En el archivo build.gradle de nivel de aplicación (<project>/<app-module>/build.gradle), agregue las siguientes instrucciones a la sección de dependencias.
implementation 'com.google.firebase:firebase-core:16.0.8'
implementation 'com.google.firebase:firebase-messaging:17.3.4'
Agregue la siguiente línea al final del archivo app-level build.gradle después de la sección de dependencias.
apply plugin: 'com.google.gms.google-services'Seleccione Sinc Now (Sincronizar ahora) en la barra de herramientas.
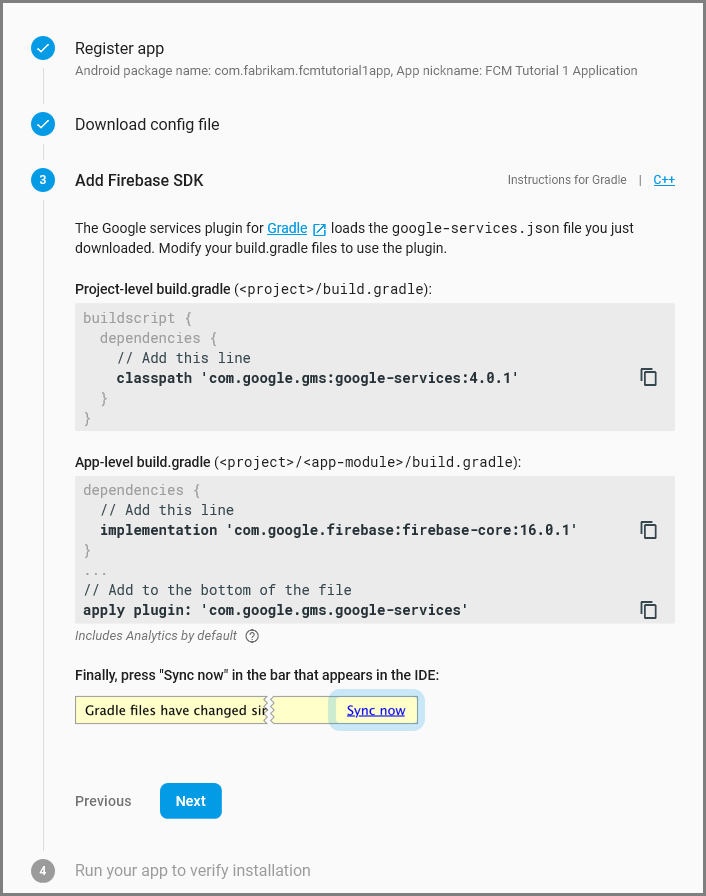
Seleccione Next (Siguiente).
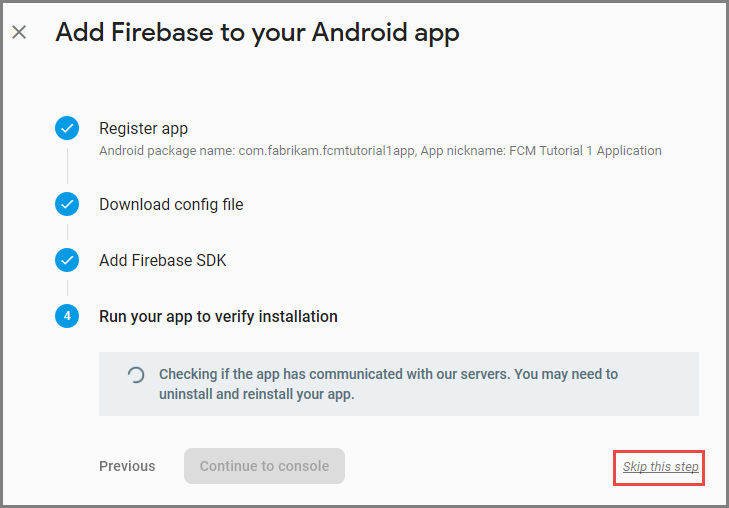
Seleccione Skip this step (Omitir este paso).
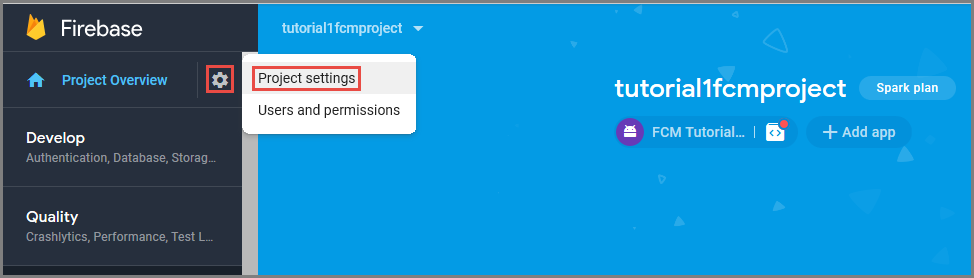
En la consola Firebase, seleccione el icono de la rueda dentada del proyecto. Luego, seleccione Project Settings (Configuración del proyecto).
Si aún no ha descargado el archivo google-services.json en la carpeta app del proyecto de Android Studio, puede hacerlo en esta página.
Cambie a la pestaña Cloud Messaging de la parte superior.
Copie y guarde la clave del servidor para su uso posterior. Usará este valor para configurar el concentrador.
Configuración de Azure para enviar notificaciones de inserción
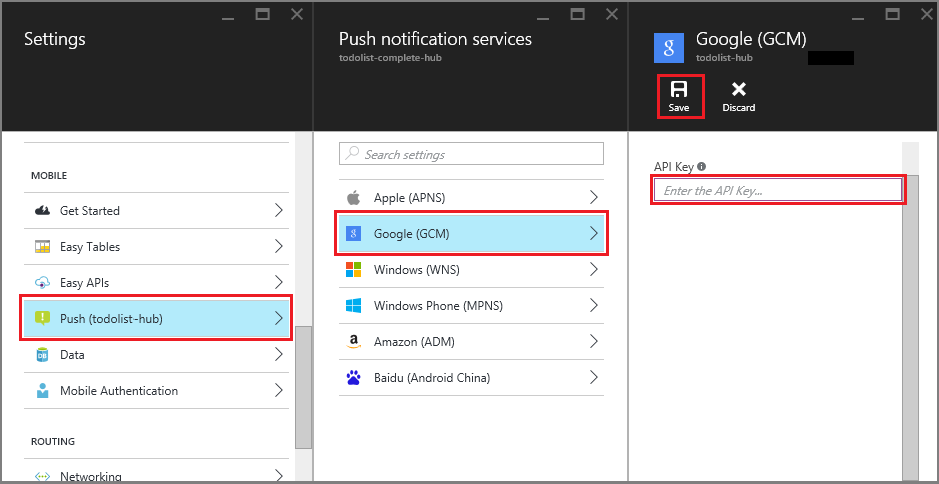
En Azure Portal, haga clic en Examinar todo>App Services y finalmente en el back-end de Mobile Apps. En Configuración, haga clic en App Service Push y, después, en el nombre del centro de notificaciones.
Vaya a Google (GCM), escriba el valor de Clave de servidor que obtuvo de Firebase en el procedimiento anterior y, después, haga clic en Guardar.
El back-end de Mobile Apps ahora está configurado para usar Firebase Cloud Messaging. Esto permite enviar notificaciones push a la aplicación que se ejecuta en un dispositivo Android mediante el centro de notificaciones.
Actualización del proyecto de servidor para enviar notificaciones push
En esta sección, se actualiza el código del proyecto de back-end de Mobile Apps existente con el objetivo de enviar una notificación push cada vez que se agrega un nuevo elemento. Este proceso funciona con la característica de plantillas de Azure Notification Hubs, que permite inserciones multiplataforma. Los diversos clientes se registran para recibir notificaciones push mediante plantillas, y una solo notificación push puede acceder a todas las plataformas de cliente.
Elija uno de los procedimientos siguientes que coincidan con el tipo de proyecto back-end: back-end de .NET o Node.js back-end.
Proyecto de back-end de .NET
En Visual Studio, haga clic con el botón derecho en el proyecto de servidor. A continuación, seleccione Administrar paquetes NuGet. Busque
Microsoft.Azure.NotificationHubsy, después, seleccione Instalar. Este proceso instala la biblioteca de Notification Hubs para enviar notificaciones desde el back-end.En el proyecto de servidor, abra Controllers>TodoItemController.cs. Luego, agregue las siguientes instrucciones using:
using System.Collections.Generic;
using Microsoft.Azure.NotificationHubs;
using Microsoft.Azure.Mobile.Server.Config;
En el método PostTodoItem, agregue el código siguiente después de la llamada a InsertAsync:
// Get the settings for the server project.
HttpConfiguration config = this.Configuration;
MobileAppSettingsDictionary settings =
    this.Configuration.GetMobileAppSettingsProvider().GetMobileAppSettings();

// Get the Notification Hubs credentials for the mobile app.
string notificationHubName = settings.NotificationHubName;
string notificationHubConnection = settings
    .Connections[MobileAppSettingsKeys.NotificationHubConnectionString].ConnectionString;

// Create a new Notification Hub client.
NotificationHubClient hub = NotificationHubClient
.CreateClientFromConnectionString(notificationHubConnection, notificationHubName);

// Send the message so that all template registrations that contain "messageParam"
// receive the notifications. This includes APNS, GCM, WNS, and MPNS template registrations.
Dictionary<string,string> templateParams = new Dictionary<string,string>();
templateParams["messageParam"] = item.Text + " was added to the list.";

try
{
    // Send the push notification and log the results.
    var result = await hub.SendTemplateNotificationAsync(templateParams);

    // Write the success result to the logs.
    config.Services.GetTraceWriter().Info(result.State.ToString());
}
catch (System.Exception ex)
{
    // Write the failure result to the logs.
    config.Services.GetTraceWriter()
        .Error(ex.Message, null, "Push.SendAsync Error");
}
Este proceso envía una notificación de plantilla que contiene el archivo item.text cuando se inserta un nuevo elemento.
Vuelva a publicar el proyecto de servidor.
Proyecto de back-end de Node.js
Configure el proyecto de back-end.
Reemplace el código existente en el archivo todoitem.js por el siguiente:
var azureMobileApps = require('azure-mobile-apps'),
promises = require('azure-mobile-apps/src/utilities/promises'),
logger = require('azure-mobile-apps/src/logger');

var table = azureMobileApps.table();

table.insert(function (context) {
// For more information about the Notification Hubs JavaScript SDK,
// see https://aka.ms/nodejshubs.
logger.info('Running TodoItem.insert');

// Define the template payload.
var payload = '{"messageParam": "' + context.item.text + '" }';

// Execute the insert. The insert returns the results as a promise.
// Do the push as a post-execute action within the promise flow.
return context.execute()
    .then(function (results) {
        // Only do the push if configured.
        if (context.push) {
            // Send a template notification.
            context.push.send(null, payload, function (error) {
                if (error) {
                    logger.error('Error while sending push notification: ', error);
                } else {
                    logger.info('Push notification sent successfully!');
                }
            });
        }
        // Don't forget to return the results from the context.execute().
        return results;
    })
    .catch(function (error) {
        logger.error('Error while running context.execute: ', error);
    });
});

module.exports = table;
Este proceso envía una notificación de plantilla que contiene el archivo item.text cuando se inserta un nuevo elemento.
Cuando edite el archivo en el equipo local, vuelva a publicar el proyecto de servidor.
Configurar el proyecto cliente para las notificaciones push
En la vista Solución (o Explorador de soluciones en Visual Studio), haga clic con el botón derecho en la carpeta Componentes, haga clic en Obtener más componentes..., busque el componente Google Cloud Messaging Client y agréguelo al proyecto.
Abra el archivo de proyecto ToDoActivity.cs y agregue la siguiente instrucción using a la clase:
using Gcm.Client;En la clase ToDoActivity , agregue el siguiente código nuevo:
// Create a new instance field for this activity.
static ToDoActivity instance = new ToDoActivity();

// Return the current activity instance.
public static ToDoActivity CurrentActivity
{
    get
    {
        return instance;
    }
}
// Return the Mobile Services client.
public MobileServiceClient CurrentClient
{
    get
    {
        return client;
    }
}
Esto le permite tener acceso a la instancia de cliente de Servicios móviles desde el proceso del servicio del controlador de inserciones.
Agregue el código siguiente al método OnCreate después de crear MobileServiceClient:
// Set the current instance of TodoActivity.
instance = this;

// Make sure the GCM client is set up correctly.
GcmClient.CheckDevice(this);
GcmClient.CheckManifest(this);

// Register the app for push notifications.
GcmClient.Register(this, ToDoBroadcastReceiver.senderIDs);
Ahora la ToDoActivity estará preparada para agregar notificaciones de inserción.
Incorporación de código de notificaciones de inserción a la aplicación
Cree una nueva clase en el proyecto denominado
ToDoBroadcastReceiver.Agregue las siguientes instrucciones using a ToDoBroadcastReceiver :
using Gcm.Client;
using Microsoft.WindowsAzure.MobileServices;
using Newtonsoft.Json.Linq;
Agregue las siguientes solicitudes de permisos entre las instrucciones using y la declaración namespace:
[assembly: Permission(Name = "@PACKAGE_NAME@.permission.C2D_MESSAGE")]
[assembly: UsesPermission(Name = "@PACKAGE_NAME@.permission.C2D_MESSAGE")]
[assembly: UsesPermission(Name = "com.google.android.c2dm.permission.RECEIVE")]
//GET_ACCOUNTS is only needed for android versions 4.0.3 and below
[assembly: UsesPermission(Name = "android.permission.GET_ACCOUNTS")]
[assembly: UsesPermission(Name = "android.permission.INTERNET")]
[assembly: UsesPermission(Name = "android.permission.WAKE_LOCK")]
Sustituya la definición de la clase ToDoBroadcastReceiver por lo siguiente:
[BroadcastReceiver(Permission = Gcm.Client.Constants.PERMISSION_GCM_INTENTS)]
[IntentFilter(new string[] { Gcm.Client.Constants.INTENT_FROM_GCM_MESSAGE },
    Categories = new string[] { "@PACKAGE_NAME@" })]
[IntentFilter(new string[] { Gcm.Client.Constants.INTENT_FROM_GCM_REGISTRATION_CALLBACK },
    Categories = new string[] { "@PACKAGE_NAME@" })]
[IntentFilter(new string[] { Gcm.Client.Constants.INTENT_FROM_GCM_LIBRARY_RETRY },
Categories = new string[] { "@PACKAGE_NAME@" })]
public class ToDoBroadcastReceiver : GcmBroadcastReceiverBase<PushHandlerService>
{
    // Set the Google app ID.
    public static string[] senderIDs = new string[] { "<PROJECT_NUMBER>" };
}
En el código anterior, debe reemplazar
<PROJECT_NUMBER>por el número de proyecto asignado por Google al aprovisionar la aplicación en el portal para desarrolladores de Google.En el archivo de proyecto ToDoBroadcastReceiver.cs, agregue el código siguiente que define la clase PushHandlerService :
// The ServiceAttribute must be applied to the class.
[Service]
public class PushHandlerService : GcmServiceBase
{
    public static string RegistrationID { get; private set; }
    public PushHandlerService() : base(ToDoBroadcastReceiver.senderIDs) { }
}
Tenga en cuenta que esta clase se deriva de GcmServiceBase y que el atributo Service se debe aplicar a esta clase.
Nota
La clase GcmServiceBase implementa los métodos OnRegistered(), OnUnRegistered(), OnMessage() y OnError(). Debe invalidar estos métodos en la clase PushHandlerService .
Agregue el código siguiente a la clase PushHandlerService que reemplaza al controlador de eventos OnRegistered.
protected override void OnRegistered(Context context, string registrationId)
{
    System.Diagnostics.Debug.WriteLine("The device has been registered with GCM.", "Success!");

    // Get the MobileServiceClient from the current activity instance.
    MobileServiceClient client = ToDoActivity.CurrentActivity.CurrentClient;
    var push = client.GetPush();

    // Define a message body for GCM.
    const string templateBodyGCM = "{\"data\":{\"message\":\"$(messageParam)\"}}";

    // Define the template registration as JSON.
    JObject templates = new JObject();
    templates["genericMessage"] = new JObject
    {
        {"body", templateBodyGCM }
    };

    try
    {
        // Make sure we run the registration on the same thread as the activity,
        // to avoid threading errors.
        ToDoActivity.CurrentActivity.RunOnUiThread(

            // Register the template with Notification Hubs.
            async () => await push.RegisterAsync(registrationId, templates));

        System.Diagnostics.Debug.WriteLine(
            string.Format("Push Installation Id", push.InstallationId.ToString()));
    }
    catch (Exception ex)
    {
        System.Diagnostics.Debug.WriteLine(
            string.Format("Error with Azure push registration: {0}", ex.Message));
    }
}
Este método usa el identificador de registro GCM devuelto para registrarse con Azure para las notificaciones de inserción. Las etiquetas solo pueden agregarse al registro después de haberlo creado. Para obtener más información, consulte Procedimientos: Incorporación de etiquetas a la instalación de un dispositivo para habilitar la inserción de etiquetas.
Reemplace el método OnMessage en PushHandlerService por el código siguiente:
protected override void OnMessage(Context context, Intent intent)
{
    string message = string.Empty;

    // Extract the push notification message from the intent.
    if (intent.Extras.ContainsKey("message"))
    {
        message = intent.Extras.Get("message").ToString();
        var title = "New item added:";

        // Create a notification manager to send the notification.
        var notificationManager =
            GetSystemService(Context.NotificationService) as NotificationManager;

        // Create a new intent to show the notification in the UI.
        PendingIntent contentIntent =
            PendingIntent.GetActivity(context, 0,
            new Intent(this, typeof(ToDoActivity)), 0);

        // Create the notification using the builder.
        var builder = new Notification.Builder(context);
        builder.SetAutoCancel(true);
        builder.SetContentTitle(title);
        builder.SetContentText(message);
        builder.SetSmallIcon(Resource.Drawable.ic_launcher);
        builder.SetContentIntent(contentIntent);
        var notification = builder.Build();

        // Display the notification in the Notifications Area.
        notificationManager.Notify(1, notification);

    }
}
Reemplace los métodos OnUnRegistered() y OnError() por el código siguiente.
protected override void OnUnRegistered(Context context, string registrationId)
{
    throw new NotImplementedException();
}

protected override void OnError(Context context, string errorId)
{
    System.Diagnostics.Debug.WriteLine(
        string.Format("Error occurred in the notification: {0}.", errorId));
}
Prueba de las notificaciones push en su aplicación
Puede probar la aplicación con un dispositivo virtual en el emulador. Hay pasos de configuración adicionales necesarios cuando se ejecuta en un emulador.
El dispositivo virtual debe tener las API de Google configuradas como destino en el administrador de dispositivos virtuales Android (AVD).

Agregue una cuenta de Google al dispositivo Android; para ello, haga clic enConfiguración> de aplicaciones>Agregar cuenta y, a continuación, siga las indicaciones.

Ejecute la aplicación todolist como antes e inserte un nuevo elemento todo. Esta vez, se muestra un icono de notificación en el área de notificación. Puede abrir el cajón de notificaciones para ver el texto completo de la notificación.
