자습서: GeoJSON 데이터를 Azure Maps Android SDK로 로드
이 자습서에서는 위치 데이터의 GeoJSON 파일을 Azure Maps Android SDK로 가져오는 과정을 안내합니다. 이 자습서에서는 다음을 하는 방법을 알아볼 수 있습니다.
- Android 애플리케이션에 Azure Maps를 추가합니다.
- 로컬 파일 또는 웹에서 데이터 원본을 만들고 GeoJSON 파일에 로드합니다.
- 지도에 데이터를 표시합니다.
- 맵의 데이터와 상호 작용하여 세부 정보를 봅니다.
참고 항목
Azure Maps Android SDK 사용 중지
이제 Android용 Azure Maps 네이티브 SDK는 더 이상 사용되지 않으며 2025년 3월 31일에 사용 중지됩니다. 서비스 중단을 방지하려면 2025년 3월 31일까지 Azure Maps 웹 SDK로 마이그레이션합니다. 자세한 내용은 Azure Maps Android SDK 마이그레이션 가이드를 참조하세요.
필수 조건
- 빠른 시작: Android 앱 만들기를 완료합니다. 이 자습서에는 해당 빠른 시작에서 사용되는 코드를 확장합니다.
- 샘플 관심 지점 GeoJSON 파일을 다운로드합니다.
웹 또는 자산 폴더에서 GeoJSON 데이터 가져오기
대부분의 GeoJSON 파일은 FeatureCollection 내에 모든 데이터를 래핑합니다. 이 시나리오로 인해 GeoJSON 파일이 애플리케이션에 문자열로 로드되면 맵에 추가할 수 있는 GeoJSON FeatureCollection 개체로 문자열을 역직렬화하는 기능 컬렉션의 정적 fromJson 메서드로 전달될 수 있습니다.
다음 단계에서는 GeoJSON 파일을 애플리케이션으로 가져와서 GeoJSON FeatureCollection 개체로 역직렬화하는 방법을 보여 줍니다.
- 다음 단계는 이 애플리케이션을 기반으로 하므로 빠른 시작: Android 앱 만들기를 완료합니다.
- Android Studio의 프로젝트 패널에서 app 폴더를 마우스 오른쪽 단추로 클릭하고
New > Folder > Assets Folder로 이동합니다. - 샘플 관심 지점 GeoJSON 파일을 자산 폴더로 끌어서 놓습니다.
- MainActivity.java 파일로 이동하여
onCreate메서드 내부에 있는mapControl.onReady이벤트에 대한 콜백 내부에 다음 코드를 추가합니다. 이 코드는importDataFromUrl메서드를 사용하여 SamplePoiDataSet.json 파일을 자산 폴더에서 데이터 원본으로 로드한 다음, 맵에 추가합니다.
//Create a data source and add it to the map.
DataSource source = new DataSource();

//Import the geojson data and add it to the data source.
source.importDataFromUrl("asset://SamplePoiDataSet.json");

//Add data source to the map.
map.sources.add(source);
- MainActivity.kt 파일로 이동하여
onCreate메서드 내부에 있는mapControl.onReady이벤트에 대한 콜백 내부에 다음 코드를 추가합니다. 이 코드는importDataFromUrl메서드를 사용하여 SamplePoiDataSet.json 파일을 자산 폴더에서 데이터 원본으로 로드한 다음, 맵에 추가합니다.
//Create a data source and add it to the map.
DataSource source = new DataSource();

//Import the geojson data and add it to the data source.
source.importDataFromUrl("asset://SamplePoiDataSet.json");

//Add data source to the map.
map.sources.add(source);
- 이제 코드를 사용해 GeoJSON 데이터를 데이터 원본으로 로드하여 해당 데이터를 맵에 표시하는 방법을 지정해야 합니다. 점 데이터의 렌더링 레이어는 여러 가지가 있습니다. 가장 일반적으로 사용되는 레이어는 거품형 레이어, 기호 레이어 및 열 지도 레이어입니다.
mapControl.onReady이벤트에 대한 콜백에서 데이터를 가져오는 코드 뒤에 데이터를 거품형 레이어에 렌더링하는 다음 코드를 추가합니다.
//Create a layer and add it to the map.
BubbleLayer layer = new BubbleLayer(source);
map.layers.add(layer);
//Create a layer and add it to the map.
val layer = new BubbleLayer(source)
map.layers.add(layer)
- Android Studio의 프로젝트 패널에서 경로
app > res > layout아래의 레이아웃 폴더를 마우스 오른쪽 단추로 클릭하고New > File로 이동합니다. popup_text.xml이라는 새 파일을 만듭니다. - popup_text.xml 파일을 엽니다. 디자이너 보기에서 파일이 열리면 화면을 마우스 오른쪽 단추로 클릭하고 XML로 이동을 선택합니다. 다음 XML을 복사하여 이 파일에 붙여넣습니다. 이 XML은 팝업과 함께 사용할 수 있고 텍스트 뷰를 포함하는 간단한 레이아웃을 만듭니다.
<?xml version="1.0" encoding="utf-8"?>
<RelativeLayout xmlns:android="http://schemas.android.com/apk/res/android"
    android:layout_width="match_parent"
    android:orientation="vertical"
    android:background="#ffffff"
    android:layout_margin="8dp"
    android:padding="10dp"

    android:layout_height="match_parent">

    <TextView
        android:id="@+id/message"
        android:layout_width="wrap_content"
        android:text=""
        android:textSize="18dp"
        android:textColor="#222"
        android:layout_height="wrap_content"
        android:width="200dp"/>

</RelativeLayout>
- MainActivity.java 파일로 돌아가기 거품형 레이어에 대한 코드 뒤에 다음 코드를 추가하여 재사용 가능한 팝업을 만듭니다.
//Create a popup and add it to the map.
Popup popup = new Popup();
map.popups.add(popup);

//Close it initially.
popup.close();
- MainActivity.kt 파일로 돌아가기 거품형 레이어에 대한 코드 뒤에 다음 코드를 추가하여 재사용 가능한 팝업을 만듭니다.
//Create a popup and add it to the map.
val popup = Popup()
map.popups.add(popup)

//Close it initially.
popup.close()
- 다음 코드를 추가하여 거품형 레이어에
click이벤트를 연결합니다. 거품형 레이어의 거품을 탭하면 이벤트가 실행되어 선택한 기능의 속성에서 세부 정보를 검색하고, popup_text.xml 레이아웃 파일을 사용하여 보기를 만들고, 콘텐츠로 팝업에 전달한 다음, 기능 위치에 팝업을 표시합니다.
//Add a click event to the layer.
map.events.add((OnFeatureClick)(feature) -> {
    //Get the first feature and it's properties.
    Feature f = feature.get(0);
    JsonObject props = f.properties();

    //Retrieve the custom layout for the popup.
    View customView = LayoutInflater.from(this).inflate(R.layout.popup_text, null);

    //Display the name and entity type information of the feature into the text view of the popup layout.
    TextView tv = customView.findViewById(R.id.message);
    tv.setText("%s\n%s",
        f.getStringProperty("Name"),
        f.getStringProperty("EntityType")
    );

    //Get the position of the clicked feature.
    Position pos = MapMath.getPosition((Point)f.geometry());

    //Set the options on the popup.
    popup.setOptions(
            //Set the popups position.
            position(pos),

            //Set the anchor point of the popup content.
            anchor(AnchorType.BOTTOM),

            //Set the content of the popup.
            content(customView)
    );

    //Open the popup.
    popup.open();

    //Return a boolean indicating if event should be consumed or continue to bubble up.
    return false;
}, layer);
//Add a click event to the layer.
map.events.add(OnFeatureClick { feature: List<Feature> ->
    //Get the first feature and it's properties.
    val f = feature[0]
    val props = f.properties()

    //Retrieve the custom layout for the popup.
    val customView: View = LayoutInflater.from(this).inflate(R.layout.popup_text, null)

    //Display the name and entity type information of the feature into the text view of the popup layout.
    val tv = customView.findViewById<TextView>(R.id.message)
    tv.text = String.format(
        "%s\n%s",
        f.getStringProperty("Name"),
        f.getStringProperty("EntityType")
    )

    //Get the position of the clicked feature.
    val pos = MapMath.getPosition(f.geometry() as Point?)

    //Set the options on the popup.
    popup.setOptions( //Set the popups position.
        position(pos),  //Set the anchor point of the popup content.
        anchor(AnchorType.BOTTOM),  //Set the content of the popup.
        content(customView)
    )

    //Open the popup.
    popup.open()

    //Return a boolean indicating if event should be consumed or continue to bubble up.
    false
} as OnFeatureClick, layer)
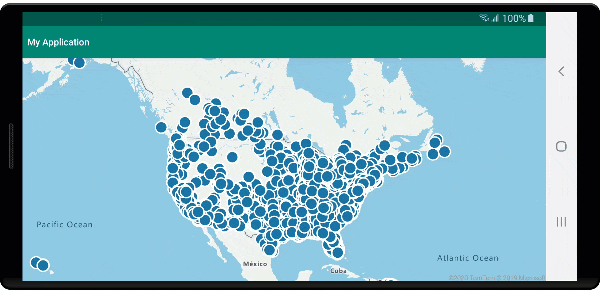
애플리케이션을 실행합니다. GeoJSON 파일의 각 위치에 거품이 오버레이된 지도가 표시됩니다. 거품을 탭하면 터치한 기능의 이름 및 엔터티 형식이 포함된 팝업이 표시됩니다.
리소스 정리
이 자습서의 리소스를 정리하려면 다음 단계를 수행합니다.
- Android Studio를 닫고 사용자가 만든 애플리케이션을 삭제합니다.
- 외부 디바이스에서 애플리케이션을 테스트한 경우 해당 디바이스에서 애플리케이션을 제거합니다.
다음 단계
더 많은 코드 예제와 대화형 코딩 환경을 살펴보려면 다음을 참조하세요.