Exercise - Deploy clustered VMs by using Azure shared disks
Your company's CTO needs to provide proof of concept for using Azure shared disks to deploy a clustered application in Azure virtual machines (VMs). You've been asked to test clustered scenarios with both Linux and Windows VMs.
Note
The first time you activate a sandbox and accept the terms, your Microsoft account is associated with a new Azure directory named Microsoft Learn Sandbox. You're also added to the special Concierge Subscription.
Note
You can use either Azure PowerShell or the Azure CLI to manage Windows and Linux VMs on Azure. Here, for learning purposes, if you choose the Windows option, you'll use Azure PowerShell. If you choose Linux, you'll use the Azure CLI.
Note
This exercise is optional. If you want to complete this exercise, you'll need to create an Azure subscription before you begin. If you don't have an Azure account or you don't want to create one at this time, you can read through the instructions so you understand the information that's being presented.
Deploy Linux VMs by using Azure shared disks
To provide proof of concept, deploy two Linux VMs that are running the Ubuntu Server OS. You'll also test the SCSI Persistent Reservations (PR) commands on the Azure shared disk.
In this exercise, you explore Azure shared disk deployment and perform the following tasks:
- Create an Azure shared disk.
- Create an availability set.
- Deploy two VMs that are running Ubuntu Server OS, and then attach a shared disk to the two VMs.
- Test SCSI PR commands.
Create an Azure shared disk
Use Azure Cloud Shell with the Azure CLI to create an Azure shared disk.
az disk create -g <rgn>[sandbox resource group name]</rgn> -n mySharedDisk --size-gb 1024 --sku Premium_LRS --max-shares 2
Create an availability set
Run the following command to create an availability set:
az vm availability-set create \
  --resource-group <rgn>[sandbox resource group name]</rgn> \
  --name myAvailabilitySet \
  --platform-fault-domain-count 2 \
  --platform-update-domain-count 2
Create two VMs that run Ubuntu Server
While you're still in Cloud Shell, run the following commands to create two VMs that run Ubuntu OS:
for i in `seq 1 2`;
do
   az vm create --resource-group <rgn>[sandbox resource group name]</rgn> --name myVM$i --availability-set myAvailabilitySet --size Standard_DS1_v2 --vnet-name myVnet --subnet mySubnet --image Ubuntu2204 --admin-username azureuser --generate-ssh-keys
done
Attach an Azure shared disk on both VMs
While you're still in Cloud Shell, attach the Azure shared disk to both VMs by using the following commands:
diskId=$(az disk show -g <rgn>[sandbox resource group name]</rgn> -n mySharedDisk --query 'id' -o tsv)

# attach the shared disk to the first VM.
az vm disk attach -g <rgn>[sandbox resource group name]</rgn> --vm-name myVM1 --name $diskId

# attach the shared disk to the second VM.
az vm disk attach -g <rgn>[sandbox resource group name]</rgn> --vm-name myVM2 --name $diskId
When you've finished this task, the shared disk is attached to two VMs at the same time.
Test SCSI PR by using the "sg3-utils" tools
While you're still in Cloud Shell, connect to the first VM by using Secure Shell (SSH) Protocol.
Use the following command to retrieve the IP addresses of VM1:
myPublicIP1=$(az network public-ip show --resource-group <rgn>[sandbox resource group name]</rgn> --name myVM1PublicIP --query 'ipAddress' --output tsv)Connect to the first VM over SSH:
ssh azureuser@$myPublicIP1At the Are you sure you want to continue connecting? (yes/no) prompt, enter yes, and then select Enter.
To install sg3-utils, run the following commands:
sudo apt-get update
sudo apt-get install -y sg3-utils
To read the current reservation, run the following command:
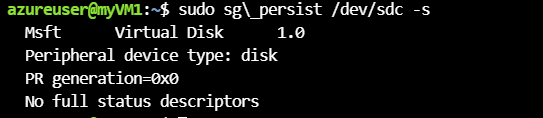
sudo sg_persist /dev/sdc -sThis command identifies the current reservations that exist for the shared disk. Because this is the first time that you've run it, there should be no new reservations.
Run the following command to register new reservation key 1234 on myVM1:
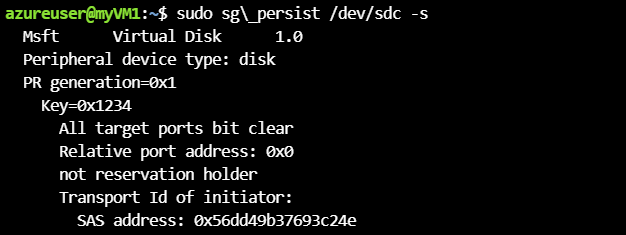
sudo sg_persist --register --device /dev/sdc --param-rk=0 --param-sark=1234 --outThis command provides SCSI_PR registration, which ensures that VM1 can read or write to the new shared disk.
Read back the keys on VM1:
sudo sg_persist /dev/sdc -sThe command should show one reservation to the shared disk for VM1.
Close the SSH session:
exitConnect to the second VM through SSH by using the following command:
myPublicIP2=$(az network public-ip show --resource-group <rgn>[sandbox resource group name]</rgn> --name myVM2PublicIP --query 'ipAddress' --output tsv)

ssh azureuser@$myPublicIP2
When prompted for Are you sure you want to continue connecting (yes/no)?, enter yes, and then select Enter.
To install sg3-utils, run the following commands:
# Install sg3-utils
sudo apt-get update
sudo apt-get install -y sg3-utils
# Register the key 1235 on VM2. This command will provide SCSI_PR registration for VM2, so it can read or write on the shared disk. sudo sg_persist --register --device /dev/sdc --param-rk=0 --param-sark=1235 --out # Read back the keys for the shared disk. Now it should show 2 reservation to the shared disk for both VM1 and VM2. sudo sg_persist /dev/sdc -s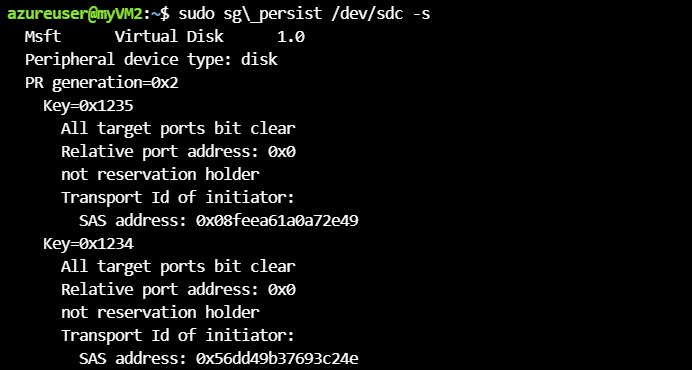
Close the SSH session:
exitConnect to myVM1 by using SSH:
ssh azureuser@$myPublicIP1Run the following commands:
# Reserve the device with exclusive write permission. This command will ensure that VM1 has exclusive write to the disk, while any write from VM2 will not succeed.
sudo sg_persist --reserve --device /dev/sdc --param-rk=1234 --prout-type=1 --out

# Check the reservation on the device.
sudo sg_persist /dev/sdc -s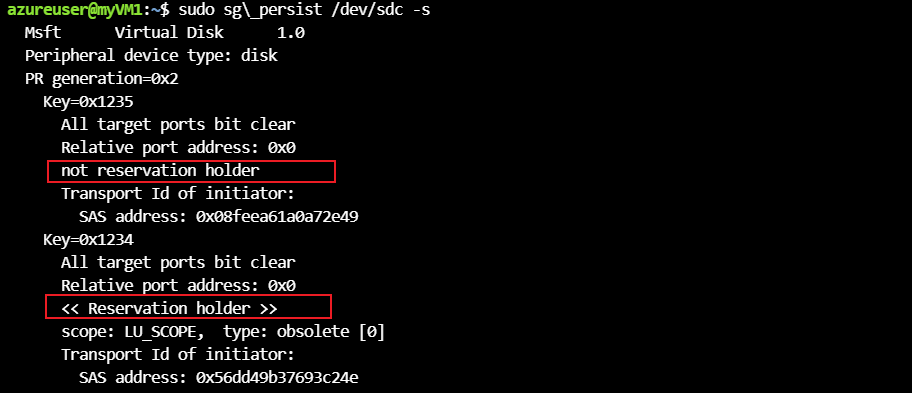
Close the SSH session:
exitConnect to myVM2 by using SSH:
ssh azureuser@$myPublicIP2Run the following commands:
# Preempt the DEVICE from **myVM2**. This command will take over the exclusive write operation from VM1. Now VM2 has write access to the disk.
sudo sg_persist --preempt --device /dev/sdc --param-rk=1235 --param-sark=1234 --prout-type=5 --out

# Report capabilities. Verify that reservation exist for VM2 with key 1235.
sudo sg_persist /dev/sdc -c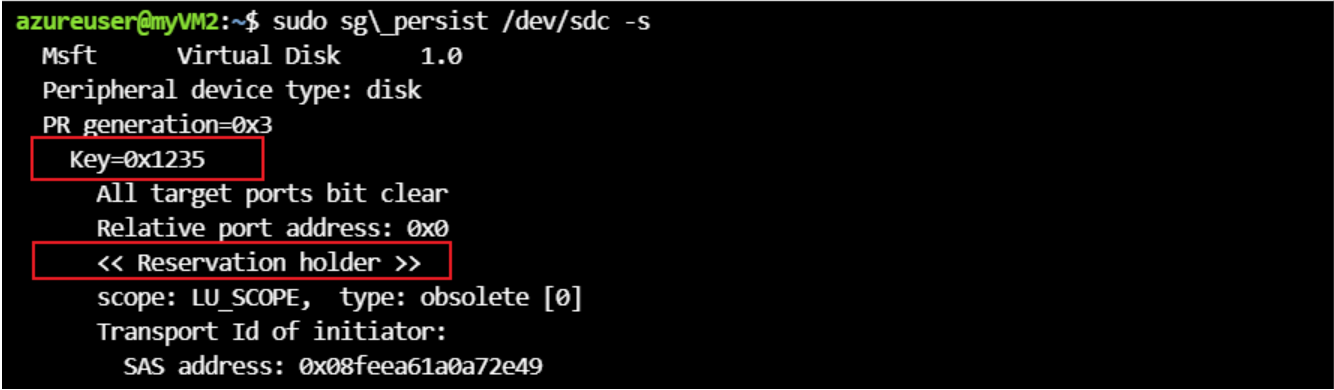
# Unregister from **myVM2**. This command release access to the shared disk.
sudo sg_persist --out --register --param-rk=1235 --param-sark=0 --device /dev/sdc

# Report capabilities.
sudo sg_persist /dev/sdc -s
Close the SSH session:
exit
Deploy Windows VMs by using Azure shared disks
To further demonstrate Azure shared disk functionality, deploy two Windows VMs running the Windows server operating system (OS). You'll then test the SCSI Persistent Reservations (PR) commands on the Azure shared disk.
In this exercise, you'll explore Azure shared disk deployment and perform the following tasks:
- Create an Azure shared disk.
- Create an availability set.
- Deploy two VMs running Windows Server OS and configure clustered services.
- Test SCSI PR commands.
Create an Azure shared disk
In Cloud Shell, you can switch from the Azure CLI to Azure PowerShell by running the following command:
# Switch to PowerShell
pwsh

# Create Azure Shared disk
$dataDiskConfig=New-AzDiskConfig -Location "EastUs" -DiskSizeGB 1024 -AccountType Premium_LRS -CreateOption Empty -MaxSharesCount 2
$dataDisk=New-AzDisk -ResourceGroupName <rgn>[sandbox resource group name]</rgn> -DiskName "mySharedDisk1" -Disk $dataDiskConfig
Create an availability set
Run the following command to create an availability set:
# Create a managed availability set by using New-AzAvailabilitySet with the -sku aligned parameter.
New-AzAvailabilitySet `
  -Location "EastUS" `
  -Name "myAvailabilitySet1" `
  -ResourceGroupName <rgn>[sandbox resource group name]</rgn> `
  -Sku aligned `
  -PlatformFaultDomainCount 2 `
  -PlatformUpdateDomainCount 2
Create two VMs that are running Windows Server
While still in Cloud Shell, run the following commands to define a credential object for logging to the VMs:
$cred = Get-CredentialUse the following credentials:
- User: Student
- Password: Pa55w.rd1234
Create two VMs that are running Windows OS:
for ($i=3; $i-le4; $i++)
{
    New-AzVm `
      -ResourceGroupName <rgn>[sandbox resource group name]</rgn> `
      -Name "myVM$i" `
      -Location eastus `
      -VirtualNetworkName "myVnet1" `
      -SubnetName "mySubnet" `
      -ImageName "MicrosoftWindowsServer:WindowsServer:2019-Datacenter:latest" `
      -SecurityGroupName "myNetworkSecurityGroup1" `
      -PublicIpAddressName "myPublicIpAddress$i" `
      -AvailabilitySetName "myAvailabilitySet1" `
      -Credential $cred
}
Attach an Azure shared disk to both VMs
Use the following command to attach the Azure shared disk to the first VM:
$vm3 = Get-AzVM -Name "myvm3" -ResourceGroupName <rgn>[sandbox resource group name]</rgn>
$vm3 = Add-AzVMDataDisk -VM $vm3 -CreateOption Attach -ManagedDiskId $dataDisk.Id -Lun 0

Update-AzVM -VM $vm3 –ResourceGroupName <rgn>[sandbox resource group name]</rgn>
Attach the Azure shared disk to the second VM:
$vm4 = Get-AzVM -Name "myvm4" -ResourceGroupName <rgn>[sandbox resource group name]</rgn>
$vm4 = Add-AzVMDataDisk -VM $vm4 -CreateOption Attach -ManagedDiskId $dataDisk.Id -Lun 0

Update-AzVM -VM $vm4 –ResourceGroupName <rgn>[sandbox resource group name]</rgn>
Install Windows Failover Clustering Service on myVM3
Sign in to the Azure portal, and make sure you're in the sandbox subscription.
In the search resources, services, and docs (G+/) field, enter virtual machines, and then select virtual machines.
Select the myVM3 VM from the toolbar, select Connect, and then select RDP.
Select Download RDP File, and then connect by using the following credentials:
- Username: Student
- Password: Pa55w.rd1234
In Server Manager, from the Tools menu, select the Computer Management snap-in.
In the Computer Management (Local) management console, select Disk Management.
In the Initialize Disk window, verify that Disk 2 is selected, and then select OK.
Right-click or select the black label on Disk 2, and then select New Simple Volume. Accept the default values to create new simple volume.
Close the Computer Management console.
In Server Manager, select Add roles and features. The Add Roles and Features wizard opens.
In the Add Roles and Features wizard, on the Before you Begin page, select Next.
On the Select installation type page, select Role-based or feature-based installation, and then select Next.
On the Server Selection page, select Next.
On the Select server roles page, select Next.
On the Select features page, select the Failover Clustering checkbox.
Verify that the Include management tools (if applicable) checkbox is selected. Select Add Features, and then select Next.
On the Confirmation page, select the Restart the destination server automatically if required checkbox, and then select Yes. Select Install to install the Failover Clustering role.
Note
After the failover cluster feature is installed, virtual machine myVM3 automatically restarts.
Install Windows Failover Clustering Service on myVM4
In the Azure portal, in the search resources, services, and docs (G+/) field, enter virtual machines, and then select virtual machines.
Select the myVM4 VM from the toolbar, select Connect, and then select RDP.
Select Download RDP File, and then connect by using the following credentials:
- Username: Student
- Password: Pa55w.rd1234
In Server Manager, from the Tools menu, select the Computer Management snap-in.
In the Computer Management (Local) management console, select Disk Management.
In the Initialize Disk window, verify that Disk 2 is selected, and then select OK.
Right-click or select the black label on Disk 2, and then select New Simple Volume. Accept the defaults to create a new simple volume.
Close the Computer Management console.
In Server Manager, select Add roles and features. The Add Roles and Features wizard opens.
In the Add Roles and Features wizard, in the Before you Begin page, select Next.
On the Select installation type page, select Role-based or feature-based installation, and select Next.
On the Server Selection page, select Next.
On the Select server roles page, select Next.
On the Select features page, select the Failover Clustering checkbox.
Verify that the Include management tools (if applicable) checkbox is selected. Select Add Features, and then select Next.
On the Confirmation page, select the Restart the destination server automatically if required checkbox, and then select Yes. Select Install to install the Failover Clustering role.
Note
After the failover cluster feature is installed, virtual machine myVM4 automatically restarts.
Test the storage for Windows Failover Clustering Service on myVM3
In the Azure portal, in the search resources, services, and docs (G+/) field, enter and select virtual machines.
Select the first VM, myVM3, from the toolbar, select Connect, and then select RDP.
Select Download RDP File, and then connect by using the following credentials:
- Username: Student
- Password: Pa55w.rd1234
In Server Manager, from the Tools menu, select Failover Cluster Manager.
In Failover Cluster Manager, from the Actions menu, select Validate Configuration. The Validate a Configuration Wizard opens.
In the Validate a Configuration Wizard, in the Before You Begin page, select Next.
On the Select Servers or a Cluster page, in the Enter Name field, enter myVM3, and then select Add.
On the Select Servers or a Cluster page, in the Enter Name field, enter myVM4, and then select Add.
Select Next to continue with testing the cluster setup.
On the Testing Options page, select Run only tests I select, and then select Next.
Clear all other tests, select only the Storage checkbox, and then select Next.
On the Confirmation page, select Next.
Verify that all the tests are successful, and then select Finish.
Close the RDP connection.
Note
To continue creating the cluster, you'll need to meet additional prerequisites, such as Microsoft Entra Domain Services (Microsoft Entra Domain Services), and create a static IP address to use for the internal load balancer.
This step is out of scope for this exercise.