Since this article was written, the ASP.NET Membership providers have been superseded by ASP.NET Identity. We strongly recommend updating apps to use the ASP.NET Identity platform rather than the Membership providers featured at the time this article was written. ASP.NET Identity has a number of advantages over the ASP.NET Membership system, including :
Better performance
Improved extensibility and testability
Support for OAuth, OpenID Connect, and two-factor authentication
In this tutorial we will explore using the Membership framework (via the SqlMembershipProvider) to create new user accounts. We will see how to create new users programmatically and through ASP.NET's built-in CreateUserWizard control.
Introduction
In the preceding tutorial we installed the application services schema in a database, which added the tables, views, and stored procedures needed by the SqlMembershipProvider and SqlRoleProvider. This created the infrastructure we will need for the remainder of the tutorials in this series. In this tutorial we will explore using the Membership framework (via the SqlMembershipProvider) to create new user accounts. We will see how to create new users programmatically and through ASP.NET's built-in CreateUserWizard control.
In addition to learning how to create new user accounts, we will also need to update the demo website we first created in the An Overview of Forms Authentication tutorial and then enhanced in the Forms Authentication Configuration and Advanced Topics tutorial. Our demo web application has a login page that validates users' credentials against hard-coded username/password pairs. Moreover, Global.asax includes code that creates custom IPrincipal and IIdentity objects for authenticated users. We will update the login page to validate users' credentials against the Membership framework and remove the custom principal and identity logic.
Let's get started!
The Forms Authentication and Membership Checklist
Before we begin working with the Membership framework, let's take a moment to review the important steps we have taken to reach this point. When using the Membership framework with the SqlMembershipProvider in a forms-based authentication scenario, the following steps need to be performed prior to implementing Membership functionality in your web application:
Enable forms-based authentication. As we discussed in An Overview of Forms Authentication, forms authentication is enabled by editing Web.config and setting the <authentication> element's mode attribute to Forms. With forms authentication enabled, each incoming request is examined for a forms authentication ticket, which, if present, identifies the requestor.
Add the application services schema to the appropriate database. When using the SqlMembershipProvider we need to install the application services schema to a database. Usually this schema is added to the same database that holds the application's data model. The Creating the Membership Schema in SQL Server tutorial looked at using the aspnet_regsql.exe tool to accomplish this.
Customize the Web Application's Settings to reference the database from step 2. The Creating the Membership Schema in SQL Server tutorial showed two ways to configure the web application so that the SqlMembershipProvider would use the database selected in step 2: by modifying the LocalSqlServer connection string name; or by adding a new registered provider to the list of Membership framework providers and customizing that new provider to use the database from step 2.
When building a web application that uses the SqlMembershipProvider and forms-based authentication, you will need to perform these three steps before using the Membership class or the ASP.NET Login Web controls. Since we already performed these steps in previous tutorials, we are ready to start using the Membership framework!
Step 1: Adding New ASP.NET Pages
In this tutorial and the next three we will be examining various Membership-related functions and capabilities. We will need a series of ASP.NET pages to implement the topics examined throughout these tutorials. Let's create those pages and then a site map file (Web.sitemap).
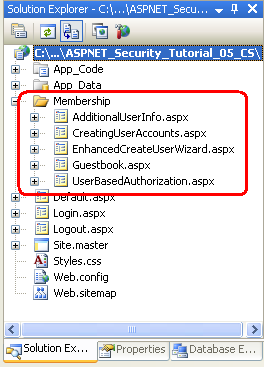
Start by creating a new folder in the project named Membership. Next, add five new ASP.NET pages to the Membership folder, linking each page with the Site.master master page. Name the pages:
CreatingUserAccounts.aspx
UserBasedAuthorization.aspx
EnhancedCreateUserWizard.aspx
AdditionalUserInfo.aspx
Guestbook.aspx
At this point your project's Solution Explorer should look similar to the screen shot shown in Figure 1.
Recall that the LoginContent ContentPlaceHolder's default markup displays a link to log on or log off the site, depending on whether the user is authenticated. The presence of the Content2 Content control, however, overrides the master page's default markup. As we discussed in An Overview of Forms Authentication tutorial, this is useful in pages where we do not want to display login-related options in the left column.
For these five pages, however, we want to show the master page's default markup for the LoginContent ContentPlaceHolder. Therefore, remove the declarative markup for the Content2 Content control. After doing so, each of the five page's markup should contain just one Content control.
Step 2: Creating the Site Map
All but the most trivial websites need to implement some form of a navigational user interface. The navigation user interface may be a simple list of links to the various sections of the site. Alternatively, these links may be arranged into menus or tree views. As page developers, creating the navigational user interface is only half of the story. We also need some means to define the site's logical structure in a maintainable and updateable fashion. As new pages are added or existing pages removed, we want to be able to update a single source – the site map – and have those modifications reflected across the site's navigational user interface.
These two tasks – defining the site map and implementing a navigational user interface based on the site map – are easy to accomplish thanks to the Site Map framework and the Navigation Web controls added in ASP.NET version 2.0. The Site Map framework allows for a developer to define a site map and then to access it through a programmatic API (the SiteMap class). The built-in Navigation Web controls include a Menu control, the TreeView control, and the SiteMapPath control.
Like the Membership and Roles frameworks, the Site Map framework is built atop the provider model. The job of the Site Map provider class is to generate the in-memory structure used by the SiteMap class from a persistent data store, such as an XML file or a database table. The .NET Framework ships with a default Site Map provider that reads the site map data from an XML file (XmlSiteMapProvider), and this is the provider we will be using in this tutorial. For some alternate Site Map provider implementations, refer to the Further Readings section at the end of this tutorial.
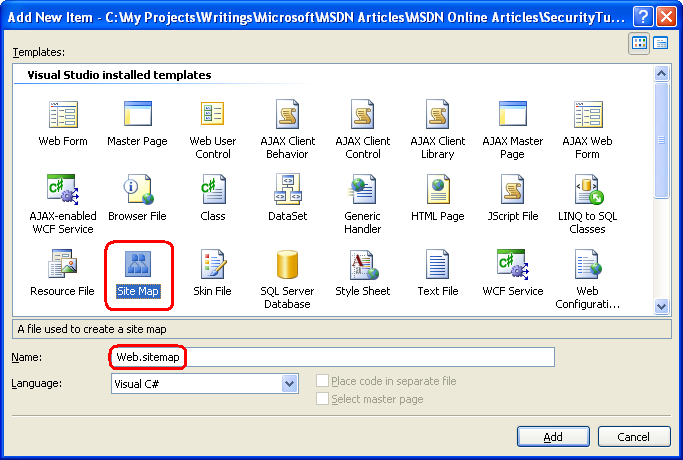
The default Site Map provider expects a properly-formatted XML file named Web.sitemap to exist the root directory. Since we are using this default provider, we need to add such a file and define the site map's structure in the appropriate XML format. To add the file, right-click on the project name in Solution Explorer and choose Add New Item. From the dialog box, opt to add a file of type Site Map named Web.sitemap.
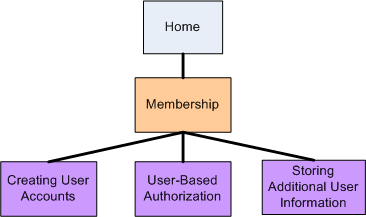
The XML site map file defines the website's structure as a hierarchy. This hierarchical relationship is modeled in the XML file via the ancestry of the <siteMapNode> elements. The Web.sitemap must start with a <siteMap> parent node that has precisely one <siteMapNode> child. This top-level <siteMapNode> element represents the root of the hierarchy, and may have an arbitrary number of descendent nodes. Each <siteMapNode> element must include a title attribute and may optionally include url and description attributes, among others; each non-empty url attribute must be unique.
Enter the following XML into the Web.sitemap file:
Step 3: Updating the Master Page to Include a Navigational User Interface
ASP.NET includes a number of navigation-related Web controls for designing a user interface. These include the Menu, TreeView, and the SiteMapPath controls. The Menu and TreeView controls render the site map structure in a menu or a tree, respectively, whereas the SiteMapPath displays a breadcrumb that shows the current node being visited as well as its ancestors. The site map data can be bound to other data Web controls using the SiteMapDataSource and can be accessed programmatically via the SiteMap class.
Since a thorough discussion of the Site Map framework and the Navigation controls is beyond the scope of this tutorial series, rather than spend time crafting our own navigational user interface let's instead borrow the one used in my Working with Data in ASP.NET 2.0 tutorial series, which uses a Repeater control to display a two-deep bulleted list of navigation links, as shown in Figure 4.
Adding a Two-Level List of Links in the Left Column
To create this interface, add the following declarative markup to the Site.master master page's left column where the text "TODO: Menu will go here..." currently resides.
The above markup binds a Repeater control named menu to a SiteMapDataSource, which returns the site map hierarchy defined in Web.sitemap. Since the SiteMapDataSource control's ShowStartingNode property is set to False it starts returning the site map's hierarchy starting with the descendents of the "Home" node. The Repeater displays each of these nodes (currently just "Membership") in an <li> element. Another, inner Repeater then displays the current node's children in a nested unordered list.
Figure 4 shows the above markup's rendered output with the site map structure we created in Step 2. The Repeater renders vanilla unordered list markup; the cascading style sheet rules defined in Styles.css are responsible for the aesthetically-pleasing layout. For a more detailed description of how the above markup works, refer to the Master Pages and Site Navigation tutorial.
In addition to the list of links in the left column, let's also have each page display a breadcrumb. A breadcrumb is a navigational user interface element that quickly shows users their current position within the site hierarchy. The SiteMapPath control uses the Site Map framework to determine the current page's location in the site map and then displays a breadcrumb based on this information.
Specifically, add a <span> element to the master page's header <div> element, and set the new <span> element's class attribute to "breadcrumb". (The Styles.css class contains a rule for a "breadcrumb" class.) Next, add a SiteMapPath to this new <span> element.
Figure 5 shows the output of the SiteMapPath when visiting ~/Membership/CreatingUserAccounts.aspx.
Figure 5: The Breadcrumb Displays the Current Page and its Ancestors in the Site Map (Click to view full-size image)
Step 4: Removing the Custom Principal and Identity Logic
Custom principal and identity objects can be associated to the authenticated user. We accomplished this by creating an event handler in Global.asax for the application's PostAuthenticateRequest event, which fires after the FormsAuthenticationModule has authenticated the user. In this event handler we replaced the GenericPrincipal and FormsIdentity objects added by the FormsAuthenticationModule with the CustomPrincipal and CustomIdentity objects we created in that tutorial.
While custom principal and identity objects are useful in certain scenarios, in most cases the GenericPrincipal and FormsIdentity objects are sufficient. Consequently, I think it would be worthwhile to return to the default behavior. Make this change by either removing or commenting out the PostAuthenticateRequest event handler or by deleting the Global.asax file entirely.
Step 5: Programmatically Creating a New User
To create a new user account through the Membership framework use the Membership class's CreateUser method. This method has input parameters for the username, password, and other user-related fields. On invocation, it delegates the creation of the new user account to the configured Membership provider and then returns a MembershipUser object representing the just-created user account.
The CreateUser method has four overloads, each accepting a different number of input parameters:
These four overloads differ on the amount of information that is collected. The first overload, for example, requires just the username and password for the new user account, whereas the second one also requires the user's email address.
These overloads exist because the information needed to create a new user account depends on the Membership provider's configuration settings. In the Creating the Membership Schema in SQL Server tutorial we examined specifying Membership provider configuration settings in Web.config. Table 2 included a complete list of the configuration settings.
One such Membership provider configuration setting that impacts what CreateUser overloads may be used is the requiresQuestionAndAnswer setting. If requiresQuestionAndAnswer is set to true (the default), then when creating a new user account we must specify a security question and answer. This information is later used if the user needs to reset or change their password. Specifically, at that time they are shown the security question and they must enter the correct answer in order to reset or change their password. Consequently, if the requiresQuestionAndAnswer is set to true then calling either of the first two CreateUser overloads results in an exception because the security question and answer are missing. Since our application is currently configured to require a security question and answer, we will need to use one of the latter two overloads when creating user's programmatically.
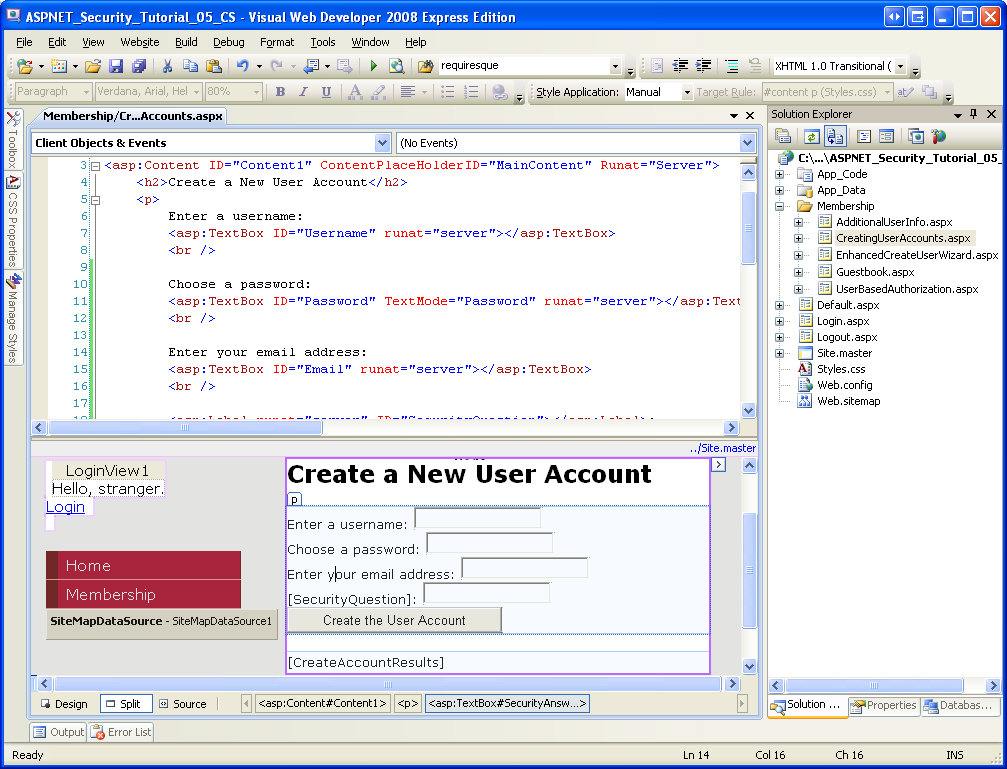
To illustrate using the CreateUser method, let's create a user interface where we prompt the user for their name, password, email, and an answer to a pre-defined security question. Open the CreatingUserAccounts.aspx page in the Membership folder and add the following Web controls to the Content control:
A TextBox named Username
A TextBox named Password, whose TextMode property is set to Password
A TextBox named Email
A Label named SecurityQuestion with its Text property cleared out
A TextBox named SecurityAnswer
A Button named CreateAccountButton whose Text property is set to "Create the User Account"
A Label control named CreateAccountResults with its Text property cleared out
At this point your screen should look similar to the screen shot shown in Figure 6.
The SecurityQuestion Label and SecurityAnswer TextBox are intended to display a pre-defined security question and collect the user's answer. Note that both the security question and answer are stored on a user-by-user basis, so it is possible to allow each user to define their own security question. However, for this example I have decided to use a universal security question, namely: "What is your favorite color?"
To implement this pre-defined security question, add a constant to the page's code-behind class named passwordQuestion, assigning it the security question. Then, in the Page_Load event handler, assign this constant to the SecurityQuestion Label's Text property:
const string passwordQuestion = "What is your favorite color";

protected void Page_Load(object sender, EventArgs e)
{
     if (!Page.IsPostBack)
          SecurityQuestion.Text = passwordQuestion;
}
Next, create an event handler for the CreateAccountButton's Click event and add the following code:
protected void CreateAccountButton_Click(object sender, EventArgs e)
{
     MembershipCreateStatus createStatus;
     MembershipUser newUser = Membership.CreateUser(Username.Text, Password.Text, Email.Text, passwordQuestion, SecurityAnswer.Text, true, out createStatus);
     switch (createStatus)
     {
          case MembershipCreateStatus.Success:
               CreateAccountResults.Text = "The user account was successfully created!";
               break;
          case MembershipCreateStatus.DuplicateUserName:
               CreateAccountResults.Text = "There already exists a user with this username.";
               break;

          case MembershipCreateStatus.DuplicateEmail:
               CreateAccountResults.Text = "There already exists a user with this email address.";
               break;
          case MembershipCreateStatus.InvalidEmail:
               CreateAccountResults.Text = "There email address you provided in invalid.";
               break;
          case MembershipCreateStatus.InvalidAnswer:
               CreateAccountResults.Text = "There security answer was invalid.";
               break;
          case MembershipCreateStatus.InvalidPassword:
               CreateAccountResults.Text = "The password you provided is invalid. It must be seven characters long and have at least one non-alphanumeric character.";

               break;
          default:
               CreateAccountResults.Text = "There was an unknown error; the user account was NOT created.";
               break;
     }
}
The Click event handler starts by defining a variable named createStatus of type MembershipCreateStatus. MembershipCreateStatus is an enumeration that indicates the status of the CreateUser operation. For example, if the user account is created successfully, the resulting MembershipCreateStatus instance will be set to a value of Success; on the other hand, if the operation fails because there already exists a user with the same username, it will be set to a value of DuplicateUserName. In the CreateUser overload we use, we need to pass a MembershipCreateStatus instance into the method as an out parameter. This parameter is set to the appropriate value within the CreateUser method, and we can examine its value after the method call to determine whether the user account was successfully created.
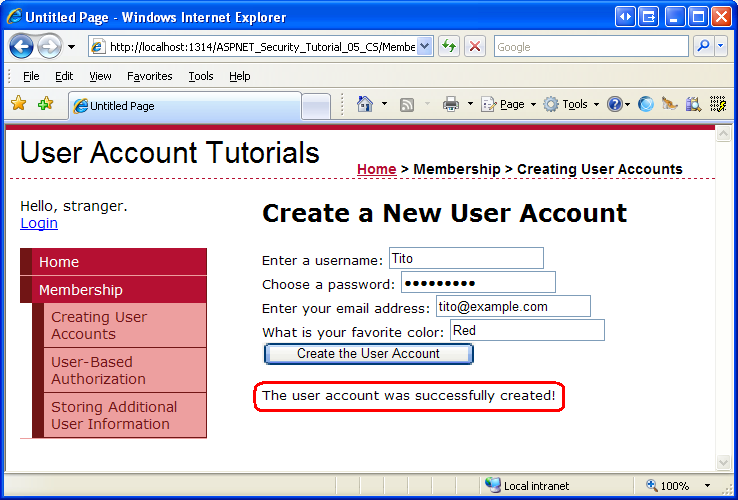
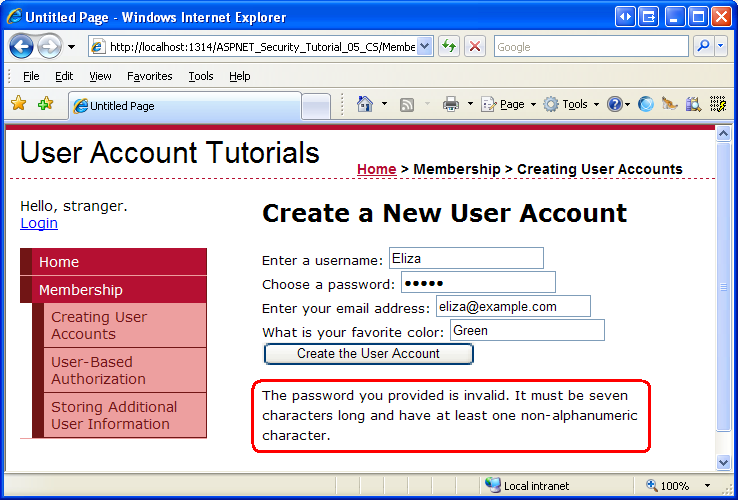
After calling CreateUser, passing in createStatus, a switch statement is used to output an appropriate message depending on the value assigned to createStatus. Figures 7 shows the output when a new user has successfully been created. Figures 8 and 9 show the output when the user account is not created. In Figure 8, the visitor entered a five-letter password, which does not meet the password strength requirements spelled out in the Membership provider's configuration settings. In Figure 9, the visitor is attempting to create a user account with an existing username (the one created in Figure 7).
You may be wondering how to determine success or failure when using one of the first two CreateUser method overloads, neither of which has a parameter of type MembershipCreateStatus. These first two overloads throw a MembershipCreateUserException exception in the face of a failure, which includes a StatusCode property of type MembershipCreateStatus.
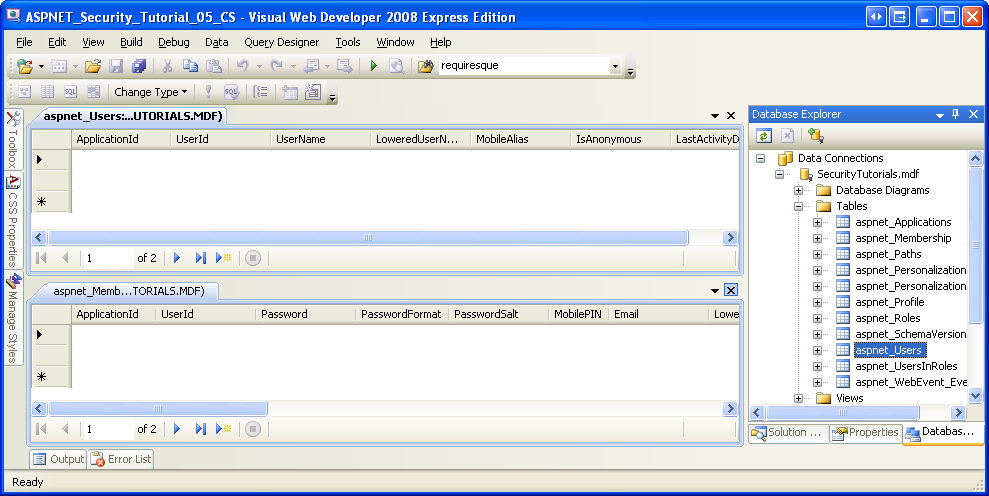
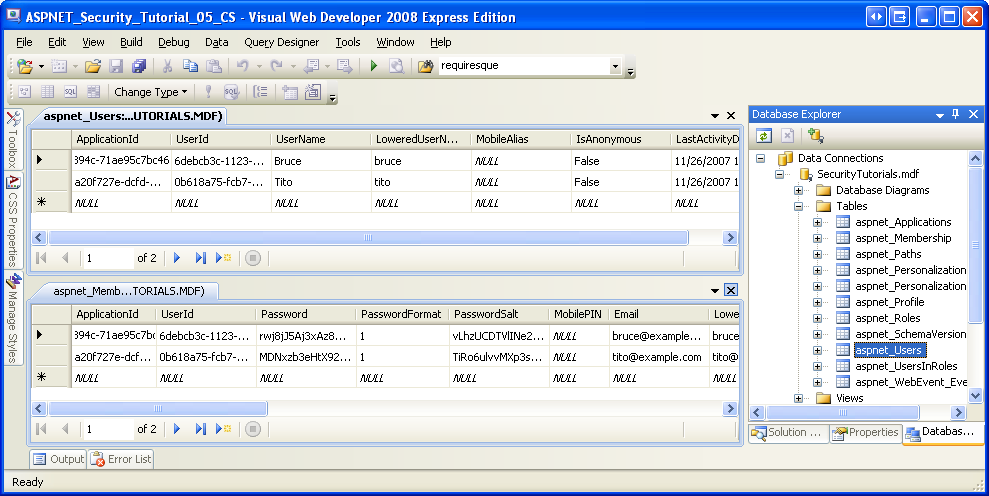
After creating a few user accounts, verify that the accounts have been created by listing the contents of the aspnet_Users and aspnet_Membership tables in the SecurityTutorials.mdf database. As Figure 10 shows, I have added two users via the CreatingUserAccounts.aspx page: Tito and Bruce.
While the Membership user store now includes Bruce and Tito's account information, we have yet to implement functionality that allows for Bruce or Tito to log on to the site. Currently, Login.aspx validates the user's credentials against a hard-coded set of username/password pairs – it does not validate the supplied credentials against the Membership framework. For now seeing the new user accounts in the aspnet_Users and aspnet_Membership tables will have to suffice. In the next tutorial, Validating User Credentials Against the Membership User Store, we will update the login page to validate against the Membership store.
Note
If you do not see any users in your SecurityTutorials.mdf database, it may be because your web application is using the default Membership provider, AspNetSqlMembershipProvider, which uses the ASPNETDB.mdf database as its user store. To determine if this is the problem, click the Refresh button in the Solution Explorer. If a database named ASPNETDB.mdf has been added to the App_Data folder, this is the problem. Return to Step 4 of the Creating the Membership Schema in SQL Server tutorial for instructions on how to properly configure the Membership provider.
In most create user account scenarios, the visitor is presented with some interface to enter their username, password, email, and other essential information, at which point a new account is created. In this step we looked at building such an interface by hand and then saw how to use the Membership.CreateUser method to programmatically add the new user account based on the user's inputs. Our code, however, just created the new user account. It did not perform any follow up actions, like logging in the user to the site under the just-created user account, or sending a confirmation email to the user. These additional steps would require additional code in the Button's Click event handler.
ASP.NET ships with the CreateUserWizard control, which is designed to handle the user account creation process, from rendering a user interface for creating new user accounts, to creating the account in the Membership framework and performing post-account creation tasks, such as sending a confirmation email and logging the just-created user into the site. Using the CreateUserWizard control is as simple as dragging the CreateUserWizard control from the Toolbox onto a page, and then setting a few properties. In most cases, you won't need to write a single line of code. We will explore this nifty control in detail in Step 6.
If new user accounts are only created through a typical Create Account web page, it is unlikely that you will ever need to write code that uses the CreateUser method, as the CreateUserWizard control will likely meet your needs. However, the CreateUser method is handy in scenarios where you need a highly customized Create Account user experience or when you need to programmatically create new user accounts through an alternative interface. For example, you might have a page that allows a user to upload an XML file that contains user information from some other application. The page might parses the contents of the uploaded XML file and create a new account for each user represented in the XML by calling the CreateUser method.
Step 6: Creating a New User with the CreateUserWizard Control
ASP.NET ships with a number of Login Web controls. These controls aid in many common user account- and login-related scenarios. The CreateUserWizard control is one such control that is designed to present a user interface for adding a new user account to the Membership framework.
Like many of the other Login-related Web controls, the CreateUserWizard can be used without writing a single line of code. It intuitively provides a user interface based on the Membership provider's configuration settings and internally calls the Membership class's CreateUser method after the user enters the necessary information and clicks the "Create User" button. The CreateUserWizard control is extremely customizable. There are a host of events that fire during various stages of the account creation process. We can create event handlers, as needed, to inject custom logic into the account creation workflow. Furthermore, the CreateUserWizard's appearance is very flexible. There are a number of properties that define the appearance of the default interface; if necessary, the control can be converted into a template or additional user registration "steps" may be added.
Let's start with a look at using the CreateUserWizard control's default interface and behavior. We'll then explore how to customize the appearance via the control's properties and events.
Examining the CreateUserWizard's Default Interface and Behavior
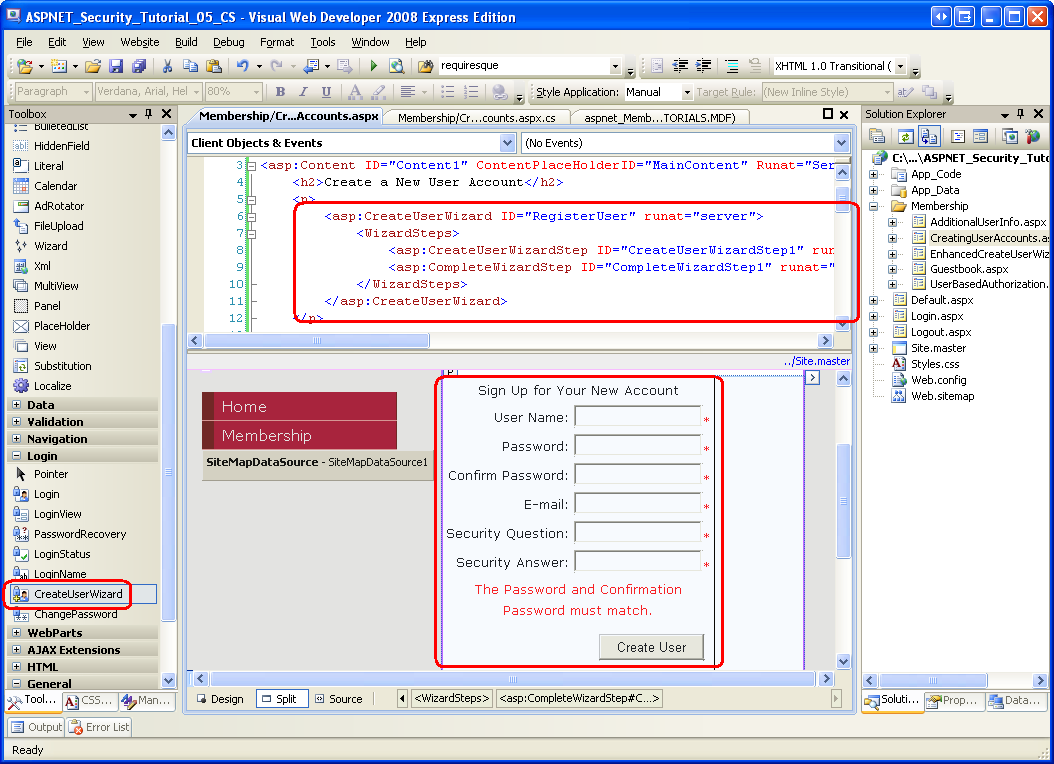
Return to the CreatingUserAccounts.aspx page in the Membership folder, switch to the Design or Split mode, and then add a CreateUserWizard control to the top of the page. The CreateUserWizard control is filed under the Toolbox's Login controls section. After adding the control, set its ID property to RegisterUser. As the screen shot in Figure 11 shows, the CreateUserWizard renders an interface with textboxes for the new user's username, password, email address, and security question and answer.
Let's take a moment to compare the default user interface generated by the CreateUserWizard control with the interface we created in Step 5. For starters, the CreateUserWizard control allows the visitor to specify both the security question and answer, whereas our manually-created interface used a pre-defined security question. The CreateUserWizard control's interface also includes validation controls, whereas we had yet to implement validation on our interface's form fields. And the CreateUserWizard control interface includes a "Confirm Password" textbox (along with a CompareValidator to ensure that the text entered the "Password" and "Compare Password" textboxes are equal).
What's interesting is that the CreateUserWizard control consults the Membership provider's configuration settings when rendering its user interface. For example, the security question and answer textboxes are only displayed if requiresQuestionAndAnswer is set to True. Likewise, CreateUserWizard automatically adds a RegularExpressionValidator control to ensure that the password strength requirements are met, and sets its ErrorMessage and ValidationExpression properties based on the minRequiredPasswordLength, minRequiredNonalphanumericCharacters, and passwordStrengthRegularExpression configuration settings.
The CreateUserWizard control, as its name implies, is derived from the Wizard control. Wizard controls are designed to provide an interface for completing multi-step tasks. A Wizard control may have an arbitrary number of WizardSteps, each of which is a template that defines the HTML and Web controls for that step. The Wizard control initially displays the first WizardStep, along with navigation controls that permit the user to proceed from one step to the next, or to return to previous steps.
As the declarative markup in Figure 11 shows, the CreateUserWizard control's default interface includes two WizardSteps:
CreateUserWizardStep – renders the interface to collect information for creating the new user account. This is the step shown in Figure 11.
CompleteWizardStep – renders a message indicating that the account has successfully been created.
The CreateUserWizard's appearance and behavior can be modified by converting either of these steps to templates, or by adding your own WizardSteps. We will look at adding a WizardStep to the registration interface in the Storing Additional User Information tutorial.
Let's see the CreateUserWizard control in action. Visit the CreatingUserAccounts.aspx page through a browser. Start by entering some invalid values into the CreateUserWizard's interface. Try entering a password that doesn't conform to the password strength requirements, or leaving the "User Name" textbox empty. The CreateUserWizard will display an appropriate error message. Figure 12 shows the output when attempting to create a user with an insufficiently strong password.
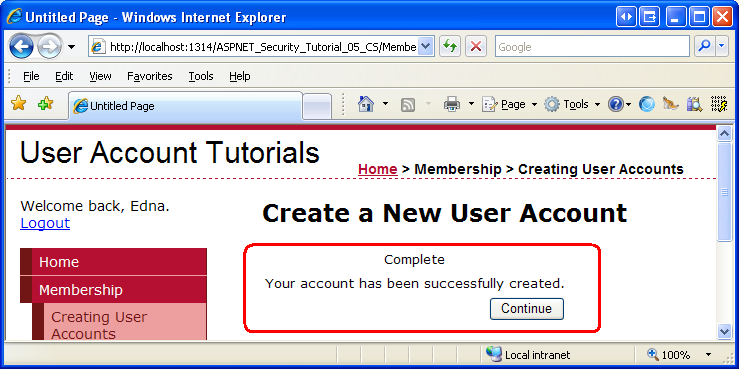
Next, enter appropriate values into the CreateUserWizard and click the "Create User" button. Assuming the required fields have been entered and the password's strength is sufficient, the CreateUserWizard will create a new user account through the Membership framework and then display the CompleteWizardStep's interface (see Figure 13). Behind the scenes, the CreateUserWizard calls the Membership.CreateUser method, just like we did in Step 5.
As Figure 13 shows, the CompleteWizardStep's interface includes a Continue button. However, at this point clicking it just performs a postback, leaving the visitor on the same page. In the "Customizing the CreateUserWizard's Appearance and Behavior Through Its Properties" section we will look at how you can have this button send the visitor to Default.aspx (or some other page).
After creating a new user account, return to Visual Studio and examine the aspnet_Users and aspnet_Membership tables like we did in Figure 10 to verify that the account was successfully created.
Customizing the CreateUserWizard's Behavior and Appearance Through Its Properties
The CreateUserWizard can be customized in a variety of ways, through properties, WizardSteps, and event handlers. In this section we will look at how to customize the control's appearance through its properties; the next section looks at extending the control's behavior through event handlers.
Virtually all of the text displayed in the CreateUserWizard control's default user interface can be customized through its plethora of properties. For example, the "User Name", "Password", "Confirm Password", "E-mail", "Security Question", and "Security Answer" labels displayed to the left of the textboxes can be customized by the UserNameLabelText, PasswordLabelText, ConfirmPasswordLabelText, EmailLabelText, QuestionLabelText, and AnswerLabelText properties, respectively. Likewise, there are properties for specifying the text for the "Create User" and "Continue" buttons in the CreateUserWizardStep and CompleteWizardStep, as well as if these buttons are rendered as Buttons, LinkButtons, or ImageButtons.
The colors, borders, fonts, and other visual elements are configurable through a host of style properties. The CreateUserWizard control itself has the common Web control style properties – BackColor, BorderStyle, CssClass, Font, and so on – and there are a number of style properties for defining the appearance for particular sections of the CreateUserWizard's interface. The TextBoxStyle property, for instance, defines the styles for the textboxes in the CreateUserWizardStep, while the TitleTextStyle property defines the style for the title ("Sign Up for Your New Account").
In addition to the appearance-related properties, there are a number of properties that affect the CreateUserWizard control's behavior. The DisplayCancelButton property, if set to True, displays a Cancel button next to the "Create User" button (the default value is False). If you display the Cancel button, be sure to also set the CancelDestinationPageUrl property, which specifies the page the user is sent to after clicking Cancel. As noted in the previous section, the Continue button in the CompleteWizardStep's interface causes a postback, but leaves the visitor on the same page. To send the visitor to some other page after clicking the Continue button, simply specify the URL in the ContinueDestinationPageUrl property.
Let's update the RegisterUser CreateUserWizard control to show a Cancel button and to send the visitor to Default.aspx when the Cancel or Continue buttons are clicked. To accomplish this, set the DisplayCancelButton property to True and both the CancelDestinationPageUrl and ContinueDestinationPageUrl properties to "~/Default.aspx". Figure 14 shows the updated CreateUserWizard when viewed through a browser.
When a visitor enters a username, password, email address, and security question and answer and clicks "Create User," a new user account is created and the visitor is logged in as that newly created user. Assuming that the person visiting the page is creating a new account for themselves, this is likely the desired behavior. However, you may want to allow Administrators to add new user accounts. In doing so, the user account would be created, but the Administrator would remain logged in as an Administrator (and not as the newly created account). This behavior can be modified through the Boolean LoginCreatedUser property.
User accounts in the Membership framework contain an approved flag; users who are not approved are unable to log into the site. By default, a newly created account is marked as approved, allowing the user to log into the site immediately. It is possible, however, to have new user accounts marked as unapproved. Perhaps you want an Administrator to manually approve new users before they can log in; or maybe you want to verify that the email address entered at signup is valid before permitting a user to log on. Whatever the case may be, you can have the newly created user account marked as unapproved by setting the CreateUserWizard control's DisableCreatedUser property to True (the default is False).
Other behavior-related properties of note include AutoGeneratePassword and MailDefinition. If the AutoGeneratePassword property is set to True, the CreateUserWizardStep does not display the "Password" and "Confirm Password" textboxes; instead, the newly-created user's password is automatically generated using the Membership class's GeneratePassword method. The GeneratePassword method constructs a password of a specified length and with a sufficient number of non-alphanumeric characters to satisfy the configured password strength requirements.
The MailDefinition property is useful if you want to send an email to the email address specified during the account creation process. The MailDefinition property includes a series of subproperties for defining information about the constructed email message. These subproperties include options like Subject, Priority, IsBodyHtml, From, CC, and BodyFileName. The BodyFileName property points to a text or HTML file that contains the body for the email message. The body supports two pre-defined placeholders: <%UserName%> and <%Password%>. These placeholders, if present in the BodyFileName file, will be replaced with the just-created user's name and password.
Note
The CreateUserWizard control's MailDefinition property just specifies details about the email message that is sent when a new account is created. It does not include any details on how the email message is actually sent (that is, whether an SMTP server or mail drop directory is used, any authentication information, and so on). These low-level details need to be defined in the <system.net> section in Web.config. For more information on these configuration settings and on sending email from ASP.NET 2.0 in general, refer to the FAQs at SystemNetMail.com and my article, Sending Email in ASP.NET 2.0.
Extending the CreateUserWizard's Behavior Using Event Handlers
The CreateUserWizard control raises a number of events during its workflow. For example, after a visitor enters their username, password, and other pertinent information and clicks the "Create User" button, the CreateUserWizard control raises its CreatingUser event. If there is a problem during the create process, the CreateUserError event is fired; however, if the user is successfully created, then the CreatedUser event is raised. There are additional CreateUserWizard control events that get raised, but these are the three most germane ones.
In certain scenarios we may want to tap into the CreateUserWizard workflow, which we can do by creating an event handler for the appropriate event. To illustrate this, let's enhance the RegisterUser CreateUserWizard control to include some custom validation on the username and password. In particular, let's enhance our CreateUserWizard so that usernames cannot contain leading or trailing spaces and the username cannot appear anywhere in the password. In short, we want to prevent someone from creating a username like "Scott ", or having a username/password combination like "Scott" and "Scott.1234".
To accomplish this we will create an event handler for the CreatingUser event to perform our extra validation checks. If the supplied data is not valid we need to cancel the creation process. We also need to add a Label Web control to the page to display a message explaining that the username or password is invalid. Start by adding a Label control beneath the CreateUserWizard control, setting its ID property to InvalidUserNameOrPasswordMessage and its ForeColor property to Red. Clear out its Text property and set its EnableViewState and Visible properties to False.
Next, create an event handler for the CreateUserWizard control's CreatingUser event. To create an event handler, select the control in the Designer and then go to the Properties window. From there, click on the lightning bolt icon and then double-click the appropriate event to create the event handler.
Add the following code to the CreatingUser event handler:
protected void RegisterUser_CreatingUser(object sender, LoginCancelEventArgs e)
{
     string trimmedUserName = RegisterUser.UserName.Trim();
     if (RegisterUser.UserName.Length != trimmedUserName.Length)
     {
          // Show the error message
          InvalidUserNameOrPasswordMessage.Text = "The username cannot contain leading or trailing spaces.";
          InvalidUserNameOrPasswordMessage.Visible = true;

          // Cancel the create user workflow
          e.Cancel = true;
     }
     else
     {
          // Username is valid, make sure that the password does not contain the username

          if (RegisterUser.Password.IndexOf(RegisterUser.UserName, StringComparison.OrdinalIgnoreCase) >= 0)
          {
               // Show the error message
               InvalidUserNameOrPasswordMessage.Text = "The username may not appear anywhere in the password.";
               InvalidUserNameOrPasswordMessage.Visible = true;
               // Cancel the create user workflow
               e.Cancel = true;
          }
     }
}
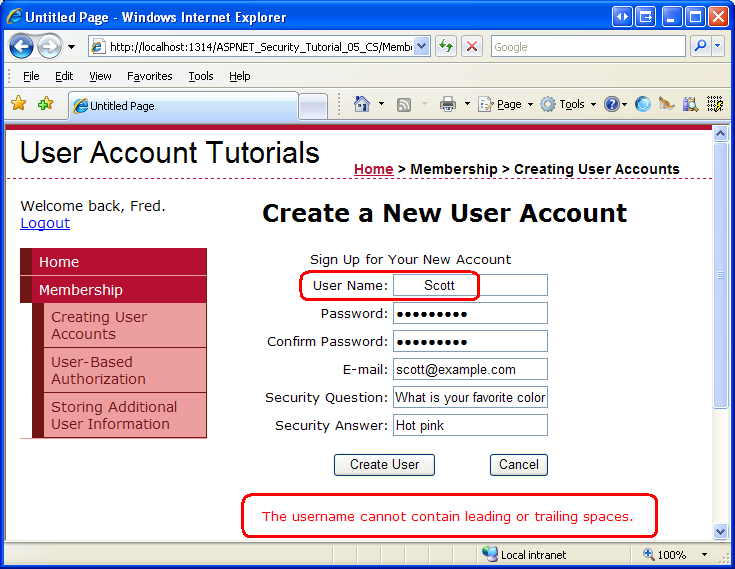
Note that the username and password entered into the CreateUserWizard control are available through its UserName and Password properties, respectively. We use these properties in the above event handler to determine whether the supplied username contains leading or trailing spaces and whether the username is found within the password. If either of these conditions is met, an error message is displayed in the InvalidUserNameOrPasswordMessage Label and the event handler's e.Cancel property is set to true. If e.Cancel is set to true, the CreateUserWizard short-circuits its workflow, effectively cancelling the user account creation process.
Figure 15 shows a screen shot of CreatingUserAccounts.aspx when the user enters a username with leading spaces.
The Membership class's CreateUser method creates a new user account in the Membership framework. It does so by delegating the call to the configured Membership provider. In the case of the SqlMembershipProvider, the CreateUser method adds a record to the aspnet_Users and aspnet_Membership database tables.
While new user accounts can be created programmatically (as we saw in Step 5), a faster and easier approach is to use the CreateUserWizard control. This control renders a multi-step user interface for collecting user information and creating a new user in the Membership framework. Underneath the covers, this control uses the same Membership.CreateUser method as examined in Step 5, but the control creates the user interface, validation controls, and responds to user account creation errors without having to write a lick of code.
At this point we have the functionality in place to create new user accounts. However, the login page still is validating against those hard-coded credentials we specified back in the second tutorial. In the next tutorial we will update Login.aspx to validate the user's supplied credentials against the Membership framework.
Happy Programming!
Further Reading
For more information on the topics discussed in this tutorial, refer to the following resources:
This tutorial series was reviewed by many helpful reviewers. Lead reviewer for this tutorial was Teresa Murphy. Interested in reviewing my upcoming MSDN articles? If so, drop me a line at mitchell@4GuysFromRolla.com.
Protect your Active Directory environment by securing user accounts to least privilege and placing them in the Protected Users group. Learn how to limit authentication scope and remediate potentially insecure accounts.


