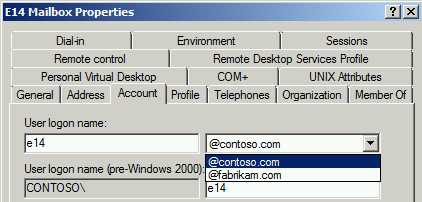
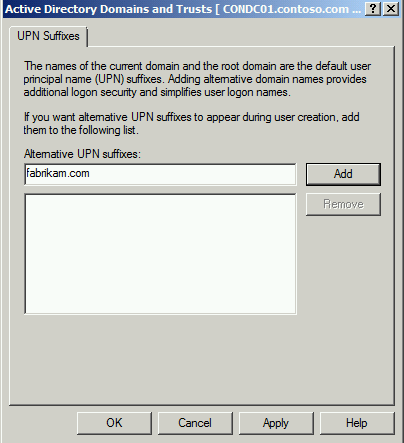
Most Exchange ActiveSync devices request the email address and password to set up the device. This combination only works when the user principal name value matches the email address for the user. Verify these two attributes have the same value. To do this, follow these steps:
Exchange ActiveSync includes the use of ActiveSync mailbox policies. The available device settings are dependent on each device and not all settings work with all devices. To determine if the ActiveSync mailbox policy is an issue, create a new ActiveSync mailbox policy and assign it to the user. To do this, follow these steps:
Run the following cmdlet to assign this new policy to the mailbox:
Set-CASMailbox user -ActiveSyncMailboxPolicy "Test ActiveSync Policy"
Did creating a new ActiveSync mailbox policy resolve the issue?
If yes, congratulations, your ActiveSync issue is resolved.
If no, sorry, we cannot resolve the issue by using this guide. For more help resolving this issue contact Microsoft Support. Please have all of the data collected from this troubleshooting available when you contact support.
Determine impact
You must identify the impact in your environment before you begin to troubleshoot this issue.
How many users are unable to connect to Exchange ActiveSync?
You need to enable ActiveSync mailbox logging on the Client Access Server and the mailbox to collect more detailed logging. Additional information on mailbox logging can be found here. To do this, follow these steps:
Note
This change should be made on Exchange 2013 mailbox servers.
Open Windows Explorer and browse to the Sync folder (C:\Program Files\Microsoft\Exchange Server\V14\ClientAccess\Sync).
Make a copy of the web.config file.
Open the web.config file in Notepad and modify the following sections with the values below:
Run the following cmdlet to enable the mailbox logging for a user:
Set-CASMailbox user -ActiveSyncDebugLogging:$True
Capture fiddler trace
ActiveSync device requests do not always reach the destination as desired. To ensure the device request and response is being sent and received as expected, route the device through an HTTP proxy and review the data. To do this, follow these steps:
Extract EASInspectorFiddler.dll into the c:\Program Files\Fiddler2\Inspectors folder.
Launch the Fiddler application.
Select the Tools menu and select Fiddler Options.
Go to the HTTPS tab and select Decrypt HTTPS traffic, select Yes to all prompts.
Go to the Connections tab and select Allow remote computers to connect, select OK to any prompt.
Select OK and close the Fiddler application.
Configure the ActiveSync device to use this workstation as a proxy server(This is typically done under the WiFi settings for the device).
Launch the Fiddler application.
Attempt to send one or more messages from the ActiveSync client.
Select the File menu and select Capture Traffic to stop the trace.
Analyze ActiveSync mailbox Log
We now have the data collected and we are ready to begin troubleshooting. The first step we will take is to look at the mailbox log and check if the item was captured. To do this, follow these steps:
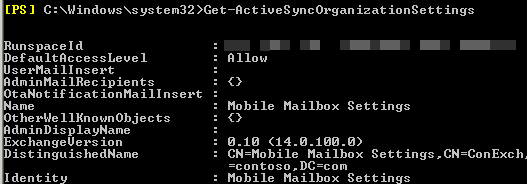
Exchange ActiveSync organization settings (if status code is 120 or 129)
Note
This feature is not available in Exchange 2007. If your organization is running Exchange 2007, click "I'm running Exchange 2007" at the end of the page. The Exchange ActiveSync organization settings allow administrators the ability to set the default access level for ActiveSync devices. These default settings include Block, Quarantine, and Allow. Check the current organization settings to determine the current default access level in the environment. To do this, follow these steps:
The Exchange ActiveSync device access rules allow an administrator to create access groups based on device characteristics. Check the current configuration for any device access rules that would allow the device to connect. To do this, follow these steps:
Open the Exchange Management Shell.
Run the following cmdlet to find any device access rules with the access level set to Allow:
Get-ActiveSyncDeviceAccessRule | Where { $_.AccessLevel -eq "Allow" }
Are there any device access rules that match the user's device with the access level set to Block or Quarantine?
An administrator can configure a list of devices that are not allowed to synchronize with the mailbox. Check the user configuration to determine if the device has been blocked from synchronizing. To do this, follow these steps:
You attempted to send a message from the device so you should see the request in the Fiddler trace. You can use the Fiddler trace to see the request sent by the client and the response from the server. To do this, follow these steps:
Open the Fiddler trace.
Go to the Edit menu and select Find Sessions.
Enter ActiveSync and select Find Sessions.
Review the Result column for any HTTP response values that do not equal 200.
Select requests where the Body column has a value.
Select the TextView tab to view the response for additional details.
Were there any HTTP errors found in the Fiddler trace?
You did not find any HTTP errors, so you should find a status code for the ActiveSync response. You can use the Fiddler trace locate these responses. To do this, follow these steps:
Open the Fiddler trace.
Go to the Edit menu and select Find Sessions.
Enter ActiveSync and select Find Sessions.
Review the Body column and look for small values.
View the EAS XML tab for the request from the device and response received
What status code do you see in the response window?
The ActiveSync client may have encountered errors while attempting to communicate with the Exchange server. Now we need to determine where these errors originated. We will start by checking the IIS logs on the Client Access Server. Before these logs can be analyzed, the workstation where the analysis will be completed should have Log Parser Studio installed. To do this, follow these steps:
Once LogParser is installed and Log Parser Studio has been extracted, copy the IIS logs from the Exchange server(s) to the local workstation for analysis.
Log Parser Studio Query – SendMail
To determine if any of these ActiveSync requests are resulting in an error, query the IIS logs for the device traffic. To do this, follow these steps:
Launch Log Parser Studio by double-clicking LPS.exe.
Select the Log folder icon to select files to process.
Select the Add Files or Add Folder button, then locate and select the file(s) copied earlier.
Verify the file/folder is selected and select OK.
Double-click ActiveSync: SendMail from the Library.
Select the exclamation point icon to execute the query.
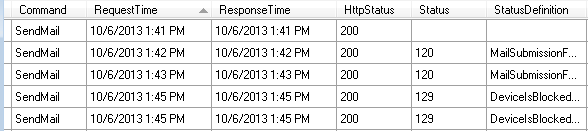
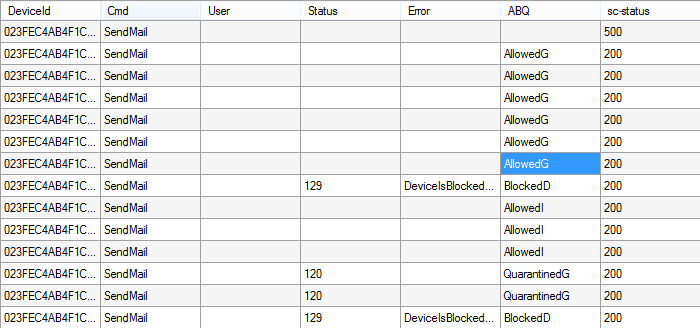
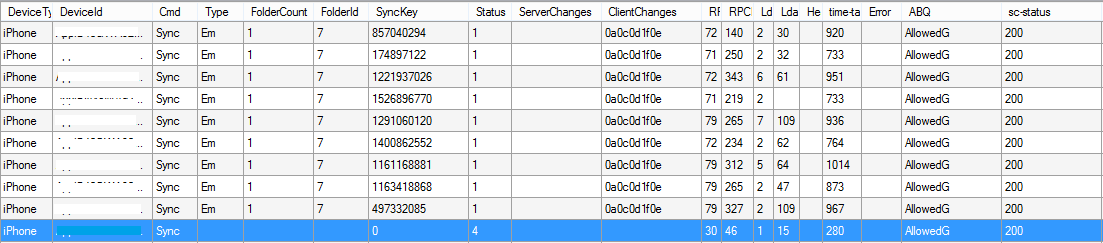
Analyze the results for this query by reviewing the Status, Error, ABQ, and sc-status columns.
Query results analysis
The following example shows the results from the previous query:
You need to review the results from your query for any issues. To do this, follow these steps:
Review the Status column and locate any request where there is a value. Use the Exchange ActiveSync protocol document to investigate these values and if any corrective action can be taken.
Review the Error column and locate any request where there is a value in this column. Many of these error messages are self-explanatory and corrective action can be taken accordingly.
Review the sc-status column and locate any request where there is a value other than 200. This is the HTTP status response from IIS and additional information can be found in The HTTP status code in IIS 7 and later versions.
Were you able to resolve the issue after analyzing the IIS logs?
If yes, congratulations, your ActiveSync issue is resolved.
If no, sorry, we cannot resolve the issue by using this guide. For more help resolving this issue contact Microsoft Support. Please have all of the data collected from this troubleshooting available when you contact support.
Exchange Remote Connectivity Analyzer
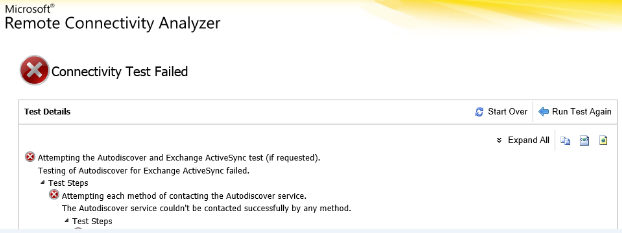
To determine if the user can successfully connect to Exchange, run the Exchange Remote Connectivity Analyzer with the user account. To do this, follow these steps:
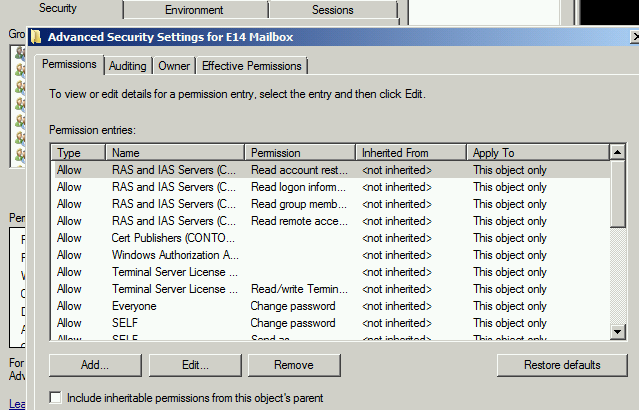
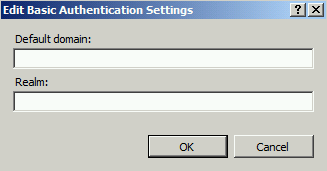
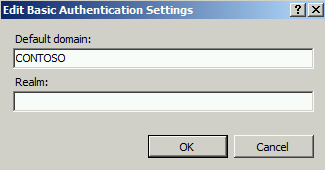
Some devices send only the username value for the credentials, which will cause an authentication failure. Verify that the default domain value is configured on the ActiveSync virtual directory. To do this, follow these steps:
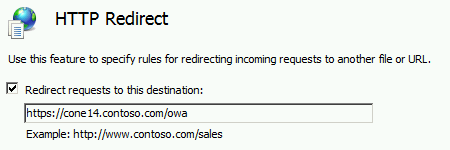
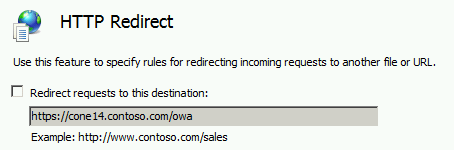
When an HTTP redirect is configured in IIS 7, the redirect setting is inherited by all virtual directories underneath that web site. Check the ActiveSync virtual directory for an HTTP redirect. To do this, follow these steps:
Your SendMail command received an unexpected status code response from Exchange. To understand what error was encountered, you must review the Exchange ActiveSync Command Reference Protocol document to troubleshoot the issue.
Were you able to resolve the issue by reviewing the status code in the response?
If yes, congratulations, your ActiveSync issue is resolved.
If no, sorry, we cannot resolve the issue by using this guide. For more help resolving this issue contact Microsoft Support. Please have all of the data collected from this troubleshooting available when you contact support.
Exchange ActiveSync organization settings
Note
This feature is not available in Exchange 2007. If your organization is running Exchange 2007, select I'm running Exchange 2007 at the end of this section.
The Exchange ActiveSync organization settings allow administrators the ability to set the default access level for ActiveSync devices. These default settings include Block, Quarantine, and Allow. Check the current organization settings to determine the current default access level in the environment. To do this, follow these steps:
Install Log Parser Studio; Log Parser Studio Query - Count Syncs with SyncKey of Zero Per User
Install Log Parser Studio
The ActiveSync client may have encountered errors while attempting to communicate with the Exchange server. Now we need to determine where these errors originated. We will start by checking the IIS logs on the Client Access Server. Before these logs can be analyzed, the workstation where the analysis will be completed should have Log Parser Studio installed. To do this, follow these steps:
Once LogParser is installed and Log Parser Studio has been extracted, copy the IIS logs from the Exchange server(s) to the local workstation for analysis.
Log Parser Studio Query – Count Syncs with SyncKey of Zero Per User
To determine if devices are resynchronizing with Exchange, run the Log Parser query to find the users. To do this, follow these steps:
Launch Log Parser Studio by double-clicking LPS.exe.
Select the Log folder icon to select files to process.
Select the Add Files or Add Folder button, then locate and select the file(s) copied earlier.
Verify the file/folder is selected and select OK.
Double-click ActiveSync: Count Syncs with SyncKey of Zero Per User from the Library.
Select the exclamation point icon to execute the query.
Analyze the results for this query.
Are there any devices with multiple requests using the SyncKey value of 0?
Check for file level anti-virus (delays on device/CAS performance)
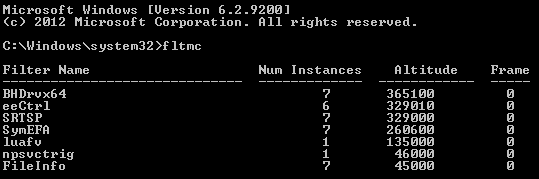
In many cases file-level anti-virus impacts ActiveSync traffic by delaying the processing of the request or response. Stopping these services does not disable the kernel mode filter driver used by these services. To disable file level anti-virus follow the steps from How to temporarily deactivate the kernel mode filter driver in Windows. Verify the kernel mode filter driver is no longer active after the Client Access Server has been restarted. To do this, follow these steps:
Open a command prompt.
Run the following command:
fltmc
Compare the results to the example filter drivers from this article or search the web for the Filter Name.
Did disabling the anti-virus kernel mode filter driver resolve the issue?
If yes, congratulations, your ActiveSync issue is resolved.
The reported issue is a message that appears in the mailbox within Outlook but not on the ActiveSync client or vice versa. Before we begin troubleshooting this issue, we need to know if the issue can be reproduced on the ActiveSync client. If we can reproduce the issue, then we can capture data during the process to get a better understanding of the issue. Otherwise we will need to examine existing logs to attempt to determine what happened.
Can you reproduce the Calendar issue on the device?
Launch Log Parser Studio by double-clicking LPS.exe.
Select the Log folder icon to select files to process.
Select the Add Files or Add Folder button, then locate and select the file(s) copied earlier.
Verify the file/folder is selected and select OK.
Double-click ActiveSync: Device query from the Library.
Modify the DeviceId value in the WHERE clause at the end of the query with the value from step 2.
Select the exclamation point icon to execute the query.
Analyze the results for this query by reviewing the Error and sc-status columns.
Query results analysis
Now we want to review the results from your query for any issues. To do this, follow these steps:
Review the Status column and locate any request where there is a value. Use the Exchange ActiveSync protocol document to investigate these values and if any corrective action can be taken.
Review the Error column and locate any request where there is a value in this column. Many of these error messages are self-explanatory and corrective action can be taken accordingly.
Review the sc-status column and locate any request where there is a value other than 200. This is the HTTP status response from IIS and additional information can be found in The HTTP status code in IIS 7 and later versions.
Unfortunately the review of the IIS logs does not show us any identifier for the item in question. Your best effort will be locating a request within the IIS logs around the time the last item change occurred. You can also use the article Understanding Exchange ActiveSync Reporting Services to help you better understand some of the elements found with the IIS log entry.
Resync the folder
The previous steps taken help to identify why the issue occurred with the item. The ActiveSync client may still not have the item in the correct state. To resolve this issue, remove the folder from the list of folders to synchronize, wait approximately five minutes, and then add the folder to the list of folders to synchronize.
Is the item in the correct state on the ActiveSync client?
If yes, congratulations, your ActiveSync issue is resolved.
If no, sorry, we cannot resolve the issue by using this guide. For more help resolving this issue contact Microsoft Support. Please have all of the data collected from this troubleshooting available when you contact support.
Enable ActiveSync mailbox logging; Capture fiddler trace; Locate item using MfcMapi; Search for item in mailbox log
Enable ActiveSync mailbox logging
The first troubleshooting step is enabling mailbox logging on the Client Access Server and the mailbox. Additional information on mailbox logging can be found Exchange ActiveSync Mailbox Logging. To do this, follow these steps:
Note
This change should be made on Exchange 2013 mailbox servers.
Open Windows Explorer and browse to the Sync folder (C:\Program Files\Microsoft\Exchange Server\V14\ClientAccess\Sync).
Make a copy of the web.config file.
Open the web.config file in Notepad and modify the following sections with the values below:
Run the following cmdlet to enable the mailbox logging for a user:
Set-CASMailbox user -ActiveSyncDebugLogging:$True
Capture fiddler trace
ActiveSync device requests do not always reach the destination as desired. To ensure the device request and response is being sent and received as expected, route the device through an HTTP proxy and review the data. To do this, follow these steps:
Select the Outlook profile for the mailbox and select OK.
Double-click the mailbox to open.
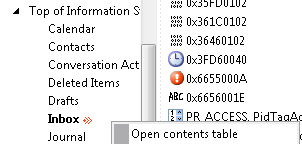
Expand the Root Container, expand Top of Information Store, then right-click on the Inbox (or other folder where the item is located) and select Open contents table.
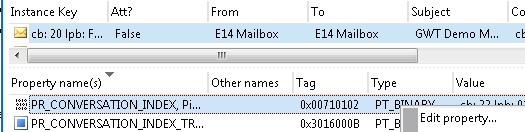
Select the item within the table, right-click on the tag 0x00710102 and select Edit property.
Copy the Binary value.
Search for item in mailbox log
We now have the data collected and we are ready to begin troubleshooting. The first step we will take is to look at the mailbox log and check if the item was captured.
Launch the utility by opening MailboxLogParser.exe.
Select Import Mailbox Logs to Grid to open the mailbox log.
Search for item in mailbox log
Remove the first byte (or two characters) from the binary value copied earlier. Then use the next 5 bytes (or 10 characters) for your search value.
Example: 01CEC1E829ED44997723AC344564BBEEF22D3A1A3373
Enter the value from Step 1 in Search raw log data for strings and select Search
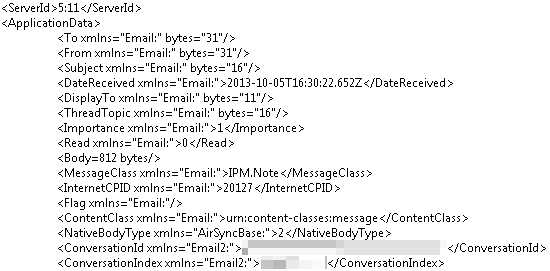
Take the next 16 bytes (or 32 characters) from the binary value and compare the value with the ConversationId in the search results.
Example: 01CEC1E829ED44997723AC344564BBEEF22D3A1A3373
Make note of the ServerId value for the item. The value for the example above is 5:11.
Were you able to locate the item in the mailbox log using the ConversationId?
Analyze mailbox log for item; Check the final status of the item
Analyze mailbox log for item
Now that we know we have the item in our mailbox log, we need to track the actions taken against the appointment. To do this, follow these steps:
Search for the ServerId value found earlier.
Scroll up the log and look for either RequestBody or ResponseBody. If the item appears in the response body, then the item was updated from the server. Otherwise the item appears in the request body, which means the item was updated from the client.
Make note of the action (Add, Change, or Delete) and whether the server or client sent the action.
Repeat steps 2-4 until you cannot find any further entries.
We verified that one or more actions were taken against the item within the mailbox log. The end result of the item is dependent on the final action. The following describes the expected status of the item based on that action:
Add - The item should be in the folder on the ActiveSync client.
Change - The item should be updated in the folder on the ActiveSync client.
Delete - The item should be removed from the folder on the ActiveSync client.
Does the result of the final action meet the expected state of the item?
Fiddler trace analysis for item; Check the final status of the item
Fiddler trace analysis for item
The activity on the Exchange server indicates that the device should have the correct status for this appointment. We can use the Fiddler trace to verify that the response was received by the client. To do this, follow these steps:
Open the Fiddler trace.
Go to the Edit menu and select Find Sessions.
Enter the namespace for ActiveSync (Example: mail.contoso.com) and select Find Sessions.
Select requests where the Body column has a value.
Select the EAS XML tab to view the request and response.
Locate all requests and responses for the ServerId found earlier.
Check the final status of the item
We verified that one or more actions were taken against the item within the Fiddler trace. The end result of the item is dependent on the final action. The following describes the expected status of the item based on that action:
Add - The item should be in the folder on the ActiveSync client.
Change - The item should be updated in the folder on the ActiveSync client.
Delete - The item should be removed from the folder on the ActiveSync client.
Does the result of the final action meet the expected state of the item?
If yes, sorry, we cannot resolve the issue by using this guide. Based on the results of these troubleshooting steps, it is recommended you contact the device vendor for further support. You can also contact Microsoft Support for more help resolving this issue.
Fiddler trace analysis for errors (if the result doesn't meet the expected state)
We expect the device to send one or more requests to obtain the latest updates for the folder. We can use the Fiddler trace to verify that the request was sent by the client and a response was received by the server. To do this, follow these steps:
Open the Fiddler trace.
Go to the Edit menu and select Find Sessions.
Enter the namespace for ActiveSync (Example: mail.contoso.com) and select Find Sessions.
Review the Result column for any HTTP response values that do not equal 200.
Select requests where the Body column has a value.
Select the TextView tab to view the response for additional details.
If no, sorry, we cannot resolve the issue by using this guide. For more help resolving this issue contact Microsoft Support. Please have all of the data collected from this troubleshooting available when you contact support.
Install Log Parser Studio; Log Parser Studio Query - Device Query; Query results analysis; Resync the folder
Once LogParser is installed and Log Parser Studio has been extracted, copy the IIS logs from the Exchange server(s) to the local workstation for analysis.
Log Parser Studio Query - Device Query
To determine if any of these ActiveSync requests are resulting in an error, query the IIS logs for the device traffic. To do this, follow these steps:
Launch Log Parser Studio by double-clicking LPS.exe.
Select the Log folder icon to select files to process.
Select the Add Files or Add Folder button, then locate and select the file(s) copied earlier.
Verify the file/folder is selected and select OK.
Double-click ActiveSync: Device query from the Library.
Modify the DeviceId value in the WHERE clause at the end of the query with the value from the previous step.
Select the exclamation point icon to execute the query.
Analyze the results for this query by reviewing the Error and sc-status columns.
Query results analysis
Now we want to review the results of the previous query for any errors. To do this, follow these steps:
Review the Status column and locate any request where there is a value. Use the Exchange ActiveSync protocol document to investigate these values and if any corrective action can be taken. (You can ignore Ping commands from this review.)
Review the Error column and locate any request where there is a value in this column. Many of these error messages are self-explanatory and corrective action can be taken accordingly.
Review the sc-status column and locate any request where there is a value other than 200. This is the HTTP status response from IIS and additional information can be found in The HTTP status code in IIS 7 and later versions.
Unfortunately the review of the IIS logs does not show us any identifier for the item in question. Your best effort will be locating a request within the IIS logs around the time the last item change occurred.
The previous steps taken help to identify why the issue occurred with the item. The ActiveSync client may still not have the item in the correct state. To resolve this issue, remove the folder from the list of folders to synchronize, wait approximately five minutes, and then add the folder to the list of folders to synchronize.
Is the item in the correct state on the ActiveSync client?
If yes, congratulations, your ActiveSync issue is resolved.
If no, sorry, we cannot resolve the issue by using this guide. For more help resolving this issue contact Microsoft Support. Please have all of the data collected from this troubleshooting available when you contact support.
Mailbox log analysis for errors (if final action doesn't meet the expected state)
The ActiveSync traffic for this item does not result in the item being in the correct state on the device. Now we need to review the mailbox log further for issues with ActiveSync requests for the folder. To do this, follow these steps:
Review the search results from the previous step.
Check the Status code value in the response and if the value does not equal 1, review the ActiveSync protocol document for more information on the status code.
Also check the log entry for any exception messages.
Repeat steps 2-4 for each log entry for the Calendar.
Install Log Parser Studio; Locate DeviceId for User; Log Parser Studio Query - Device query; Query results analysis
Install Log Parser Studio
The ActiveSync client may have encountered errors while attempting to communicate with the Exchange server. Now we need to determine where these errors originated. We will start by checking the IIS logs on the Client Access Server. Before these logs can be analyzed, the workstation where the analysis will be completed should have Log Parser Studio installed. To do this, follow these steps:
Once LogParser is installed and Log Parser Studio has been extracted, copy the IIS logs from the Exchange server(s) to the local workstation for analysis.
Locate DeviceId for user
We need to obtain the DeviceId for the ActiveSync client experiencing the issue. To do this, follow these steps:
If None, sorry, we cannot resolve the issue by using this guide. For more help resolving this issue contact Microsoft Support. Please have all of the data collected from this troubleshooting available when you contact support.
Check ActiveSync mailbox policy for error AttachmentTooBig
To determine if there is an ActiveSync mailbox policy setting causing the AttachmentTooBig error, check the ActiveSync mailbox policy assigned to this mailbox. To do this, follow these steps:
To determine if maximum message size restrictions may be causing the AttachmentTooBig error, check the transport settings for the Exchange organization. To do this, follow these steps:
If no, sorry, we cannot resolve the issue by using this guide. For more help resolving this issue contact Microsoft Support. Please have all of the data collected from this troubleshooting available when you contact support.
Modify Exchange ActiveSync settings
To resolve this issue, increase the maximum amount of data transfer for the ActiveSync virtual directory. To do this, follow these steps:
Important
The following changes may result in increased data charges on mobile devices.
Open Windows Explorer.
Browse to the Exchange Install Path (%ExchangeInstallPath%) then browse to the ClientAccess and Sync directories.
Make a copy of the web.config file.
Open the web.config file in Notepad.
Locate the MaxDocumentDataSIze and modify the value as needed.
Note
This value is in bytes.
Locate the MaxRequestLength and modify the value as needed.
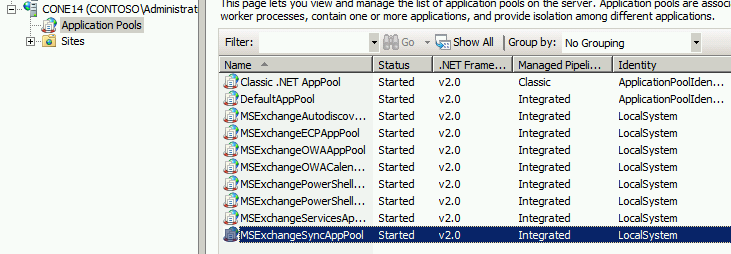
Right-click on the MSExchangeSyncAppPool and select Stop.
Right-click on the MSExchangeSyncAppPool and select Start.
Did modifying the ActiveSync setting resolve the issue?
If yes, congratulations, your ActiveSync issue is resolved.
If no, sorry, we cannot resolve the issue by using this guide. For more help resolving this issue contact Microsoft Support. Please have all of the data collected from this troubleshooting available when you contact support.
To determine the ActiveSync response that is causing the failure, mailbox logging must be enabled. Additional information on mailbox logging can be found Exchange ActiveSync Mailbox Logging. To do this, follow these steps:
Note
This change should be made on Exchange 2013 mailbox servers.
Open Windows Explorer and browse to the Sync folder (C:\Program Files\Microsoft\Exchange Server\V14\ClientAccess\Sync).
Make a copy of the web.config file.
Open the web.config file in Notepad and modify the following sections with the values below:
Run the following cmdlet to retrieve the mailbox log for a user:
Get-ActiveSyncDeviceStatistics -Mailbox user -GetMailboxLog:$True -NotificationEmailAddresses admin@contoso.com
Note
This will send the ActiveSync mailbox log to the specified email address for analysis. Additional information on mailbox logging can be found in Exchange ActiveSync Mailbox Logging.
Launch the utility by opening MailboxLogParser.exe.
Select Import Mailbox Logs to Grid to open the mailbox log.
Enter ObjectNotFound under Search raw log data for strings and select Search.
Review the search results by finding the error in the log entry. Make note of the attachment number in the FileReference. This is the last number in the value: 5%3a12%3a0. (The full value is 5:12:0, which is attachment 0 for ServerId 5:12.)
Select the Outlook profile for the mailbox and select OK.
Double-click the mailbox to open.
Expand the Root Container, expand Top of Information Store, then right-click on the Inbox (or other folder where the item is located) and select Open contents table.
Right-click on the message and select Attachments > Display attachment table.
You should see a list of attachments within the message
Do you see an attachment with the FileReference number found in the mailbox log?
If no, sorry, we cannot resolve the issue by using this guide. For more help resolving this issue contact Microsoft Support. Please have all of the data collected from this troubleshooting available when you contact support.
View attachment using outlook
To determine if the attachment is corrupt, ask the user to open the attachment in either Outlook or Outlook Web Access.
Is the user able to open the attachment from another client?
If no, sorry, we cannot resolve the issue by using this guide. For more help resolving this issue contact Microsoft Support. Please have all of the data collected from this troubleshooting available when you contact support.
Check ActiveSync mailbox policy
To determine if there is an ActiveSync mailbox policy setting causing the AttachmentTooBig error, check the ActiveSync mailbox policy assigned to this mailbox. To do this, follow these steps:
Run the following cmdlet to retrieve the ActiveSync mailbox policy settings for this user:
Get-ActiveSyncMailboxPolicy (Get-Mailbox alias ).ActiveSyncMailboxPolicy | ft name,*Attach* -AutoSize
Note
This cmdlet should only return one result. If you receive more than one policy in the results, use the settings from the Default.
Is the AttachmentsEnabled setting set to True?
If yes, sorry, we cannot resolve the issue by using this guide. For more help resolving this issue contact Microsoft Support. Please have all of the data collected from this troubleshooting available when you contact support.
Did increasing the maximum attachment size in the ActiveSync mailbox policy resolve the issue?
If yes, congratulations, your ActiveSync issue is resolved.
If no, sorry, we cannot resolve the issue by using this guide. For more help resolving this issue contact Microsoft Support. Please have all of the data collected from this troubleshooting available when you contact support.
Unable to send a message
We are going to troubleshoot the issue where a user is unable to send a message from an ActiveSync client.
The first step is to enable mailbox logging on the Client Access Server(s) and the user mailbox. Additional information on mailbox logging can be found here. To do this, follow these steps:
Note
This change should be made on Exchange 2013 mailbox servers.
Open Windows Explorer and browse to the Sync folder (C:\Program Files\Microsoft\Exchange Server\V14\ClientAccess\Sync).
Make a copy of the web.config file.
Open the web.config file in Notepad and modify the following sections with the values below:
Run the following cmdlet to enable the mailbox logging for a user:
Set-CASMailbox user -ActiveSyncDebugLogging:$True
Capture fiddler trace
ActiveSync device requests do not always reach the destination as desired. To ensure the device request and response is being sent and received as expected, route the device through an HTTP proxy and review the data. To do this, follow these steps:
Extract EASInspectorFiddler.dll into the c:\Program Files\Fiddler2\Inspectors folder.
Launch the Fiddler application.
Select the Tools menu and select Fiddler Options.
Go to the HTTPS tab and select Decrypt HTTPS traffic, select Yes to all prompts.
Go to the Connections tab and select Allow remote computers to connect, select OK to any prompt.
Select OK and close the Fiddler application.
Configure the ActiveSync device to use this workstation as a proxy server (This is typically done under the WiFi settings for the device).
Launch the Fiddler application.
Attempt to send one or more messages from the ActiveSync client.
Select the File menu and select Capture Traffic to stop the trace.
Mailbox log analysis for errors
The request from the ActiveSync client to send this message is not successful. We need to verify that the Exchange server received the request and determine if the server sent any response. To do this, follow these steps:
Run the following cmdlet to retrieve the mailbox log for a user:
Get-ActiveSyncDeviceStatistics -Mailbox user -GetMailboxLog:$True -NotificationEmailAddresses admin@contoso.com
Note
This sends the ActiveSync mailbox log to the specified email address. Additional information on mailbox logging can be found in Exchange ActiveSync Mailbox Logging.
Fiddler trace analysis for errors (if no errors in mailbox log)
We expect the device to send one or more requests to obtain the latest updates for the folder. We can use the Fiddler trace to verify that the request was sent by the client and a response was received by the server. To do this, follow these steps:
Open the Fiddler trace.
Go to the Edit menu and select Find Sessions.
Enter the namespace for ActiveSync (Example: mail.contoso.com) and select Find Sessions.
Review the Result column for any HTTP response values that do not equal 200.
Select requests where the Body column has a value.
Select the TextView tab to view the response for additional details.
If no, sorry, we cannot resolve the issue by using this guide. For more help resolving this issue contact Microsoft Support. Please have all of the data collected from this troubleshooting available when you contact support.
Install Log Parser Studio; Log Parser Studio Query - SendMail; Query results analysis (if no user can reproduce the issue)
Install Log Parser Studio
The ActiveSync client may have encountered errors while attempting to communicate with the Exchange server. Now we need to determine where these errors originated. We will start by checking the IIS logs on the Client Access Server. Before these logs can be analyzed, the workstation where the analysis will be completed should have Log Parser Studio installed. To do this, follow these steps:
Once LogParser is installed and Log Parser Studio has been extracted, copy the IIS logs from the Exchange server(s) to the local workstation for analysis.
Log Parser Studio Query – SendMail
To determine if any of these ActiveSync requests are resulting in an error, query the IIS logs for the device traffic. To do this, follow these steps:
Launch Log Parser Studio by double-clicking LPS.exe.
Select the Log folder icon to select files to process.
Select the Add Files or Add Folder button, then locate and select the file(s) copied earlier.
Verify the file/folder is selected and select OK.
Double-click ActiveSync: SendMail from the Library.
Select the exclamation point icon to execute the query.
Analyze the results for this query by searching for any value in the Status or Error columns. Also look for any HTTP status codes that do not equal 200.
Query results analysis
Now we want to review the results of the previous query for any errors.
Error not listed or HTTP error, sorry, we cannot resolve the issue by using this guide. For more help resolving this issue contact Microsoft Support. Please have all of the data collected from this troubleshooting available when you contact support.
QutoaExceeded error
This error is reporting that the user has exceeded their mailbox quota and cannot send any messages. To resolve this issue, either increase the user's mailbox storage quota or inform the user to reduce their mailbox size.
Does one of these options resolves the issue?
If yes, congratulations, your ActiveSync issue is resolved.
If no, sorry, we cannot resolve the issue by using this guide. For more help resolving this issue contact Microsoft Support. Please have all of the data collected from this troubleshooting available when you contact support.
NoRecipients error
This error is reporting that the user attempted to send a message without any recipients. The device should not allow this behavior. You may want to review the mailbox logs and/or Fiddler trace for this device to verify that the SendMail command included one or more recipients.
Were you able to verify the device sent one or more recipients in the request?
If yes, sorry, we cannot resolve the issue by using this guide. For more help resolving this issue contact Microsoft Support. Please have all of the data collected from this troubleshooting available when you contact support.
If no, sorry, we cannot resolve the issue by using this guide. Based on the results of these troubleshooting steps, it is recommended you contact the device vendor for further support. You can also contact Microsoft Support for more help resolving this issue.
MailSubmissionFailed error
The MailSubmissionFailed error is essentially a catch all error message for SendMail failures. The user should attempt to send the message again. Check the Mailbox server event log for any errors or warnings at the time of this message submission.
Were you able to resolve the issue using the event logs on the Mailbox server?
If yes, congratulations, your ActiveSync issue is resolved.
If no, sorry, we cannot resolve the issue by using this guide. For more help resolving this issue contact Microsoft Support. Please have all of the data collected from this troubleshooting available when you contact support.
Calendaring issues
Before we begin troubleshooting, we need to know if the issue can be reproduced on the device. If we can reproduce the issue, then we can capture data during the process to get a better understanding of the issue. Otherwise we will need to examine existing logs to attempt to determine what happened.
Can you reproduce the Calendar issue on the device?
Enable ActiveSync mailbox logging; Capture fiddler trace; Locate appointment within the mailbox; Search for UID
Enable ActiveSync Mailbox Logging
The first step is to enable mailbox logging on the Client Access Server(s) and the user mailbox. Additional information on mailbox logging can be found here. To do this, follow these steps:
Note
This change should be made on Exchange 2013 mailbox servers.
Open Windows Explorer and browse to the Sync folder (C:\Program Files\Microsoft\Exchange Server\V14\ClientAccess\Sync).
Make a copy of the web.config file.
Open the web.config file in Notepad and modify the following sections with the values below:
Run the following cmdlet to enable the mailbox logging for a user:
Set-CASMailbox user -ActiveSyncDebugLogging:$True
Capture fiddler trace
ActiveSync device requests do not always reach the destination as desired. To ensure the device request and response is being sent and received as expected, route the device through an HTTP proxy and review the data. To do this, follow these steps:
Select the Outlook profile for the mailbox and select OK.
Double-click the mailbox to open.
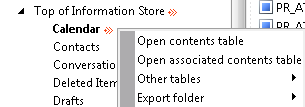
Expand the Root Container, expand Top of Information Store, then right-click on the Calendar and select Open contents table.
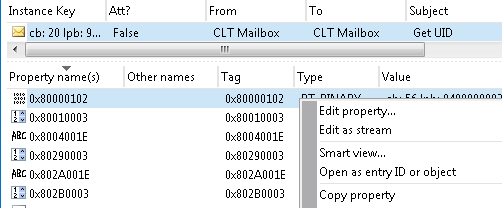
Select the appointment within the table, then right-click on the tag 0x80000102 and select Edit property.
Copy the Binary value (this will be used to search for the UID in the mailbox log).
Search for UID
We now have the data collected and we are ready to begin troubleshooting. The first step we will take is to look at the mailbox log and check if the appointment was captured. To do this, follow these steps:
Run the following cmdlet to retrieve the mailbox log for a user:
Get-ActiveSyncDeviceStatistics -Mailbox user -GetMailboxLog:$True -NotificationEmailAddresses admin@contoso.com
Note
This will send the ActiveSync mailbox log to the specified email address for analysis. Additional information on mailbox logging can be found Exchange ActiveSync Mailbox Logging.
Analyze mailbox log for UID; Check the final status of the appointment
Analyze mailbox log for UID
Now that we know we have the appointment within our mailbox log, we need to track the actions taken against the appointment. To do this, follow these steps:
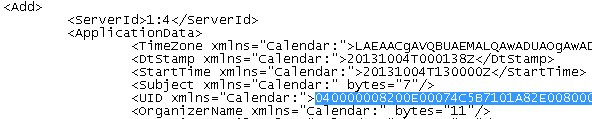
Search for the UID value found earlier.
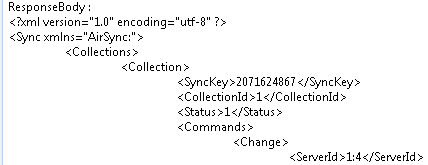
Review the results and analyze the log entries. Check the logs and look for either RequestBody or ResponseBody. If the item appears in the response body, then the item was updated from the server. Otherwise the item appears in the request body, which means the item was updated from the client.
Make note of the action (Add, Change, or Delete) and whether the server or client sent the action.
Repeat steps 2-4 until you cannot find any further entries.
We verified that one or more actions were taken against the appointment within the mailbox log. The end result of the appointment is dependent on the final action. The following describes the expected status of the appointment based on that action:
Add - The appointment should be in the Calendar on the ActiveSync client.
Change - The appointment should be updated in the Calendar on the ActiveSync client.
Delete - The appointment should be removed from the Calendar on the ActiveSync client.
Does the result of the final action meet the expected state of the appointment?
Fiddler trace analysis for UID; Check the final status of the appointment
Fiddler trace analysis for UID
We expect the device to send requests related to this appointment. We can use the Fiddler trace to verify that the request was sent by the client and a response was received by the server. To do this, follow these steps:
Open the Fiddler trace.
Go to the Edit menu and select Find Sessions.
Enter the namespace for ActiveSync (Example: mail.contoso.com) and select Find Sessions.
Select requests where the Body column has a value and the HTTP response values that do not equal 200.
Select the EAS XML tabs to view the request and response.
Locate all requests and responses for the ServerId found earlier.
Check the final status of the appointment
We need to verify that the actions taken against the appointment within Fiddler trace align with the mailbox log. The final action should match the mailbox log action found earlier. The following describes the expected status of the appointment based on that action:
Add - The appointment should be in the Calendar on the ActiveSync client.
Change - The appointment should be updated in the Calendar on the ActiveSync client.
Delete - The appointment should be removed from the Calendar on the ActiveSync client.
Does the result of the final action meet the expected state of the appointment?
If yes, sorry, we cannot resolve the issue by using this guide. Based on the results of these troubleshooting steps, it is recommended you contact the device vendor for further support. You can also contact Microsoft Support for more help resolving this issue.
The ActiveSync traffic for this appointment does not result in the appointment being in the correct state on the device. Now we need to review the mailbox log further for issues with ActiveSync requests for the Calendar folder. To do this, follow these steps:
Review the search results from earlier.
Check the Status column for the response and if the value does not equal 1, review the ActiveSync protocol document for more information on the status code.
Also check the log entry for any exception messages.
Were there any Status codes that did not equal 1 in the response or any exceptions found in the mailbox log?
If yes, sorry, we cannot resolve the issue by using this guide. Based on the results of these troubleshooting steps, it is recommended you contact the device vendor for further support. You can also contact Microsoft Support for more help resolving this issue.
Based on the results of the mailbox log, the client did not encounter any errors with ActiveSync traffic between the client and Exchange. Next we need to verify that all of the requests from the device did not encounter an error. To do this, follow these steps:
We expect the device to send one or more requests to obtain the latest updates for the folder. We can use the Fiddler trace to verify that the request was sent by the client and a response was received by the server. To do this, follow these steps:
Open the Fiddler trace.
Go to the Edit menu and select Find Sessions.
Enter the namespace for ActiveSync (Example: mail.contoso.com) and select Find Sessions.
Review the Result column for any HTTP response values that do not equal 200.
Select requests where the Body column has a value.
Select the TextView tab to view the response for additional details.
Were there any errors found in the Fiddler trace for the Calendar requests?
If no, sorry, we cannot resolve the issue by using this guide. For more help resolving this issue contact Microsoft Support. Please have all of the data collected from this troubleshooting available when you contact support.
Install Log Parser Studio; Log Parser Studio Query - Device Calendar requests; Query results analysis; Resync the Calendar folder
Install Log Parser Studio
The ActiveSync client may have encountered errors while attempting to communicate with the Exchange server. Now we need to determine where these errors originated. We will start by checking the IIS logs on the Client Access Server. Before these logs can be analyzed, the workstation where the analysis will be completed should have Log Parser Studio installed. To do this, follow these steps:
Once LogParser is installed and Log Parser Studio has been extracted, copy the IIS logs from the Exchange server(s) to the local workstation for analysis.
Log Parser Studio Query – Device Calendar requests
We need to determine if the requests from this ActiveSync client encountered any issues while being processed on the Client Access Server. To do this, follow these steps:
Launch Log Parser Studio by double-clicking LPS.exe.
Select the Log folder icon to select files to process.
Select the Add Files or Add Folder button, then locate and select the file(s) copied earlier.
Verify the file/folder is selected and select OK.
Double-click ActiveSync: Count Syncs with SyncKey of Zero Per User from the Library.
Select the exclamation point icon to execute the query.
Example results:
Query results analysis
Now we want to review the results from your query for any issues. To do this, follow these steps:
Review the Status column and locate any request where there is a value. Use the Exchange ActiveSync protocol document to investigate these values and if any corrective action can be taken.
Review the Error column and locate any request where there is a value in this column. Many of these error messages are self-explanatory and corrective action can be taken accordingly.
Review the sc-status column and locate any request where there is a value other than 200. This is the HTTP status response from IIS and additional information can be found in The HTTP status code in IIS 7 and later versions.
Unfortunately, the review of the IIS logs does not show us any identifier for the appointment in question. Your best effort will be locating a request within the IIS logs around the time the last appointment change occurred. You can also use this article Understanding Exchange ActiveSync Reporting Services to help you better understand some of the elements found with the IIS log entry.
Resync the Calendar folder
The previous steps taken help to identify why the issue occurred with the appointment. The ActiveSync client may not have the appointment in the correct state. To resolve this issue, remove the Calendar from the list of folders to synchronize, wait approximately five minutes, and then add the Calendar to the list of folders to synchronize.
Is the appointment in the correct state on the ActiveSync client?
If yes, congratulations, your ActiveSync issue is resolved.
If no, sorry, we cannot resolve the issue by using this guide. For more help resolving this issue contact Microsoft Support. Please have all of the data collected from this troubleshooting available when you contact support.
Prepare for Data Analysis; Log Parser Studio Query - Count Syncs with SyncKey of Zero Per User
Prepare for Data analysis
The ActiveSync client may have encountered errors while attempting to communicate with the Exchange server. Now we need to determine where these errors originated. We will start by checking the IIS logs on the Client Access Server. Before these logs can be analyzed, the workstation where the analysis will be completed should have Log Parser Studio installed. To do this, follow these steps:
Once LogParser is installed and Log Parser Studio has been extracted, copy the IIS logs from the Exchange server(s) to the local workstation for analysis.
Log Parser Studio Query - Count Syncs with SyncKey of Zero Per User
To determine if devices are resynchronizing with Exchange, run the Log Parser query to find the users. To do this, follow these steps:
Launch Log Parser Studio by double-clicking LPS.exe.
Select the Log folder icon to select files to process.
Select the Add Files or Add Folder button, then locate and select the file(s) copied earlier.
Verify the file/folder is selected and select OK.
Double-click ActiveSync: Count Syncs with SyncKey of Zero Per User from the Library.
Select the exclamation point icon to execute the query.
Analyze the results for this query.
Are there any devices with multiple requests using the SyncKey value of 0?
Log Parser Studio Query - Device Query (if using SyncKey value of 0)
To determine why the device sent a SyncKey of 0, analyze the device activity prior to the resync request. To do this, follow these steps:
Launch Log Parser Studio by double-clicking LPS.exe.
Select the Log folder icon to select files to process.
Select the Add Files or Add Folder button, then locate and select the file(s) copied earlier.
Verify the file/folder is selected and select OK.
Double-click ActiveSync: Device query from the Library.
Modify the DeviceId value in the WHERE clause at the end of the query with the value from the previous step.
Select the exclamation point icon to execute the query.
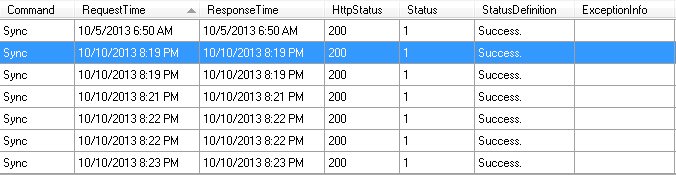
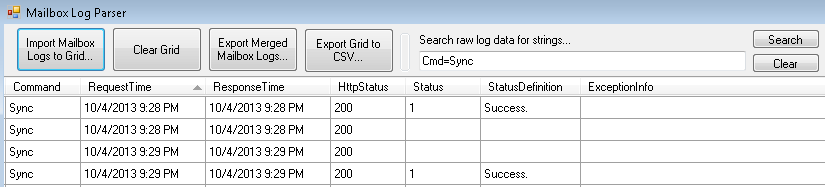
Analyze the results for this query by locating the request where the value in the SyncKey column is 0. Then look at the previous requests where the Cmd=Sync and check if the sc-status value is 5xx.
Example: In the above image, there are multiple Sync requests prior to the request containing the SyncKey value of 0. None of these requests received an HTTP 500 response from IIS. There is a known issue where multiple HTTP 500 responses will cause a device to resync.
Does this Sync request result in an HTTP status code of 500?
To determine the cause of the HTTP 500 errors, enable failed request tracing on the Microsoft-Server-ActiveSync virtual directory. To do this, follow these steps:
Expand the server, expand Sites, and select the Default Web Site.
Select Failed Request Tracing in the Actions pane.
Select Enable and enter a different directory path if needed and select OK.
Expand the Default Web Site and select the Microsoft-Server-ActiveSync virtual directory.
In Features View, double-click Failed Request Tracing Rules.
Select Add in the Actions pane.
Select All content and select Next.
Enter the HTTP status code found earlier when parsing the IIS log and select Next.
Select Finish.
Once failed request tracing has been enabled, reproduce the connection issue by attempting another Sync on the device.
Failed request trace logging analysis
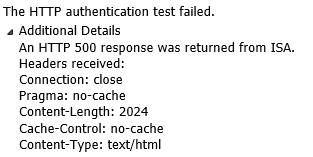
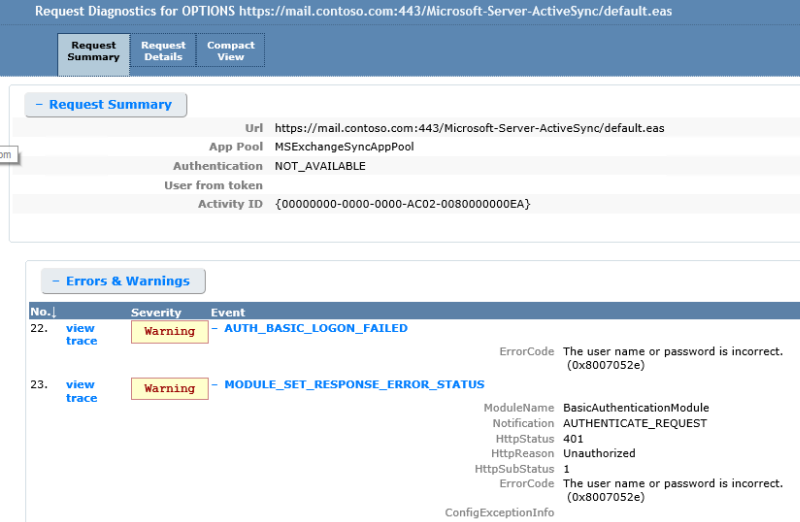
To resolve this issue, review the failed request tracing logs to determine the cause. Here is an example set of logs and the request summary gives basic information on the error:
Then when reviewing the Compact View tab, additional details including the username supplied are available.
Was the issue resolved using the failed request tracing logs?
If yes, congratulations, your ActiveSync issue is resolved.
To determine if a previous request caused the device to send the SyncKey value of 0, review the results from the previous query. To do this, follow these steps:
Launch Log Parser Studio by double-clicking LPS.exe.
Select the Log folder icon to select files to process.
Select the Add Files or Add Folder button, then locate and select the file(s) copied earlier.
Verify the file/folder is selected and select OK.
Double-click ActiveSync: Request with ActiveSync errors from the Library.
Select the exclamation point icon to execute the query.
Analyze the results for this query by referencing the Status response with the device Cmd. Use the ActiveSync protocol documentation as a reference. For example, any Ping request that results in a status greater than 2 is an error and should be investigated further. Any Sync request that results in a status greater than 1 is an error and should be investigated further.
Are there any requests that result in an error status code?
Review the results from the previous query for any errors and research the Status value.
Address the issues based on the cause shown in the protocol documentation.
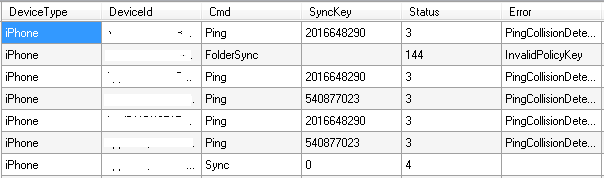
Example results from query executed in the previous step:
These results show that a Ping command resulted in a status code of 3. Using the ActiveSync protocol document, this error is caused by the request sent by the device. The device should send another Ping request.
The results also show a Sync command that received a response with a status code of 4. Once again, this error is caused by the request sent by the device.
Was the issue resolved using the ActiveSync status in the response?
If yes, congratulations, your ActiveSync issue is resolved.
ActiveSync device requests do not always reach the destination as desired. To ensure the device request and response is being sent and received as expected, route the device through an HTTP proxy and review the data. To do this, follow these steps:
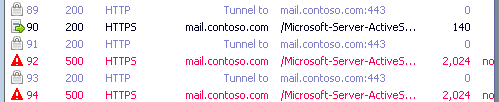
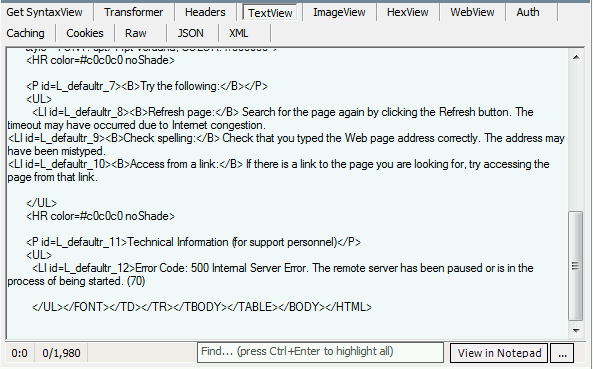
The Fiddler trace shows the ActiveSync device did not receive a successful response from its destination. Further analysis of the trace is required to determine where the response originated. To do this, follow these steps:
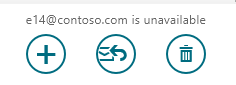
**Example: User is using the Windows Mail App to access e-mail. Currently the device is not receiving new messages and there is an error message in the upper right-hand corner stating the mailbox is unavailable:
Analysis of the Fiddler trace shows the connection to the Exchange server resulted in an HTTP 500 error.
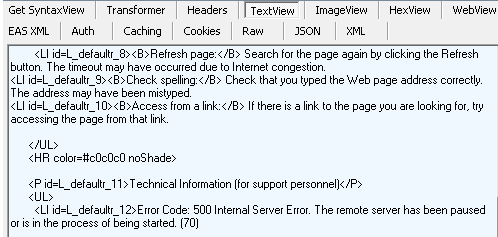
Analysis of the HTTP response show an internal server error and the details of the error give an indication to the issue. In this example, all of the servers in the TMG server farm were drained so TMG had no available destination for the request.
Did the Fiddler trace analysis help resolve the issue?
If yes, congratulations, your ActiveSync issue is resolved.
Log Parser Studio Query - Count all Syncs per SyncKey
To determine if devices are sending the same SyncKey to Exchange for the same folder, run the Log Parser query associated with this issue. To do this, follow these steps:
Launch Log Parser Studio by double-clicking LPS.exe.
Select the Log folder icon to select files to process.
Select the Add Files or Add Folder button, then locate and select the file(s) copied earlier.
Verify the file/folder is selected and select OK.
Double-click ActiveSync: Count all Syncs per SyncKey from the Library.
Select the exclamation point icon to execute the query.
Analyze the results for this query.
Are there any devices sending the same SyncKey multiple times for the same folder?
Review the results from the previous query for any errors and research the Status value.
Address the issues based on the cause shown in the protocol documentation.
Example results from query executed in the previous step:
These results show that a Ping command resulted in a status code of 3. Using the ActiveSync protocol document, this error is caused by the request sent by the device. The device should send another Ping request.
The results also show a Sync command that received a response with a status code of 4. Once again, this error is caused by the request sent by the device.
Was the issue resolved by addressing the ActiveSync errors?
If yes, congratulations, your ActiveSync issue is resolved.
Reprovision the ActiveSync client (if disabling ActiveSync solves the issue)
To resolve this issue, reprovision the ActiveSync client. To do this, follow these steps:
1.Remove the current ActiveSync profile for the mailbox following the device guidelines.
2.Create an ActiveSync profile for the mailbox following the device guidelines.
Did reprovisioning the ActiveSync client resolve the issue?
If yes, congratulations, your ActiveSync issue is resolved.
To determine the ActiveSync response that is causing the failure, mailbox logging must be enabled. Additional information on mailbox logging can be found Exchange ActiveSync Mailbox Logging. To do this, follow these steps:
Note
This change should be made on Exchange 2013 mailbox servers.
Open Windows Explorer and browse to the Sync folder (C:\Program Files\Microsoft\Exchange Server\V14\ClientAccess\Sync).
Make a copy of the web.config file.
Open the web.config file in Notepad and modify the following sections with the values below:
Log Parser Studio Query - Report [Top 20]; Log Parser Studio Query - Device Query
Log Parser Studio Query - Report [Top 20]
To determine if one or more users are contributing to the performance issue, run the associated Log Parser query to identify these users. To do this, follow these steps:
Launch Log Parser Studio by double-clicking LPS.exe.
Select the Log folder icon to select files to process.
Select the Add Files or Add Folder button, then locate and select the file(s) copied earlier.
Verify the file/folder is selected and select OK.
Double-click ActiveSync: Report [Top 20] from the Library.
Select the exclamation point icon to execute the query.
Analyze the results for this query
These results must be analyzed to determine what type of traffic users are sending to the Exchange server(s).
Log Parser Studio Query - Device Query
To determine device traffic, analyze the device activity using the associated Log Parser query. To do this, follow these steps:
Launch Log Parser Studio by double-clicking LPS.exe.
Select the Log folder icon to select files to process.
Select the Add Files or Add Folder button, then locate and select the file(s) copied earlier.
Verify the file/folder is selected and select OK.
Double-click ActiveSync: Device query from the Library
Modify the DeviceId value in the WHERE clause at the end of the query with the value from the previous step.
Select the exclamation point icon to execute the query.
Analyze the results for this query and look for any trends.
Were you able to resolve the issue by identifying a pattern in user activity?
If yes, congratulations, your ActiveSync issue is resolved.
Capture performance data; Analyze performance data
Capture performance data
To determine if the Exchange server(s) are experiencing performance issue, capture performance data from each of the Exchange servers. To do this, follow these steps:
Download ExPerfwiz and extract the contents to the %ExchangeInstallPath%\Scripts folder.
To resolve this issue, analyze the performance data and address any issues found. To do this, follow these steps:
Wait for the data collector set to complete the data collection from the previous step (command syntax collects data for 4 hours).
Open Performance Monitor.
In the console pane toolbar, select the Add Log Data button. The Performance Monitor properties page will open at the Source tab.
In the Data Source section, select Log files > Add.
Browse to the log file you want to view and select Open. To add multiple log files to the Performance Monitor view, select Add again.
When you are finished selecting log files, select OK.
Right-click in the Performance Monitor display and select Add Counters. The Add Counters dialog box will open. Only the counters included in the log file or files you selected in step 4 will be available.
Select the counters you want to view in the Performance Monitor graph and select OK.
Was the issue resolved by address server performance issue?
If yes, congratulations, your ActiveSync issue is resolved.
If no, sorry, we cannot resolve the issue by using this guide. For more help resolving this issue contact Microsoft Support. Please have all of the data collected from this troubleshooting available when you contact support.
Log Parser Studio query for errors
To determine if these errors are causing a performance issue, run a Log Parser query for these errors. To do this, follow these steps:
Launch Log Parser Studio by double-clicking LPS.exe.
Select the Log folder icon to select files to process.
Select the Add Files or Add Folder button, then locate and select the file(s) copied earlier.
Verify the file/folder is selected and select OK.
Go to the File menu and select New > Query.
Enter the following query in the window:
SELECT * FROM '[LOGFILEPATH]' WHERE cs-uri-query LIKE '%KeepAliveFailure%'
Note
Replace KeepAliveFailure with the error found in the previous step.
Select the exclamation point icon to execute the query.
Analyze the results for this query and try to determine the cause of the error. In the following example, the KeepAliveFailure only occurs when requests are have the PrxTo to a CAS server in another site. Here we would want to investigate network connectivity issues between the two sites.
Were you able to resolve the issue by address ActiveSync errors found in the IIS logs?
If yes, congratulations, your ActiveSync issue is resolved.
In many cases file-level anti-virus impacts ActiveSync traffic by delaying the processing of the request or response. Stopping these services does not disable the kernel mode filter driver used by these services. To disable file level anti-virus, follow the steps from How to temporarily deactivate the kernel mode filter driver in Windows. Verify the kernel mode filter driver is no longer active after the Client Access Server has been restarted. To do this, follow these steps:
Open a command prompt.
Run the following command:
fltmc
Compare the results to the example filter drivers from this article or search the web for the Filter Name.
Did disabling the anti-virus kernel mode filter driver resolve the issue?
If yes, congratulations, your ActiveSync issue is resolved.
This module examines the Microsoft Entra Connect Sync and Microsoft Entra Cloud Sync installation requirements, the options for installing and configuring the tools, and how to monitor synchronization services using Microsoft Entra Connect Health.
Describes an issue that occurs when an Exchange Server user tries to synchronize an Exchange ActiveSync device for the first time. Provides a workaround.
Discusses that Outlook doesn't support a connection to Exchange by using the Exchange ActiveSync protocol. Log onto Exchange ActiveSync mail server (EAS) The server cannot be found error occurs. Provides a resolution.


![Screenshot of the result of Count all errors query in the Log Parser Studio Query - Report [Top 20]; Device Query section.](../exchangeserver/client-connectivity/media/troubleshoot-activesync-with-exchange-server/count-all-errors.png)
![Screenshot of the query results example for Report [Top 20].](../exchangeserver/client-connectivity/media/troubleshoot-activesync-with-exchange-server/query-results-for-report-top-20.png)

