Use Markdown language in Power Automate approval requests
This article shows you how to use [Markdown](https://en.wikipedia.org/wiki/Markdown syntax to add rich formatting to your approval requests.
Important
- Approval request emails are actionable messages. If your Microsoft Outlook client doesn't support actionable messages, it displays approval requests in HTML format.
- All markdown renderers have implementation differences. For details, review the Client Support section.
- Markdown isn't currently supported for the Approvals app on Microsoft Teams.
Markdown support among clients is inconsistent. The Power Automate team works to address these inconsistencies, however, inconsistencies remain. The following table lays out the known limitations among the supported clients.
| Feature | Power Automate | Power Automate mobile app | Outlook | Outlook Web | Teams | Teams mobile app | Approvals Teams App |
|---|---|---|---|---|---|---|---|
| Headers | Yes | Yes | Yes | Yes | No | No | No |
| Numbered Lists | Yes | Yes | No | Yes | Yes | Yes | No |
| Nested Numbered Lists | Yes | Yes | No | Yes | Yes | Yes | Yes |
| Tables | Yes | Yes | Yes | Yes | No | No | No |
| Images | No | No | No | No | No | No | No |
| Forced Line Breaks | Yes* | Yes* | No (use a blank line instead) | Yes* | Yes* | Yes* | No |
| Blank Lines | No | No | Yes | Yes | No | Yes | No |
| Emphasis | Yes | Yes | Yes | Yes | No | No | No |
*Forced line breaks within table cells aren't supported for Power Automate, the Power Automate mobile app, Outlook Web, Teams, and the Teams mobile app.
Note
For Outlook Mobile, the previous parameters can vary depending on the Outlook client app and version that you're using.
Structure your comments using headers. Headers segment longer comments, making them easier to read.
Start a line with a hash character # to set a heading. Organize your remarks with subheadings by starting a line with additional hash characters, for example ####. Up to six levels of headings are supported.
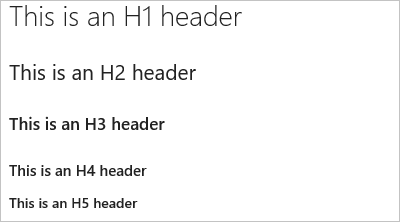
Example:
# This is a H1 header
## This is a H2 header
### This is a H3 header
#### This is a H4 header
##### This is a H5 header
Result:
Make your text easier to read by breaking it up with paragraphs or line breaks. Enter two spaces prior to the line break to force most clients to start a new line.
Example:
This is line 1.(space)
Now text will appear on the next line.
Result:
This is line 1.
Now text will appear on the next line.
Example 2
This is line 1.(space, space)

Line 2 has extra space before it.
Result:
This is line 1.
Line 2 has extra space before it.
Organize related items with lists. You can add ordered lists with numbers, or unordered lists with just bullets.
Ordered lists start with a number followed by a period for each list item. Unordered lists start with a *. Begin each list item on a new line. In a Markdown file or widget, enter two spaces prior to the line break to begin a new paragraph, or enter two line breaks consecutively to begin a new paragraph.
Example:
1. First item.
1. Second item.
1. Third item.
Result:
- First item.
- Second item.
- Third item.
Example:
- Item 1
- Item 2
- Item 3
Result:
- Item 1
- Item 2
- Item 3
Example:
1. First item.
   - Item 1
   - Item 2
   - Item 3
1. Second item.
   - Nested item 1
   - Nested item 2
   - Nested item 3
Result:
First item.
- Item 1
- Item 2
- Item 3
Second item.
- Nested item 1
- Nested item 2
- Nested item 3
Use HTTPS links, which are rendered as links in all clients. Non-HTTPS links (for example, FTP, HTTP, and mail) can be rendered as regular text.
You can set text hyperlinks for your URL using the standard markdown link syntax:
[Link Text](Link URL)
Example:
[Power Automate](https://make.powerautomate.com)
Result:
Power Automate
Organize structured data with tables.
- Place each table row on its own line
- Separate table cells using the pipe character
| - The first two lines of a table set the column headers and the alignment of elements in the table
- Make sure to end each row with a CR or LF.
- Aligning text within a table element is currently not supported.
Example:
| Heading 1 | Heading 2 | Heading 3 |
|-----------|-----------|-----------|
| Cell A1 | Cell A2 | Cell A3 |
| Cell B1 | Cell B2 | Cell B3 |
Result:
| Heading 1 | Heading 2 | Heading 3 |
|---|---|---|
| Cell A1 | Cell A2 | Cell A3 |
| Cell B1 | Cell B2 | Cell B3 |
You can emphasize text by applying bold, italics, or strikethrough to characters.
- To apply italics: surround the text with an asterisk
*or underscore_ - To apply bold: surround the text with double asterisks
**. - To apply strikethrough: surround the text with double tilde characters
~~.
Combine these elements to apply multiple emphases to text.
Example:
Use _emphasis_ in comments to express **strong** opinions and point out ~~corrections~~
**_Bold, italicized text_**
**~~Bold, strike-through text~~**
Result:
Use emphasis in comments to express strong opinions and point out corrections
Bold, italicized text
Bold, strike-through text
| Syntax | Example/notes |
|---|---|
|
To insert one of the following characters, prefix with a backslash:
|
Some examples on inserting special characters
Enter ```\\``` to get \\ Enter ```\_``` to get \_ Enter ```\#``` to get \# Enter ```\(``` to get \( Enter ```\.``` to get \. Enter ```\!``` to get \! |