In a canvas app, customize a Display form control and an Edit form control so that they show the data that matters most and in the most intuitive order to help users easily understand and update the data.
Each form comprises one or more cards, each of which shows data from a particular column in the data source. By following the steps in this topic, you can specify which cards appear in a form and move cards up and down within a form.
Sign in to Power Apps, and then open the app that you generated and customized.
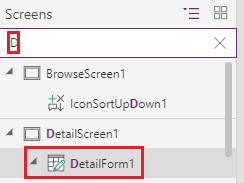
In the left navigation bar, type or paste D in the search bar to filter the list of elements, and then select DetailForm1.
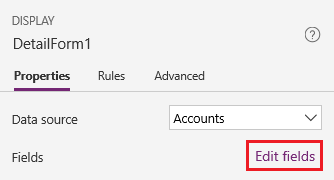
On the Properties tab of the right-hand pane, select Edit fields to open the Fields pane.
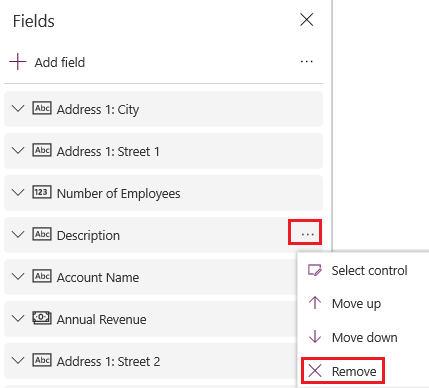
Hide a field, such as Description, by hovering over it, selecting the ellipsis (...) that appears, and then selecting Remove.
Show a field by selecting Add field, typing or pasting the first few letters of the field's name in the search box, selecting the field's check box, and then selecting Add.
Reorder the cards
In the Fields pane, drag the Account Name field to the top of the list of fields.
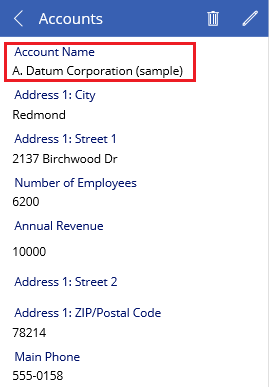
The cards in DetailForm1 reflect the change.
(optional) Reorder the other cards into this sequence:
Account Name
Number of Employees
Annual Revenue
Main Phone
Address 1: Street 1
Address 1: Street 2
Address 1: City
Address 1: ZIP/Postal Code
In the left navigation bar, type or paste Ed in the search bar, and then select EditForm1 to select it.
Repeat the steps in the previous procedure and this one so that the fields in EditForm1 match those in DetailForm1.
Run the app
In the left navigation bar, type or paste Br in the search bar, and then select BrowseScreen1 to select it.
Open Preview mode by pressing F5 (or by selecting the Preview icon near the upper-right corner).
In the upper-right corner, select the plus icon to add a record in EditScreen1.
Add whatever data you want, and then select the checkmark icon in the upper-right corner to save your changes and return to BrowseScreen1.
Select the arrow for the item that you just created to show details about that item in DetailScreen1.
In the upper-right corner, select the edit icon to update the record in EditScreen1.
Change the information in one or more fields, and then select the check mark in the upper-right corner to save your changes and return to DetailScreen1.
Near the upper-right corner, select the trash-can icon to delete the record that you just updated and to return to BrowseScreen1.
Close Preview mode by pressing Esc (or by selecting the close icon near the upper-left corner).
Demonstrate the business value and product capabilities of Microsoft Power Platform, such as Power Apps, data connections with Dataverse, and Power Automate.