Events
Apr 29, 2 PM - Apr 30, 7 PM
Join the ultimate Windows Server virtual event April 29-30 for deep-dive technical sessions and live Q&A with Microsoft engineers.
Sign up nowThis browser is no longer supported.
Upgrade to Microsoft Edge to take advantage of the latest features, security updates, and technical support.
This article describes how to set up a hyper-converged cluster running Storage Spaces Direct (S2D) in System Center Virtual Machine Manager (VMM). Learn more about S2D.
You can deploy a hyper-converged S2D cluster by provisioning a Hyper-V cluster and enable S2D from existing Hyper-V hosts or by provisioning from bare-metal servers.
You can't currently enable S2D in a hyper-converged deployment on a Hyper-V cluster deployed from bare metal computers with the Nano operating system.
Note
You must enable S2D before adding the storage provider to VMM.
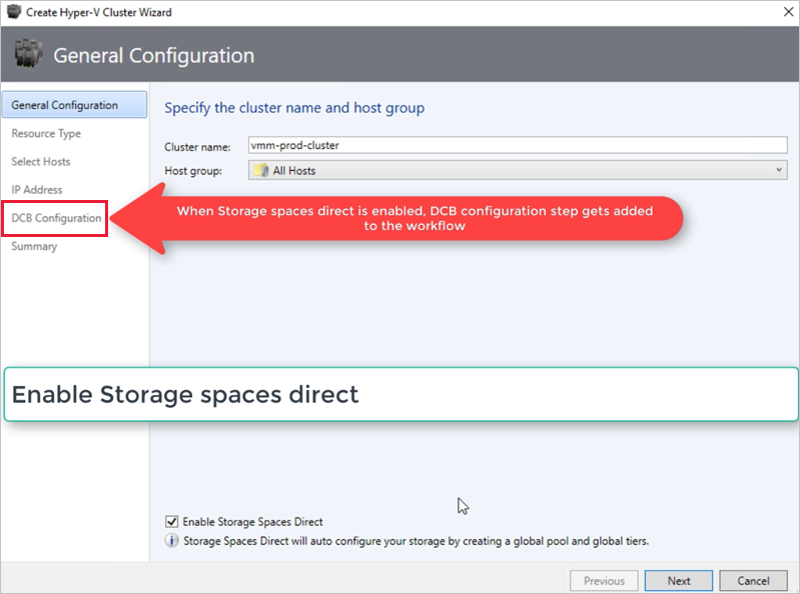
To enable S2D, go to General Configuration > Specify the cluster name and host group, and select the Enable Storage Spaces Direct option as shown below:

After you enable a cluster with S2D, VMM does the following:
If you use PowerShell to create a hyper-converged cluster, the pool and the storage tier are automatically created with the Enable-ClusterS2D autoconfig=true option.
Note
VMM 2019 UR3 and later supports Azure Stack Hyper Converged Infrastructure (HCI, version 20H2).
Note
VMM 2025 supports Azure Local (version 23H2 and 22H2).
After these prerequisites are in place, you provision a cluster, and set up storage resources on it. You can then deploy VMs on the cluster or export the storage to other resources using SOFS.
You can provision a cluster in the following ways:
Select the required tab for the steps to provision a cluster:
Follow these steps to provision a cluster from Hyper-V hosts:
Note
After the cluster is provisioned and managed in the VMM fabric, you need to set up networking for cluster nodes.
Note
The following feature is applicable for VMM 2019 UR1.
Note
Configuration of DCB settings is an optional step to achieve high performance during S2D cluster creation workflow. Skip to step 4 if you don't wish to configure DCB settings.
If you have vNICs deployed, for optimal performance, we recommend you to map all your vNICs with the corresponding pNICs. Affinities between vNIC and pNIC are set randomly by the operating system, and there could be scenarios where multiple vNICs are mapped to the same pNIC. To avoid such scenarios, we recommend you to manually set affinity between vNIC and pNIC by following the steps listed here.
When you create a network adapter port profile, we recommend you to allow IEEE priority. Learn more. You can also set the IEEE Priority using the following PowerShell commands:
PS> Set-VMNetworkAdapterVlan -VMNetworkAdapterName SMB2 -VlanId "101" -Access -ManagementOS
PS> Set-VMNetworkAdapter -ManagementOS -Name SMB2 -IeeePriorityTag on
Ensure the following:
Ensure the following:
Note
Use the following steps to configure DCB settings:
Create a new Hyper-V cluster, and select Enable Storage Spaces Direct. DCB Configuration option gets added to the Hyper-V cluster creation workflow.
In DCB configuration, select Configure Data Center Bridging.
Provide Priority and Bandwidth values for SMB-Direct and Cluster Heartbeat traffic.
Note
Default values are assigned to Priority and Bandwidth. Customize these values based on your organization's environment needs.
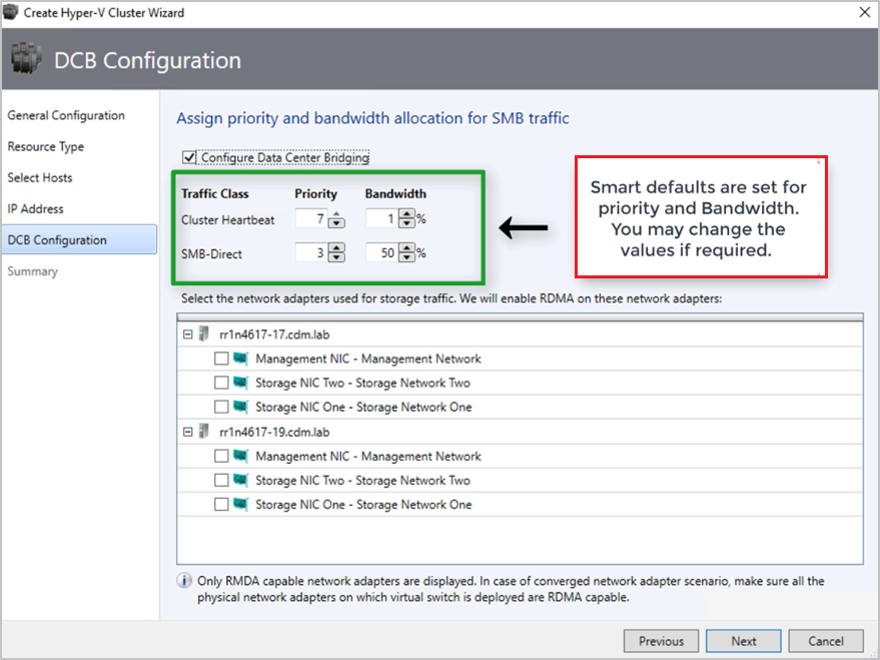
Default values:
| Traffic Class | Priority | Bandwidth (%) |
|---|---|---|
| Cluster Heartbeat | 7 | 1 |
| SMB-Direct | 3 | 50 |
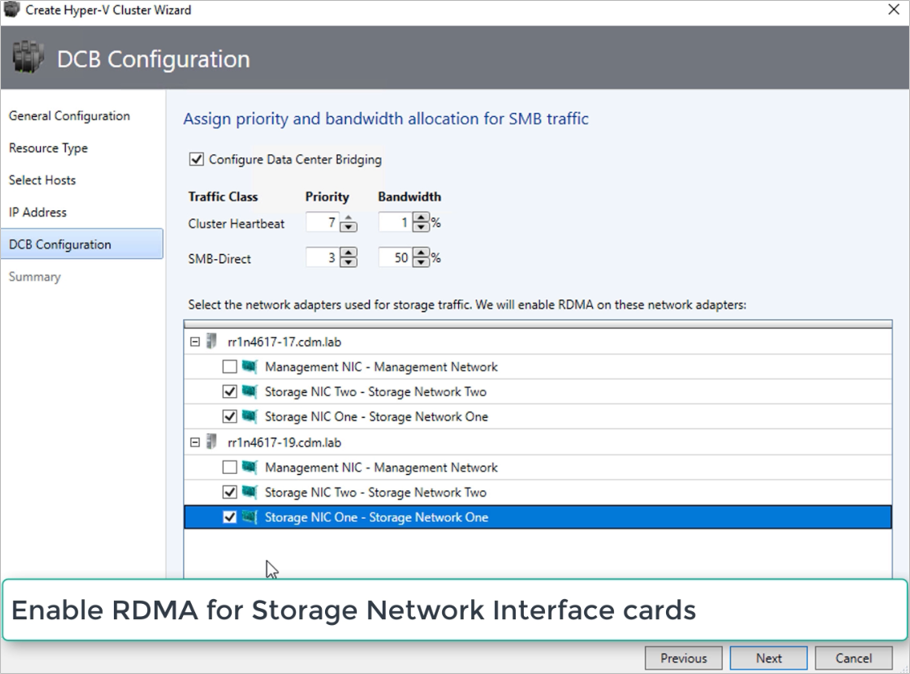
Select the network adapters used for storage traffic. RDMA is enabled on these network adapters.
Note
In a converged NIC scenario, select the storage vNICs. The underlying pNICs must be RDMA capable for vNICs to be displayed and available for selection.
Review the summary and select Finish.
An S2D cluster will be created, and the DCB parameters are configured on all the S2D Nodes.
Note
You can now modify the storage pool settings and create virtual disks and CSVs.
Select Fabric > Storage > Arrays.
Right-click the cluster > Manage Pool, and select the storage pool that was created by default. You can change the default name and add a classification.
To create a CSV, right-click the cluster > Properties > Shared Volumes.
In the Create Volume Wizard > Storage Type, specify the volume name and select the storage pool.
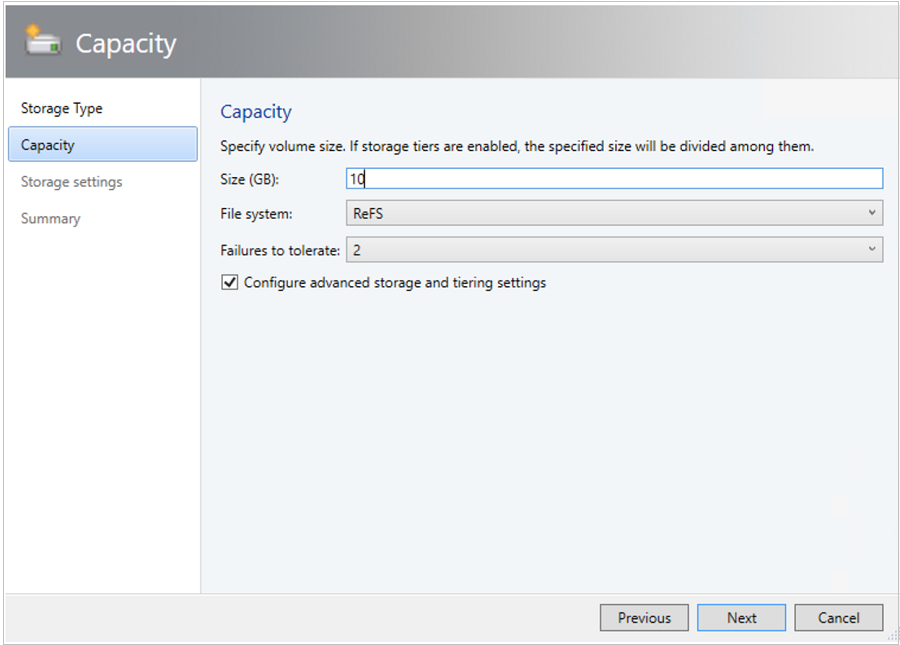
In Capacity, you can specify the volume size, file system, and resiliency settings.
Select Configure advanced storage and tiering settings to set up these options.
Select Next.
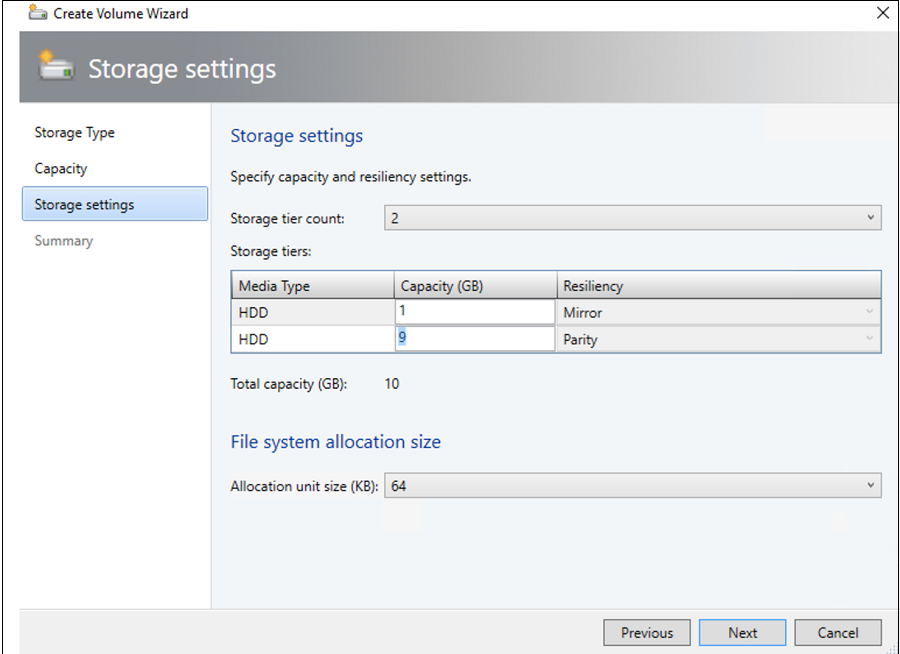
In Storage Settings, specify the storage tier split, capacity, and resiliency settings.
In Summary, verify the settings and finish the wizard. A virtual disk will be created automatically when you create the volume.
If you use PowerShell, the pool and the storage tier are automatically created with the Enable-ClusterS2D autoconfig=true option.
In a hyper-converged topology, VMs can be directly deployed on the cluster. Their virtual hard disks are placed on the volumes you created using S2D. You create and deploy these VMs just as you would any other VM.
You can now modify the storage pool settings and create virtual disks and CSVs.
Select Fabric > Storage > Arrays.
Right-click the cluster > Manage Pool, and select the storage pool that was created by default. You can change the default name and add a classification.
To create a CSV, right-click the cluster > Properties > Shared Volumes.
In the Create Volume Wizard > Storage Type, specify the volume name and select the storage pool.
In Capacity, you can specify the volume size, file system, and resiliency settings.
Select Configure advanced storage and tiering settings to set up these options.
Select Next.
In Storage Settings, specify the storage tier split, capacity, and resiliency settings.
In Summary, verify settings and finish the wizard. A virtual disk will be created automatically when you create the volume.
If you use PowerShell, the pool and the storage tier are automatically created with the Enable-ClusterS2D autoconfig=true option.
In a hyper-converged topology, VMs can be directly deployed on the cluster. Their virtual hard disks are placed on the volumes you created using S2D. You create and deploy these VMs just as you would any other VM.
Events
Apr 29, 2 PM - Apr 30, 7 PM
Join the ultimate Windows Server virtual event April 29-30 for deep-dive technical sessions and live Q&A with Microsoft engineers.
Sign up now