Events
May 19, 6 PM - May 23, 12 AM
Calling all developers, creators, and AI innovators to join us in Seattle @Microsoft Build May 19-22.
Register todayThis browser is no longer supported.
Upgrade to Microsoft Edge to take advantage of the latest features, security updates, and technical support.
You can use the Publish tool to import publish settings and then deploy your app. In this article, we use publish settings for IIS.
These steps apply to ASP.NET and ASP.NET Core web applications.
Note
A publish settings file (*.publishsettings) is different than a publishing profile (*.pubxml). A publish settings file is created in IIS, and then it can be imported into Visual Studio. Visual Studio creates the publishing profile.
Visual Studio installed with the ASP.NET and web development workload. If you've already installed Visual Studio:
On your server, you must be running Windows Server 2012 or greater, and you must have the IIS Web Server role correctly installed (required to generate the publish settings file (.publishsettings). Either ASP.NET 4.5 or ASP.NET Core must also be installed on the server. The steps in this tutorial were tested in Windows Server 2022.
To set up ASP.NET Core, see Host ASP.NET Core on Windows with IIS. For ASP.NET Core, make sure you configure the Application Pool to use No Managed Code, as described in the article.
To set up ASP.NET 4.5, see IIS 8.0 Using ASP.NET 3.5 and ASP.NET 4.5.
Note
IIS on Windows does not support generating the publish settings. You can, however, still publish to IIS using the Publish tool in Visual Studio.
Web Deploy provides additional configuration features that enable the creation of the publish settings file from the UI.
Note
The Web Platform Installer reached End-of-Life on 7/1/22. For more information, see Web Platform Installer - End of support and sunsetting the product/application feed. You can directly install Web Deploy 4.0 to create the publish settings file.
If you did not already install IIS Management Scripts and Tools, install it now.
Go to Select server roles > Web Server (IIS) > Management Tools, and then select the IIS Management Scripts and Tools role, click Next, and then install the role.
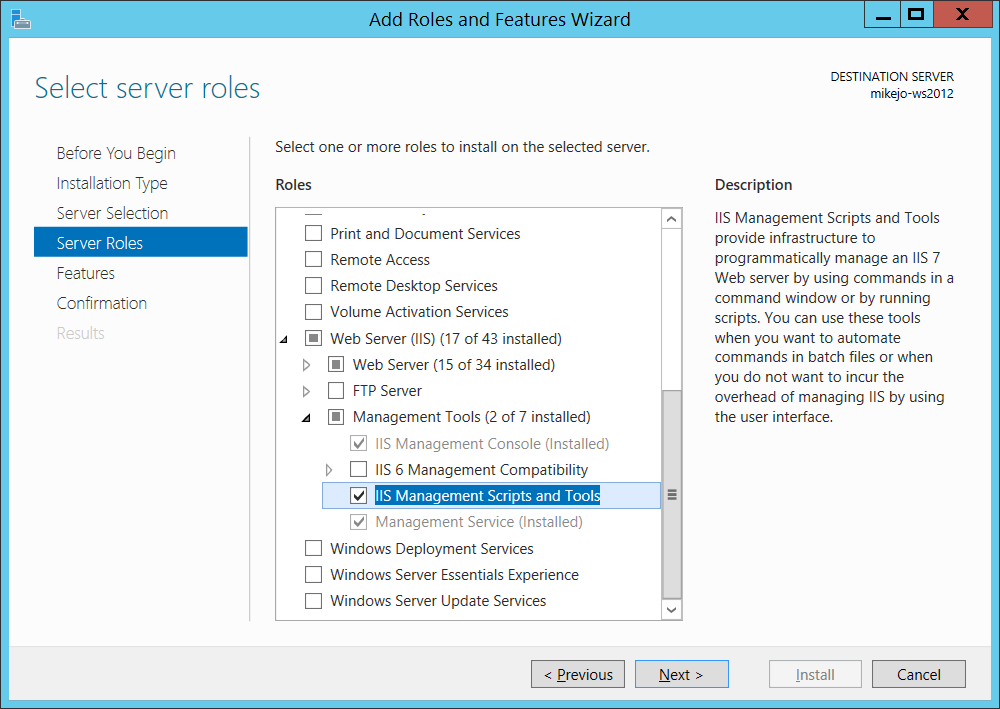
The scripts and tools are required to enable the generation of the publish settings file.
Make sure you also install the Management Service and IIS Management Console (they may be already installed).
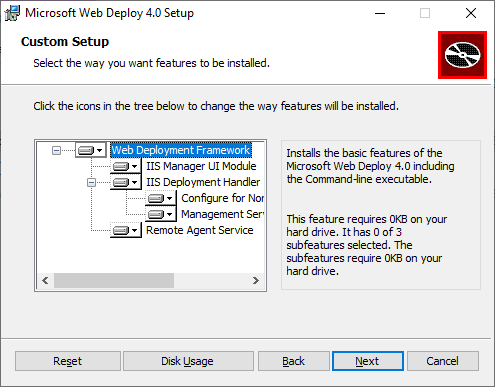
On Windows Server, download Web Deploy 4.0.
Run the Web Deploy installation program, and make sure you select Complete installation instead of a typical installation.
With a complete installation, you get the components you need to generate a publish settings file. (If you choose Custom instead, you can see the list of components, as shown in the following illustration.)
(Optional) Verify that Web Deploy is running correctly by opening Control Panel > System and Security > Administrative Tools > Services, and then make sure that:
Web Deployment Agent Service is running (the service name is different in older versions).
Web Management Service is running.
If one of the agent services is not running, restart the Web Deployment Agent Service.
If the Web Deployment Agent Service is not present at all, go to Control Panel > Programs > Uninstall a program, find Microsoft Web Deploy <version>. Choose to Change the installation and make sure that you choose Will be installed to the local hard drive for the Web Deploy components. Complete the change installation steps.
Close and reopen the IIS Management Console to show updated configuration options in the UI.
In IIS, right-click the Default Web Site, choose Deploy > Configure Web Deploy Publishing.

If you don't see the Deploy menu, see the preceding section to verify that Web Deploy is running.
In the Configure Web Deploy Publishing dialog box, examine the settings.
Click Setup.
In the Results panel, the output shows that access rights are granted to the specified user, and that a file with a .publishsettings file extension has been generated in the location shown in the dialog box.
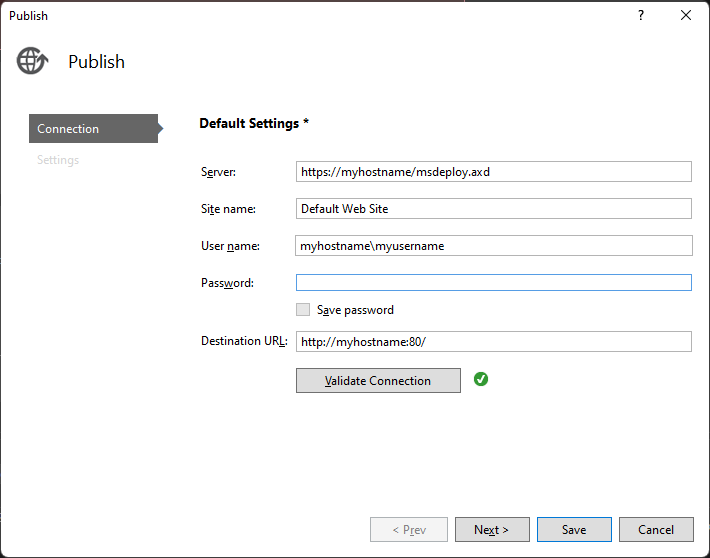
<?xml version="1.0" encoding="utf-8"?>
<publishData>
  <publishProfile
    publishUrl="https://myhostname:8172/msdeploy.axd"
    msdeploySite="Default Web Site"
    destinationAppUrl="http://myhostname:80/"
    profileName="Default Settings"
    publishMethod="MSDeploy"
    userName="myhostname\myusername" />
</publishData>
Depending on your Windows Server and IIS configuration, you see different values in the XML file. Here are a few details about the values that you see:
The msdeploy.axd file referenced in the publishUrl attribute is a dynamically generated HTTP handler file for Web Deploy. (For testing purposes, http://myhostname:8172 generally works as well.)
The publishUrl port is set to port 8172, which is the default for Web Deploy.
The destinationAppUrl port is set to port 80, which is the default for IIS.
If, in later steps, you are unable to connect to the remote host from Visual Studio using the host name, test the server's IP address in place of the host name.
Note
If you are publishing to IIS running on an Azure VM, you must open an inbound port for Web Deploy and IIS in the Network Security group. For detailed information, see Open ports to a virtual machine.
Copy this file to the computer where you are running Visual Studio.
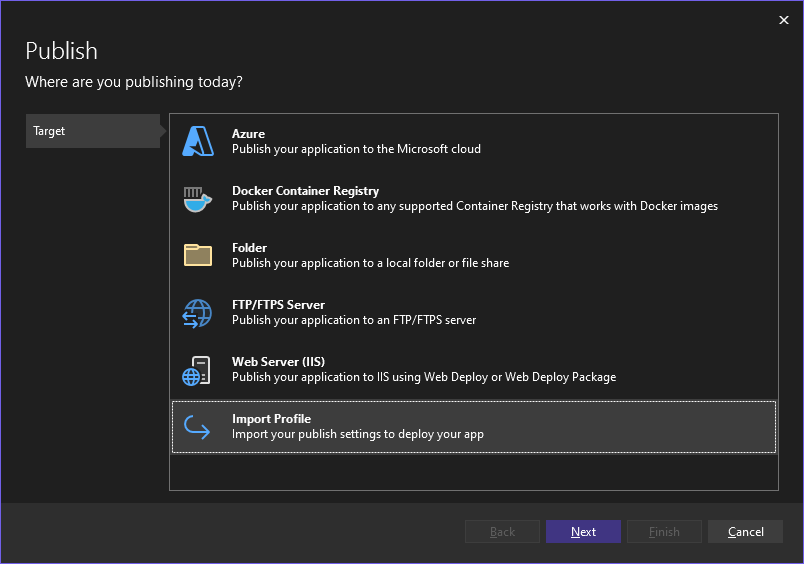
On the computer where you have the ASP.NET project open in Visual Studio, right-click the project in Solution Explorer, and choose Publish.
If you have previously configured any publishing profiles, the Publish pane appears. Click New or Create new profile.
Select the option to import a profile.
In the Publish dialog box, click Import Profile.
Navigate to the location of the publish settings file that you created in the previous section.
In the Import Publish Settings File dialog, navigate to and select the profile that you created in the previous section, and click Open.
Click Finish to save the publishing profile, and then click Publish.
Visual Studio begins the deployment process, and the Output window shows progress and results.
If you get an any deployment errors, click More Actions > Edit to edit settings. Modify settings and click Validate to test new settings. If the host name is not found, try the IP address instead of the host name in both the Server and Destination URL fields.
After the app deploys successfully, it should start automatically.
First, check the Output window in Visual Studio for status information, and check your error messages. In addition:
<AllowUntrustedCertificate>true</AllowUntrustedCertificate>. This setting is for testing only!Events
May 19, 6 PM - May 23, 12 AM
Calling all developers, creators, and AI innovators to join us in Seattle @Microsoft Build May 19-22.
Register todayTraining
Module
Publish a web app to Azure with Visual Studio - Training
Learn how to use Azure App Service to create a new ASP.NET-based web app, then publish and update directly from Visual Studio.
Certification
Microsoft Certified: Azure Developer Associate - Certifications
Build end-to-end solutions in Microsoft Azure to create Azure Functions, implement and manage web apps, develop solutions utilizing Azure storage, and more.
Documentation
ASP.NET Web Deployment using Visual Studio: Deploying to Test
How to deploy an ASP.NET web application to Azure App Service Web Apps or to a third-party hosting provider by using Visual Studio 2017
Publish an ASP.NET web app - Visual Studio (Windows)
Use the Publish tool in Visual Studio to deploy ASP.NET and ASP.NET Core apps to local web servers like IIS or remote cloud environments like Azure App Service.
Manage web deployment settings - Visual Studio (Windows)
Learn how to configure deployment settings for web applications in Visual Studio, when you publish a web application to Azure, IIS, or another target.