This article describes how to enable and disable Server Message Block (SMB) version 1 (SMBv1), SMB version 2 (SMBv2), and SMB version 3 (SMBv3) on SMB client and server components.
If you disable or remove SMBv1, you might encounter compatibility issues with old computers or software. SMBv1 has significant security vulnerabilities, and we strongly encourage you not to use it. SMBv1 isn't installed by default in any edition of Windows 11 or Windows Server 2019 and later versions. SMBv1 also isn't installed by default in Windows 10, except Home and Pro editions. We recommend that instead of reinstalling SMBv1, you update the SMB server that still requires it. For a list of partners that require SMBv1 and their updates that remove the requirement, see SMB1 Product Clearinghouse.
Disabling SMBv3 deactivates the following functionality:
Transparent failover: Provides clients with a way to reconnect without interruption to cluster nodes during maintenance or failover
Scale-out: Supplies concurrent access to shared data on all file cluster nodes
SMB Multichannel: Facilitates aggregation of network bandwidth and fault tolerance if multiple paths are available between the client and server
SMB Direct: Adds remote direct memory access (RDMA) networking support for high performance, with low latency and low CPU use
Encryption: Provides end-to-end encryption and offers protection from eavesdropping on untrustworthy networks
Directory leasing: Improves application response times in branch offices through caching
Performance optimization: Optimizes small random read/write I/O operations
Disabling SMBv2 deactivates the following functionality:
Request compounding: Supports sending multiple SMBv2 requests as a single network request
Larger reads and writes: Improves the use of faster networks
Caching of folder and file properties: Gives clients the ability to keep local copies of folders and files
Durable handles: Provides a way for a connection to transparently reconnect to the server after a temporary disconnection
Improved message signing: Uses a hash-based message authentication code (HMAC) secure hash algorithm (SHA) with a 256-bit digest (HMAC SHA-256) instead of Message-Digest Algorithm 5 (MD5) as a hashing algorithm
Improved scalability for file sharing: Greatly increases the number of users, shares, and open files per server
Support for symbolic links
Client oplock leasing model: Limits the data transferred between the client and server, improving performance on high-latency networks and increasing SMB server scalability
Large maximum transmission unit (MTU) support: Supports full use of 10 Gigabit Ethernet (GbE)
Improved energy efficiency: Provides a way for clients that have open files to a server to sleep
The SMBv2 protocol was introduced in Windows Vista and Windows Server 2008. The SMBv3 protocol was introduced in Windows 8 and Windows Server 2012. For more information about SMBv2 and SMBv3 capabilities, see the following articles:
You can detect the SMBv1 status without elevation by running the Get-SmbServerConfiguration command: Get-SmbServerConfiguration | Format-List EnableSMB1Protocol.
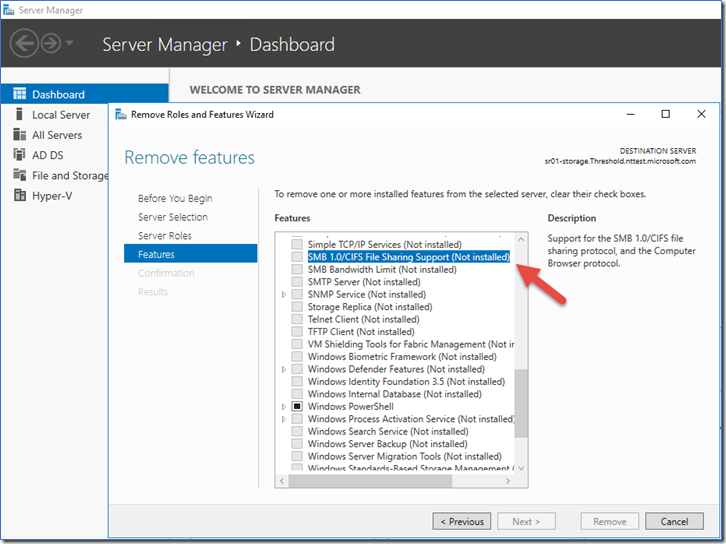
SMBv1 isn't installed by default on Windows Server 2019 and later versions. On earlier versions of Windows Server, you can use Server Manager to remove SMBv1:
On the server that you want to remove SMBv1 from, open Server Manager.
On the Server Manager Dashboard, under Configure this local server, select Add roles and features.
On the Before you begin page, select Start the Remove Roles and Features Wizard, and then on the following page, select Next.
On the Select destination server page, under Server Pool, ensure that the server you want to remove the feature from is selected, and then select Next.
On the Remove server roles page, select Next.
On the Remove features page, clear the checkbox for SMB 1.0/CIFS File Sharing Support, and then select Next.
On the Confirm removal selections page, confirm that the feature is listed, and then select Remove.
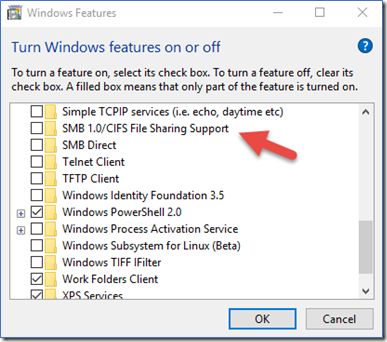
On Windows 8.1, Windows 10, and Windows 11, you can use Remove Programs to disable SMBv1.
To disable SMBv1 on these operating systems, take the following steps:
In Control Panel, select Programs and Features.
Under Control Panel Home, select Turn Windows features on or off to open the Windows Features dialog.
In the Windows Features dialog, scroll down the list, clear the checkbox for SMB 1.0/CIFS File Sharing Support, and then select OK.
After Windows applies the change, on the confirmation page, select Restart now.
Use the command line or Registry Editor to manage SMB protocols
When you enable or disable SMBv2 in Windows 8 or Windows Server 2012, SMBv3 is also enabled or disabled. This behavior occurs because these protocols share the same stack.
You can use the Set-SMBServerConfiguration cmdlet to enable or disable the SMBv1, SMBv2, and SMBv3 protocols on a server component. You can use the Get-SmbServerConfiguration cmdlet to retrieve the SMB server configuration.
You don't have to restart the computer after you run the Set-SMBServerConfiguration cmdlet.
Enable or disable SMB on Windows 7, Windows Server 2008 R2, Windows Vista, and Windows Server 2008
To enable or disable SMB protocols on an SMB Server that runs Windows 7, Windows Server 2008 R2, Windows Vista, or Windows Server 2008, use Windows PowerShell or Registry Editor, as explained in the following sections.
You must restart the computer after you make these changes.
Use Registry Editor
Important
Follow the steps in this section carefully. Serious problems might occur if you modify the registry incorrectly. Before you modify it, back up the registry for restoration in case problems occur.
To enable or disable SMBv1 on an SMB server, open Registry Editor and go to the following registry key path:
This procedure disables the SMBv1 server components. You must apply this policy to all necessary workstations, servers, and domain controllers in the domain.
Note
You can set Windows Management Instrumentation (WMI) filters to exclude specific operating systems or to exclude client or server operating systems. For more information, see Group Policy Filtering and Create WMI Filters for the GPO.
Important
Some systems require access to the SYSVOL folder or other file shares but don't support SMBv2 or SMBv3. Examples of such systems include legacy Windows systems and older Linux and partner systems. Be careful when you disable SMBv1 on domain controllers on these systems.
SMBv1
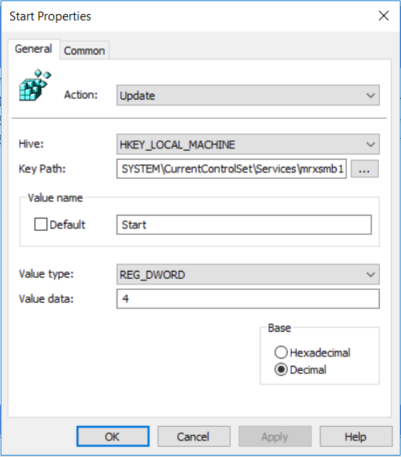
To disable the SMBv1 client, you need to update the services registry key to prevent the start of the MRxSMB10 driver. Then you need to remove the dependency on MRxSMB10 from the entry for LanmanWorkstation so that it can start normally without requiring MRxSMB10 to first start.
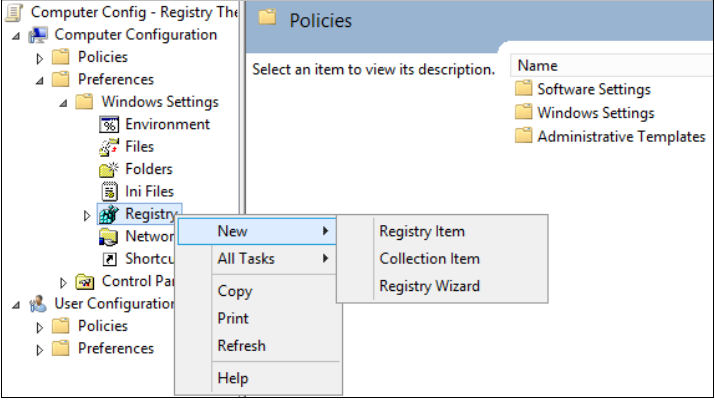
This section shows you how to update and replace the default values in the following two items in the registry:
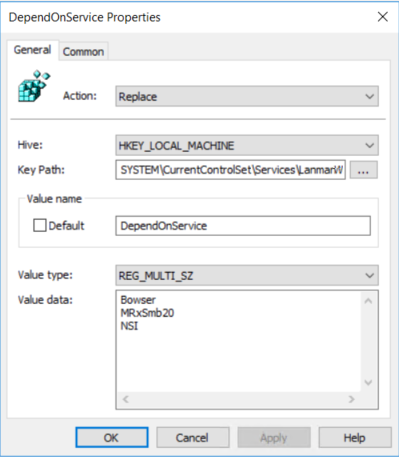
To remove the dependency on the MRxSMB10 driver that was disabled, open the New Registry Properties dialog, and then select or enter the following values:
Don't include bullet points in the three Value data strings. List only the strings, as shown in the following screenshot.
The default value includes MRxSMB10 in many versions of Windows. By replacing the default value with these three strings, you effectively remove MRxSMB10 as a dependency for LanmanWorkstation. Instead of the four default values, you use these three values.
Note
When you use Group Policy Management Console, you don't have to use quotation marks or commas. Just type each entry on individual lines.
To finish disabling SMBv1, restart the targeted systems.
Audit SMBv1 usage
To determine which clients attempt to connect to an SMB server by using SMBv1, you can enable auditing on Windows Server and Windows clients. To enable or disable auditing, use the Set-SmbServerConfiguration cmdlet. To check the auditing status, use the Get-SmbServerConfiguration cmdlet.
After you enable SMBv1 auditing, you can check the Microsoft-Windows-SMBServer\Audit event log for access events. Each time a client attempts to use SMBv1 to connect to a server, an entry that has an event ID of 3000 appears in the log.
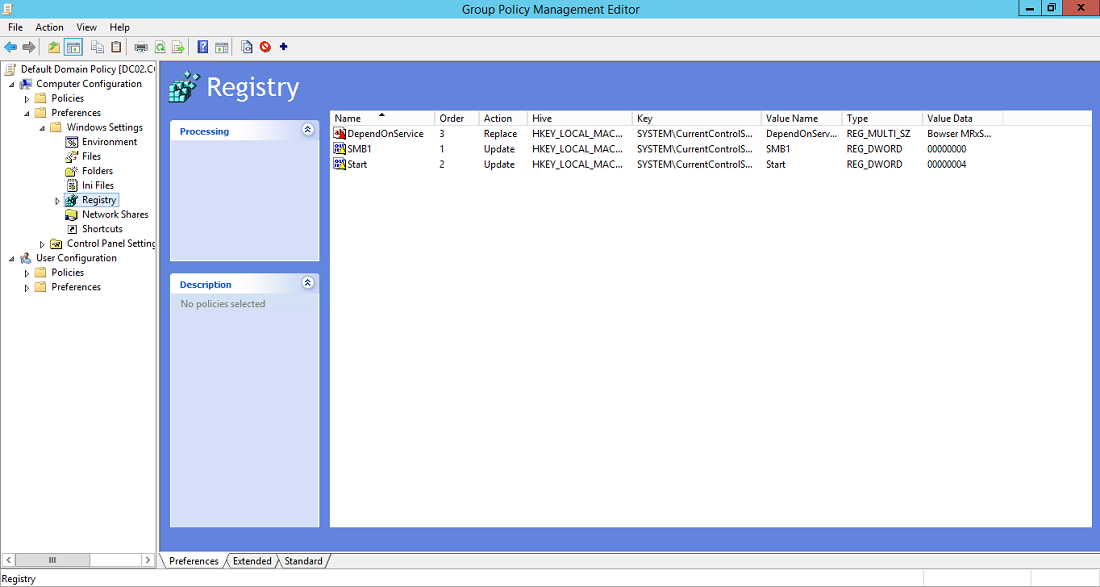
Check Group Policy settings
If all the settings are in the same GPO, Group Policy Management displays the following settings:
Test and validate the policy
After you complete the configuration steps in Group Policy Management Console, give Group Policy time to apply the updates to its settings. If needed for testing, run gpupdate /force at a command prompt, and then review the target computers to make sure that the registry settings are applied correctly. Make sure SMBv2 and SMBv3 are functioning for all other systems in the environment.
Note
After you test the policy, restart the target systems.
This module describes how administrators can activate Windows clients at scale and use Group Policy and PowerShell to apply configuration settings to groups of Windows clients.