Events
Apr 29, 2 PM - Apr 30, 7 PM
Join the ultimate Windows Server virtual event April 29-30 for deep-dive technical sessions and live Q&A with Microsoft engineers.
Sign up nowThis browser is no longer supported.
Upgrade to Microsoft Edge to take advantage of the latest features, security updates, and technical support.
This article describes how to enable and disable Server Message Block (SMB) version 1 (SMBv1), SMB version 2 (SMBv2), and SMB version 3 (SMBv3) on SMB client and server components.
If you disable or remove SMBv1, you might encounter compatibility issues with old computers or software. SMBv1 has significant security vulnerabilities, and we strongly encourage you not to use it. SMBv1 isn't installed by default in any edition of Windows 11 or Windows Server 2019 and later versions. SMBv1 also isn't installed by default in Windows 10, except Home and Pro editions. We recommend that instead of reinstalling SMBv1, you update the SMB server that still requires it. For a list of partners that require SMBv1 and their updates that remove the requirement, see SMB1 Product Clearinghouse.
We recommend keeping SMBv2 and SMBv3 enabled, but you might find it useful to disable one temporarily for troubleshooting. For more information, see Use the command line or Registry Editor to manage SMB protocols.
Disabling SMBv3 deactivates the following functionality:
Disabling SMBv2 deactivates the following functionality:
The SMBv2 protocol was introduced in Windows Vista and Windows Server 2008. The SMBv3 protocol was introduced in Windows 8 and Windows Server 2012. For more information about SMBv2 and SMBv3 capabilities, see the following articles:
You can use the Get-WindowsOptionalFeature, Disable-WindowsOptionalFeature, and Enable-WindowsOptionalFeature PowerShell commands to detect, disable, and enable an SMBv1 client or server. Run the commands at an elevated command prompt.
Note
The computer restarts after you run the PowerShell commands to disable or enable SMBv1.
Detect:
Get-WindowsOptionalFeature -Online -FeatureName SMB1Protocol
Disable:
Disable-WindowsOptionalFeature -Online -FeatureName SMB1Protocol
Enable:
Enable-WindowsOptionalFeature -Online -FeatureName SMB1Protocol
Tip
You can detect the SMBv1 status without elevation by running the Get-SmbServerConfiguration command: Get-SmbServerConfiguration | Format-List EnableSMB1Protocol.
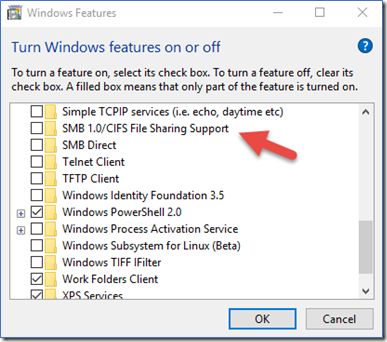
SMBv1 isn't installed by default on Windows Server 2019 and later versions. On earlier versions of Windows Server, you can use Server Manager to remove SMBv1:
On the server that you want to remove SMBv1 from, open Server Manager.
On the Server Manager Dashboard, under Configure this local server, select Add roles and features.
On the Before you begin page, select Start the Remove Roles and Features Wizard, and then on the following page, select Next.
On the Select destination server page, under Server Pool, ensure that the server you want to remove the feature from is selected, and then select Next.
On the Remove server roles page, select Next.
On the Remove features page, clear the checkbox for SMB 1.0/CIFS File Sharing Support, and then select Next.
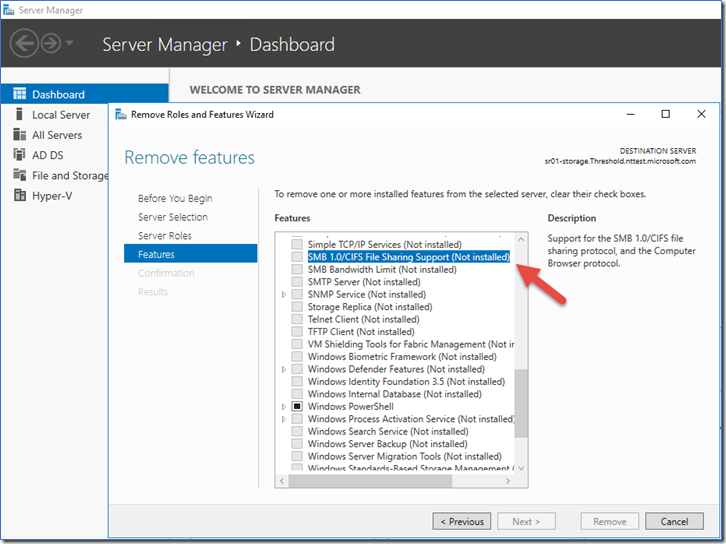
On the Confirm removal selections page, confirm that the feature is listed, and then select Remove.
Starting with the Windows 10 Fall Creators Update and Windows Server 2019, SMBv1 is no longer installed by default. For more information, see SMBv1 is not installed by default in Windows 10 version 1709, Windows Server version 1709, and later versions.
When you enable or disable SMBv2 in Windows 8 or Windows Server 2012, SMBv3 is also enabled or disabled. This behavior occurs because these protocols share the same stack.
You can use the Set-SMBServerConfiguration cmdlet to enable or disable the SMBv1, SMBv2, and SMBv3 protocols on a server component. You can use the Get-SmbServerConfiguration cmdlet to retrieve the SMB server configuration.
You don't have to restart the computer after you run the Set-SMBServerConfiguration cmdlet.
Detect:
Get-SmbServerConfiguration | Select EnableSMB1Protocol
Disable:
Set-SmbServerConfiguration -EnableSMB1Protocol $false
Enable:
Set-SmbServerConfiguration -EnableSMB1Protocol $true
For more information, see Stop using SMB1.
Detect:
Get-SmbServerConfiguration | Select EnableSMB2Protocol
Disable:
Set-SmbServerConfiguration -EnableSMB2Protocol $false
Enable:
Set-SmbServerConfiguration -EnableSMB2Protocol $true
To enable or disable SMB protocols on an SMB Server that runs Windows 7, Windows Server 2008 R2, Windows Vista, or Windows Server 2008, use Windows PowerShell or Registry Editor, as explained in the following sections.
You can use the Get-Item, Get-ItemProperty, and Set-ItemProperty cmdlets to detect, enable, and disable SMB protocols.
Note
The commands in the following sections require PowerShell 2.0 or later.
Detect:
Get-Item HKLM:\SYSTEM\CurrentControlSet\Services\LanmanServer\Parameters | ForEach-Object {Get-ItemProperty $_.pspath}
The default configuration is Enabled. As a result, no registry named value is created, so the command doesn't return an SMB1 value.
Disable:
Set-ItemProperty -Path "HKLM:\SYSTEM\CurrentControlSet\Services\LanmanServer\Parameters" SMB1 -Type DWORD -Value 0 -Force
Enable:
Set-ItemProperty -Path "HKLM:\SYSTEM\CurrentControlSet\Services\LanmanServer\Parameters" SMB1 -Type DWORD -Value 1 -Force
Note
You must restart the computer after you make these changes.
For more information, see Stop using SMB1.
Detect:
Get-ItemProperty HKLM:\SYSTEM\CurrentControlSet\Services\LanmanServer\Parameters | ForEach-Object {Get-ItemProperty $_.pspath}
Disable:
Set-ItemProperty -Path "HKLM:\SYSTEM\CurrentControlSet\Services\LanmanServer\Parameters" SMB2 -Type DWORD -Value 0 -Force
Enable:
Set-ItemProperty -Path "HKLM:\SYSTEM\CurrentControlSet\Services\LanmanServer\Parameters" SMB2 -Type DWORD -Value 1 -Force
Note
You must restart the computer after you make these changes.
Important
Follow the steps in this section carefully. Serious problems might occur if you modify the registry incorrectly. Before you modify it, back up the registry for restoration in case problems occur.
To enable or disable SMBv1 on an SMB server, open Registry Editor and go to the following registry key path:
HKEY_LOCAL_MACHINE\SYSTEM\CurrentControlSet\Services\LanmanServer\Parameters
Configure an entry that has the following properties:
To enable or disable SMBv2 on an SMB server, open Registry Editor and go to the following registry key path:
HKEY_LOCAL_MACHINE\SYSTEM\CurrentControlSet\Services\LanmanServer\Parameters
Configure an entry that has the following properties:
Note
You must restart the computer after you make these changes.
This section shows you how to use Group Policy to disable SMBv1. You can use this method on various versions of Windows.
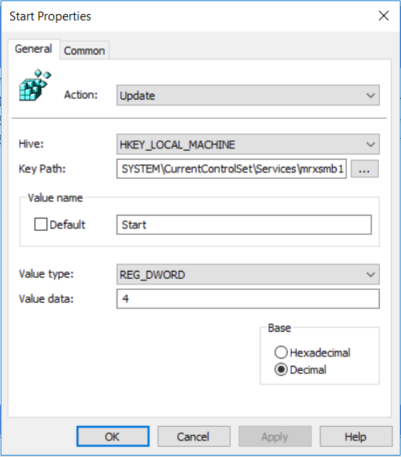
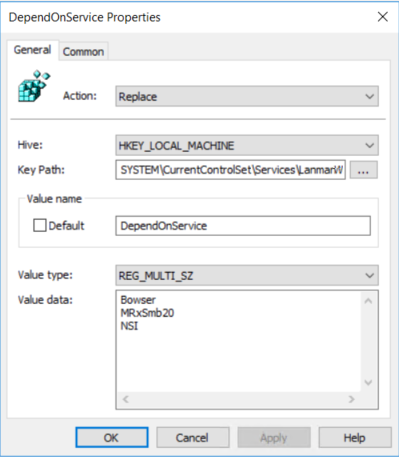
You can disable SMBv1 on an SMB server by configuring the following new item in the registry:
To use Group Policy to configure this item, take the following steps:
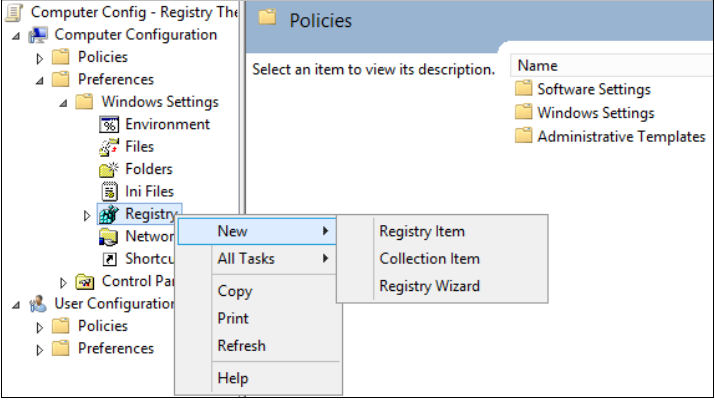
Open Group Policy Management Console. Right-click the Group Policy object (GPO) that should contain the new preference item, and then select Edit.
In the console tree under Computer Configuration, expand the Preferences folder, and then expand the Windows Settings folder.
Right-click the Registry node, point to New, and then select Registry Item.
In the New Registry Properties dialog, select or enter the following values:

This procedure disables the SMBv1 server components. You must apply this policy to all necessary workstations, servers, and domain controllers in the domain.
Note
You can set Windows Management Instrumentation (WMI) filters to exclude specific operating systems or to exclude client or server operating systems. For more information, see Group Policy Filtering and Create WMI Filters for the GPO.
Important
Some systems require access to the SYSVOL folder or other file shares but don't support SMBv2 or SMBv3. Examples of such systems include legacy Windows systems and older Linux and partner systems. Be careful when you disable SMBv1 on domain controllers on these systems.
To determine which clients attempt to connect to an SMB server by using SMBv1, you can enable auditing on Windows Server and Windows clients. To enable or disable auditing, use the Set-SmbServerConfiguration cmdlet. To check the auditing status, use the Get-SmbServerConfiguration cmdlet.
Enable:
Set-SmbServerConfiguration -AuditSmb1Access $true
Disable:
Set-SmbServerConfiguration -AuditSmb1Access $false
Detect:
Get-SmbServerConfiguration | Select AuditSmb1Access
After you enable SMBv1 auditing, you can check the Microsoft-Windows-SMBServer\Audit event log for access events. Each time a client attempts to use SMBv1 to connect to a server, an entry that has an event ID of 3000 appears in the log.
If all the settings are in the same GPO, Group Policy Management displays the following settings:
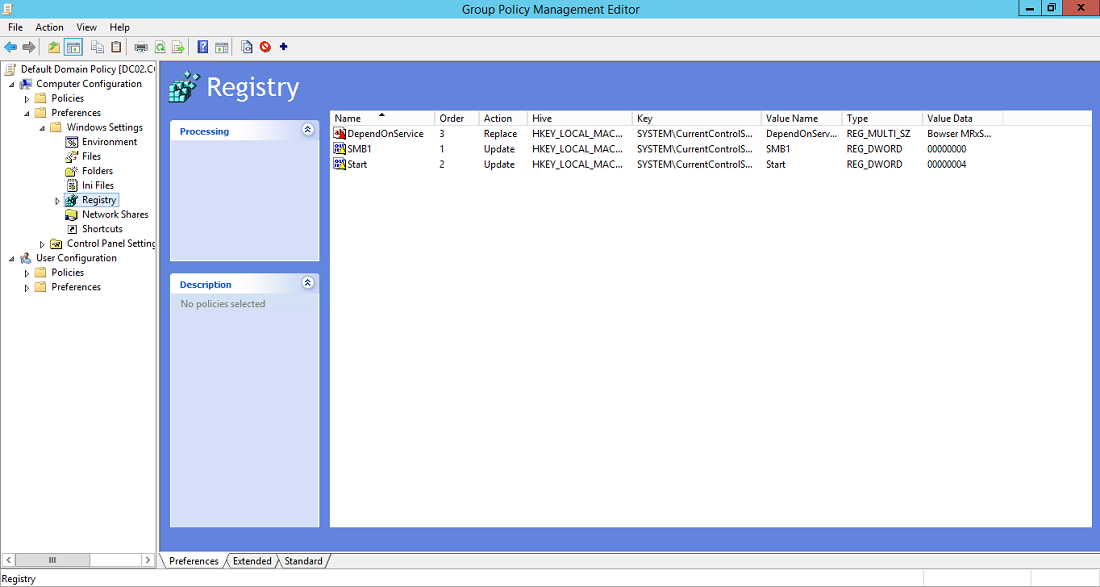
After you complete the configuration steps in Group Policy Management Console, give Group Policy time to apply the updates to its settings. If needed for testing, run gpupdate /force at a command prompt, and then review the target computers to make sure that the registry settings are applied correctly. Make sure SMBv2 and SMBv3 are functioning for all other systems in the environment.
Note
After you test the policy, restart the target systems.
Events
Apr 29, 2 PM - Apr 30, 7 PM
Join the ultimate Windows Server virtual event April 29-30 for deep-dive technical sessions and live Q&A with Microsoft engineers.
Sign up nowTraining
Module
Explore advanced configuration methods - Training
This module describes how administrators can activate Windows clients at scale and use Group Policy and PowerShell to apply configuration settings to groups of Windows clients.
Certification
Microsoft Certified: Information Protection and Compliance Administrator Associate - Certifications
Demonstrate the fundamentals of data security, lifecycle management, information security, and compliance to protect a Microsoft 365 deployment.