Features in Configuration Manager technical preview version 2009
Applies to: Configuration Manager (technical preview branch)
This article introduces the features that are available in the technical preview for Configuration Manager, version 2009. Install this version to update and add new features to your technical preview site.
Review the technical preview article before installing this update. That article familiarizes you with the general requirements and limitations for using a technical preview, how to update between versions, and how to provide feedback.
The following sections describe the new features to try out in this version:
Based on your feedback, cloud management gateway (CMG) deployments now use virtual machine scale sets in Azure. This change introduces support for Azure Cloud Solution Provider (CSP) subscriptions.
Except for the following aspects, the configuration, operation, and functionality of the CMG remains the same:
A new prerequisite is to register the following resource providers in your Azure subscription:
- Microsoft.KeyVault
- Microsoft.Storage
- Microsoft.Network
- Microsoft.Compute
For more information, see Azure resource providers and types.
When you create a CMG in the Configuration Manager console, the default option to deploy the cloud service is as a Virtual machine scale set. If necessary, you can still select Cloud service (classic) to use the existing Azure Resource Manager deployment.
For a CMG deployment to a virtual machine scale set, the service name is different. This name is from the CMG server authentication certificate.
With the previous Azure Resource Manager deployment option, the service name is in the cloudapp.net domain. For example, GraniteFalls.CloudApp.Net.
With a virtual machine scale set, the service name uses the cloudapp.azure.com domain along with the region. For example, GraniteFalls.EastUS.CloudApp.Azure.Com for a deployment in the East US Azure region.
The CMG connection point only communicates with the virtual machine scale set in Azure over HTTPS. It doesn't require TCP-TLS ports 10140-10155 to build the CMG communication channel.
If you already have an existing CMG deployment using Azure Resource Manager, you don't have to redeploy the service. This new deployment method is primarily to support CSP customers to use the CMG. If you do redeploy the service to leverage the new architecture, since the service name changes, you'll need to make configuration changes:
If you issue the CMG server authentication certificate for your own domain name, update the CNAME record in DNS. For example, the certificate uses GraniteFalls.Contoso.Com. First deploy the new service with the same certificate. When you're ready to switch, change the CNAME to point to the virtual machine scale set. For example, change the CNAME mapping for GraniteFalls.Contoso.Com to GraniteFalls.EastUS.CloudApp.Azure.Com.
If you're using a CMG server authentication certificate from a third-party provider, they issued the certificate in the cloudapp.net domain. You need to get a new certificate for the new service domain. For example, GraniteFalls.EastUS.CloudApp.Azure.Com. Create the new service with the new certificate, and add a second CMG connection point. Then wait at least one day before you delete the old CMG and remove the original CMG connection point. If clients are turned off or without an internet connection, you may need to wait longer.
For more general information on the cloud management gateway, see Overview of CMG.
The following CMG configurations are currently not supported in this release:
Azure US Government Cloud
Enforce TLS 1.2
This release continues to improve the functionality of remote control as first introduced in technical preview version 1906. You can now connect to any Configuration Manager client with an online status.
The following prerequisites now apply:
In the Remote Tools group of client settings:
Enable remote control
Add the user as a permitted viewer for remote control.
For more information, see About client settings - Remote Tools.
Configuration Manager client requirements:
Update the client to the latest version.
The client status needs to be online.
If the client is internet-based, use a cloud management gateway (CMG).
Important
This feature was removed in Configuration Manager technical preview branch version 2112. For more information, see A new remote assistance tool.
Note
Remote control now supports all available client authentication methods. For example, internet-based clients might authenticate using one of the following methods:
These requirements aren't unique to remote control. If you properly configure clients to communicate with a CMG, HTTPS management points, or sites with enhanced HTTP, then they already use a supported authentication method.
For more information on how to use remote control, see the instructions from version 1906.
When you start a remote control session, select the option to Connect via CMG or HTTPS MP for any of the following scenarios:
- CMG
- HTTPS management point
- Enhanced HTTP site
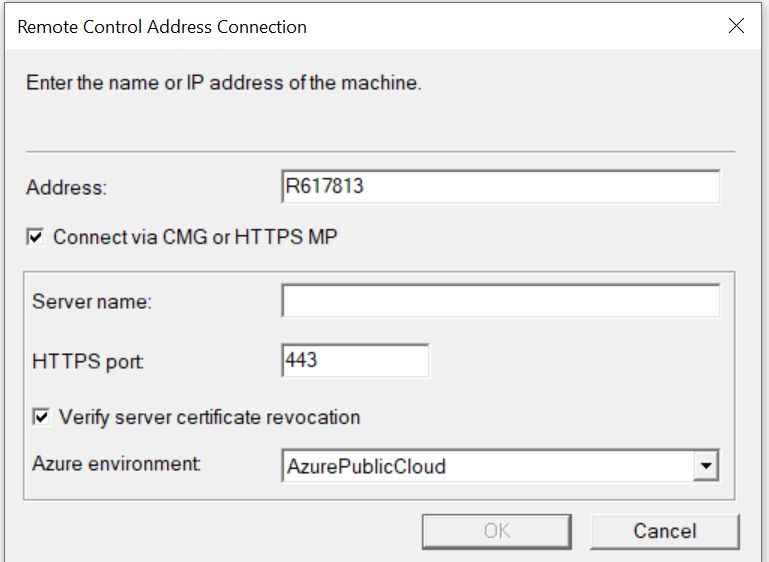
Enter the fully qualified domain name (FQDN) of the applicable service. For example:
- CMG:
granitefalls.cloudapp.net - HTTPS management point:
mp1.contoso.com
- CMG:
If you specify a CMG, the permitted viewer and the target client device need a connection to the internet. This connection is required even if they're on the internal network.
Starting in current branch version 2006, the cloud management gateway (CMG) supports running a task sequence with a boot image when you start it from Software Center. With this release, you can now use boot media to reimage internet-based devices that connect through a CMG. This scenario helps you better support remote workers. If Windows won't start so that the user can access Software Center, you can now send them a USB drive to reinstall Windows.
For all content referenced in the task sequence, distribute it to a content-enabled CMG or a cloud distribution point. For more information, see Distribute content.
Enable the following client settings in the Cloud services group:
- Allow access to cloud distribution point
- Enable clients to use a cloud management gateway
Configure the Apply Network Settings task sequence step to join a workgroup. During the task sequence, the device can't join the on-premises Active Directory domain. It doesn't have connectivity to a domain controller to join the domain.
When you deploy the task sequence to a collection, configure the following settings:
- User experience page: Allow task sequence to run for client on the internet
- Deployment settings page: Make available to an option that includes media.
- Distribution points page, deployment options: Download content locally when needed by the running task sequence. For more information, see Deployment options.
Make sure the device has a constant internet connection while the task sequence runs. Windows PE doesn't support wireless networks, so the device needs a wired network connection.
Try to complete the tasks. Then send Feedback with your thoughts on the feature.
Start the create task sequence media wizard for bootable media. For more information, see Create bootable media. Modify the standard process using the following steps:
On the Media Management page of the wizard, select the option for Internet-based media.
On the Security page, set a strong password to protect this media.
On the Boot Image page, select the Cloud management gateway for this boot media to use.
When you boot an internet-connected device using this media, it communicates with the specified CMG. The boot media downloads the policy for the task sequence deployment via the CMG. As the task sequence runs, it downloads any additional content and policies over the internet.
After the task sequence runs, the client uses token-based authentication.
Based on your feedback, you can now view dependency relationships between collections in a graphical format. It shows limiting, include, and exclude relationships.

If you want to change or delete collections, view the relationships to understand the impact of the proposed change. Before you create a deployment, look at the potential target collection for any include or exclude relationships that might affect the deployment.
Try to complete the tasks. Then send Feedback with your thoughts on the feature.
In the Configuration Manager console, go to the Assets and Compliance workspace, and select the Device Collections node.
Select a collection, and then in the ribbon, select View Relationships. On the main page:
To view the relationships with parent collections, select Dependency.
To view the relationships with child collections, select Dependent.
For example, if you select the All Systems collection to view its relationships, the Dependency node will be 0 as it has no parent collections.
Use the following tips to navigate the relationship viewer:
Select the plus (
+) or minus (-) icons next to the collection name to expand or collapse members of a node.The number in parentheses after the collection name is the number of relationships. If the number is 0, then that collection is the final or leaf node in that relationship tree.
The style and color of the line between the collections determines the type of relationship:
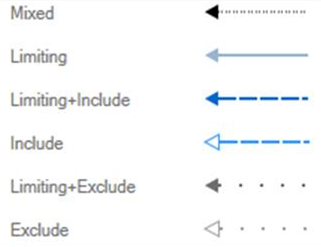
If you hover over a specific line, a tooltip shows the relationship type.
When the width of the tree is larger than the window, use the green arrows to the right or the left to view more.
When a node of the relationship tree is larger than the available space, select More to change the view to just that node.
To navigate to a prior view, select the Back arrow in the upper right corner. Select the Home icon to return to the main page.
Use the Search box in the upper right corner to locate a collection in the current tree view.
Use the Navigator in the lower right corner to zoom and pan around the tree. You can also print the current view.
Wake on LAN (WoL) has always posed a problem in complex, subnetted networks. Good networking best practice reduces the size of broadcast domains to mitigate against the risk of broadcast traffic adversely affecting the network. The most common way to limiting network broadcast is by not allowing broadcast packets to be routed between subnets. Another option is to enable subnet directed broadcasts but most organizations don't allow the magic packet to traverse internal routers.
In version 1810, the introduction of peer wake up allowed an administrator to wake a device or collection of devices, on demand using the client notification channel. Overcoming the need for the server to be in the same broadcast domain as the client.
This latest improvement allows the Configuration Manager site to wake devices at the deadline of a deployment, using that same client notification channel. Instead of the site server issuing the magic packet directly, the site uses the client notification channel to find an online machine in the last known subnet of the target device(s) and instructs the online client to issue the WoL packet for the target device.
Try to complete the tasks. Then send Feedback with your thoughts on the feature.
At the site level, enable Wake on LAN.
- Go to Administration > Site Configuration > Sites.
- Right-click on the site and select Properties.
- On the Wake on LAN tab, select Enable Wake on LAN for this site.
Verify Allow network wake-up under the Power Management client settings is enabled.
Deploy an application as Required with the Send wake-up packages option and a Deadline.


You now have an updated look and feel for in-console notifications. Notifications are more readable and the action link is easier to find. Additionally, the age of the notification is displayed to help you find the latest information. If you dismiss or snooze a notification, that action is now persistent for your user across consoles.
Right-click or select ... on the notification to take one of the following actions:
- Translate text: Launches Bing Translator for the text.
- Copy text: Copies the notification text to the clipboard.
- Snooze: Snoozes the notification for the specified duration:
- One hour
- One day
- One week
- One month
- Dismiss: Dismisses the notification.
To see these improvements for notifications, update the Configuration Manager console to the latest version.
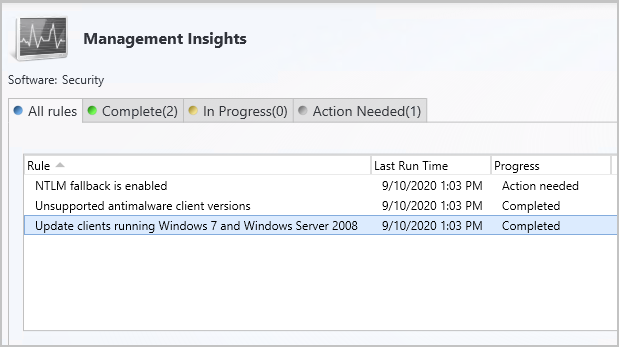
To help you manage security risk in your environment, you'll be notified in-console about devices with operating systems that are past the end of support date and that are no longer eligible to receive security updates. Additionally, a new Management Insights rule was added to detect Windows 7, Windows Server 2008, and Windows Server 2008 R2 without Extended Security Updates (ESU).
Environments with the following operating systems installed on client devices receive a notification:
- Windows 7, Windows Server 2008 (non-Azure), and Windows Server 2008 R2 (non-Azure) without ESU.
- Versions of Windows 10 Semi-Annual Channel that are past the end-of-support date.
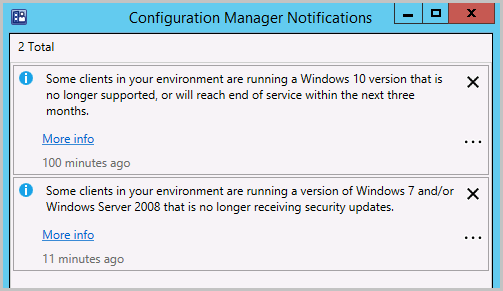
Selecting More info on either of these notifications takes you to All Insights in Management Insights. Choose from the following options for review:
For Windows 10 clients, review the Update clients to a supported Windows 10 version rule in the Simplified Management group. The rule shows clients running Windows 10 versions that are no longer supported or will reach end of service within the next three months.
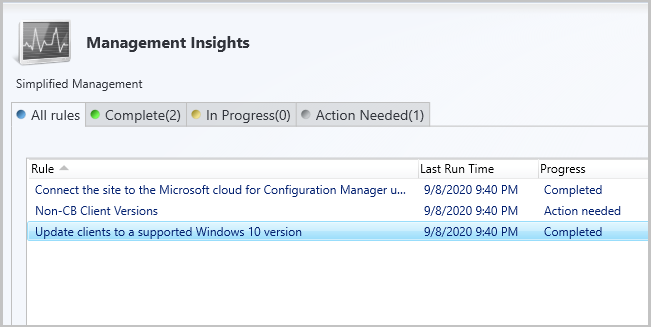
For Windows 7, Windows Server 2008, and Windows Server 2008 R2 without Extended Security Updates (ESU), review the new rule, Update clients running Windows 7 and Windows Server 2008 in the Security group. The rule shows clients running Windows 7, Windows Server 2008, and Windows Server 2008 R2 that are no longer receiving security updates.
For a low-rights user on a device that runs Windows Server, by default they aren't assigned the user rights to restart Windows. When you target a deployment to this device, this user can't manually restart. For example, they can't restart Windows to install software updates.
Starting in this release, you can now control this behavior as needed. In the Computer Restart group of client settings, enable the following setting: When a deployment requires a restart, allow low-rights users to restart a device running Windows Server.
Important
Allowing low-rights users to restart a server can potentially impact other users or services.
For more information on client settings, see How to configure client settings.
This release includes the following improvements to OS deployment:
After you update the site to version 2009, the Configuration Manager console shows the size in KB for all existing task sequences. Previously, the console showed a size of 0 for existing task sequences, which only updated when you modified the task sequence.
It resolves a bug with boot image metadata on PXE-enabled distribution points that have multiple content library drives. This bug could cause the client to fail to download the boot image over TFTP.
For more information about installing or updating the technical preview branch, see Technical preview.
For more information about the different branches of Configuration Manager, see Which branch of Configuration Manager should I use?.