Grant RSC permissions to your app
Resource-specific consent (RSC) is a Microsoft Teams and Microsoft Graph API integration that enables your app to use API endpoints to manage specific resources, either teams, chats, or users within an organization.
In this section, you learn to:
- Add RSC permissions to your Teams app
- Install your app in a team, chat, or user
- Verify app RSC permission granted to your app
Add RSC permissions to your Teams app
To add RSC permissions to your app, follow these steps:
- Register your app with Microsoft identity platform using the Microsoft Entra admin center.
- Update your app manifest (previously called Teams app manifest).
Register your app with Microsoft identity platform using the Microsoft Entra admin center
The Microsoft Entra admin center provides a central platform for you to register and configure your apps. You must register your app in the Microsoft Entra admin center to integrate with the identity platform and call Graph APIs. For more information, see register an app with the identity platform.
Warning
You mustn't share your Microsoft Entra app ID across multiple Teams apps. There must be a 1:1 mapping between a Teams app and a Microsoft Entra app. Installing multiple Teams apps associated with the same Microsoft Entra app ID will cause installation or runtime failures.
Update your app manifest
You must declare RSC permissions in your app manifest.json file. You don't need to add the non-RSC permissions to the app manifest as Microsoft Entra admin center stores them.
Request RSC permissions for Teams app
To request RSC permissions for an app, list the permissions that the app requires in the authorization section of the app manifest. The instructions can vary based on the app manifest version of the app.
Note
For delegated permissions, use app manifest v1.12 or later.
Whenever an authorized user installs your app within Teams, the RSC permissions requested in the app’s manifest are shown to the user. The permissions are granted as part of the app installation process.
RSC permissions for app manifest v1.12 or later
To add RSC permission in app manifest:
Add the webApplicationInfo key to your app manifest with the following values:
Name Type Description idString Your Microsoft Entra app ID. For more information, see register your app in the Microsoft Entra admin center. resourceString This field has no operation in RSC but you must add a value to avoid an error response. You can add any string as value. Add permissions needed by your app.
Name Type Description authorizationObject List of permissions that the app needs to function. For more information, see authorization in app manifest. If an app is meant to support installation in both team and chat scopes, then both team and chat permissions can be specified in the same app manifest under
authorization.
Example for RSC permissions in a team:
"webApplicationInfo": {
    "id": "XXxxXXXXX-XxXX-xXXX-XXxx-XXXXXXXxxxXX",
    "resource": "https://RscBasedStoreApp"
    },
"authorization": {
    "permissions": {
        "resourceSpecific": [
            {
                "name": "TeamSettings.Read.Group",
                "type": "Application"
            },
            {
                "name": "TeamSettings.ReadWrite.Group",
                "type": "Application"
            },
            {
                "name": "ChannelSettings.Read.Group",
                "type": "Application"
            },
            {
                "name": "ChannelSettings.ReadWrite.Group",
                "type": "Application"
            },
            {
                "name": "Channel.Create.Group",
                "type": "Application"
            },
            {
                "name": "Channel.Delete.Group",
                "type": "Application"
            },
            {
                "name": "ChannelMessage.Read.Group",
                "type": "Application"
            },
            {
                "name": "TeamsAppInstallation.Read.Group",
                "type": "Application"
            },
            {
                "name": "TeamsTab.Read.Group",
                "type": "Application"
            },
            {
                "name": "TeamsTab.Create.Group",
                "type": "Application"
            },
            {
                "name": "TeamsTab.ReadWrite.Group",
                "type": "Application"
            },
            {
                "name": "TeamsTab.Delete.Group",
                "type": "Application"
            },
            {
                "name": "TeamMember.Read.Group",
                "type": "Application"
            },
            {
                "name": "TeamsActivity.Send.Group",
                "type": "Application"
            },
            {
              "name": "ChannelMeeting.ReadBasic.Group",
              "type": "Delegated"
            },
            {
              "name": "ChannelMeetingParticipant.Read.Group",
              "type": "Delegated"
            },
            {
              "name": "ChannelMeetingStage.Write.Group",
              "type": "Delegated"
            }
        ]
    }
}
Example for RSC permissions in a chat:
"webApplicationInfo": {
    "id": "XXxxXXXXX-XxXX-xXXX-XXxx-XXXXXXXxxxXX",
    "resource": "https://RscBasedStoreApp"
    },
"authorization": {
    "permissions": {
        "resourceSpecific": [
            {
                "name": "ChatSettings.Read.Chat",
                "type": "Application"
            },
            {
                "name": "ChatSettings.ReadWrite.Chat",
                "type": "Application"
            },
            {
                "name": "ChatMessage.Read.Chat",
                "type": "Application"
            },
            {
                "name": "ChatMember.Read.Chat",
                "type": "Application"
            },
            {
                "name": "Chat.Manage.Chat",
                "type": "Application"
            },
            {
                "name": "TeamsTab.Read.Chat",
                "type": "Application"
            },
            {
                "name": "TeamsTab.Create.Chat",
                "type": "Application"
            },
            {
                "name": "TeamsTab.Delete.Chat",
                "type": "Application"
            },
            {
                "name": "TeamsTab.ReadWrite.Chat",
                "type": "Application"
            },
            {
                "name": "TeamsAppInstallation.Read.Chat",
                "type": "Application"
            },
            {
                "name": "OnlineMeeting.ReadBasic.Chat",
                "type": "Application"
            },
            {
                "name": "Calls.AccessMedia.Chat",
                "type": "Application"
            },
            {
                "name": "Calls.JoinGroupCalls.Chat",
                "type": "Application"
            },
            {
                "name": "TeamsActivity.Send.Chat",
                "type": "Application"
            },
            {
                "name": "MeetingStage.Write.Chat",
                "type": "Delegated"
            }
        ]
    }
}
Example for RSC permissions for user:
"webApplicationInfo": {
    "id": "XXxxXXXXX-XxXX-xXXX-XXxx-XXXXXXXxxxXX",
    "resource": "https://RscBasedStoreApp"
    },
"authorization": {
    "permissions": {
        "orgWide": []
        "resourceSpecific": [
            {
                "name": "InAppPurchase.Allow.User",
                "type": "Delegated"
            },
            {
                "name": "TeamsActivity.Send.User",
                "type": "Application"
            },
        ]
    }
}
RSC permissions for app manifest v1.11 or earlier
Note
It's recommended to use app manifest v1.12 or later.
Add the webApplicationInfo key to your app manifest with the following values:
| Name | Type | Description |
|---|---|---|
id |
String | Your Microsoft Entra app ID. For more information, see register your app in the Microsoft Entra admin center. |
resource |
String | This field has no operation in RSC but you must add a value to avoid an error response. You can add any string as value. |
applicationPermissions |
Array of strings | RSC permissions for your app. For more information, see Supported RSC permissions. |
If an app is meant to support installation in both team and chat scopes, then both team and chat permissions can be specified in the same app manifest under applicationPermissions.
Example for RSC permissions in a team:
"webApplicationInfo": {
    "id": "XXxxXXXXX-XxXX-xXXX-XXxx-XXXXXXXxxxXX",
    "resource": "https://RscBasedStoreApp",
    "applicationPermissions": [
        "TeamSettings.Read.Group",
        "TeamSettings.ReadWrite.Group",
        "ChannelSettings.Read.Group",
        "ChannelSettings.ReadWrite.Group",
        "Channel.Create.Group",
        "Channel.Delete.Group",
        "ChannelMessage.Read.Group",
        "TeamsAppInstallation.Read.Group",
        "TeamsTab.Read.Group",
        "TeamsTab.Create.Group",
        "TeamsTab.ReadWrite.Group",
        "TeamsTab.Delete.Group",
        "TeamMember.Read.Group",
        "TeamsActivity.Send.Group"
    ]
  }
Example for RSC permissions in a chat:
"webApplicationInfo": {
    "id": "XXxxXXXXX-XxXX-xXXX-XXxx-XXXXXXXxxxXX",
    "resource": "https://RscBasedStoreApp",
    "applicationPermissions": [
        "ChatSettings.Read.Chat",
        "ChatSettings.ReadWrite.Chat",
        "ChatMessage.Read.Chat",
        "ChatMember.Read.Chat",
        "Chat.Manage.Chat",
        "TeamsTab.Read.Chat",
        "TeamsTab.Create.Chat",
        "TeamsTab.Delete.Chat",
        "TeamsTab.ReadWrite.Chat",
        "TeamsAppInstallation.Read.Chat",
        "OnlineMeeting.ReadBasic.Chat",
        "Calls.AccessMedia.Chat",
        "Calls.JoinGroupCalls.Chat",
        "TeamsActivity.Send.Chat"
    ]
  }
Example for RSC permissions for a user:
"webApplicationInfo": {
    "id": "XXxxXXXXX-XxXX-xXXX-XXxx-XXXXXXXxxxXX",
    "resource": "https://RscBasedStoreApp",
    "applicationPermissions": [
        "TeamsActivity.Send.User"
    ]
  }
Install your app in a team, chat, or user
To install your app on which you've enabled RSC permission in a team, chat, or user, follow these steps:
- Ensure that you've configured consent settings for team, chat, or user.
- Upload your custom app in Teams.
Note
To see the RSC settings for team or chat, users must have one of these Microsoft 365 roles:
- Global Administrator
- Global Reader
- Teams Administrator
- Privileged Role Administrator
Configure consent settings
The tenant-level controls of application RSC permissions vary based on the resource type.
For delegated permissions, any authorized user can consent to the permissions requested by the app.
Warning
The way you manage team and chat RSC permission settings is being updated. The pre-selection period for government clouds has started and continues till May 14, 2024. During this period, government cloud organizations can continue to use Group Owner Consent. For all other organizations, following are the instructions to modify your consent settings in PowerShell.
For organizations in government clouds, you can manage consent settings with group owner consent settings in Microsoft Entra admin center till May 14th, 2024.
Tenant level RSC settings are managed by PowerShell and Graph API. For more information on managing Microsoft Graph settings with PowerShell, see get started with the Microsoft Graph PowerShell SDK.
You can use the Connect-MgGraph cmdlet and connect with the following permissions:
TeamworkAppSettings.ReadWrite.AllPolicy.ReadWrite.AuthorizationPolicy.ReadWrite.PermissionGrantAppCatalog.Read.All
The following are the available states for the PowerShell settings and each section shows examples of how to use these states to adjust your settings:
| PowerShell State | Description |
|---|---|
| ManagedByMicrosoft | This is the default state for all tenants. It allows chat and team RSC permissions to be consented for all users but can be changed at any time at Microsoft's discretion. |
| EnabledForAllApps | Any app requesting RSC permissions can be consented to by users (resource owners) in your tenant. |
| DisabledForAllApps | No RSC permissions can be consented to by users. |
Configure team RSC through PowerShell cmdlets
You can configure which users are allowed to consent to apps accessing their teams' data by using the available PowerShell states, such as ManagedByMicrosoft, EnabledForAllApps, and DisabledForAllApps.
The following example shows how to enable team RSC for all apps:
Set-MgBetaTeamRscConfiguration -State EnabledForAllApps
Configure chat RSC through PowerShell cmdlets
You can configure which users are allowed to consent to apps accessing their chats' data by using the available PowerShell states, such as ManagedByMicrosoft, EnabledForAllApps, and DisabledForAllApps.
The following example shows how to enable chat RSC for all apps:
Set-MgBetaChatRscConfiguration -State EnabledForAllApps
Configure user owner consent settings for RSC for a user using the Graph APIs
You can enable or disable RSC for user using Graph API. The isUserPersonalScopeResourceSpecificConsentEnabled property in teamsAppSettings governs whether user RSC is enabled in the tenant.
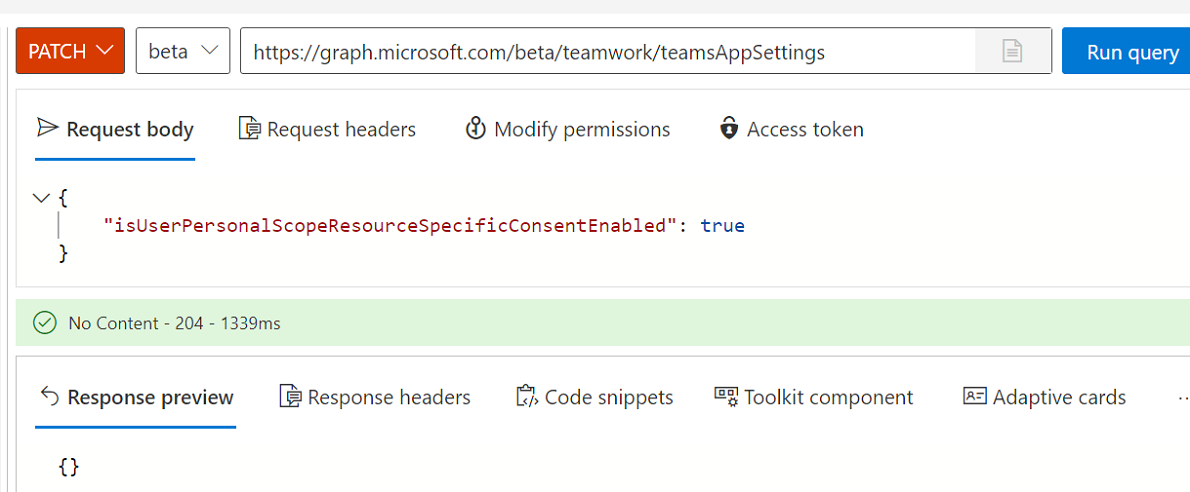
The default value of the isUserPersonalScopeResourceSpecificConsentEnabled property is based on whether user consent settings is turned on or off in the tenant when RSC for user is first used. The default value is defined either when:
- TeamsAppSettings are retrieved for the first time.
- Teams app with RSC permissions is installed for a user.
Note
Admin control is added to allow or block RSC consent settings based on the sensitivity of the data accessed. It isn't based on the single master switch that enables or disables consent settings for app RSC permissions for all apps in the tenant.
Upload your custom app in Teams
If your Teams admin allows custom app uploads, you can upload your custom app directly to a specific team, chat, or user.
Verify app RSC permission granted to your app
To verify the app RSC permissions, follow these steps:
- Obtain an access token from the Microsoft identity platform.
- Check the RSC permissions granted to a specific resource.
Obtain an access token from the Microsoft identity platform
To make Graph API calls, you must obtain an access token for your app from the identity platform. Before your app can get a token from the identity platform, you must register your app in the Microsoft Entra admin center. The access token contains information about your app and its permissions for the resources and APIs available through Microsoft Graph.
You must have the following values from the Microsoft Entra registration process to retrieve an access token from the identity platform:
- Application ID: The app ID assigned by the Microsoft Entra admin center to your app. If your app supports single sign-on (SSO), you must use the same app ID for your app and SSO.
- Client secret or Certificate: The password for your app, or the public or private key pair that is the certificate. The client secret or certificate isn't required for native apps.
- Redirect URI: The URL for your app to receive responses from Microsoft Entra ID.
For more information, see get access on behalf of a user and get access without a user.
Check the RSC permissions granted to a specific resource
You can check the type of RSC permission granted to a resource in the app:
For application RSC permissions, call the following APIs to retrieve the list of apps installed in a team, chat, or user:
These are all the application RSC permissions granted on this specific resource. Each entry in the list can be correlated to the Teams app by matching the
clientAppIdin the permission grants list with thewebApplicationInfo.Idproperty in the app's manifest.Delegated RSC permissions are Teams client-only permissions. You can't retrieve the list of apps installed in a team or chat as these permissions are granted when a user interacts with the app.
Important
The RSC permissions aren't attributed to a user. Calls are made with application permissions, not user delegated permissions. The app can be allowed to perform actions that the user can't, such as deleting a tab. You must review the team owner's or chat owner's intent for your use before making RSC API calls. For more information, see Microsoft Teams API overview.
After the app has been installed to a resource, you can use Microsoft Graph Explorer to view the permissions that have been granted to the app in the resource.
Check your app for added RSC permissions in a team
Get the team's groupId from Teams.
In Teams, select Teams from the left pane.
Select the team where the app is to be installed.
Select the ellipses ●●● for that team.
Select Get link to team from the dropdown list.
Copy and save the groupId value from the Get a link to the team pop-up dialog.
Sign in to Graph Explorer.
Make a GET call to this endpoint:
https://graph.microsoft.com/beta/teams/{teamGroupId}/permissionGrants.The
clientAppIdfield in the response must map to thewebApplicationInfo.idspecified in the app manifest.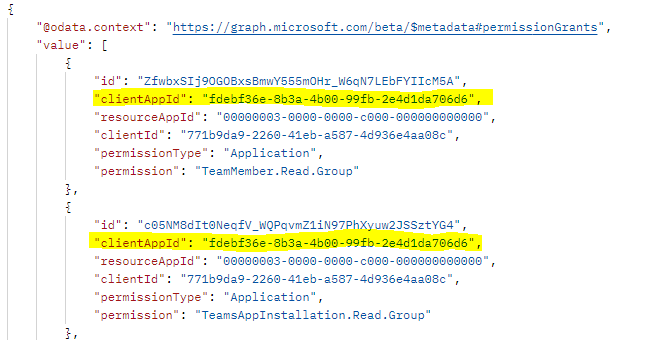
For more information on how to get details of the apps installed in a specific team, see get the names and other details of apps installed in the specified team.
Check your app for added RSC permissions in a chat
Get the chat thread ID from the Teams web client.
In the Teams web client, select Chat from the left pane.
Select the chat where you've installed the app from the dropdown list.
Copy the web URL and save the chat thread ID from the string.

Sign in to Graph Explorer.
Make a GET call to the following endpoint:
https://graph.microsoft.com/beta/chats/{chatId}/permissionGrants.The
clientAppIdfield in the response must map to thewebApplicationInfo.idspecified in the app manifest.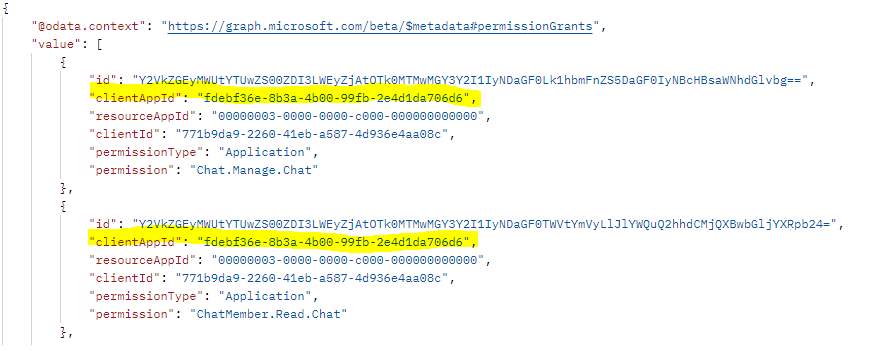
For more information on how to get details of apps installed in a specific chat, see get the names and other details of apps installed in the specified chat.
Check your app for added RSC permissions for a user
Use the Get user API. In the request url, pass the user's UPN and from the response body use the
idfield as the user's ID.Sign in to Graph Explorer.
Make a GET call to this endpoint:
https://graph.microsoft.com/beta/users/{user-id}/permissionGrants.Alternatively, you can pass the user's UPN instead of the
user-id.The
clientAppIdfield in the response must map to thewebApplicationInfo.idspecified in the Teams app manifest.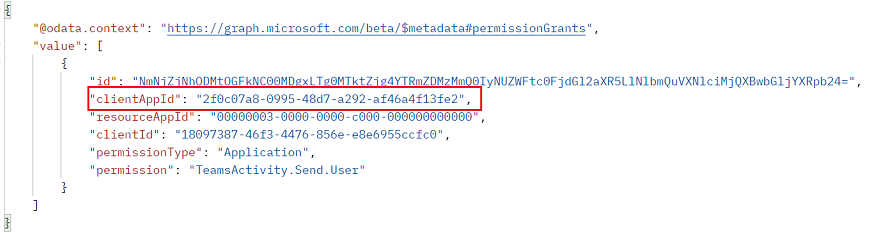
For more information on how to get details of the apps installed for the user, see get the names and other details of apps installed for the user.
Code sample
| Sample name | Description | .NET | Node.js | App manifest |
|---|---|---|---|---|
| Resource-Specific Consent (RSC) | This sample code describes the process to use RSC to call Graph APIs. | View | View | View |
See also
Platform Docs
Feedback
Coming soon: Throughout 2024 we will be phasing out GitHub Issues as the feedback mechanism for content and replacing it with a new feedback system. For more information see: https://aka.ms/ContentUserFeedback.
Submit and view feedback for