Training
Module
Upload images to Azure Blob Storage from a static web app - Training
Learn how to securely upload images to Azure Blob Storage from a static web app by using an Azure Function to generate on demand shared access signatures.
This browser is no longer supported.
Upgrade to Microsoft Edge to take advantage of the latest features, security updates, and technical support.
Before you begin, use the Choose a policy type selector at the top of this page to choose the type of policy you’re setting up. Azure Active Directory B2C offers two methods to define how users interact with your applications: through predefined user flows or through fully configurable custom policies. The steps required in this article are different for each method.
Branding and customizing the user interface that Azure Active Directory B2C (Azure AD B2C) displays to your customers helps provide a seamless user experience in your application. These experiences include signing up, signing in, profile editing, and password resetting. This article introduces the methods of user interface (UI) customization.
Tip
If you want to modify only the banner logo, background image, and background color of your user flow pages, you can try the Company branding feature.
Azure AD B2C runs code in your customer's browser by using Cross-Origin Resource Sharing (CORS). At runtime, content is loaded from a URL you specify in your user flow or custom policy. Each page in the user experience loads its content from the URL you specify for that page. After content is loaded from your URL, it's merged with an HTML fragment inserted by Azure AD B2C, and then the page is displayed to your customer.
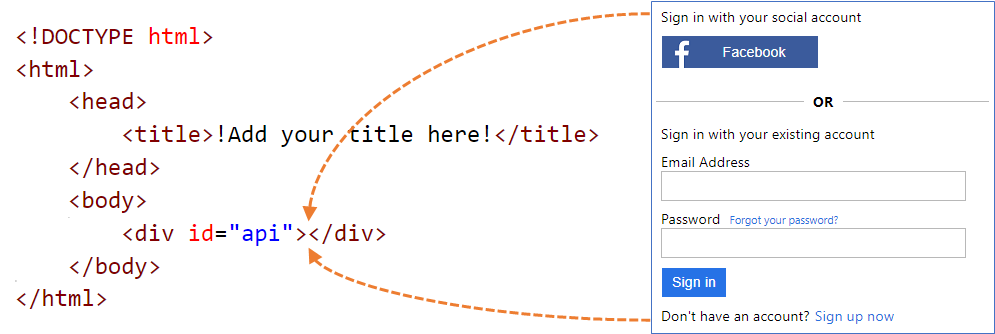
Create an HTML page with your own branding to serve your custom page content. This page can be a static *.html page, or a dynamic page like .NET, Node.js, or PHP, however, Azure B2C doesn't support any view engines. Any server-side rendering of the dynamic page must be performed by a dedicated web application.
Your custom page content can contain any HTML elements, including CSS and JavaScript, but can't include insecure elements like iframes. The only required element is a div element with id set to api, such as this one <div id="api"></div> within your HTML page.
<!DOCTYPE html>
<html>
<head>
    <title>My Product Brand Name</title>
</head>
<body>
    <div id="api"></div>
</body>
</html>
Instead of creating your custom page content from scratch, you can customize Azure AD B2C's default page content.
The following table lists the default page content provided by Azure AD B2C. Download the files and use them as a starting point for creating your own custom pages. See Sample templates to learn how you can download and use the sample templates.
| Page | Description | Templates |
|---|---|---|
| Unified sign-up or sign-in | This page handles the user sign-up and sign-in process. Users can use enterprise identity providers, social identity providers such as Facebook, Microsoft account, or local accounts. | Classic, Ocean Blue, and Slate Gray. |
| Sign-in (only) | The sign-in page is also known as the Identity provider selection. It handles the user sign-in with local account, or federated identity providers. Use this page to allow sign-in without the ability to sign up. For example before user can edit their profile. | Classic, Ocean Blue, and Slate Gray. |
| Self-Asserted | Most interactions in Azure AD B2C where the user is expected to provide input are self-asserted. For example, a sign-up page, sign-in page, or password reset page. Use this template as a custom page content for a social account sign-up page, a local account sign-up page, a local account sign-in page, password reset, edit profile, block page and more. The self-asserted page can contain various input controls, such as: a text input box, a password entry box, a radio button, single-select drop-down boxes, and multi-select check boxes. | Classic, Ocean Blue, and Slate Gray. |
| Multifactor authentication | On this page, users can verify their phone numbers (by using text or voice) during sign-up or sign-in. | Classic, Ocean Blue, and Slate Gray. |
| Error | This page is displayed when an exception or an error is encountered. | Classic, Ocean Blue, and Slate Gray. |
When using your own HTML and CSS files to customize the UI, host your UI content on any publicly available HTTPS endpoint that supports CORS. For example, Azure Blob storage, Azure App Services, web servers, CDNs, AWS S3, or file sharing systems.
Use an absolute URL when you include external resources like media, CSS, and JavaScript files in your HTML file.
Using page layout version 1.2.0 and above, you can add the data-preload="true" attribute in your HTML tags to control the load order for CSS and JavaScript. With data-preload="true", the page is constructed before being shown to the user. This attribute helps prevent the page from "flickering" by preloading the CSS file, without the unstyled HTML being shown to the user. The following HTML code snippet shows the use of the data-preload tag.
<link href="https://path-to-your-file/sample.css" rel="stylesheet" type="text/css" data-preload="true"/>
We recommend that you start with the default page content and build on top of it.
You can include JavaScript in your custom content.
Supported browser versions are:
Due to security restrictions, Azure AD B2C doesn't support frame, iframe, or form HTML elements.
You localize your HTML content by enabling language customization in your Azure AD B2C tenant. Enabling this feature allows Azure AD B2C to set the HTML page language attribute and pass the OpenID Connect parameter ui_locales to your endpoint.
During page load, Azure AD B2C sets the HTML page language attribute with the current language. For example, <html lang="en">. To render different styles per the current language, use the CSS :lang selector along with your CSS definition.
The following example defines the following classes:
imprint-en - Used when the current language is English.imprint-de - Used when the current language is German.imprint - Default class that is used when the current language isn't English or German..imprint-en:lang(en),
.imprint-de:lang(de) {
display: inherit !important;
}
.imprint {
display: none;
}
The following HTML elements are shown according to the page language:
<a class="imprint imprint-en" href="Link EN">Imprint</a>
<a class="imprint imprint-de" href="Link DE">Impressum</a>
The language customization feature allows Azure AD B2C to pass the OpenID Connect parameter ui_locales to your endpoint. Your content server can use this parameter to provide language-specific HTML pages.
Note
Azure AD B2C doesn't pass OpenID Connect parameters, such as ui_locales, to the exception pages.
Content can be pulled from different places based on the locale that's used. In your CORS-enabled endpoint, you set up a folder structure to host content for specific languages. You call the right one if you use the wildcard value {Culture:RFC5646}.
For example, your custom page URI might look like:
https://contoso.blob.core.windows.net/{Culture:RFC5646}/myHTML/unified.html
You can load the page in French by pulling content from:
https://contoso.blob.core.windows.net/fr/myHTML/unified.html
Here's an overview of the process:
unified.html.Create a custom page content with your product's brand name in the title.
Copy the following HTML snippet. It's well-formed HTML5 with an empty element called <div id="api"></div> located within the <body> tags. This element indicates where Azure AD B2C content is to be inserted.
<!DOCTYPE html>
<html>
<head>
    <title>My Product Brand Name</title>
</head>
<body>
    <div id="api"></div>
</body>
</html>
Paste the copied snippet in a text editor
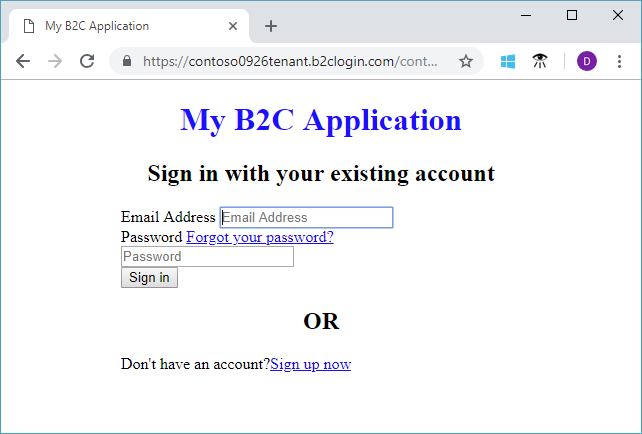
Use CSS to style the UI elements that Azure AD B2C inserts into your page. The following example shows a simple CSS file that also includes settings for the sign-up injected HTML elements:
h1 {
  color: blue;
  text-align: center;
}
.intro h2 {
  text-align: center;
}
.entry {
  width: 400px ;
  margin-left: auto ;
  margin-right: auto ;
}
.divider h2 {
  text-align: center;
}
.create {
  width: 400px ;
  margin-left: auto ;
  margin-right: auto ;
}
Save the file as customize-ui.html.
Note
HTML form elements are removed due to security restrictions if you use login.microsoftonline.com. If you want to use HTML form elements in your custom HTML content, use b2clogin.com.
In this article, we use Azure Blob storage to host our content. You can choose to host your content on a web server, but you must enable CORS on your web server.
Note
In an Azure AD B2C tenant, you can't provision Blob storage. You must create this resource in your Microsoft Entra tenant.
To host your HTML content in Blob storage, use the following steps:
To create a public container in Blob storage, perform the following steps:
ResourceNotFound error, make sure the container access type is set to blob.Configure Blob storage for Cross-Origin Resource Sharing by performing the following steps:
https://your-tenant-name.b2clogin.com. Replace your-tenant-name with the name of your Azure AD B2C tenant. For example, https://fabrikam.b2clogin.com. Use all lowercase letters when entering your tenant name.GET and OPTIONS.Validate that you're ready by performing the following steps:
https://www.test-cors.orghttps://your-account.blob.core.windows.net/root/azure-ad-b2c/unified.htmlXHR status: 200.
If you receive an error, make sure that your CORS settings are correct. You might also need to clear your browser cache or open an in-private browsing session by pressing Ctrl+Shift+P.Learn more about how to create and manage Azure storage accounts.
You should see a page similar to the following example with the elements centered based on the CSS file that you created:
To configure UI customization, copy the ContentDefinition and its child elements from the base file to the extensions file:
Open the base file of your policy. For example, SocialAndLocalAccounts/TrustFrameworkBase.xml. This base file is one of the policy files included in the custom policy starter pack, which you should have obtained in the prerequisite, Get started with custom policies.
Search for and copy the entire contents of the ContentDefinitions element.
Open the extension file. For example, TrustFrameworkExtensions.xml. Search for the BuildingBlocks element. If the element doesn't exist, add it.
Paste the entire contents of the ContentDefinitions element that you copied as a child of the BuildingBlocks element.
Search for the ContentDefinition element that contains Id="api.signuporsignin" in the XML that you copied.
Change the value of LoadUri to the URL of the HTML file that you uploaded to storage. For example, https://your-storage-account.blob.core.windows.net/your-container/customize-ui.html.
Your custom policy should look like the following code snippet:
<BuildingBlocks>
  <ContentDefinitions>
    <ContentDefinition Id="api.signuporsignin">
      <LoadUri>https://your-storage-account.blob.core.windows.net/your-container/customize-ui.html</LoadUri>
      <RecoveryUri>~/common/default_page_error.html</RecoveryUri>
      <DataUri>urn:com:microsoft:aad:b2c:elements:unifiedssp:1.0.0</DataUri>
      <Metadata>
        <Item Key="DisplayName">Signin and Signup</Item>
      </Metadata>
    </ContentDefinition>
  </ContentDefinitions>
</BuildingBlocks>
Save the extensions file.
By using Azure AD B2C custom policies, you can send a parameter in the URL path, or a query string. By passing the parameter to your HTML endpoint, you can dynamically change the page content. For example, you can change the background image on the Azure AD B2C sign-up or sign-in page, based on a parameter that you pass from your web or mobile application. The parameter can be any claim resolver, such as the application ID, language ID, or custom query string parameter, such as campaignId.
To send query string parameters, in the relying party policy, add a ContentDefinitionParameters element as shown below.
<RelyingParty>
    <DefaultUserJourney ReferenceId="SignUpOrSignIn" />
    <UserJourneyBehaviors>
    <ContentDefinitionParameters>
        <Parameter Name="campaignId">{OAUTH-KV:campaignId}</Parameter>
        <Parameter Name="lang">{Culture:LanguageName}</Parameter>
        <Parameter Name="appId">{OIDC:ClientId}</Parameter>
    </ContentDefinitionParameters>
    </UserJourneyBehaviors>
    ...
</RelyingParty>
In your content definition, change the value of LoadUri to https://<app_name>.azurewebsites.net/home/unified. Your custom policy ContentDefinition should look like the following code snippet:
<ContentDefinition Id="api.signuporsignin">
  <LoadUri>https://<app_name>.azurewebsites.net/home/unified</LoadUri>
  ...
</ContentDefinition>
When Azure AD B2C loads the page, it makes a call to your web server endpoint:
https://<app_name>.azurewebsites.net/home/unified?campaignId=123&lang=fr&appId=00001111-aaaa-2222-bbbb-3333cccc4444
Content can be pulled from different places based on the parameters used. In your CORS-enabled endpoint, set up a folder structure to host content. For example, you can organize the content in following structure. Root folder/folder per language/your html files. For example, your custom page URI might look like:
<ContentDefinition Id="api.signuporsignin">
  <LoadUri>https://contoso.blob.core.windows.net/{Culture:LanguageName}/myHTML/unified.html</LoadUri>
  ...
</ContentDefinition>
Azure AD B2C sends the two letter ISO code for the language, fr for French:
https://contoso.blob.core.windows.net/fr/myHTML/unified.html
You can find sample templates for UI customization here:
git clone https://github.com/azure-ad-b2c/html-templates
This project contains the following templates:
To use the sample:
Clone the repo on your local machine. Choose a template folder /AzureBlue, /MSA, or /classic.
Upload all the files under the template folder and the /src folder, to Blob storage as described in the previous sections.
Next, open each \*.html file in the template folder. Then replace all instances of https://login.microsoftonline.com URLs, with the URL you uploaded in step 2. For example:
From:
https://login.microsoftonline.com/templates/src/fonts/segoeui.WOFF
To:
https://your-storage-account.blob.core.windows.net/your-container/templates/src/fonts/segoeui.WOFF
Save the \*.html files and upload them to the Blob storage.
Now modify the policy, pointing to your HTML file, as mentioned previously.
If you see missing fonts, images, or CSS, check your references in the extensions policy and the \*.html files.
To use company branding assets in a custom HTML, add the following tags outside the <div id="api"> tag. The image source is replaced with that of the background image and banner logo.
<img data-tenant-branding-background="true" />
<img data-tenant-branding-logo="true" alt="Company Logo" />
Learn how to enable client-side JavaScript code.
Training
Module
Upload images to Azure Blob Storage from a static web app - Training
Learn how to securely upload images to Azure Blob Storage from a static web app by using an Azure Function to generate on demand shared access signatures.