Add Google as an identity provider for B2B guest users
Article
Applies to: Workforce tenants External tenants (learn more)
Tip
This article describes adding Google as an identity provider for B2B collaboration in workforce tenants. For instructions for external tenants, see Add Google as an identity provider.
By setting up federation with Google, you can allow invited users to sign in to your shared apps and resources with their own Gmail accounts, without having to create Microsoft accounts. After you add Google as one of your application's sign-in options, on the Sign in page, a user can enter the Gmail address they use to sign in to Google.
Starting July 12, 2021, if Microsoft Entra B2B customers set up new Google integrations for use with self-service sign-up or for inviting external users for their custom or line-of-business applications, authentication could be blocked for Gmail users (with the error screen shown in What to expect). This issue occurs only if you create Google integration for self-service sign-up user flows or invitations after July 12, 2021 and Gmail authentications in your custom or line-of-business applications haven’t been moved to system web-views. Because system web-views are enabled by default, most apps will not be affected. To avoid the issue, we strongly advise you to move Gmail authentications to system browsers before creating any new Google integrations for self-service sign-up. Please refer to Action needed for embedded web-views.
Starting September 30, 2021, Google is deprecating web-view sign-in support. If your apps authenticate users with an embedded web-view and you're using Google federation with Azure AD B2C or Microsoft Entra B2B for external user invitations or self-service sign-up, Google Gmail users won't be able to authenticate. Learn more.
What is the experience for the Google user?
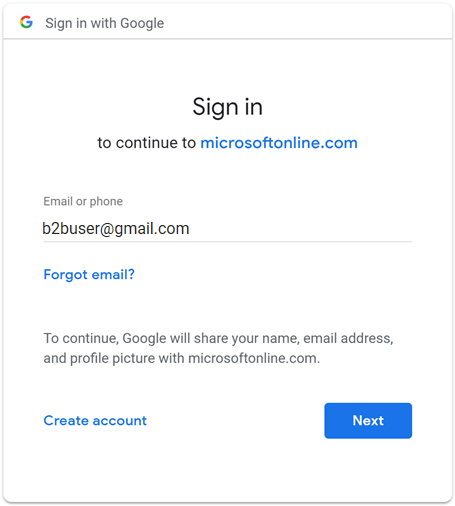
You can invite a Google user to B2B collaboration in various ways. For example, you can add them to your directory via the Microsoft Entra admin center. When they redeem your invitation, their experience varies depending on whether they're already signed in to Google:
Guest users who aren't signed in to Google are prompted to do so.
Guest users who are already signed in to Google are prompted to choose the account they want to use. They must choose the account you used to invite them.
Guest users who see a "header too long" error can clear their cookies or open a private or incognito window and try to sign in again.
Sign-in endpoints
Google guest users can now sign in to your multitenant or Microsoft first-party apps by using a common endpoint (in other words, a general app URL that doesn't include your tenant context). During the sign-in process, the guest user chooses Sign-in options, and then selects Sign in to an organization. The user then types the name of your organization and continues signing in using their Google credentials.
Google guest users can also use application endpoints that include your tenant information, for example:
You can also give Google guest users a direct link to an application or resource by including your tenant information, for example https://myapps.microsoft.com/signin/X/<application ID?tenantId=<your tenant ID>.
The following are known scenarios that affect Gmail users:
Microsoft apps (for example, Teams and Power Apps) on Windows
Windows apps that use the WebView control, WebView2, or the older WebBrowser control, for authentication. These apps should migrate to using the Web Account Manager (WAM) flow.
Google Workspace identities, for example when you’re using SAML-based federation with Google Workspace
Windows apps that use the Web Account Manager (WAM) or Web Authentication Broker (WAB).
Action needed for embedded web-views
Modify your apps to use the system browser for sign-in. For details, see Embedded web view vs system browser in the MSAL.NET documentation. All MSAL SDKs use the system browser by default.
What to expect
Starting September 30, Microsoft will globally roll out a device sign-in flow that serves as a workaround for apps still using embedded web-views to ensure that authentication isn’t blocked.
How to sign in with the device sign-in flow
The device sign-in flow prompts users who sign in with a Gmail account in an embedded web-view to enter a code in a separate browser before they can finish signing in. If users are signing in with their Gmail account for the first time with no active sessions in the browser, they see the following sequence of screens. If an existing Gmail account is already signed in, some of these steps might be eliminated.
On the Sign in screen, the user enters their Gmail address and selects Next.
The following screen appears, prompting the user to open a new window, navigate to https://microsoft.com/devicelogin, and enter the nine digit alphanumeric code displayed.
The device sign-in page opens, where the user can enter the code.
If the codes match, the user is asked to reenter their email to confirm their app and sign-in location for security purposes.
The user signs in to Google with their email and password.
Once again, they're asked to confirm the app they're signing into.
The user selects Continue. A prompt confirms that they’re signed in. The user closes the tab or window and is returned to the first screen, where they're now signed in to the app.
Alternatively, you can have your existing and new Gmail users sign in with email one-time passcode. To have your Gmail users use email one-time passcode:
Reset redemption status of your Gmail users so they can use email one-time passcode going forward.
If you want to request an extension, impacted customers with affected OAuth client IDs should have received an email from Google Developers with the following information regarding a one-time policy enforcement extension, which must be completed by January 31, 2022:
"If necessary, you may request a one-time policy enforcement extension for embedded webviews for each listed OAuth client ID until January 31, 2022. For clarity, the policy for embedded webviews will be enforced on February 1, 2022 with no exceptions or extensions."
Applications that are migrated to an allowed web-view for authentication won't be affected, and users will be allowed to authenticate via Google as usual.
If applications aren't migrated to an allowed web-view for authentication, then affected Gmail users see the following screen.
Distinguishing between CEF/Electron and embedded web-views
First, create a new project in the Google Developers Console to obtain a client ID and a client secret that you can later add to Microsoft Entra External ID.
Go to the Google APIs at https://console.developers.google.com, and sign in with your Google account. We recommend that you use a shared team Google account.
Accept the terms of service if you're prompted to do so.
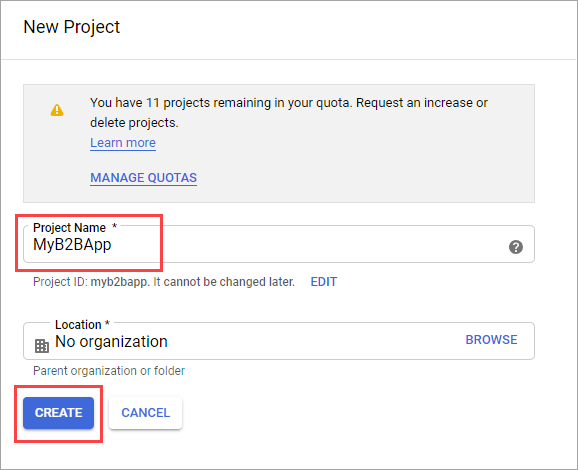
Create a new project: At the top of the page, select the project menu to open the Select a project page. Choose New Project.
On the New Project page, give the project a name (for example, MyB2BApp), and then select Create:
Open the new project by selecting the link in the Notifications message box or by using the project menu at the top of the page.
In the left menu, select APIs & Services, and then select OAuth consent screen.
Under User Type, select External, and then select Create.
On the OAuth consent screen, under App information, enter an App name.
Under User support email, select an email address.
Under Authorized domains, select Add domain, and then add the microsoftonline.com domain.
Under Developer contact information, enter an email address.
Select Save and continue.
In the left menu, select Credentials.
Select Create credentials, and then select OAuth client ID.
In the Application type menu, select Web application. Give the application a suitable name, like Microsoft Entra B2B. Under Authorized redirect URIs, add the following URIs:
https://login.microsoftonline.com
https://login.microsoftonline.com/te/<tenant ID>/oauth2/authresp (where <tenant ID> is your tenant ID)
https://login.microsoftonline.com/te/<tenant name>.onmicrosoft.com/oauth2/authresp (where <tenant name> is your tenant name)
Note
To find your tenant ID, sign in to the Microsoft Entra admin center. Under Identity, select Overview and copy the Tenant ID.
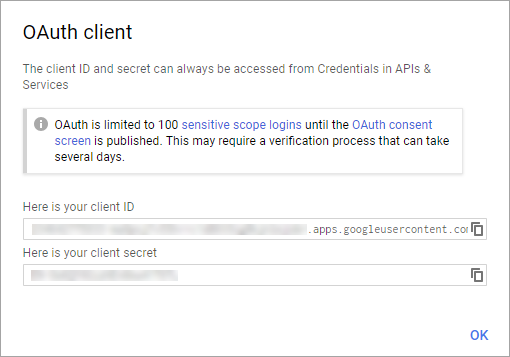
Select Create. Copy your client ID and client secret. You use them when you add the identity provider in the Microsoft Entra admin center.
You can leave your project at a publishing status of Testing and add test users to the OAuth consent screen. Or you can select the Publish app button on the OAuth consent screen to make the app available to any user with a Google Account.
Note
In some cases, your app might require verification by Google (for example, if you update the application logo). For more information, see Google's verification status help.
Step 2: Configure Google federation in Microsoft Entra External ID
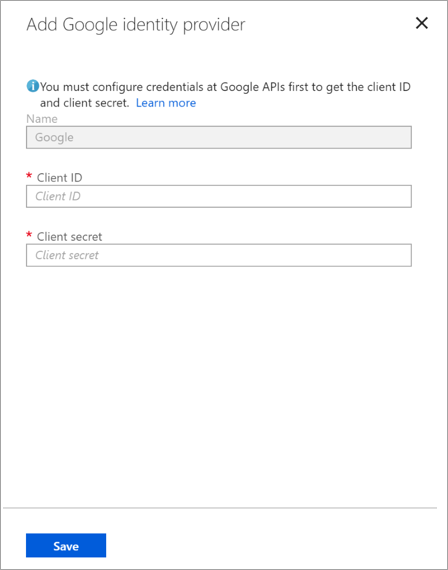
You'll now set the Google client ID and client secret. You can use the Microsoft Entra admin center or PowerShell to do so. Be sure to test your Google federation configuration by inviting yourself. Use a Gmail address and try to redeem the invitation with your invited Google account.
To configure Google federation in the Microsoft Entra admin center
Use the client ID and client secret from the app you created in "Step 1: Configure a Google developer project." For more information, see New-MgIdentityProvider.
Add Google identity provider to a user flow
At this point, the Google identity provider is set up in your Microsoft Entra tenant. Users who redeem invitations from you can use Google to sign in. However, if you've created self-service sign-up user flows, you also need to add Google to your user flow sign-in pages. To add the Google identity provider to a user flow:
Browse to Identity > External Identities > User flows.
Select the user flow where you want to add the Google identity provider.
Under Settings, select Identity providers.
In the identity providers list, select Google.
Select Save.
How do I remove Google federation?
You can delete your Google federation setup. If you do so, Google guest users who already redeemed their invitation can't sign in. But you can give them access to your resources again by resetting their redemption status.
To delete Google federation in the Microsoft Entra admin center
Inviting external users to use company Azure resources is a great benefit, but you want to do it in a secure way. Explore how to enable secure external collaboration.
 Workforce tenants
  External tenants (