Events
Apr 9, 3 PM - Apr 10, 12 PM
Code the Future with AI and connect with Java peers and experts at JDConf 2025.
Register NowThis browser is no longer supported.
Upgrade to Microsoft Edge to take advantage of the latest features, security updates, and technical support.
This article describes the steps you need to perform in both Juno Journey and Microsoft Entra ID to configure automatic user provisioning. When configured, Microsoft Entra ID automatically provisions and de-provisions users and groups to Juno Journey using the Microsoft Entra provisioning service. For important details on what this service does, how it works, and frequently asked questions, see Automate user provisioning and deprovisioning to SaaS applications with Microsoft Entra ID.
The scenario outlined in this article assumes that you already have the following prerequisites:
Add Juno Journey from the Microsoft Entra application gallery to start managing provisioning to Juno Journey. If you have previously setup Juno Journey for SSO you can use the same application. However, we recommend that you create a separate app when testing out the integration initially. Learn more about adding an application from the gallery here.
The Microsoft Entra provisioning service allows you to scope who is provisioned based on assignment to the application, or based on attributes of the user or group. If you choose to scope who is provisioned to your app based on assignment, you can use the steps to assign users and groups to the application. If you choose to scope who is provisioned based solely on attributes of the user or group, you can use a scoping filter.
Start small. Test with a small set of users and groups before rolling out to everyone. When scope for provisioning is set to assigned users and groups, you can control this by assigning one or two users or groups to the app. When scope is set to all users and groups, you can specify an attribute based scoping filter.
If you need extra roles, you can update the application manifest to add new roles.
This section guides you through the steps to configure the Microsoft Entra provisioning service to create, update, and disable users and/or groups in TestApp based on user and/or group assignments in Microsoft Entra ID.
Sign in to the Microsoft Entra admin center as at least a Cloud Application Administrator.
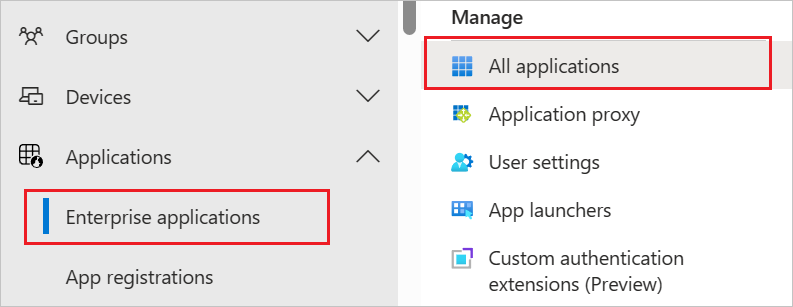
Browse to Identity > Applications > Enterprise applications
In the applications list, select Juno Journey.

Select the Provisioning tab.

Set the Provisioning Mode to Automatic.

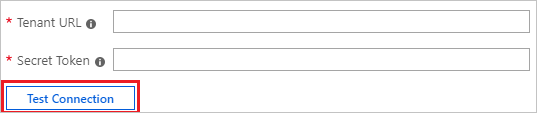
Under the Admin Credentials section, input the tenant URL value retrieved earlier in Tenant URL. Input the secret token value retrieved earlier in Secret Token. Select Test Connection to ensure Microsoft Entra ID can connect to Juno Journey. If the connection fails, ensure your Juno Journey account has admin permissions and try again.
In the Notification Email field, enter the email address of a person or group who should receive the provisioning error notifications and select the Send an email notification when a failure occurs check box.

Select Save.
Under the Mappings section, select Synchronize Microsoft Entra users to Juno Journey.
Review the user attributes that are synchronized from Microsoft Entra ID to Juno Journey in the Attribute-Mapping section. The attributes selected as Matching properties are used to match the user accounts in Juno Journey for update operations. If you choose to change the matching target attribute, you need to ensure that the Juno Journey API supports filtering users based on that attribute. Select the Save button to commit any changes.
| Variable | Type |
|---|---|
| userName | String |
| externalId | String |
| displayName | String |
| title | String |
| active | Boolean |
| preferredLanguage | String |
| emails[type eq "work"].value | String |
| addresses[type eq "work"].country | String |
| addresses[type eq "work"].region | String |
| addresses[type eq "work"].locality | String |
| addresses[type eq "work"].postalCode | String |
| addresses[type eq "work"].formatted | String |
| addresses[type eq "work"].streetAddress | String |
| name.givenName | String |
| name.familyName | String |
| name.middleName | String |
| name.formatted | String |
| phoneNumbers[type eq "fax"].value | String |
| phoneNumbers[type eq "mobile"].value | String |
| phoneNumbers[type eq "work"].value | String |
| urn:ietf:params:scim:schemas:extension:enterprise:2.0:User:department | String |
| urn:ietf:params:scim:schemas:extension:enterprise:2.0:User:employeeNumber | String |
| urn:ietf:params:scim:schemas:extension:enterprise:2.0:User:costCenter | String |
| urn:ietf:params:scim:schemas:extension:enterprise:2.0:User:division | String |
| urn:ietf:params:scim:schemas:extension:enterprise:2.0:User:manager | String |
| urn:ietf:params:scim:schemas:extension:enterprise:2.0:User:organization | String |
To configure scoping filters, refer to the following instructions provided in the Scoping filter article.
To enable the Microsoft Entra provisioning service for Juno Journey, change the Provisioning Status to On in the Settings section.

Define the users and/or groups that you would like to provision to Juno Journey by choosing the desired values in Scope in the Settings section.

When you're ready to provision, select Save.
This operation starts the initial synchronization cycle of all users and groups defined in Scope in the Settings section. The initial cycle takes longer to perform than subsequent cycles, which occur approximately every 40 minutes as long as the Microsoft Entra provisioning service is running.
Once you configure provisioning, use the following resources to monitor your deployment:
Events
Apr 9, 3 PM - Apr 10, 12 PM
Code the Future with AI and connect with Java peers and experts at JDConf 2025.
Register Now