Tutorial: Build and deploy a question and answer copilot with prompt flow in Azure AI Studio
Note
Azure AI Studio is currently in public preview. This preview is provided without a service-level agreement, and we don't recommend it for production workloads. Certain features might not be supported or might have constrained capabilities. For more information, see Supplemental Terms of Use for Microsoft Azure Previews.
In this Azure AI Studio tutorial, you use generative AI and prompt flow to build, configure, and deploy a copilot for your retail company called Contoso. Your retail company specializes in outdoor camping gear and clothing.
The copilot should answer questions about your products and services. It should also answer questions about your customers. For example, the copilot can answer questions such as "How much do the TrailWalker hiking shoes cost?" and "How many TrailWalker hiking shoes did Daniel Wilson buy?".
The steps in this tutorial are:
- Create an Azure AI Studio project.
- Deploy an Azure OpenAI model and chat with your data.
- Create a prompt flow from the playground.
- Customize prompt flow with multiple data sources.
- Evaluate the flow using a question and answer evaluation dataset.
- Deploy the flow for consumption.
Prerequisites
An Azure subscription - Create one for free.
Access granted to Azure OpenAI in the desired Azure subscription.
Currently, access to this service is granted only by application. You can apply for access to Azure OpenAI by completing the form at https://aka.ms/oai/access. Open an issue on this repo to contact us if you have an issue.
You need an Azure AI hub resource and your user role must be Azure AI Developer, Contributor, or Owner on the Azure AI hub resource. For more information, see Azure AI hub resources and Azure AI roles.
- If your role is Contributor or Owner, you can create an Azure AI hub resource in this tutorial.
- If your role is Azure AI Developer, the Azure AI hub resource must already be created.
Your subscription needs to be below your quota limit to deploy a new model in this tutorial. Otherwise you already need to have a deployed chat model.
You need a local copy of product and customer data. The Azure/aistudio-copilot-sample repository on GitHub contains sample retail customer and product information that's relevant for this tutorial scenario. Clone the repository or copy the files from 1-customer-info and 3-product-info.
Create an Azure AI project in Azure AI Studio
Your Azure AI project is used to organize your work and save state while building your copilot. During this tutorial, your project contains your data, prompt flow runtime, evaluations, and other resources. For more information about the Azure AI projects and resources model, see Azure AI hub resources.
To create an Azure AI project in Azure AI Studio, follow these steps:
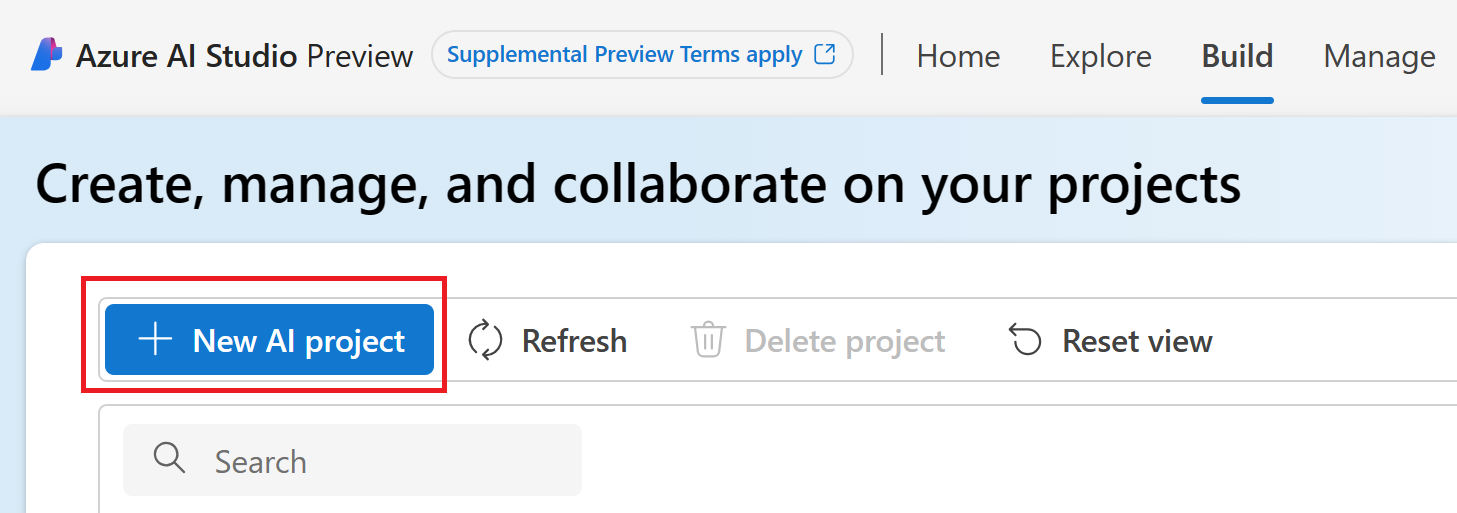
Select the Build tab at the top of the page.
Select + New AI project.
Enter a name for the project.
Select an Azure AI hub resource from the dropdown to host your project. If you don't have access to an Azure AI hub resource yet, select Create a new resource.

Note
To create an Azure AI hub resource, you must have Owner or Contributor permissions on the selected resource group. It's recommended to share an Azure AI hub resource with your team. This lets you share configurations like data connections with all projects, and centrally manage security settings and spend.
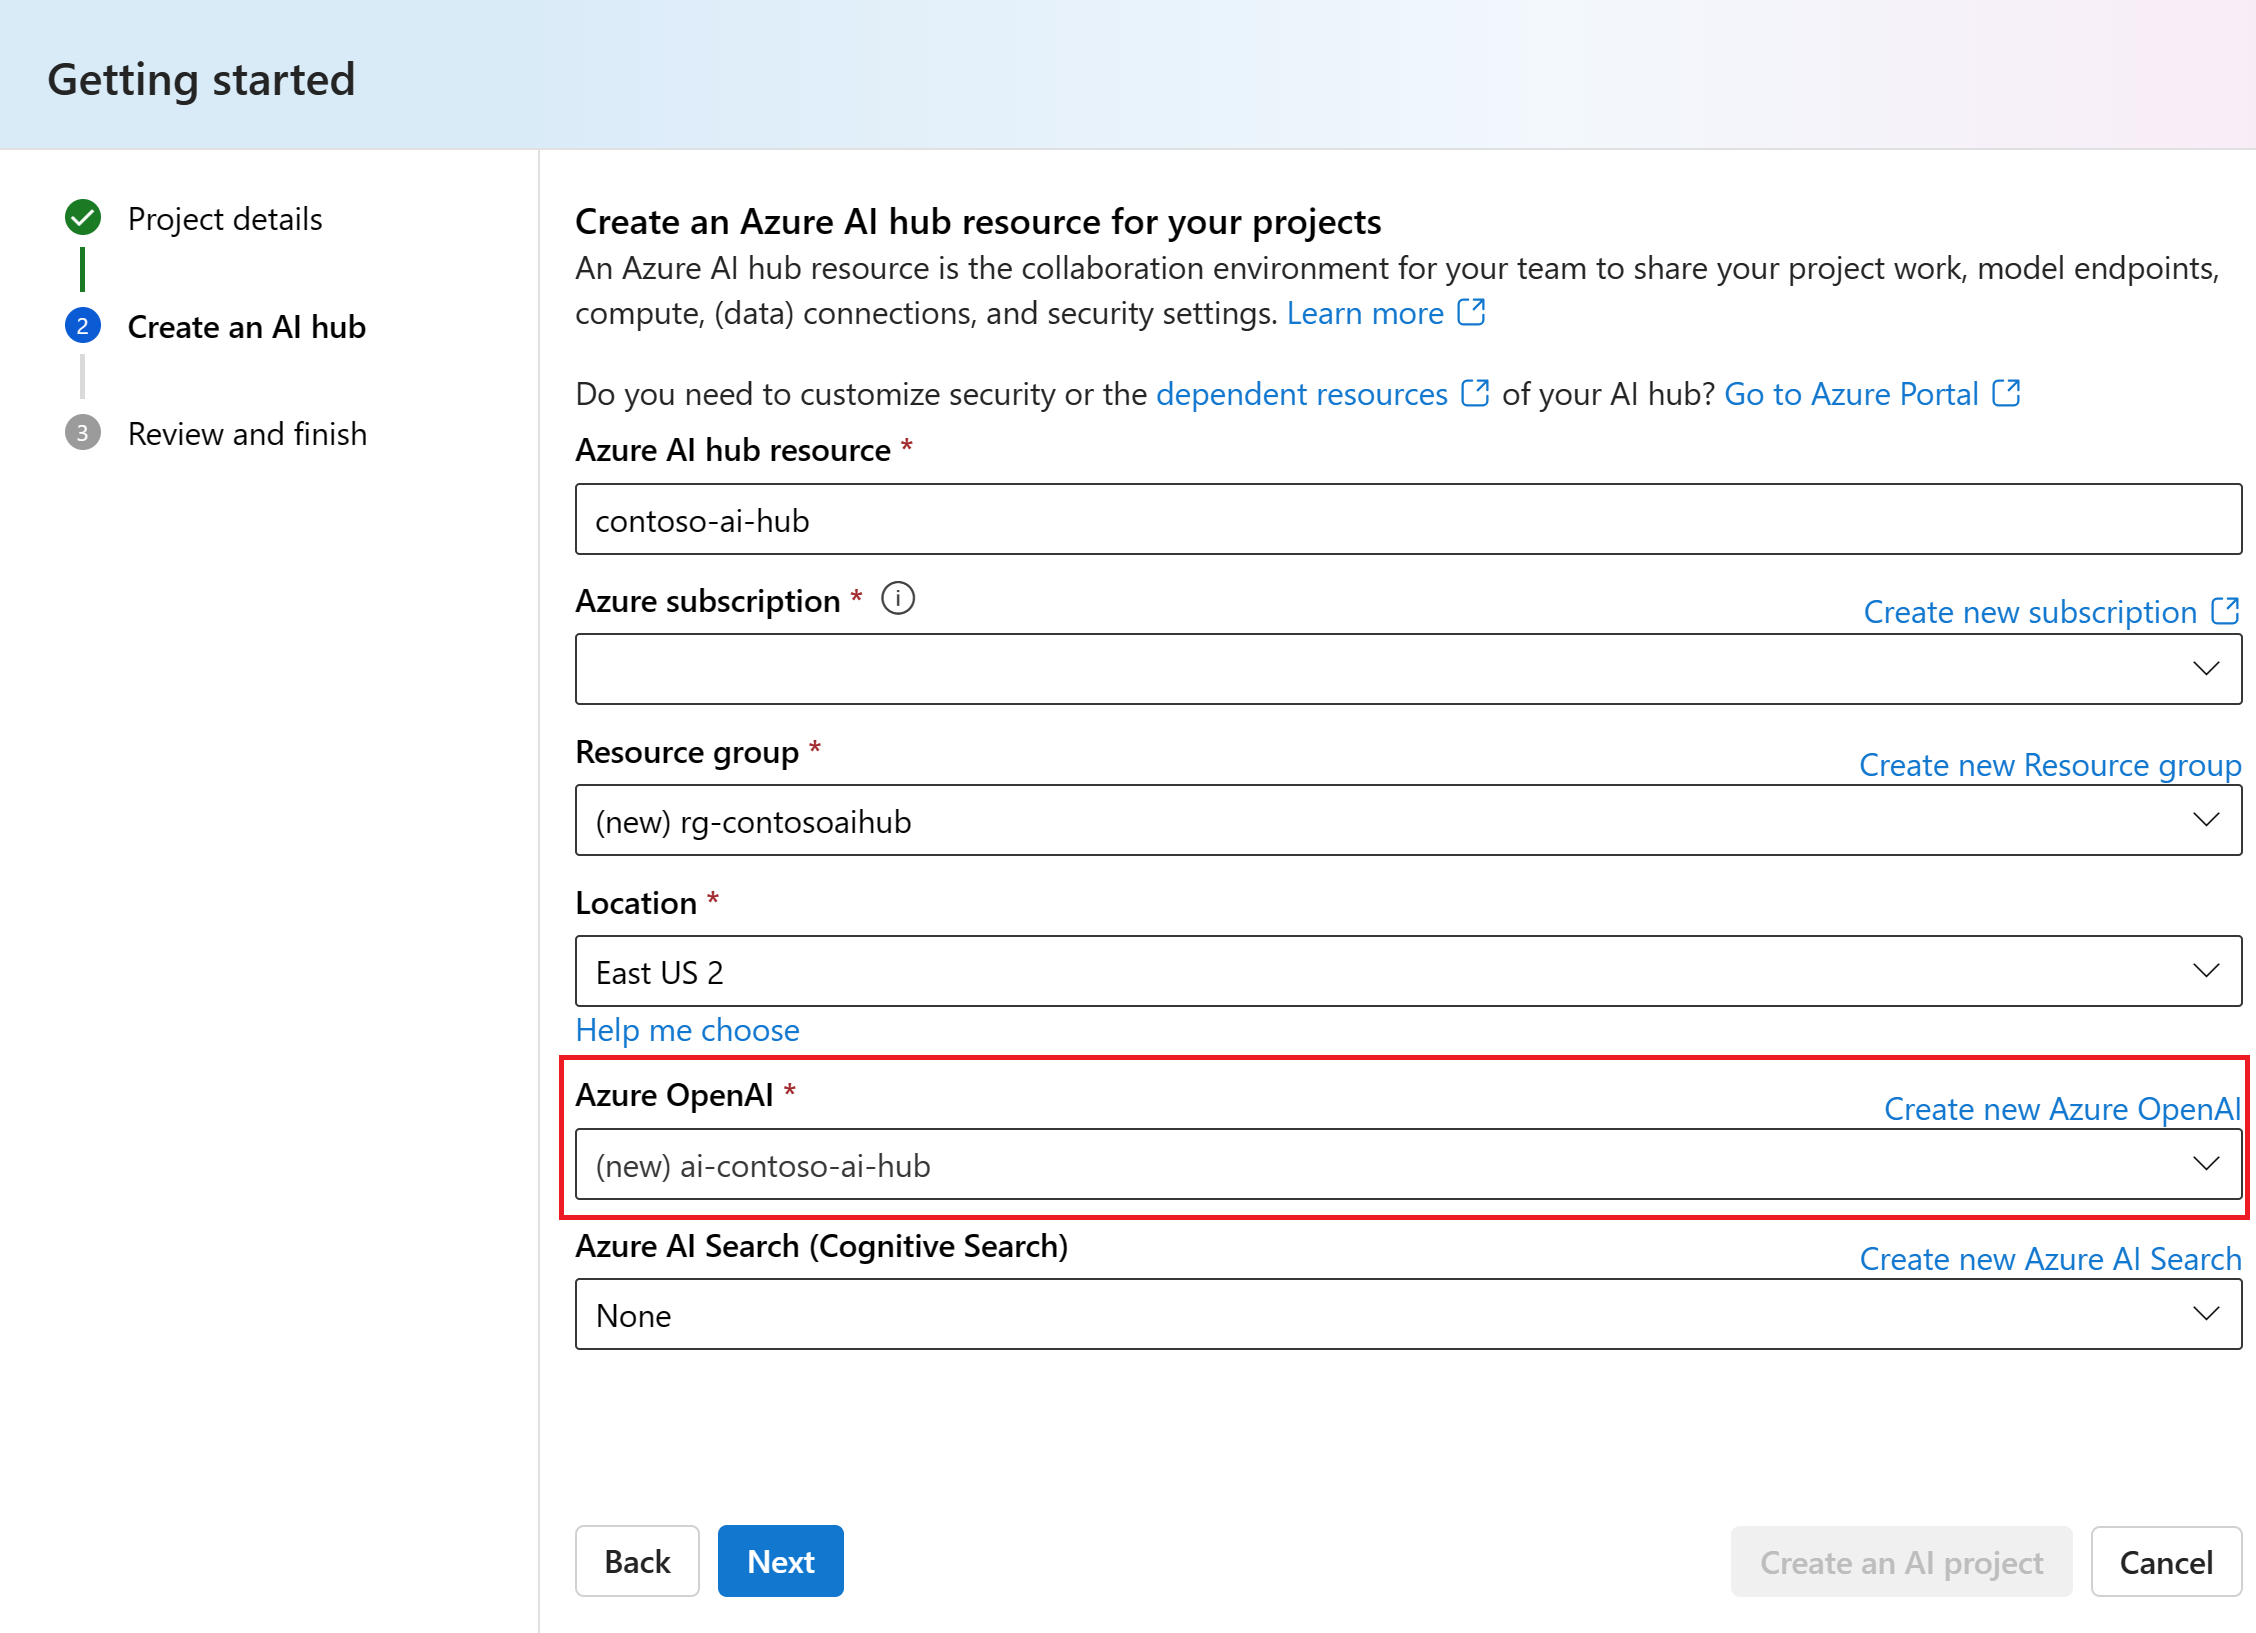
If you're creating a new Azure AI hub resource, enter a name.
Select your Azure subscription from the dropdown. Choose a specific Azure subscription for your project for billing, access, or administrative reasons. For example, this grants users and service principals with subscription-level access to your project.
Leave the Resource group as the default to create a new resource group. Alternatively, you can select an existing resource group from the dropdown.
Tip
Especially for getting started it's recommended to create a new resource group for your project. This allows you to easily manage the project and all of its resources together. When you create a project, several resources are created in the resource group, including an Azure AI hub resource, a container registry, and a storage account.
Enter the Location for the Azure AI hub resource and then select Next. The location is the region where the Azure AI hub resource is hosted. The location of the Azure AI hub resource is also the location of the project. Azure AI services availability differs per region. For example, certain models might not be available in certain regions.
Select an existing Azure OpenAI resource from the dropdown or create a new one.
On the Review and finish page, you see the Azure OpenAI Service resource name and other settings to review.
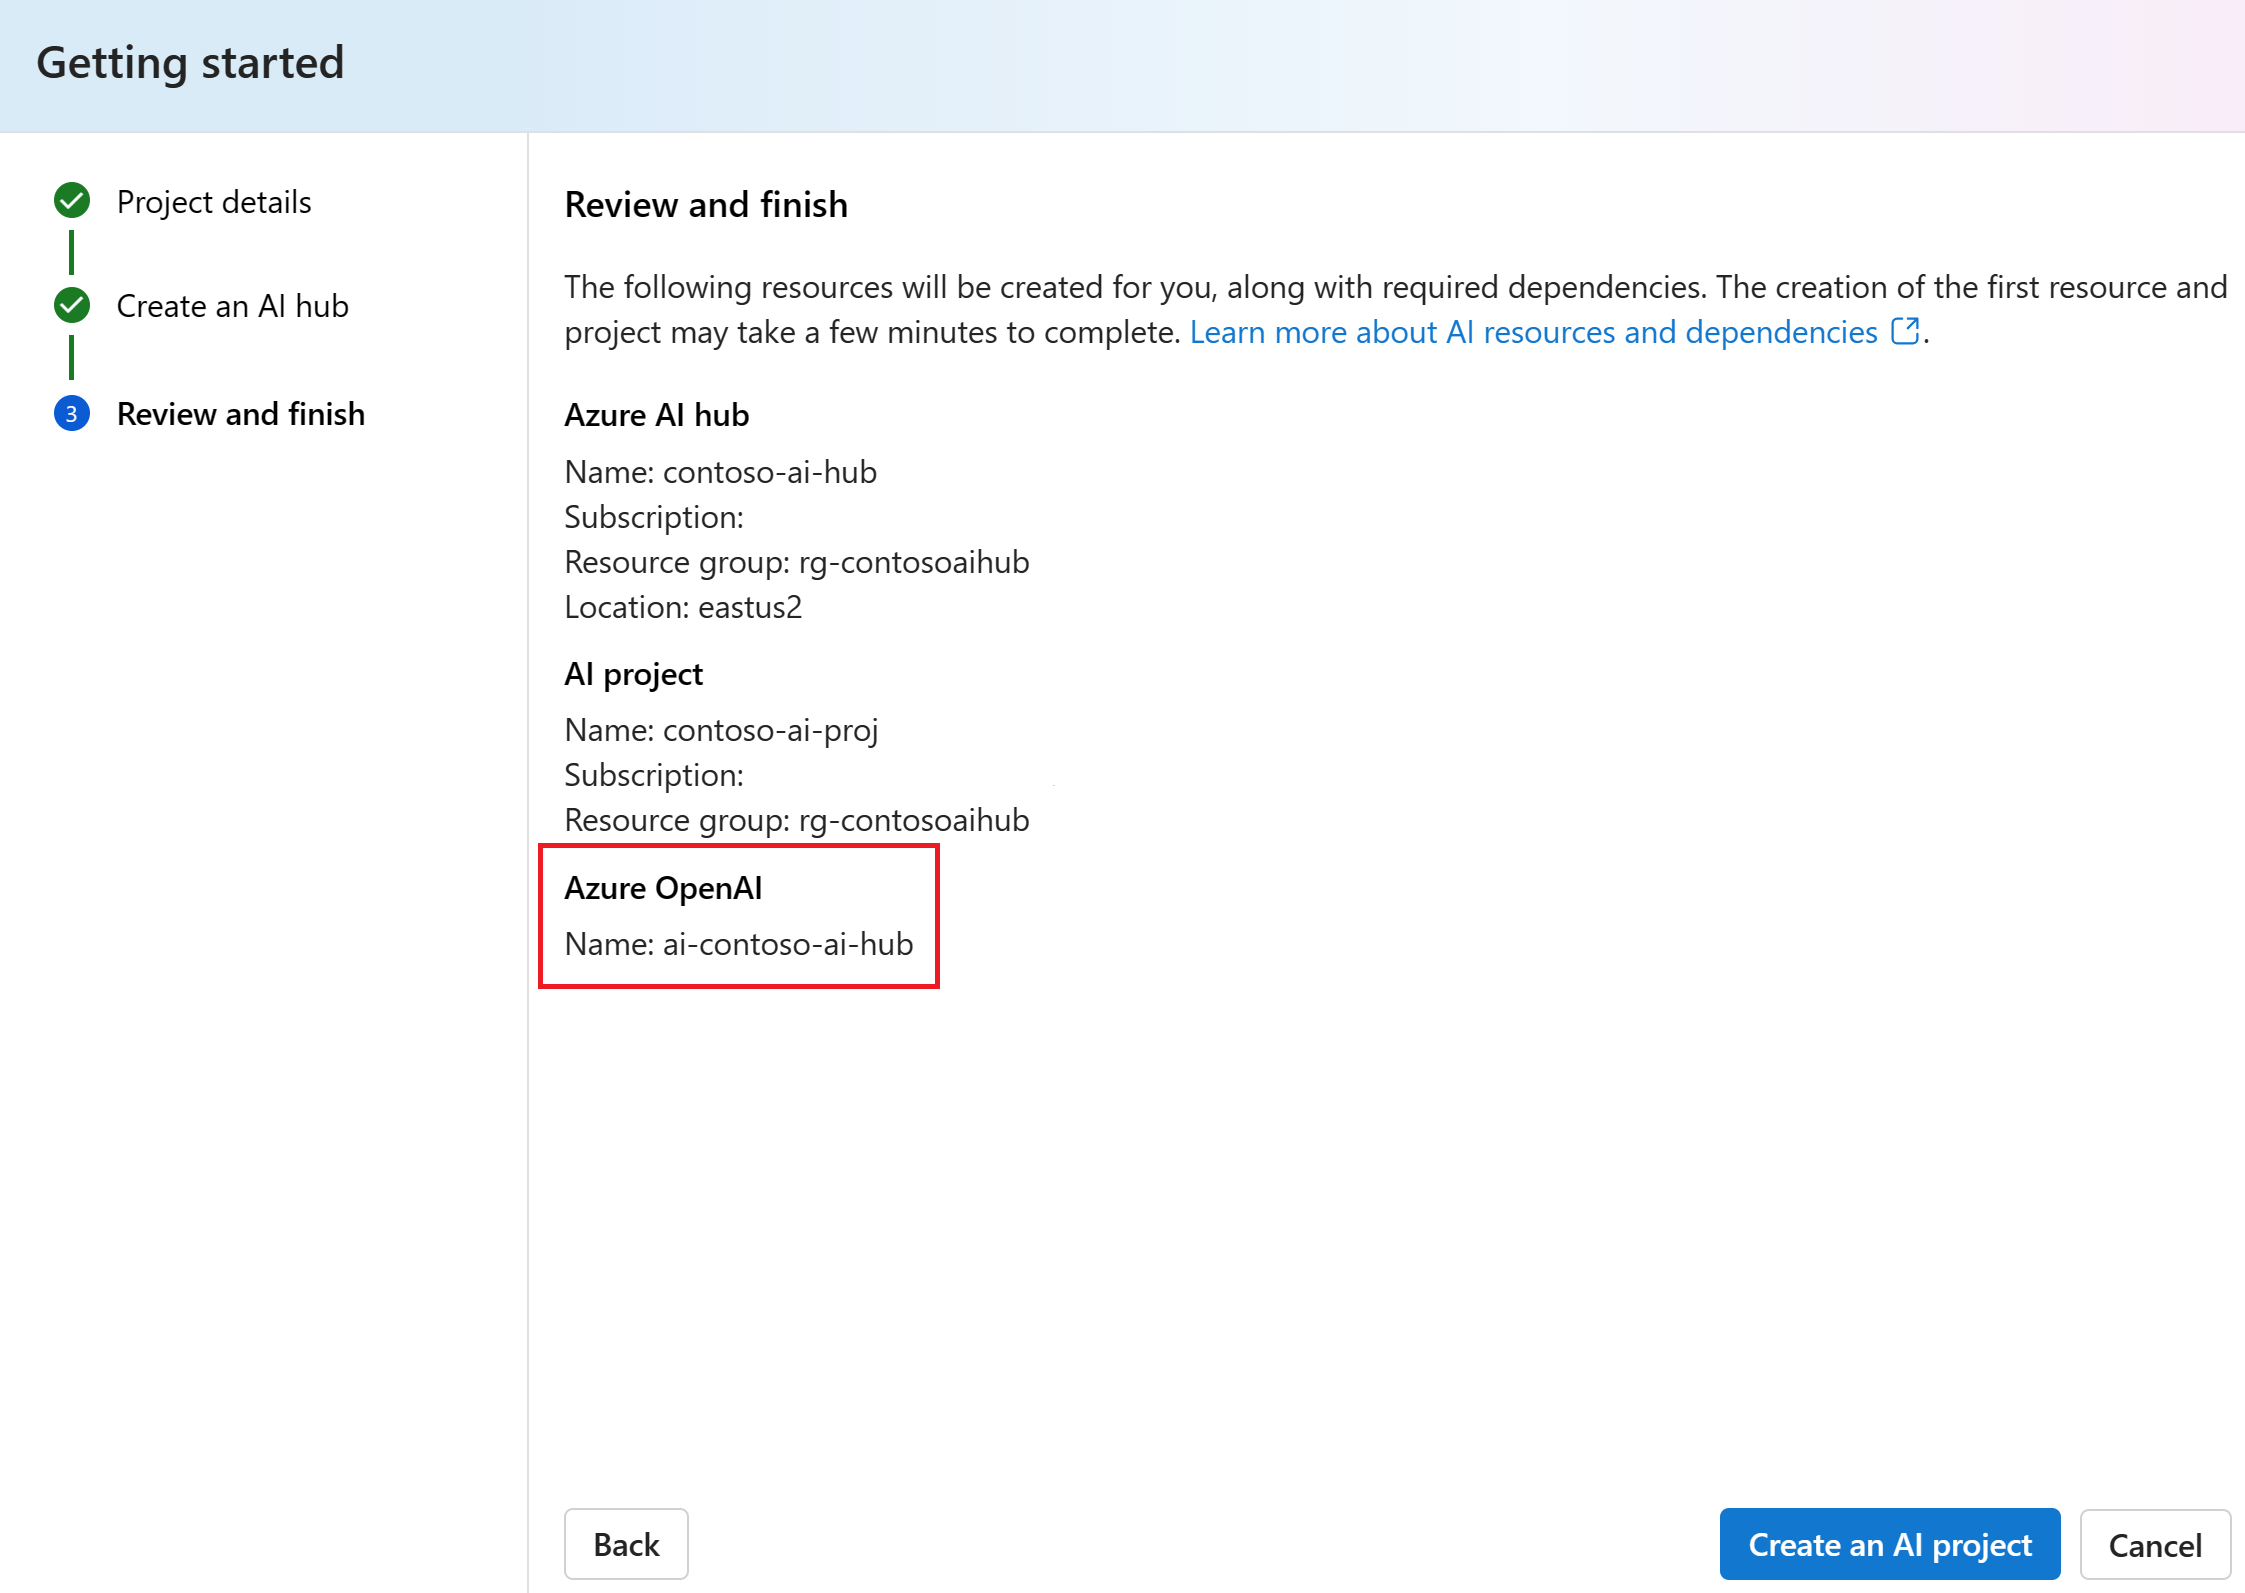
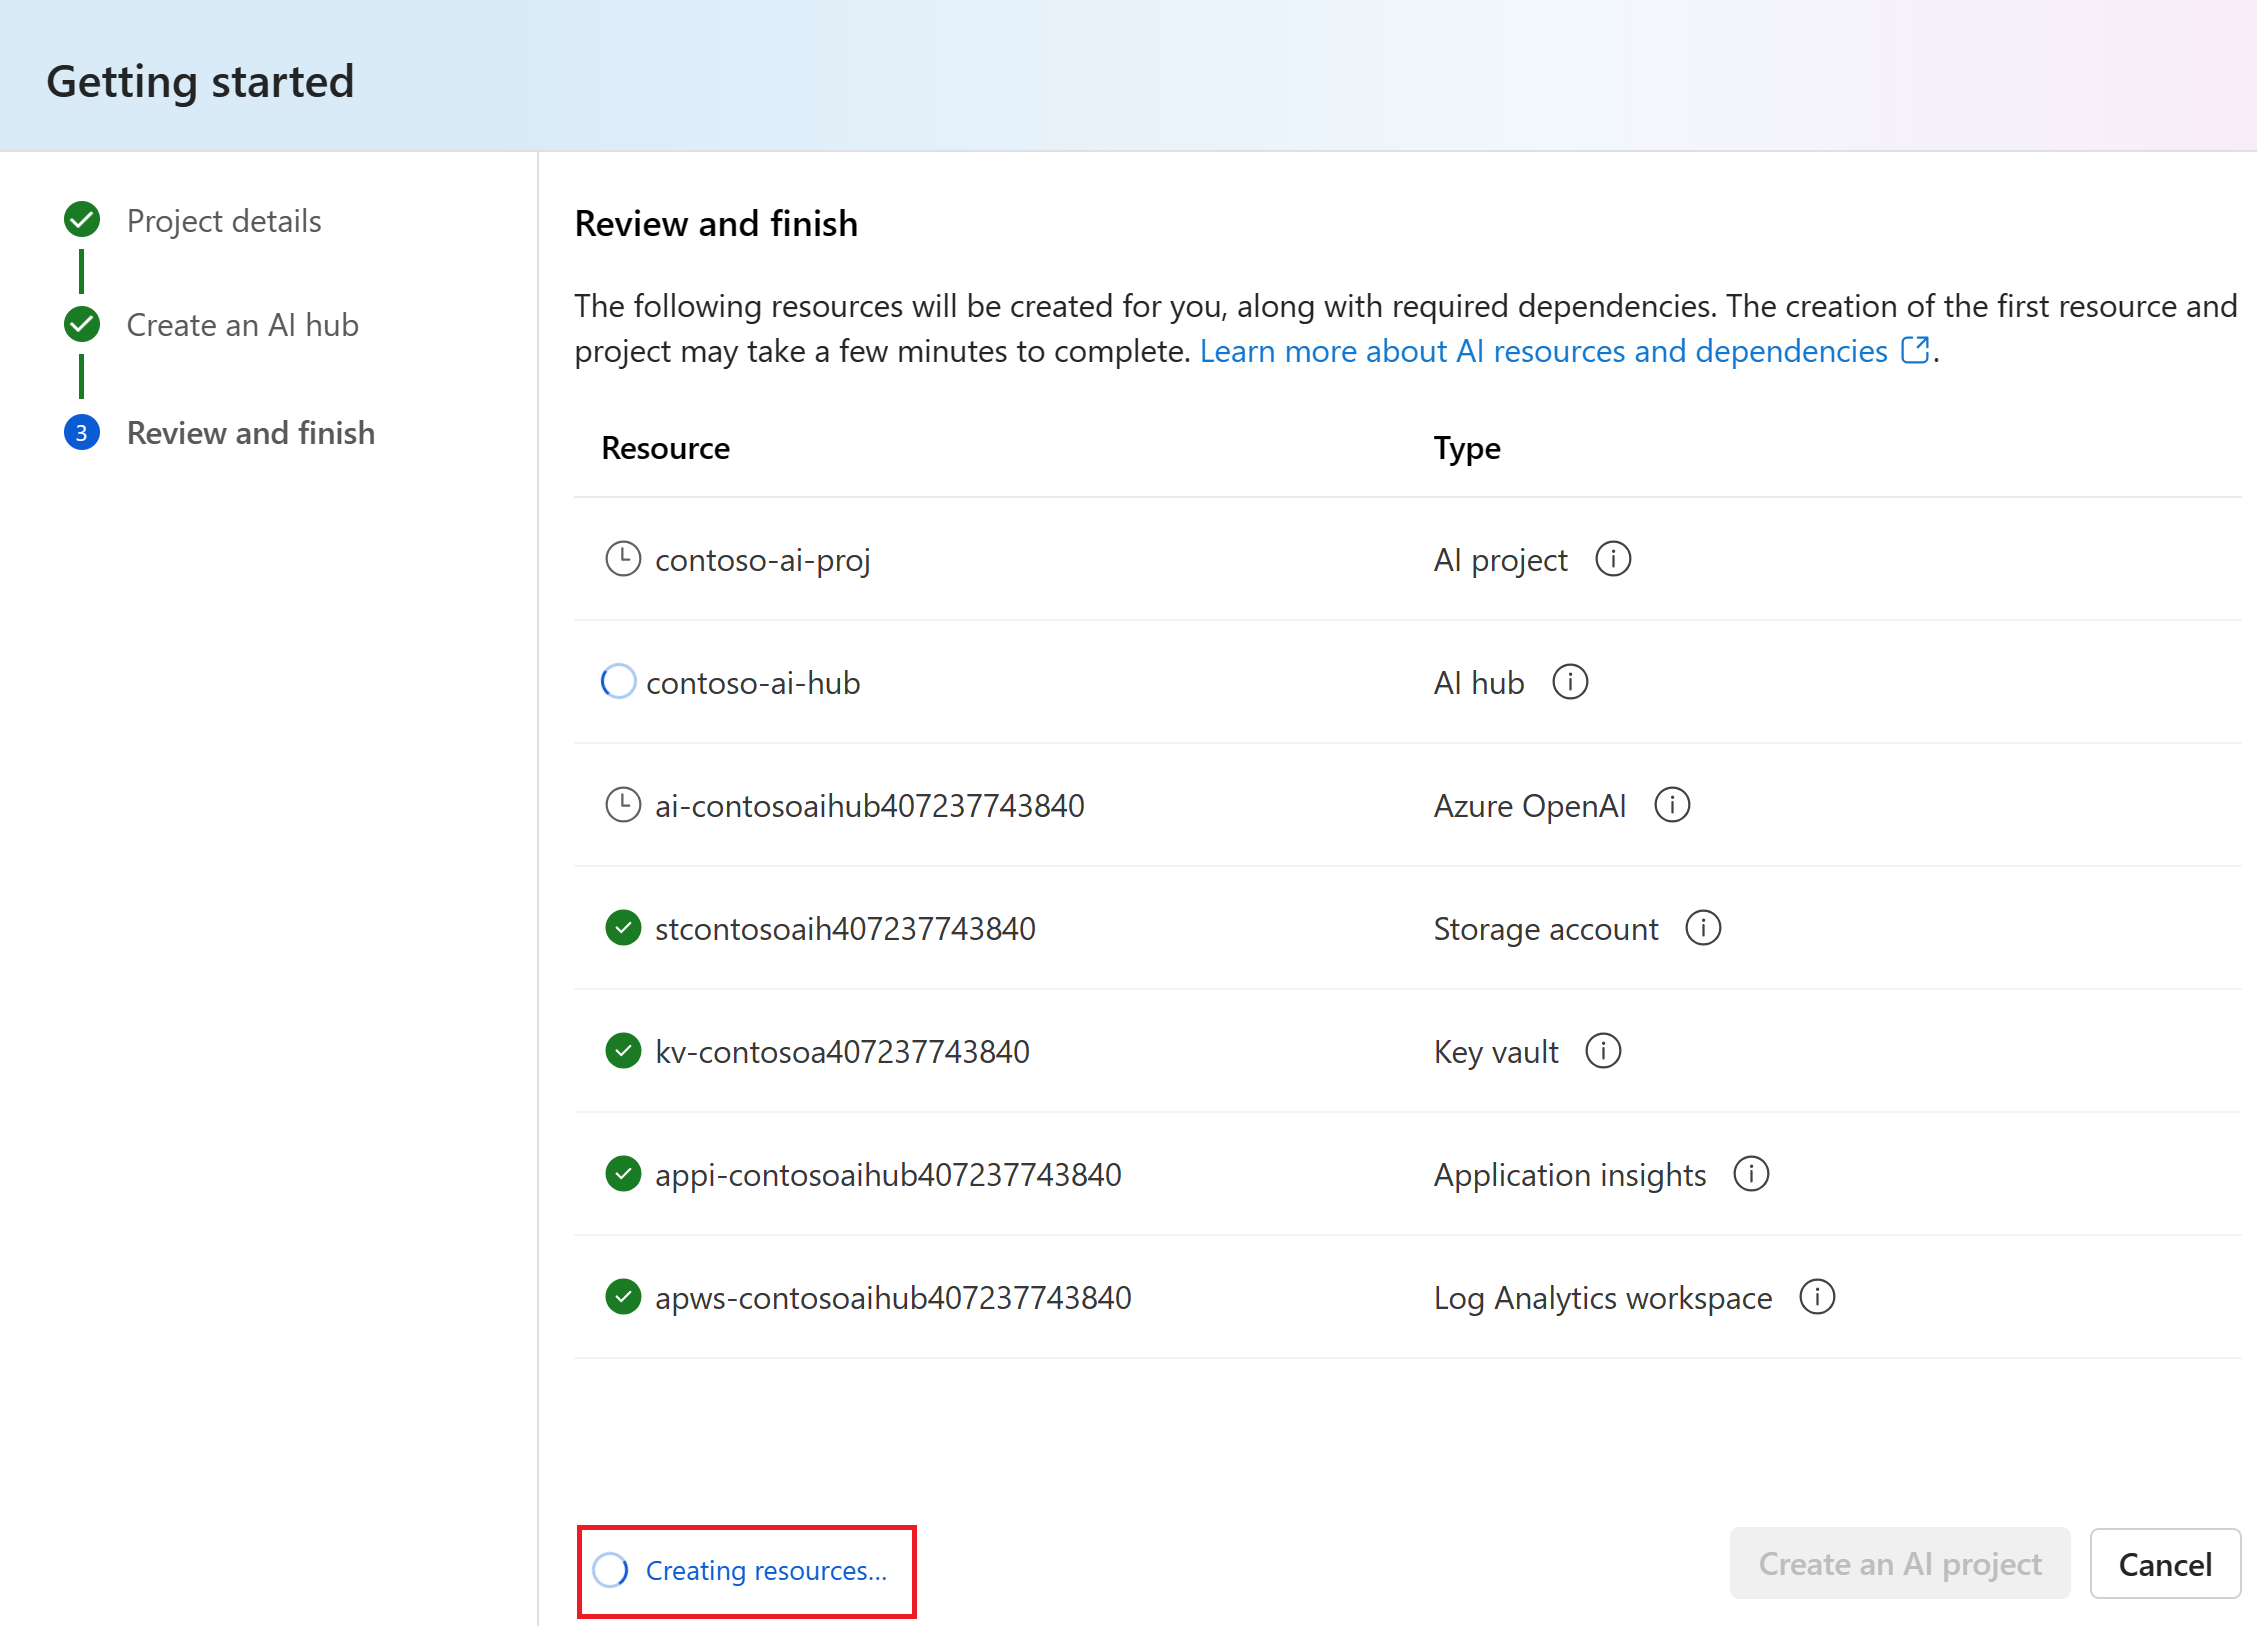
Review the project details and then select Create an AI project. You see progress of resource creation and the project is created when the process is complete.


Once a project is created, you can access the Tools, Components, and AI project settings assets in the left navigation panel. For a project that uses an Azure AI hub with support for Azure OpenAI, you see the Playground navigation option under Tools.
Deploy a chat model
Follow these steps to deploy an Azure OpenAI chat model for your copilot.
Sign in to Azure AI Studio with credentials that have access to your Azure OpenAI resource. During or after the sign-in workflow, select the appropriate directory, Azure subscription, and Azure OpenAI resource. You should be on the Azure AI Studio Home page.
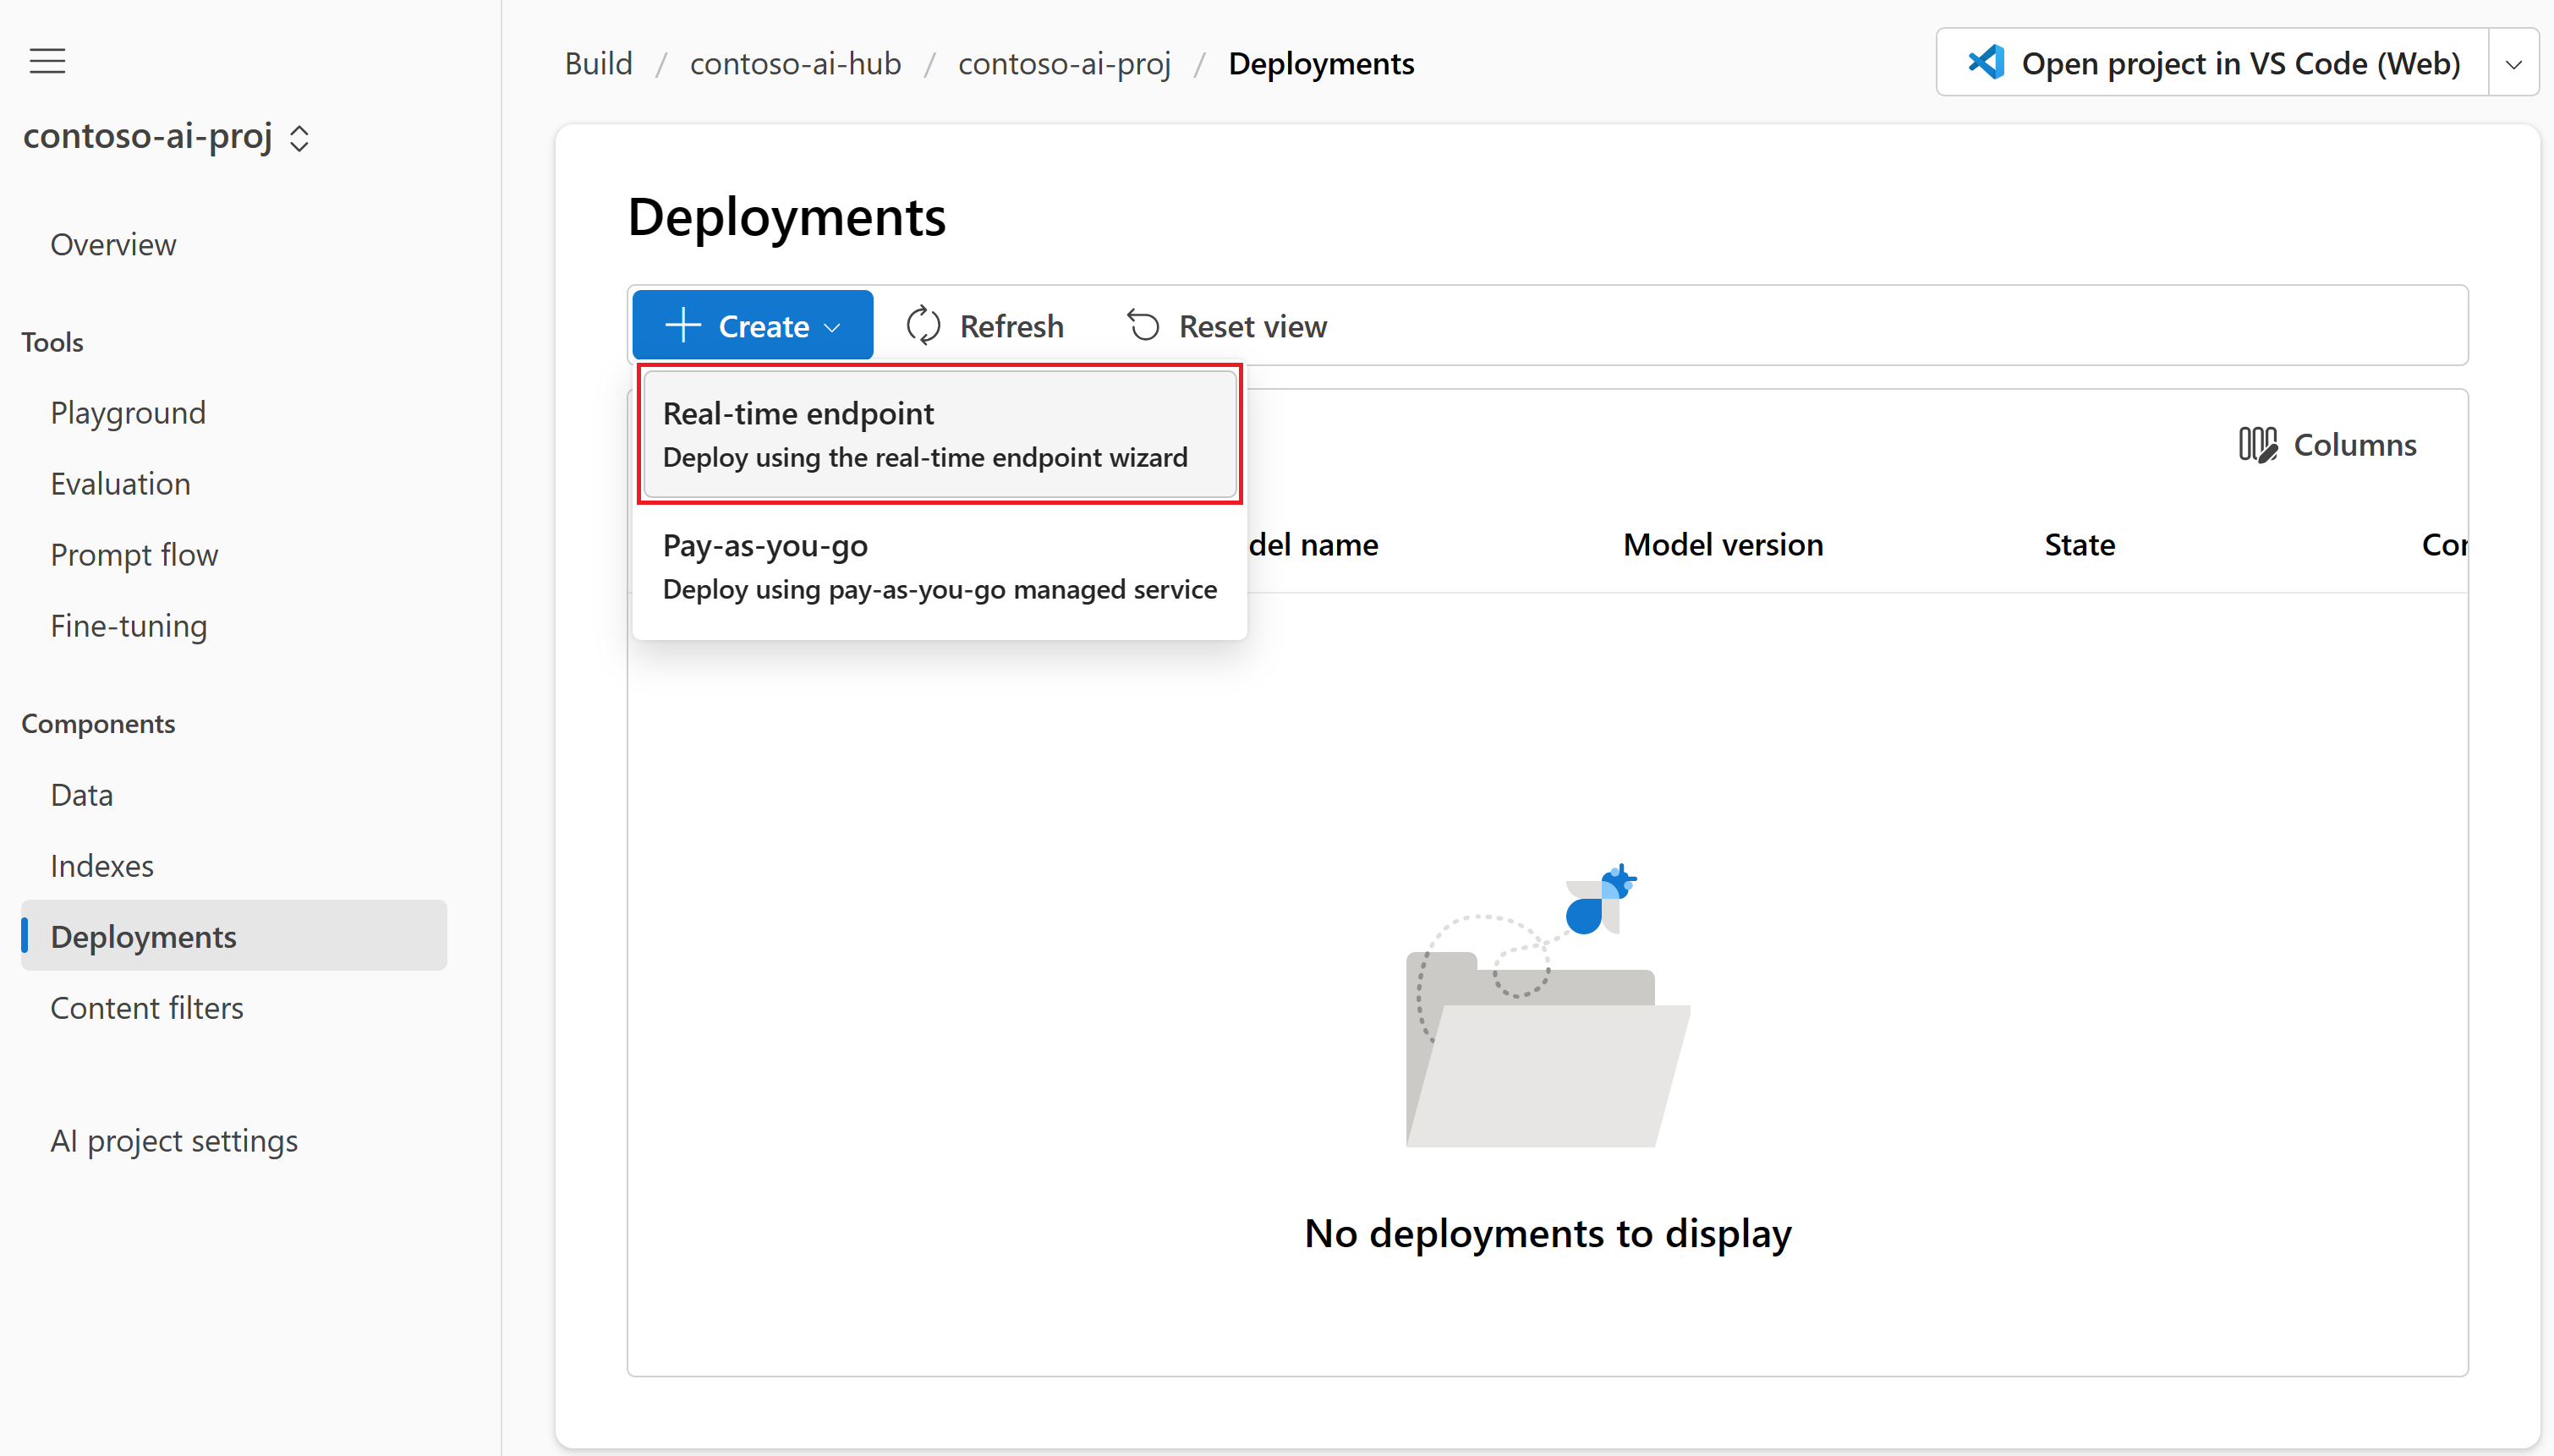
Select Build from the top menu and then select Deployments > Create > Real-time endpoint.
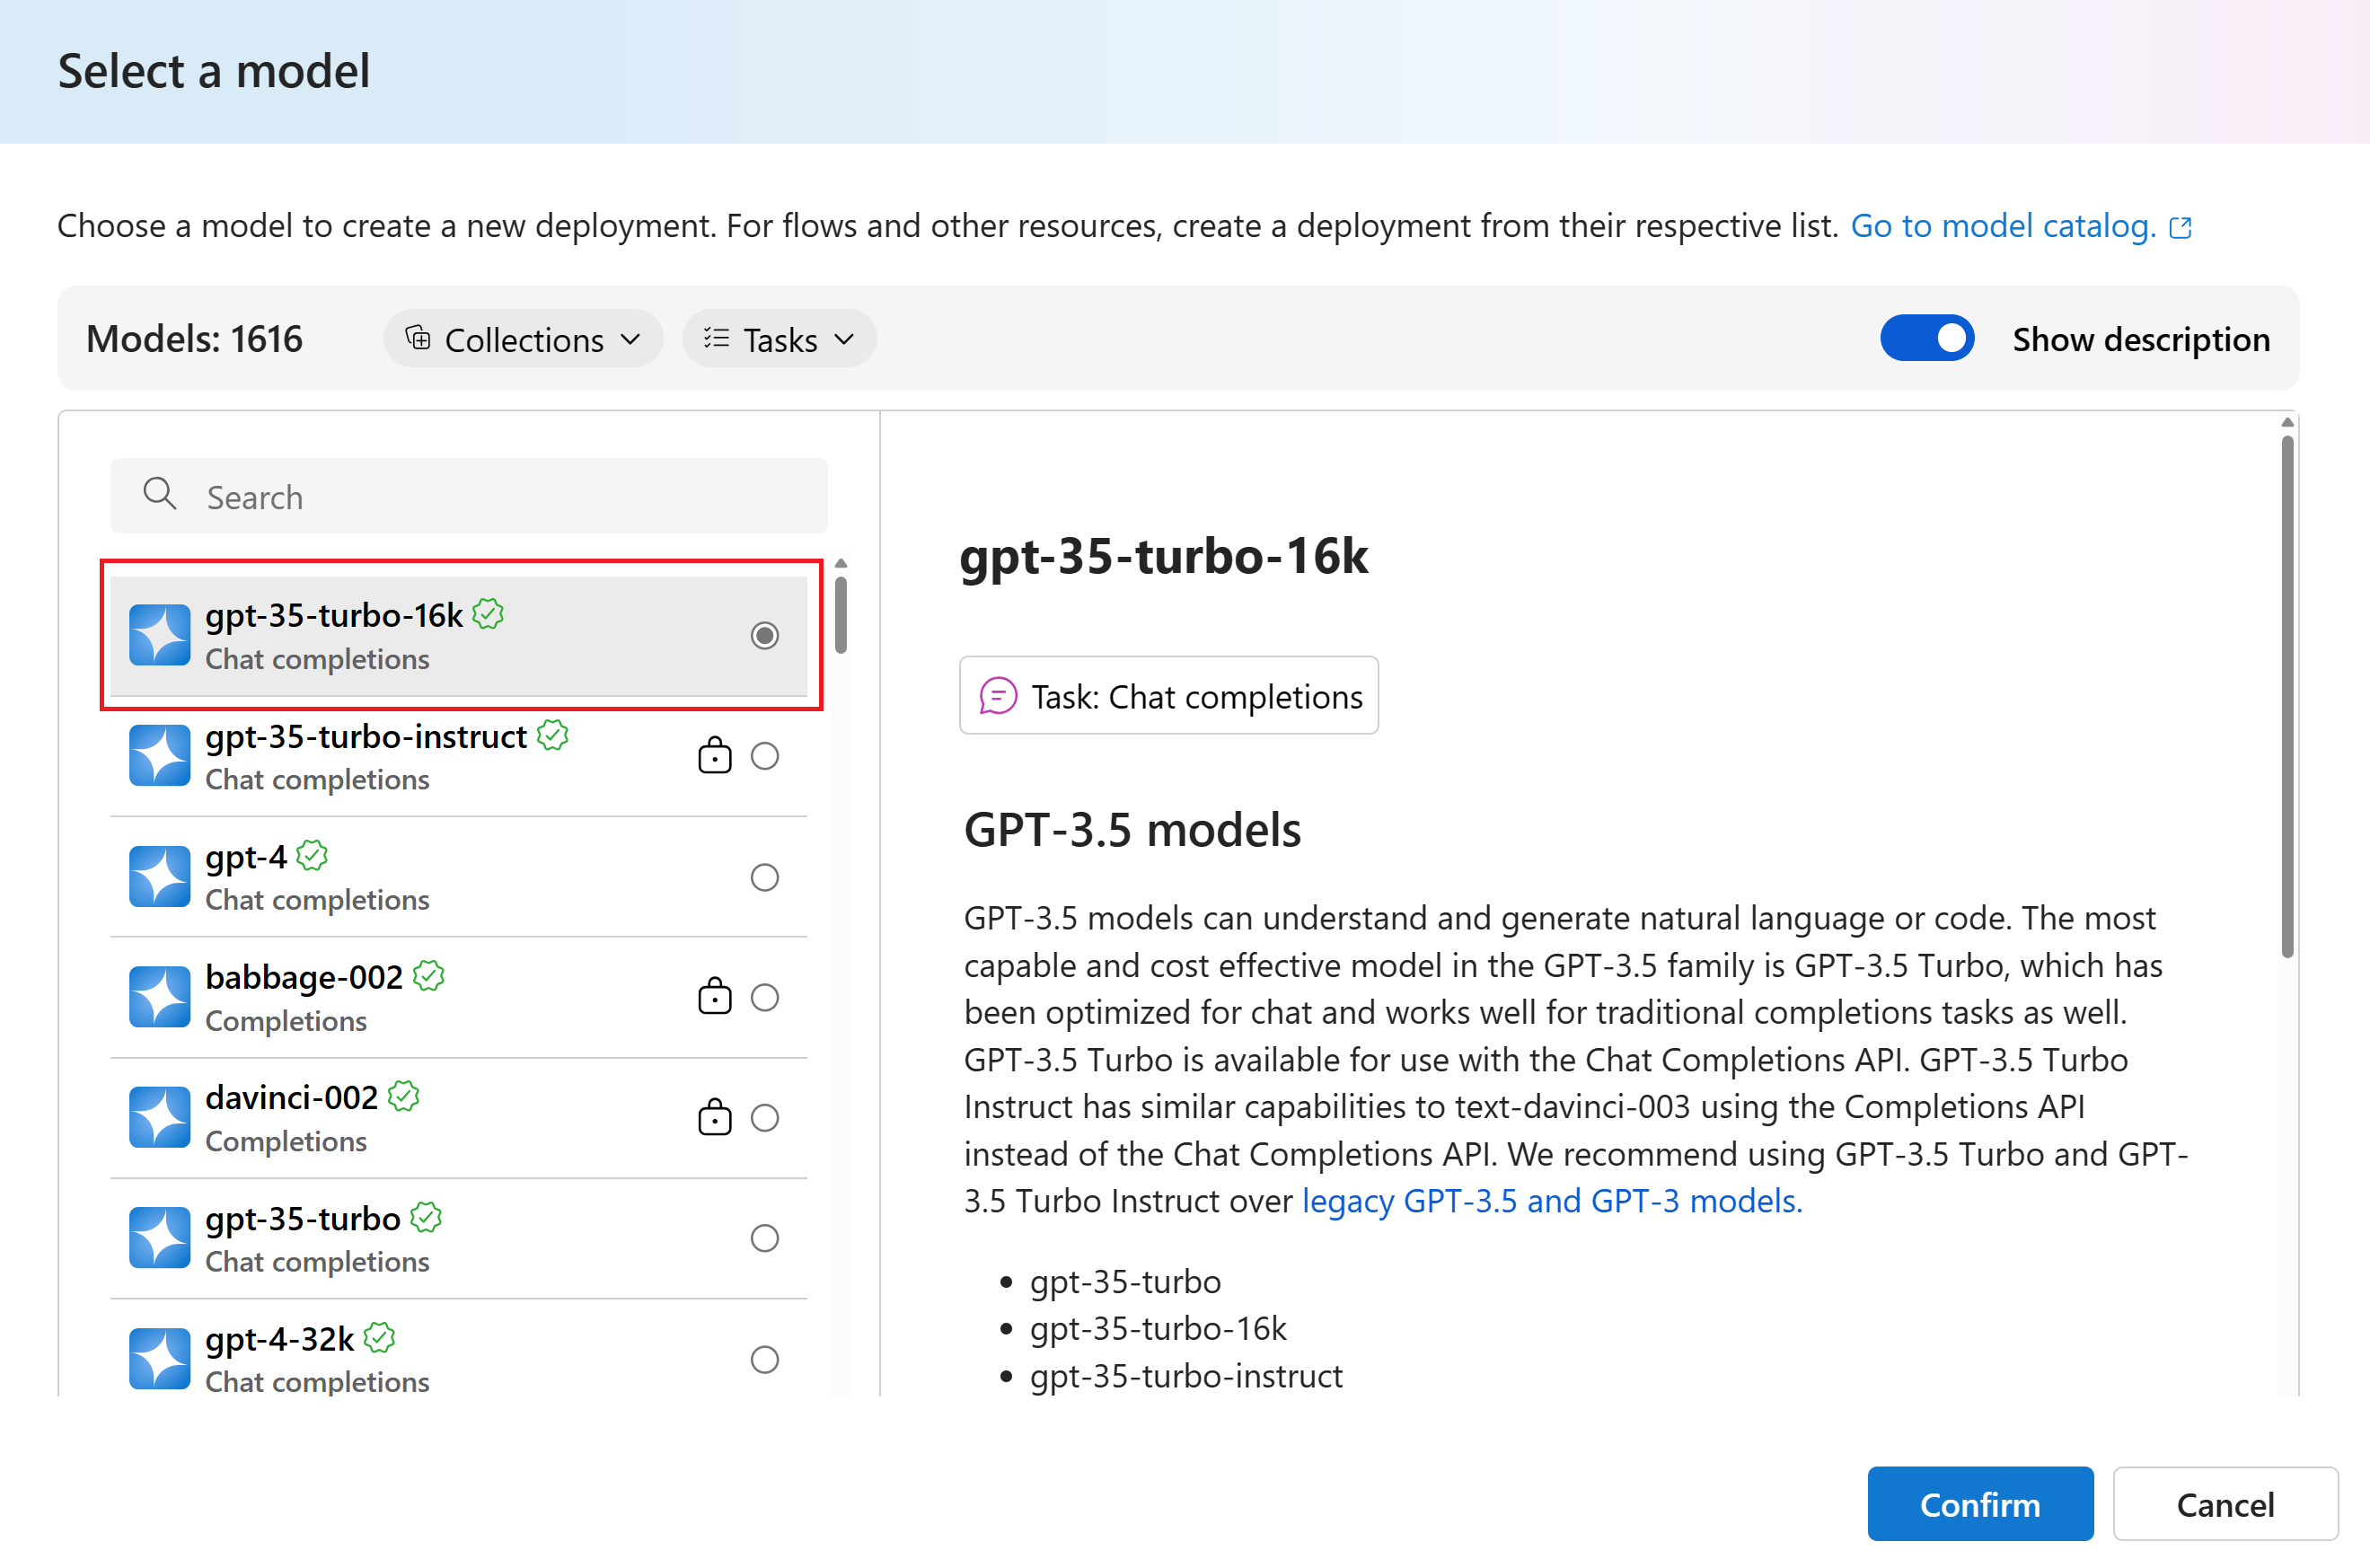
On the Select a model page, select the model you want to deploy from the list of models. For example, select gpt-35-turbo-16k. Then select Confirm.
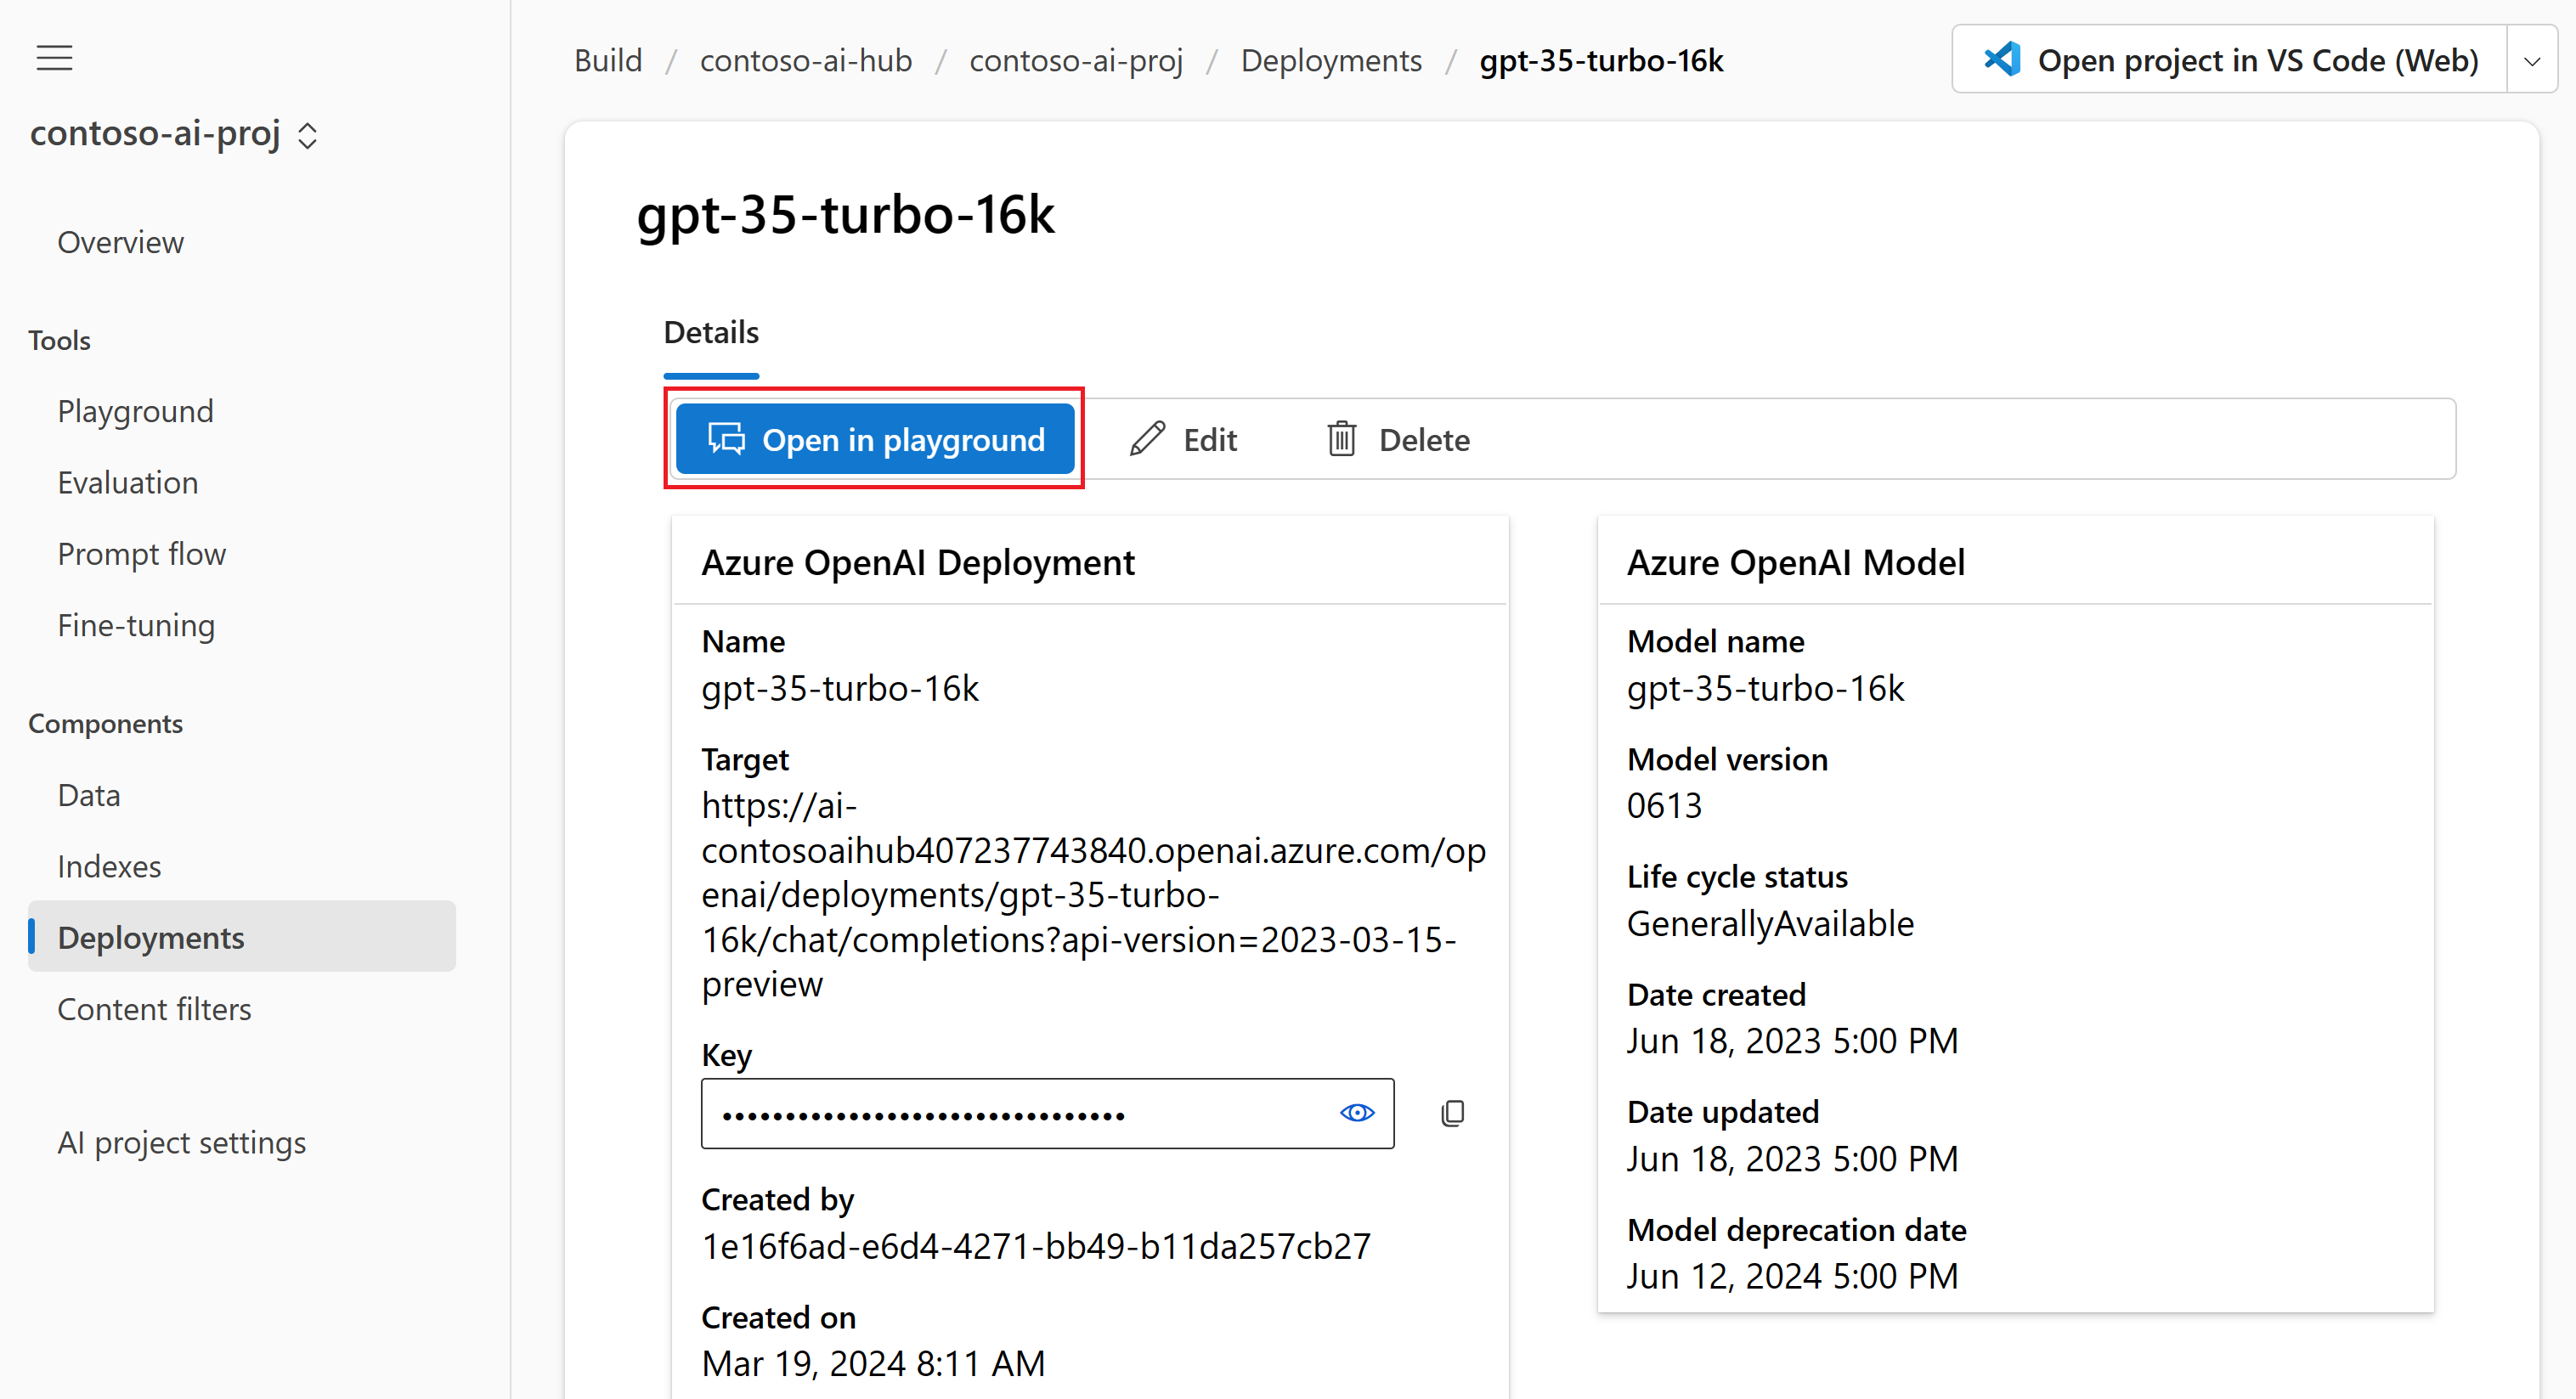
On the Deploy model page, enter a name for your deployment, and then select Deploy. After the deployment is created, you see the deployment details page. Details include the date you created the deployment and the created date and version of the model you deployed.
On the deployment details page from the previous step, select Open in playground.


For more information about deploying models, see how to deploy models.
Chat in the playground without your data
In the Azure AI Studio playground you can observe how your model responds with and without your data. In this section, you test your model without your data. In the next section, you add your data to the model to help it better answer questions about your products.
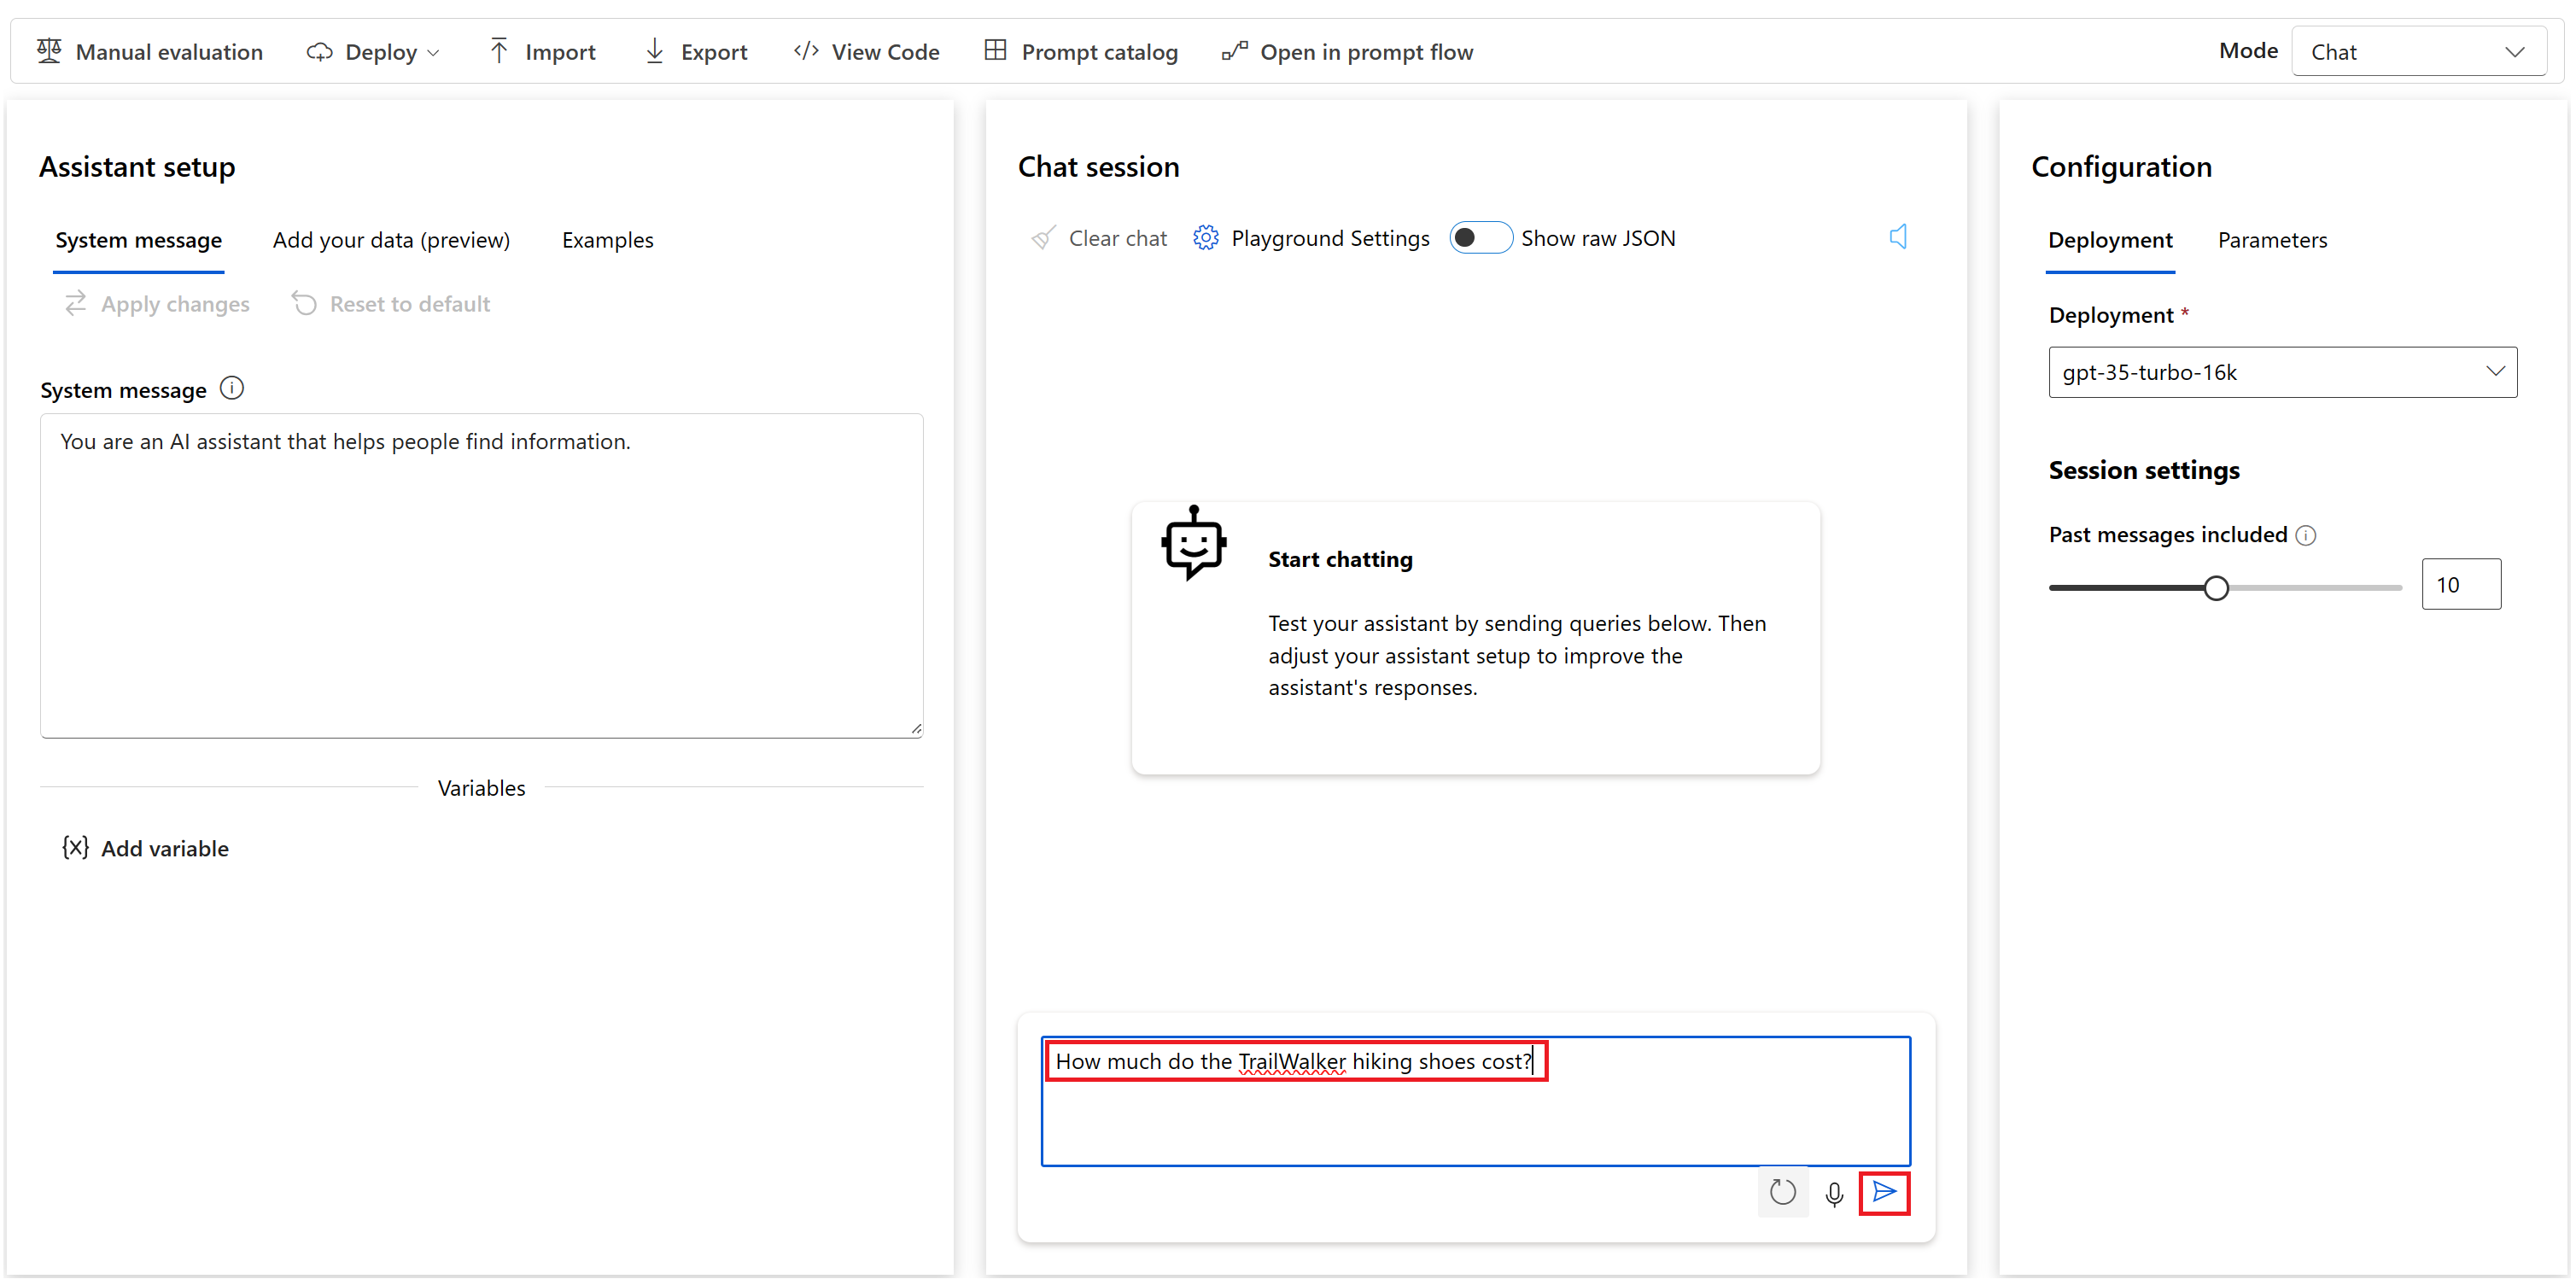
In the playground, make sure that Chat is selected from the Mode dropdown. Select your deployed GPT chat model from the Deployment dropdown.
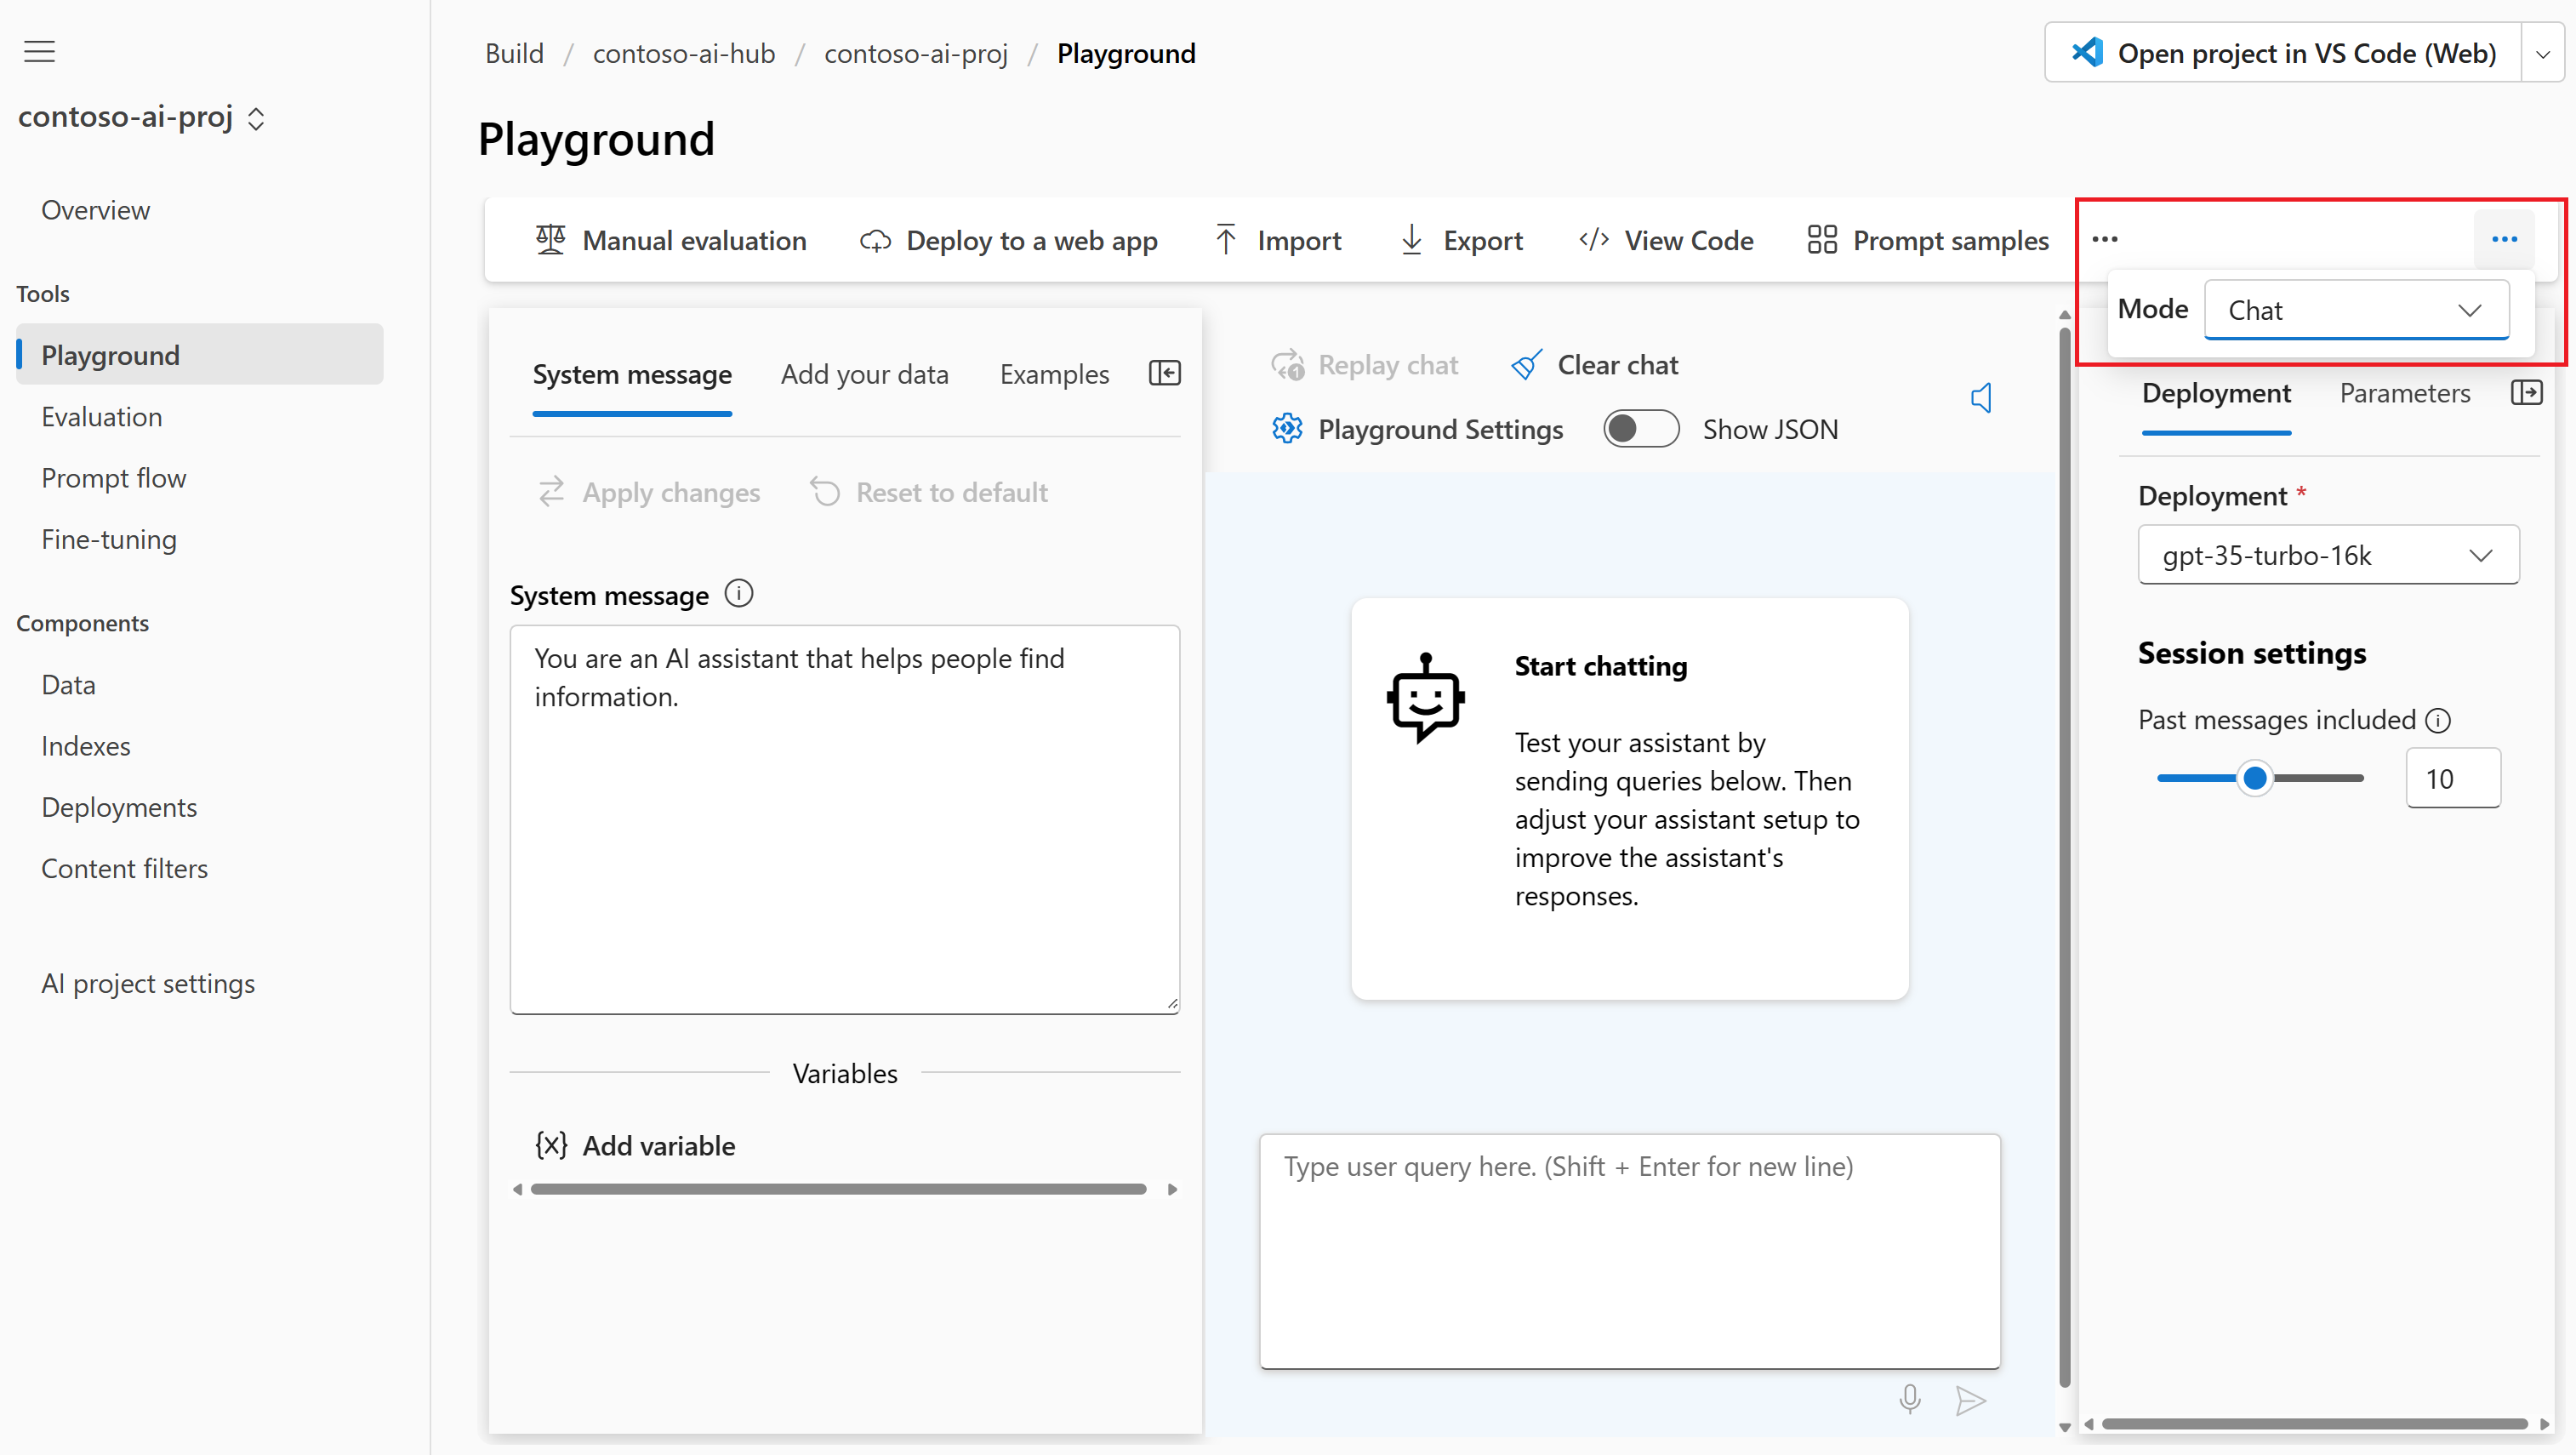
In the System message text box on the Assistant setup pane, provide this prompt to guide the assistant: "You are an AI assistant that helps people find information." You can tailor the prompt for your scenario. For more information, see prompt samples.
Select Apply changes to save your changes, and when prompted to see if you want to update the system message, select Continue.
In the chat session pane, enter the following question: "How much do the TrailWalker hiking shoes cost", and then select the right arrow icon to send.
The assistant replies that it doesn't know the answer. The model doesn't have access to product information about the TrailWalker hiking shoes.
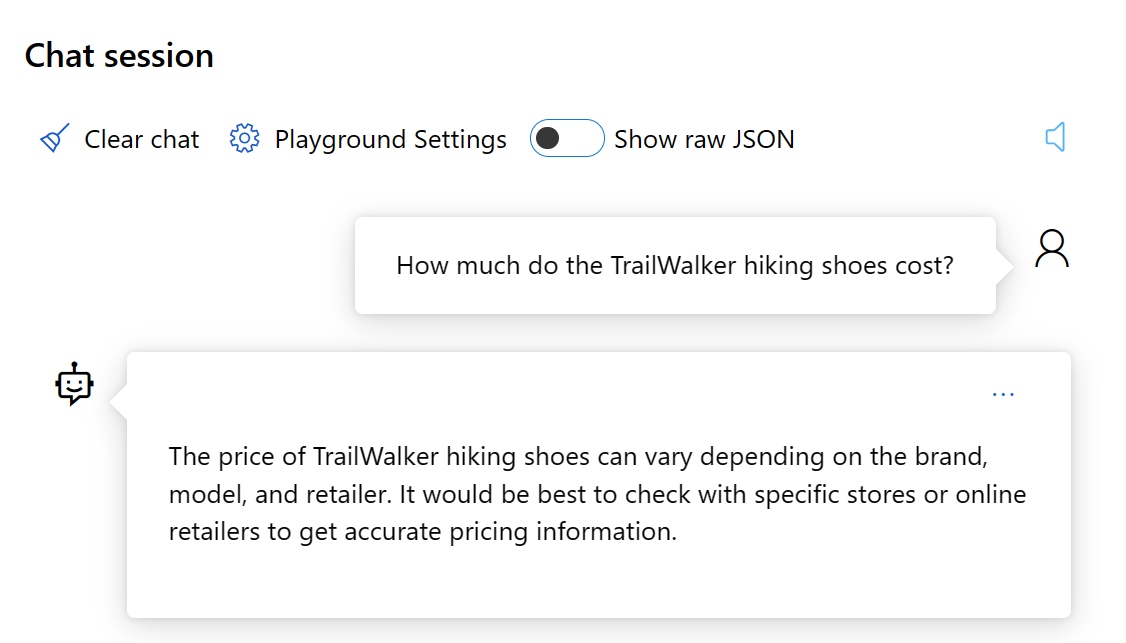


In the next section, you'll add your data to the model to help it answer questions about your products.
Add your data and try the chat model again
You need a local copy of example product information. For more information and links to example data, see the prerequisites.
You upload your local data files to Azure Blob storage and create an Azure AI Search index. Your data source is used to help ground the model with specific data. Grounding means that the model uses your data to help it understand the context of your question. You're not changing the deployed model itself. Your data is stored separately and securely in your Azure subscription. For more information, see Azure OpenAI on your data.
Follow these steps to add your data to the playground to help the assistant answer questions about your products.
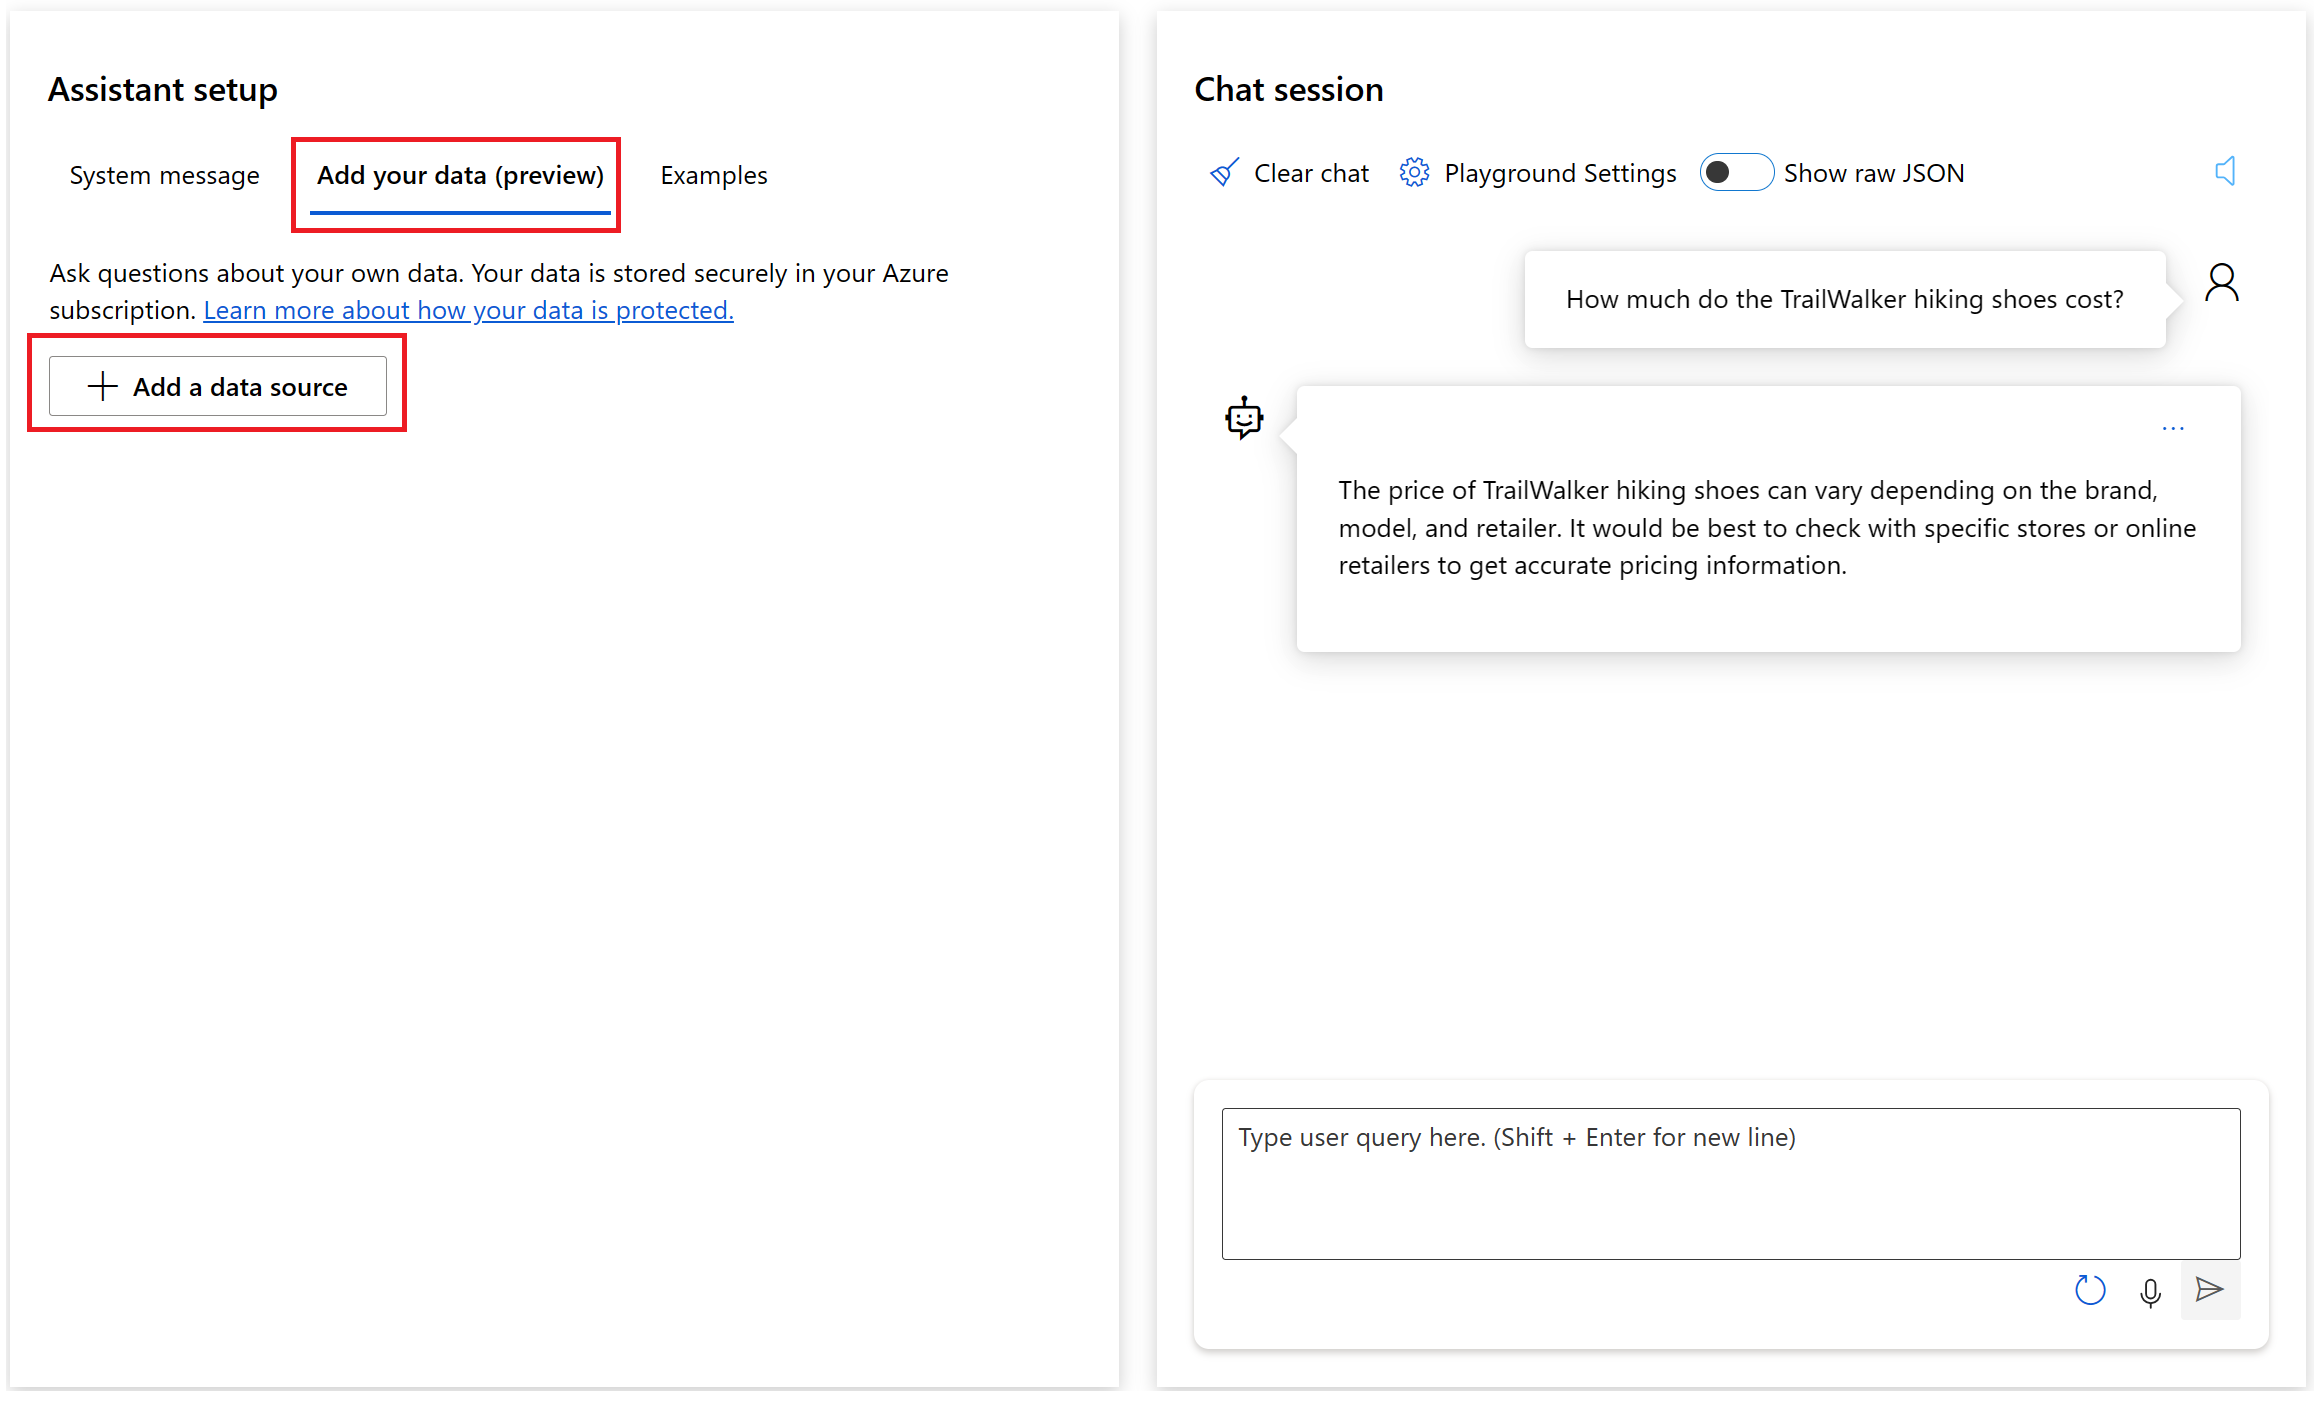
If you aren't already in the Azure AI Studio playground, select Build from the top menu and then select Playground from the collapsible left menu.
On the Assistant setup pane, select Add your data (preview) > + Add a data source.
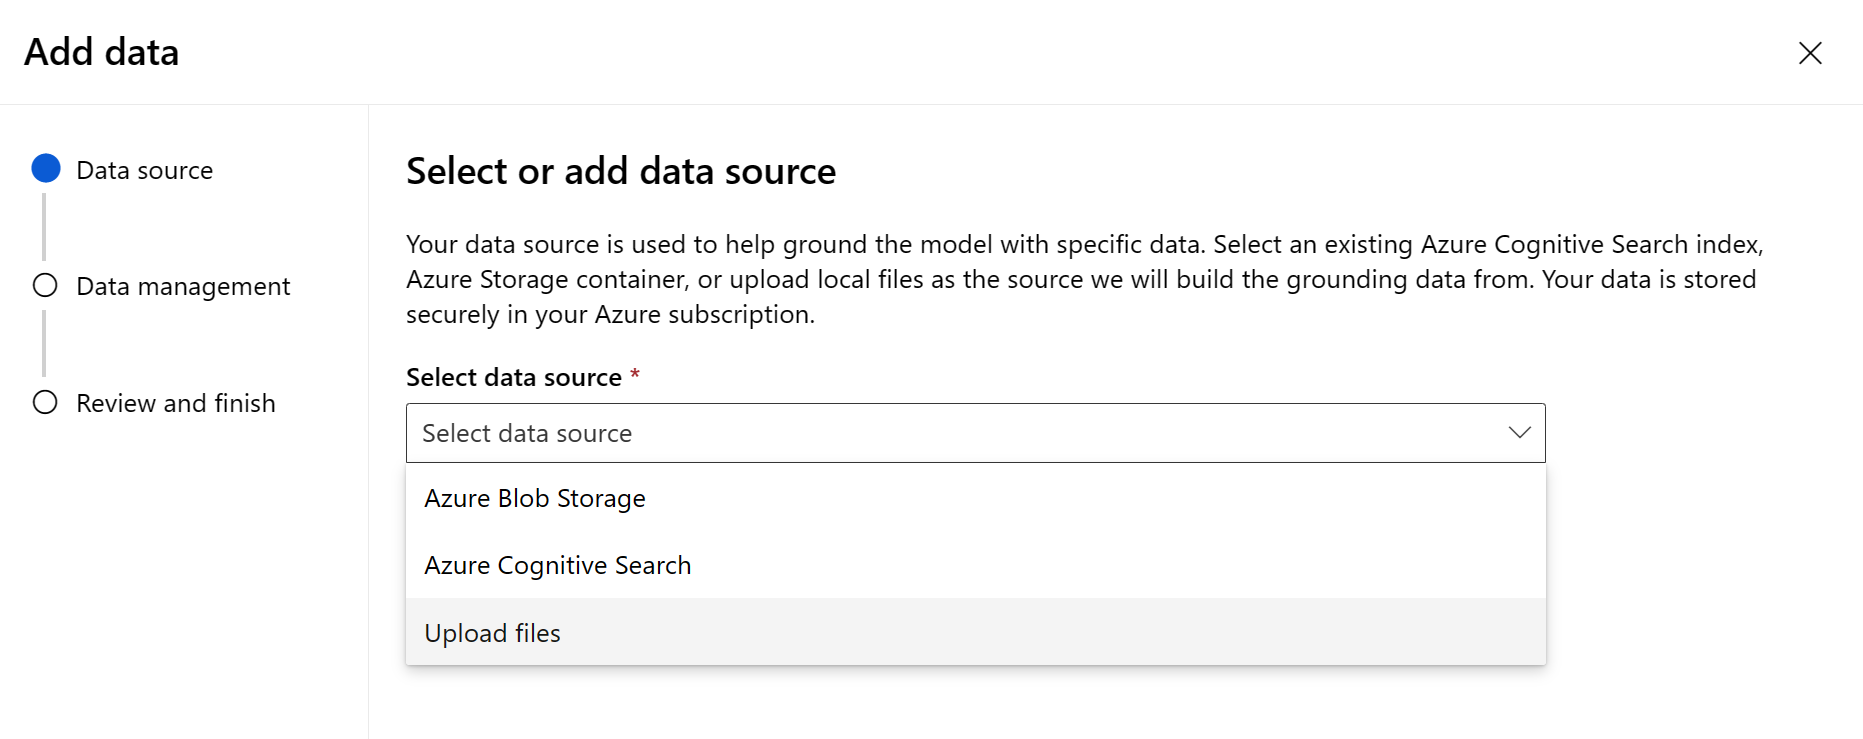
In the Data source page that appears, select Upload files from the Select data source dropdown.
Tip
For data source options and supported file types and formats, see Azure OpenAI on your data.
Enter product-info as the name of your product information index.
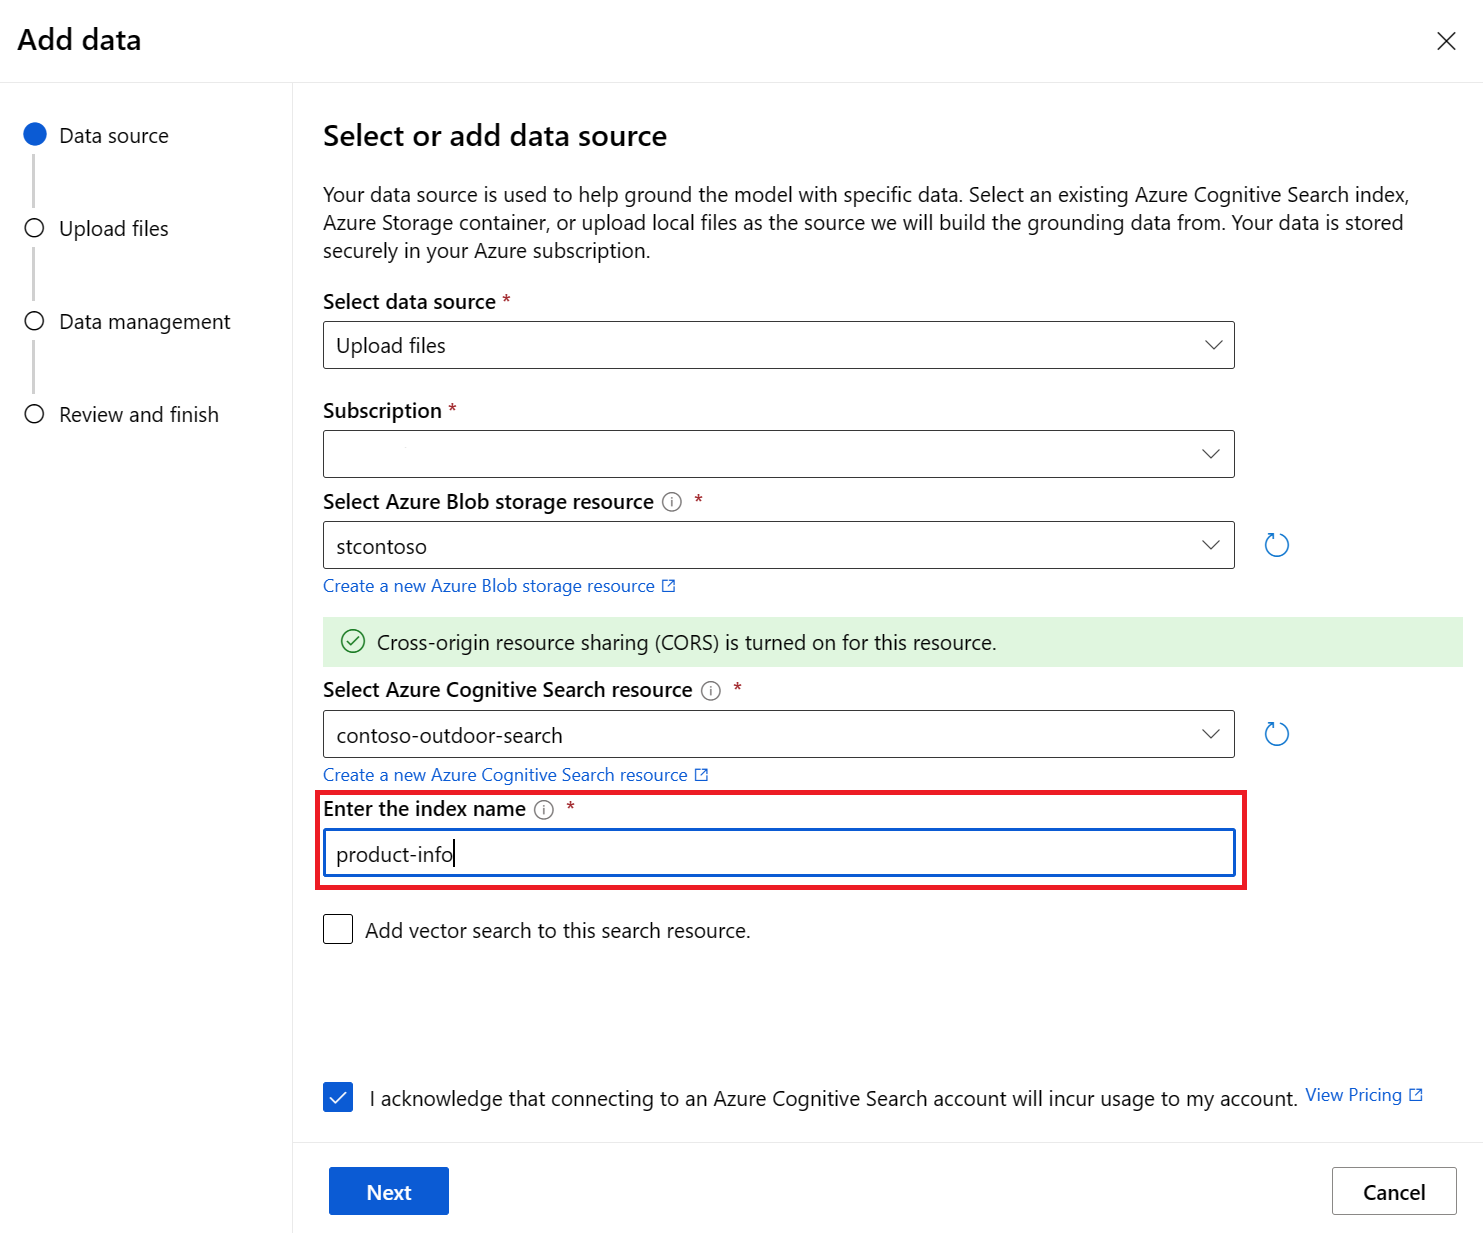
Select or create an Azure AI Search resource named contoso-outdoor-search and select the acknowledgment that connecting it incurs usage on your account.
Note
You use the product-info index and the contoso-outdoor-search Azure AI Search resource in prompt flow later in this tutorial. If the names you enter differ from what's specified here, make sure to use the names you entered in the rest of the tutorial.
Select the Azure subscription that contains the Azure OpenAI resource you want to use. Then select Next.
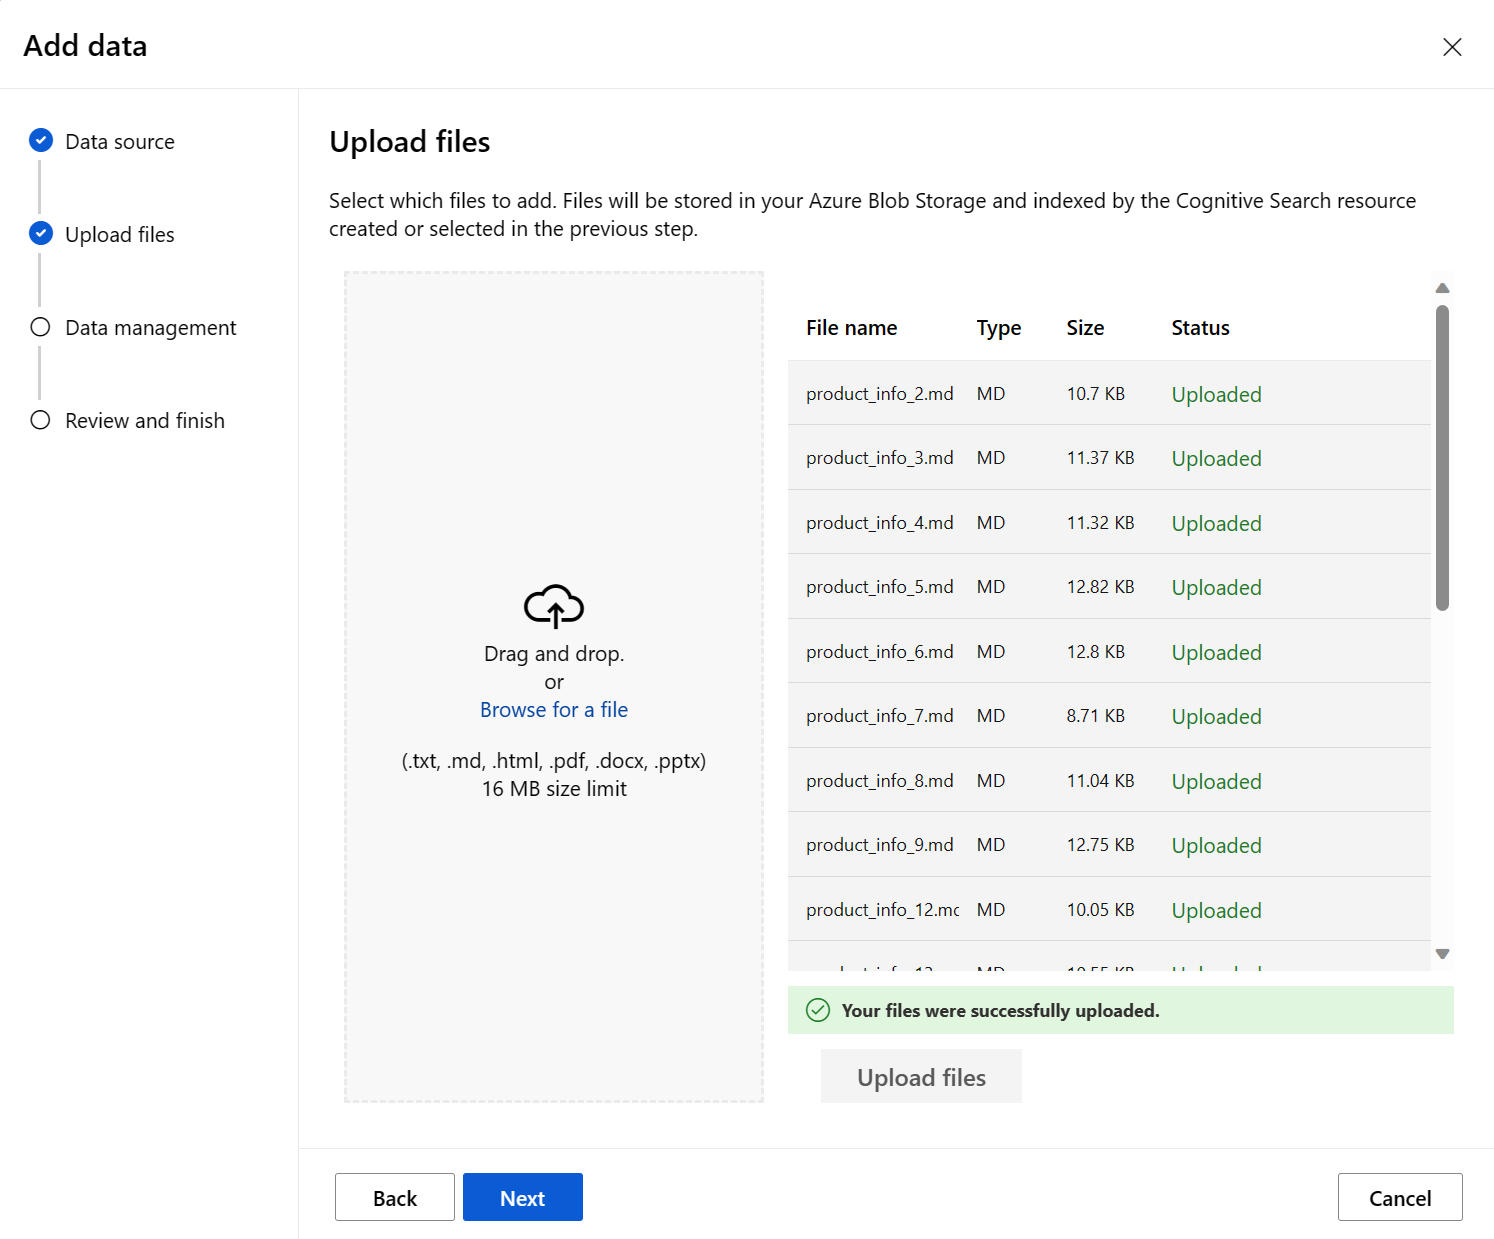
On the Upload files page, select Browse for a file and select the files you want to upload. Select the product info files that you downloaded or created earlier. See the prerequisites. If you want to upload more than one file, do so now. You can't add more files later in the same playground session.
Select Upload to upload the file to your Azure Blob storage account. Then select Next from the bottom of the page.
On the Data management page under Search type, select Keyword. This setting helps determine how the model responds to requests. Then select Next.
Note
If you had added vector search on the Select or add data source page, then more options would be available here for an additional cost. For more information, see Azure OpenAI on your data.
Review the details you entered, and select Save and close. You can now chat with the model and it uses information from your data to construct the response.

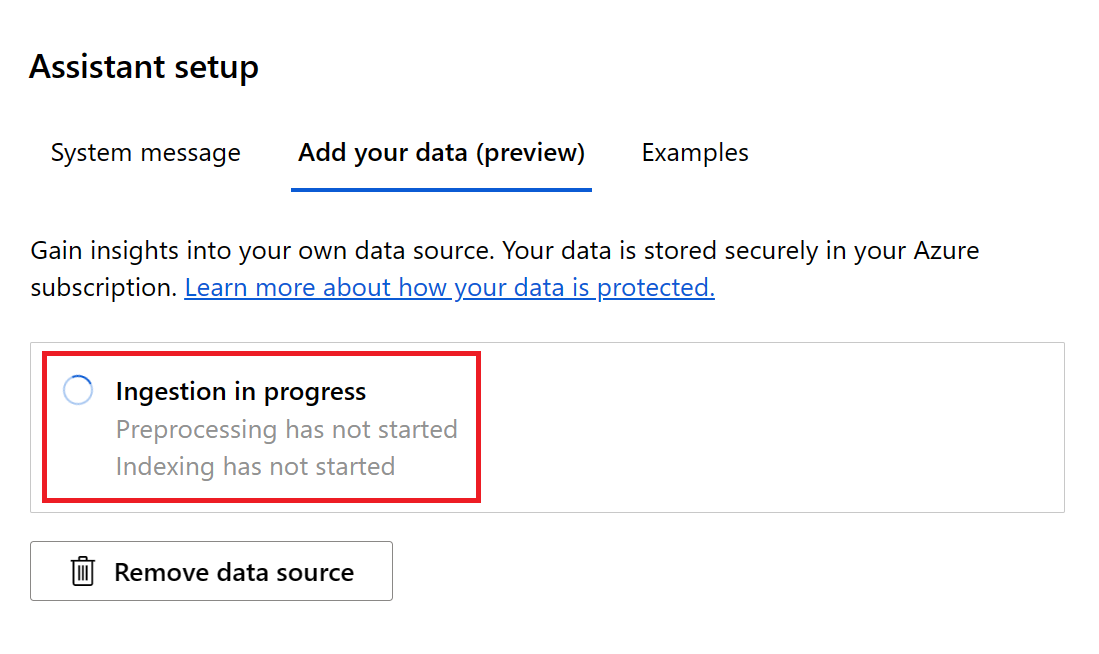
Now on the Assistant setup pane, you can see that your data ingestion is in progress. Before proceeding, wait until you see the data source and index name in place of the status.
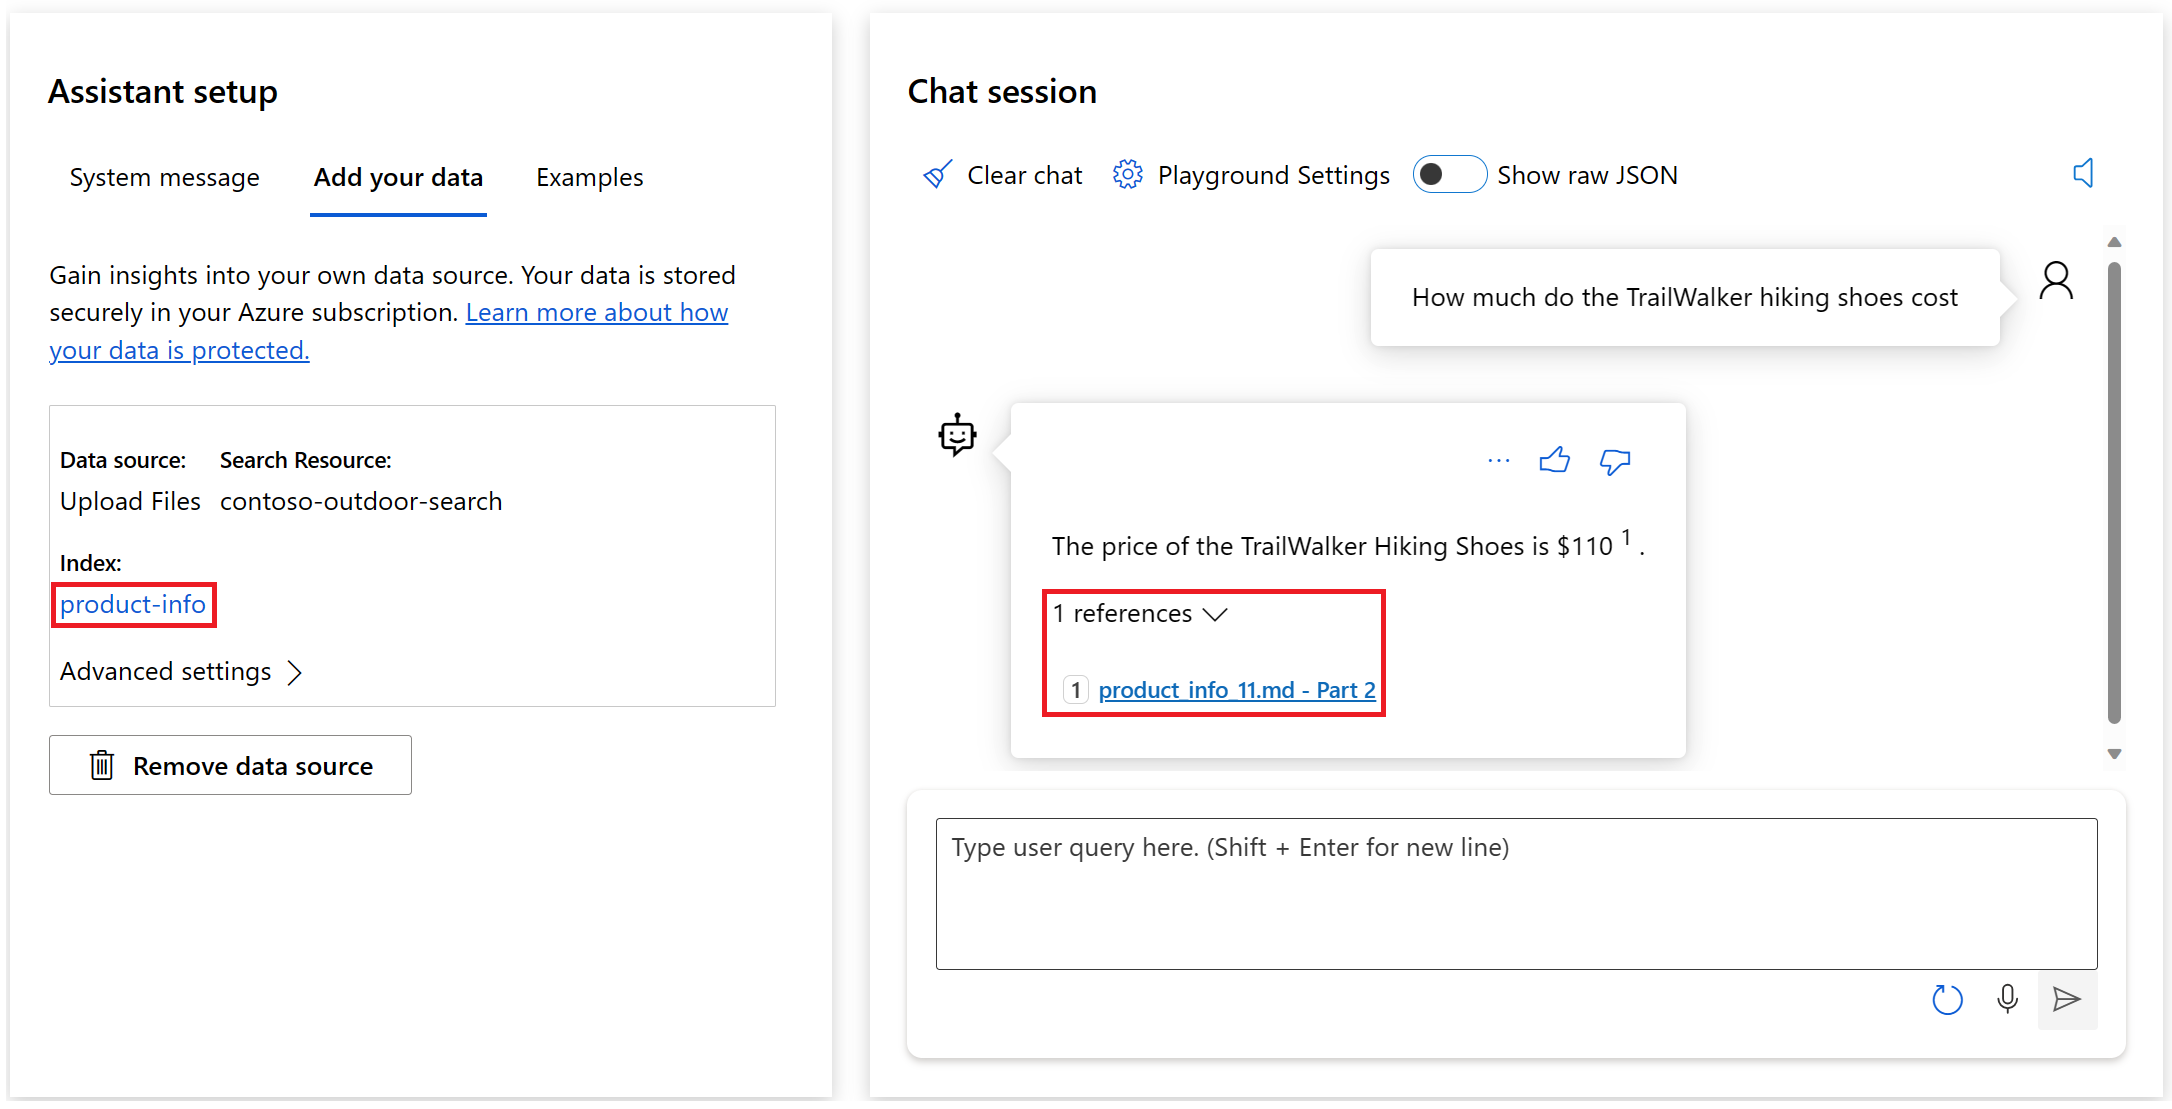
You can now chat with the model asking the same question as before ("How much do the TrailWalker hiking shoes cost"), and this time it uses information from your data to construct the response. You can expand the references button to see the data that was used.


Create compute and runtime that are needed for prompt flow
You use prompt flow to optimize the messages that are sent to the copilot's chat model. Prompt flow requires a compute instance and a runtime. If you already have a compute instance and a runtime, you can skip this section and remain in the playground.
To create a compute instance and a runtime, follow these steps:
- If you don't have a compute instance, you can create one in Azure AI Studio.
- Then create a runtime by following the steps in how to create a runtime.
To complete the rest of the tutorial, make sure that your runtime is in the Running status. You might need to select Refresh to see the updated status.
Important
You're charged for compute instances while they are running. To avoid incurring unnecessary Azure costs, pause the compute instance when you're not actively working in prompt flow. For more information, see how to start and stop compute.
Create a prompt flow from the playground
Now that your deployed chat model is working in the playground with your data, you could deploy your copilot as a web app from the playground.
But you might ask "How can I further customize this copilot?" You might want to add multiple data sources, compare different prompts or the performance of multiple models. A prompt flow serves as an executable workflow that streamlines the development of your LLM-based AI application. It provides a comprehensive framework for managing data flow and processing within your application.
In this section, you learn how to transition to prompt flow from the playground. You export the playground chat environment including connections to the data that you added. Later in this tutorial, you evaluate the flow and then deploy the flow for consumption.
Note
The changes made in prompt flow aren't applied backwards to update the playground environment.
You can create a prompt flow from the playground by following these steps:
If you aren't already in the Azure AI Studio playground, select Build from the top menu and then select Playground from the collapsible left menu.
Select Open in prompt flow from the menu above the Chat session pane.
Enter a folder name for your prompt flow. Then select Open. Azure AI Studio exports the playground chat environment including connections to your data to prompt flow.


Within a flow, nodes take center stage, representing specific tools with unique capabilities. These nodes handle data processing, task execution, and algorithmic operations, with inputs and outputs. By connecting nodes, you establish a seamless chain of operations that guides the flow of data through your application. For more information, see prompt flow tools.
To facilitate node configuration and fine-tuning, a visual representation of the workflow structure is provided through a DAG (Directed Acyclic Graph) graph. This graph showcases the connectivity and dependencies between nodes, providing a clear overview of the entire workflow. The nodes in the graph shown here are representative of the playground chat experience that you exported to prompt flow.

Nodes can be added, updated, rearranged, or removed. The nodes in your flow at this point include:
- DetermineIntent: This node determines the intent of the user's query. It uses the system prompt to determine the intent. You can edit the system prompt to provide scenario-specific few-shot examples.
- ExtractIntent: This node formats the output of the DetermineIntent node and sends it to the RetrieveDocuments node.
- RetrieveDocuments: This node searches for top documents related to the query. This node uses the search type and any parameters you pre-configured in playground.
- FormatRetrievedDocuments: This node formats the output of the RetrieveDocuments node and sends it to the DetermineReply node.
- DetermineReply: This node contains an extensive system prompt, which asks the LLM to respond using the retrieved documents only. There are two inputs:
- The RetrieveDocuments node provides the top retrieved documents.
- The FormatConversation node provides the formatted conversation history including the latest query.
The FormatReply node formats the output of the DetermineReply node.
In prompt flow, you should also see:
Save: You can save your prompt flow at any time by selecting Save from the top menu. Be sure to save your prompt flow periodically as you make changes in this tutorial.
Runtime: The runtime that you created earlier in this tutorial. You can start and stop runtimes and compute instances via AI project settings in the left menu. To work in prompt flow, make sure that your runtime is in the Running status.
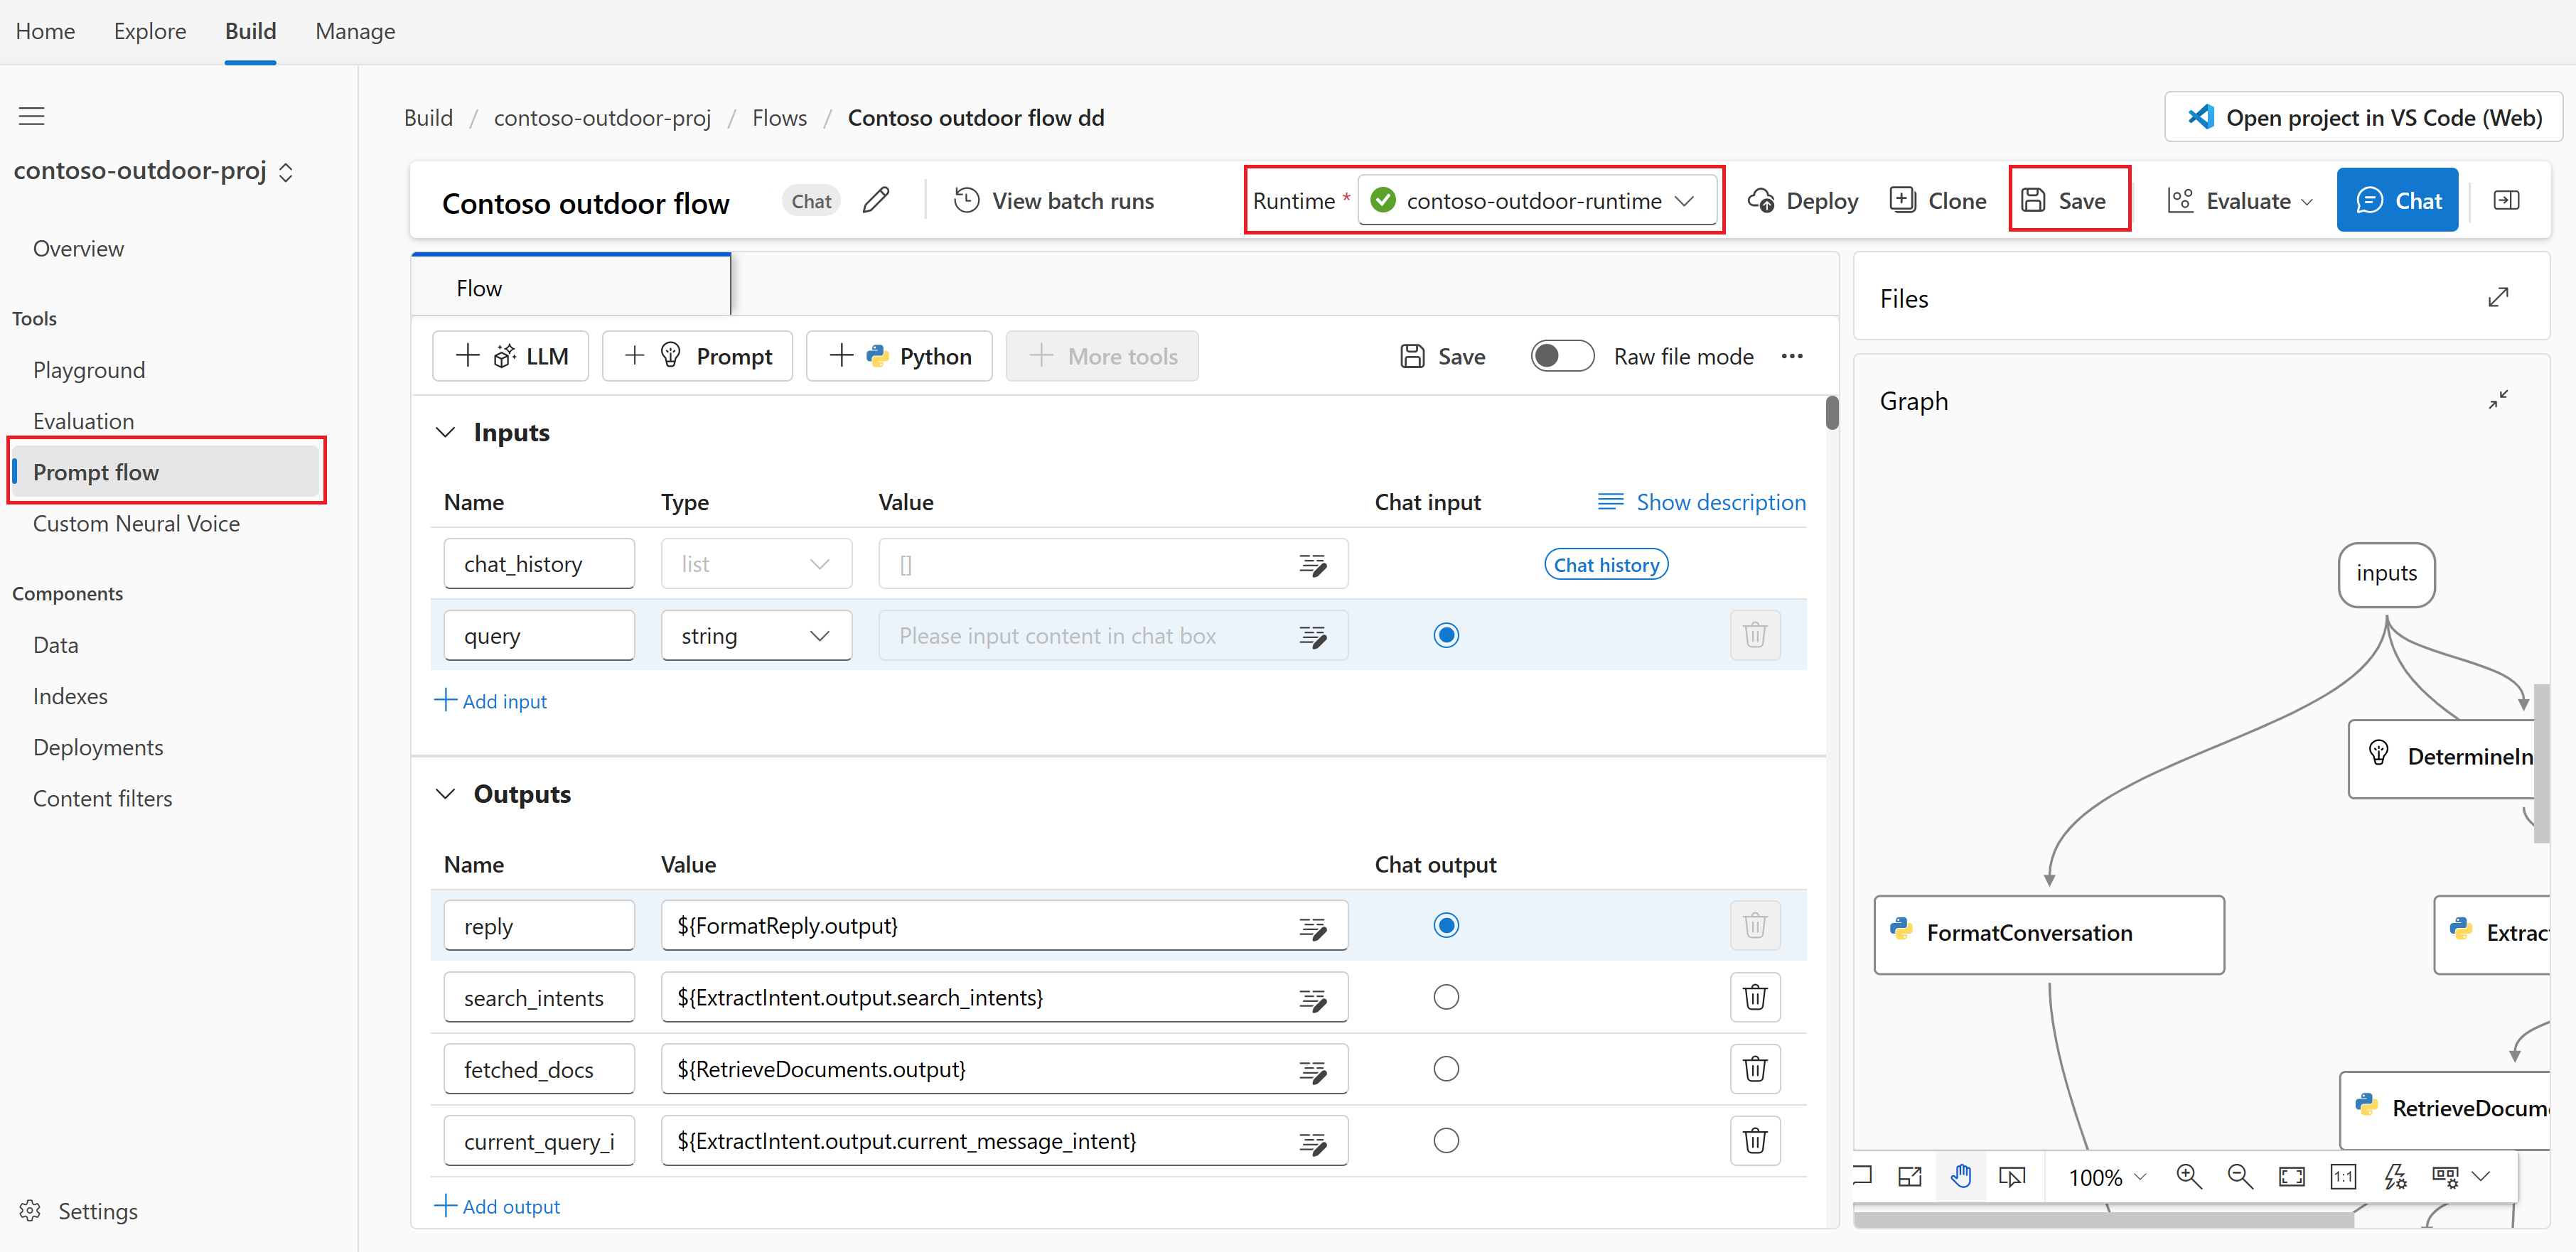
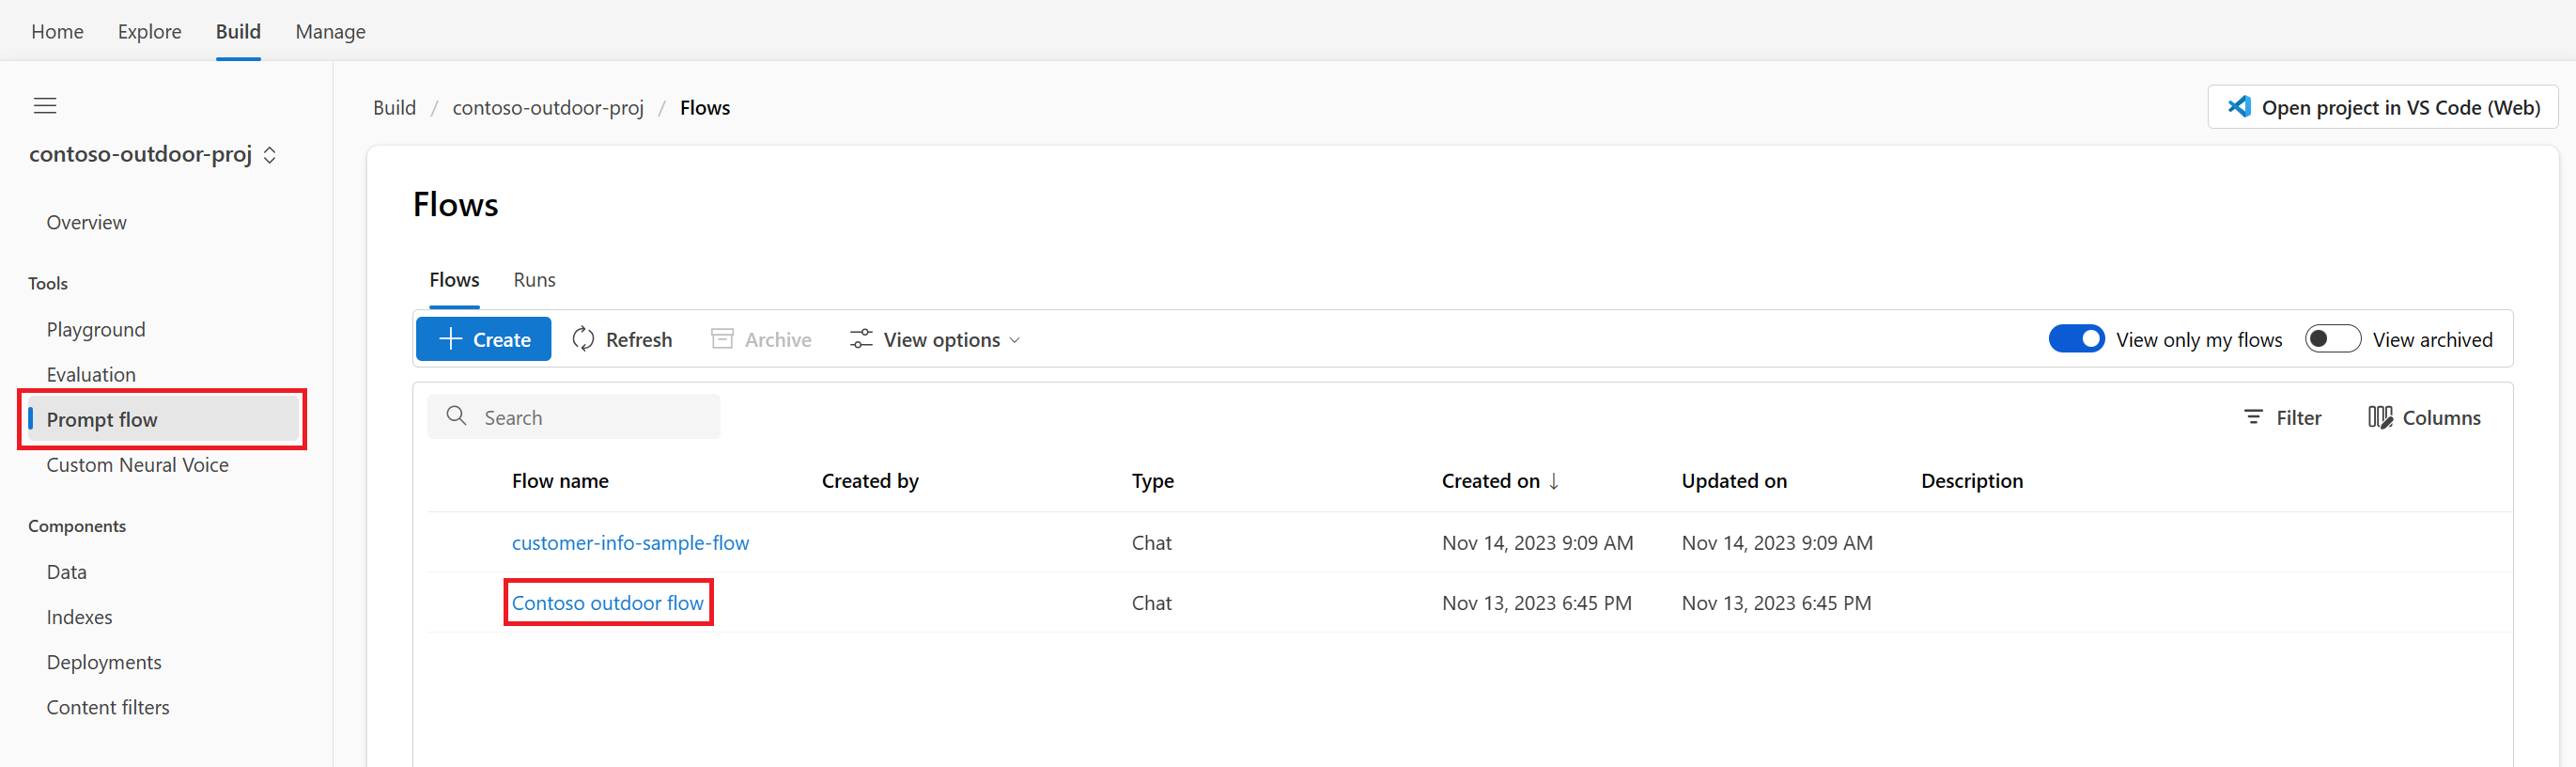
Tools: You can return to the prompt flow anytime by selecting Prompt flow from Tools in the left menu. Then select the prompt flow folder that you created earlier (not the sample flow).


Customize prompt flow with multiple data sources
Earlier in the Azure AI Studio playground, you added your data to create one search index that contained product data for the Contoso copilot. So far, users can only inquire about products with questions such as "How much do the TrailWalker hiking shoes cost?". But they can't get answers to questions such as "How many TrailWalker hiking shoes did Daniel Wilson buy?" To enable this scenario, we add another index with customer information to the flow.
Create the customer info index
You need a local copy of example customer information. For more information and links to example data, see the prerequisites.
Follow these instructions on how to create a new index:
Select Index from the left menu. Then select + New index.
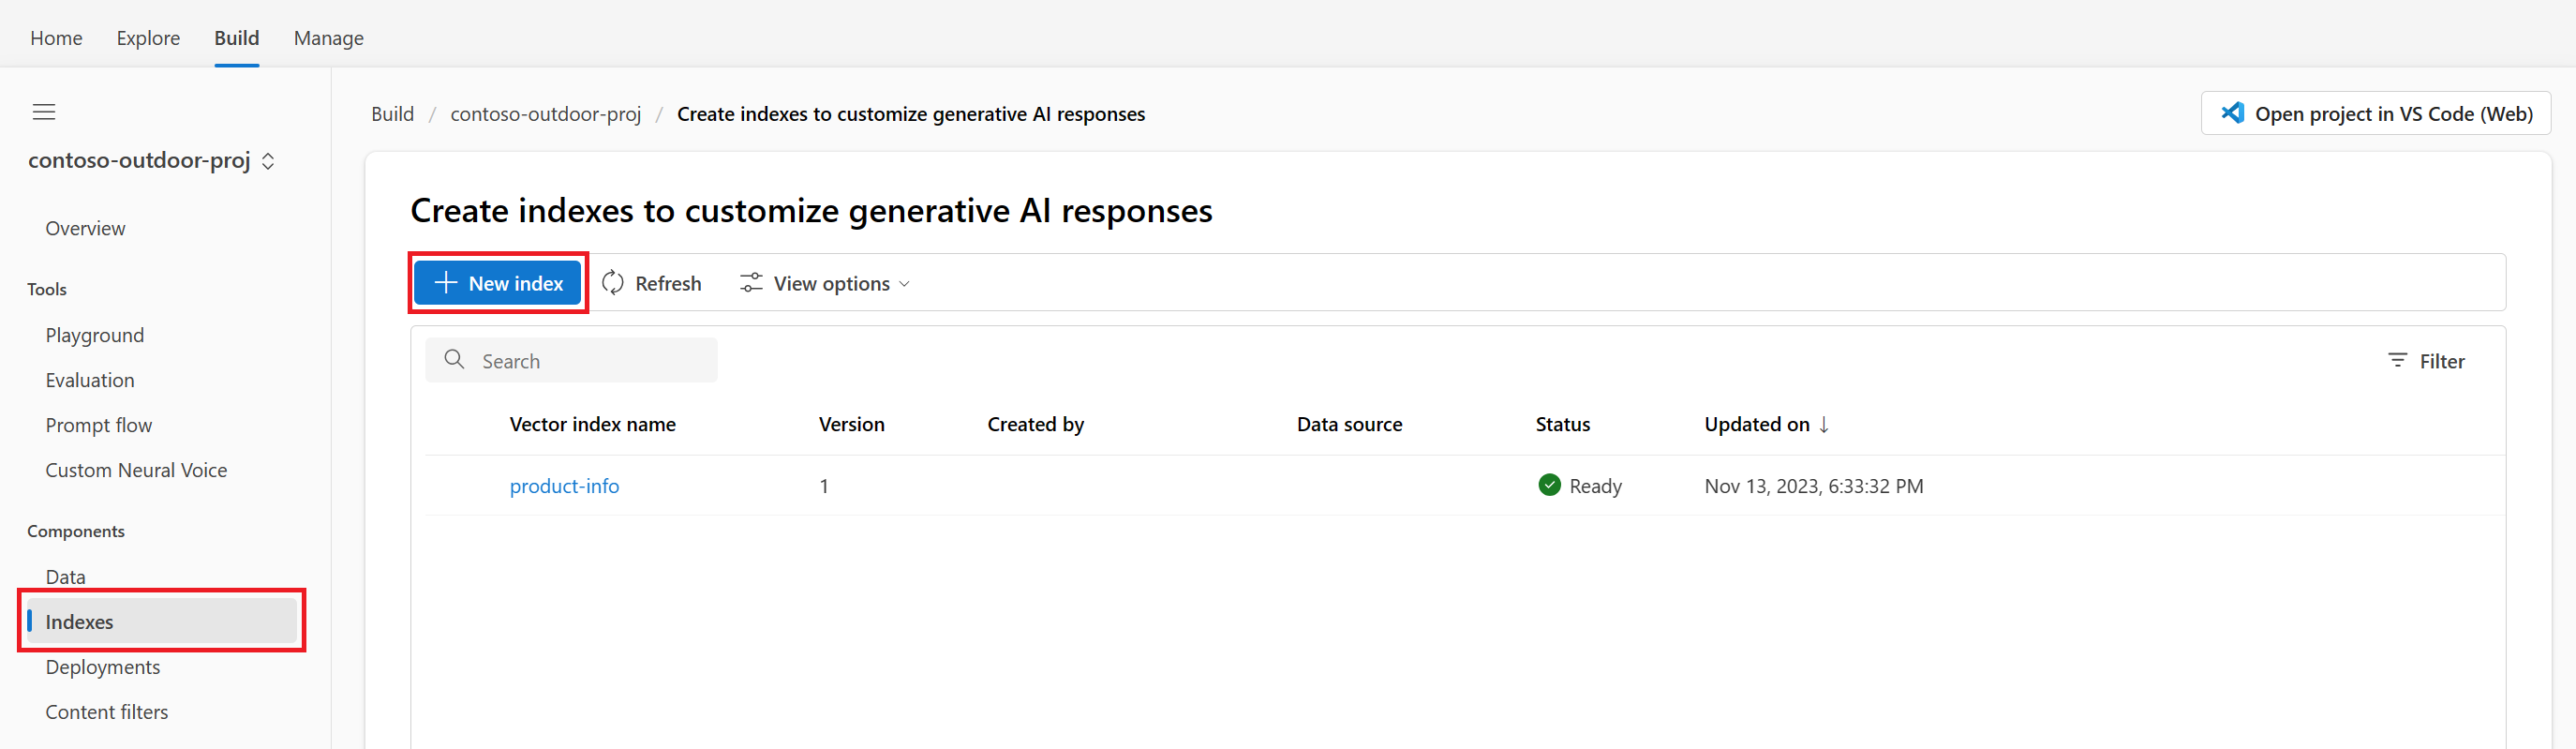
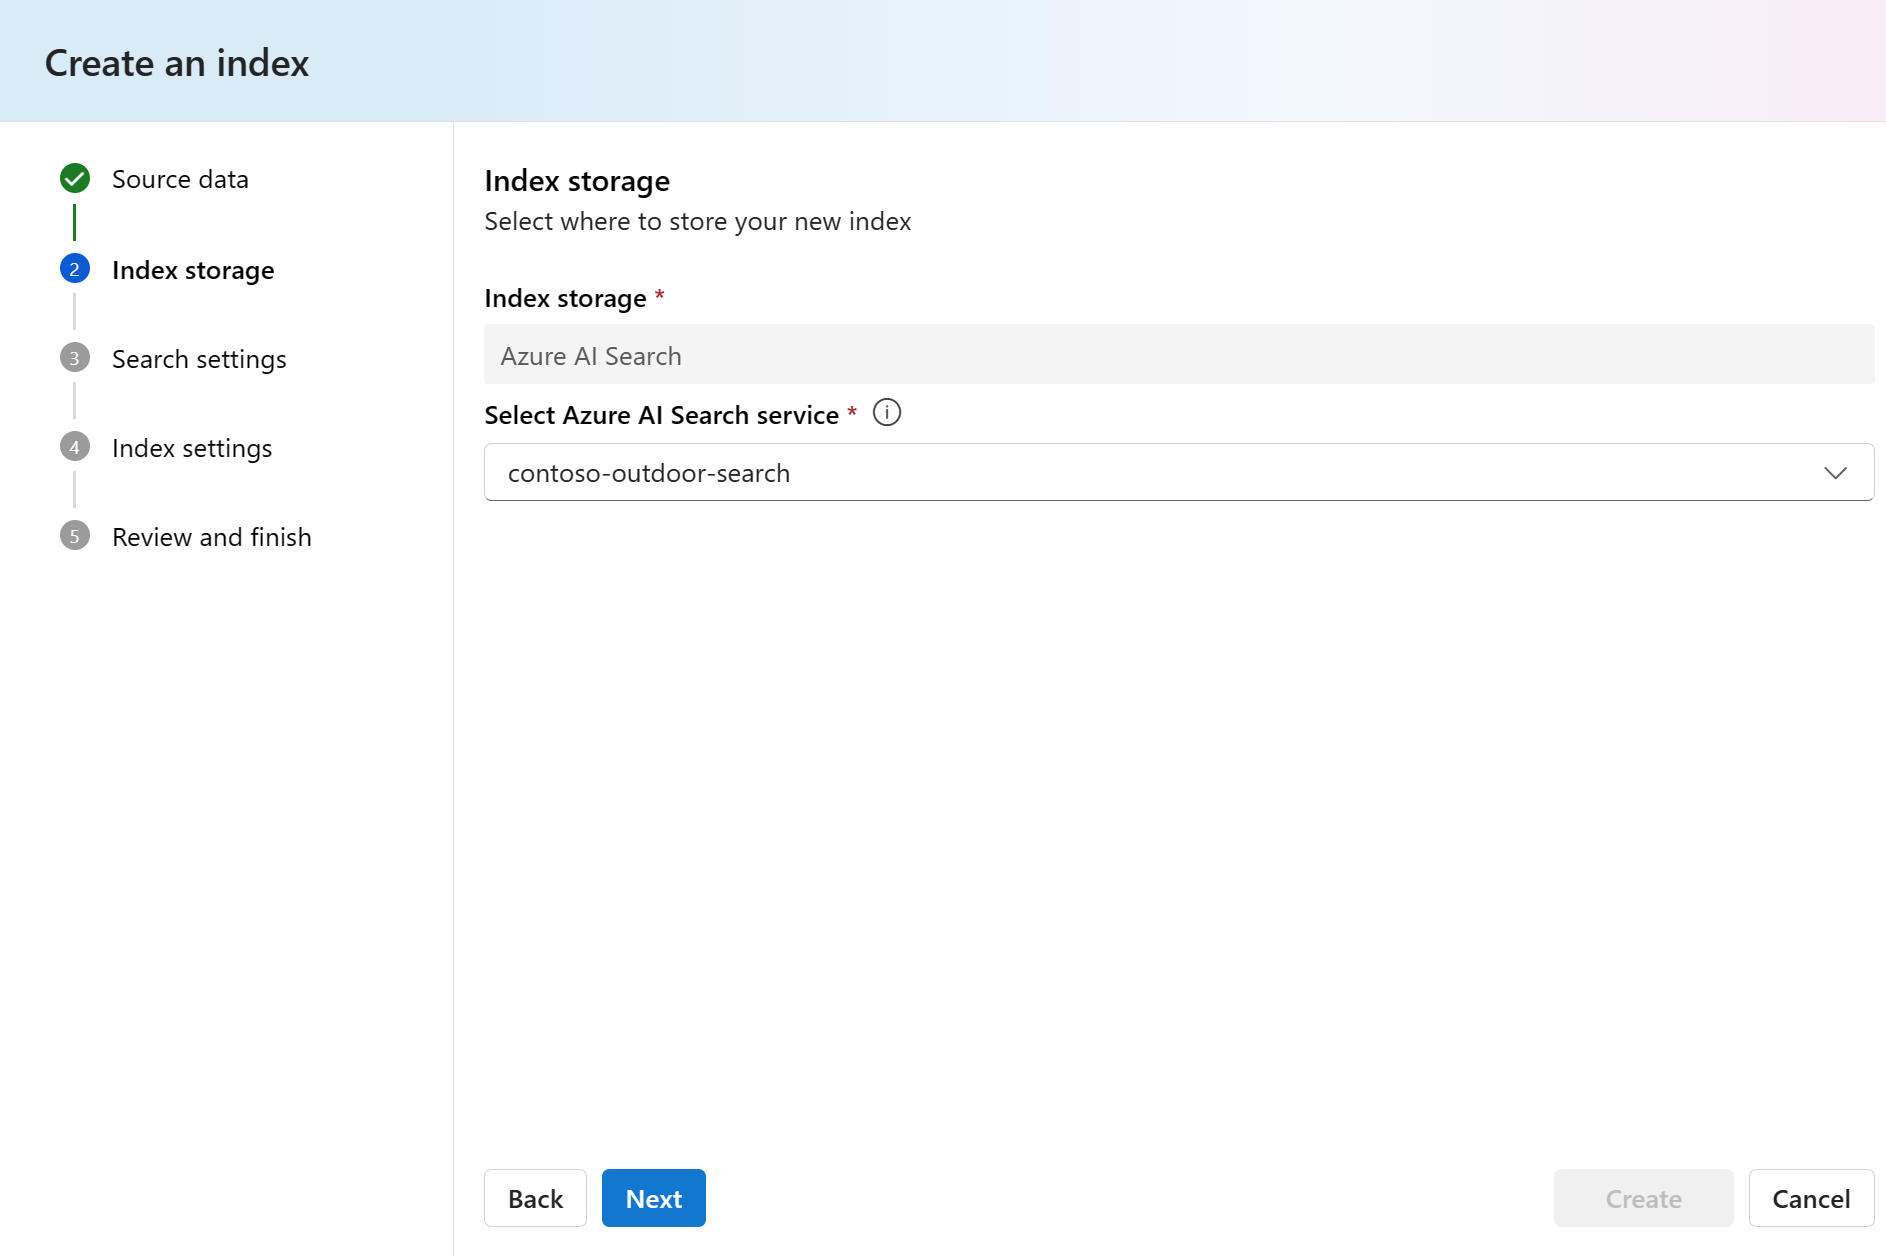
You're taken to the Create an index wizard.
On the Source data page, select Upload folder from the Upload dropdown. Select the customer info files that you downloaded or created earlier. See the prerequisites.
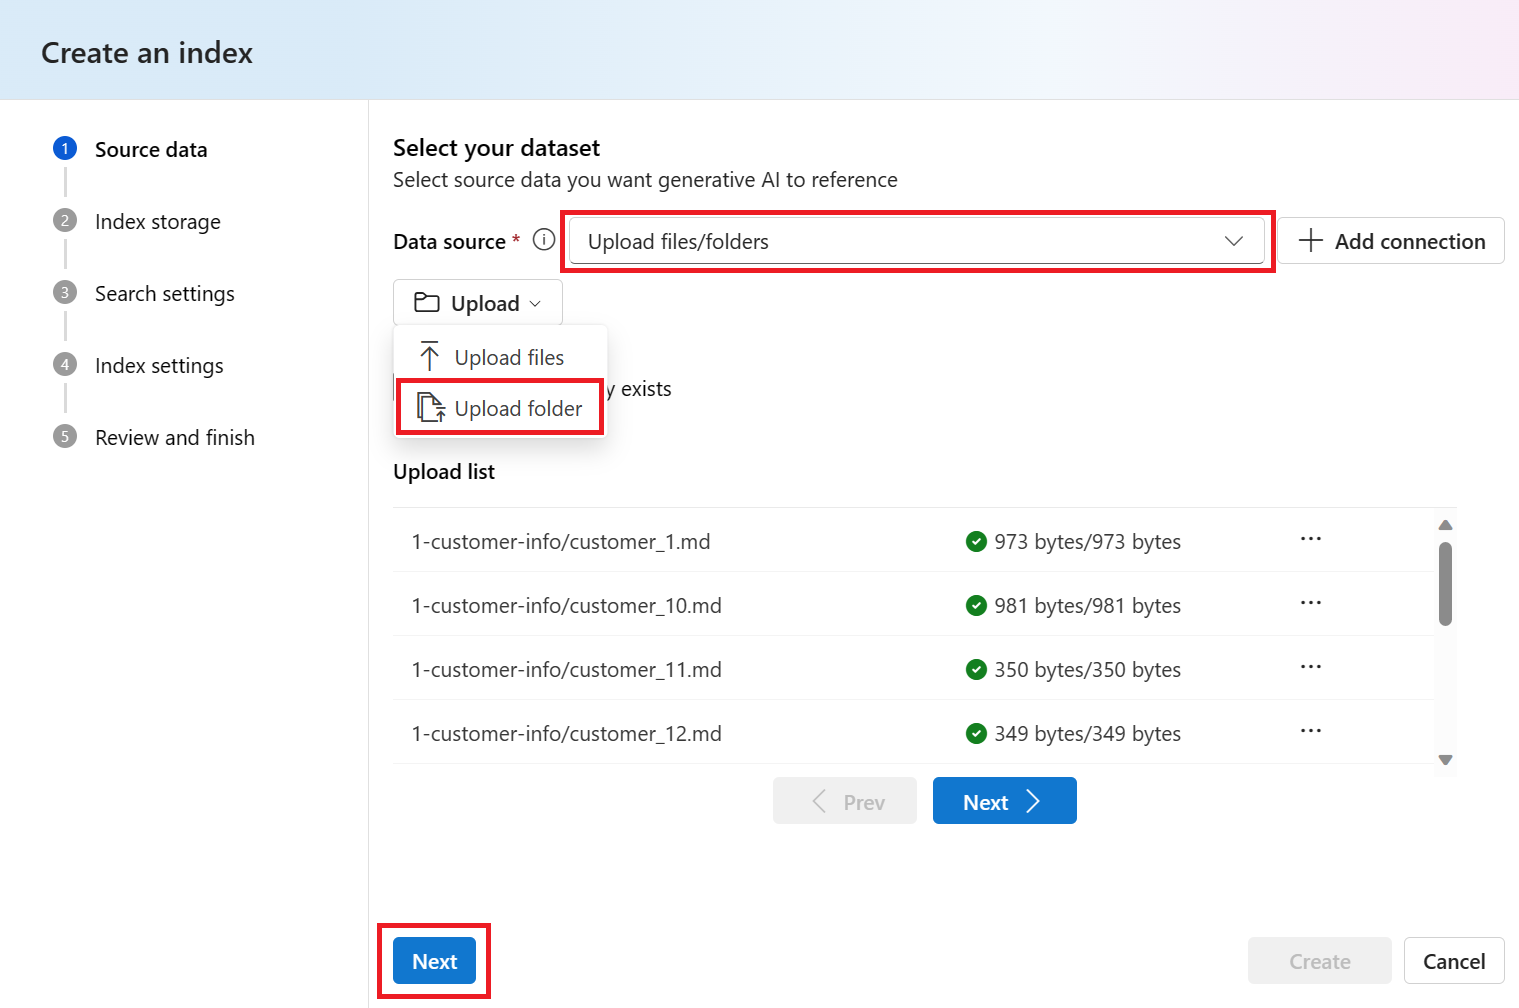
Select Next at the bottom of the page.
Select the same Azure AI Search resource (contoso-outdoor-search) that you used for your product info index (product-info). Then select Next.
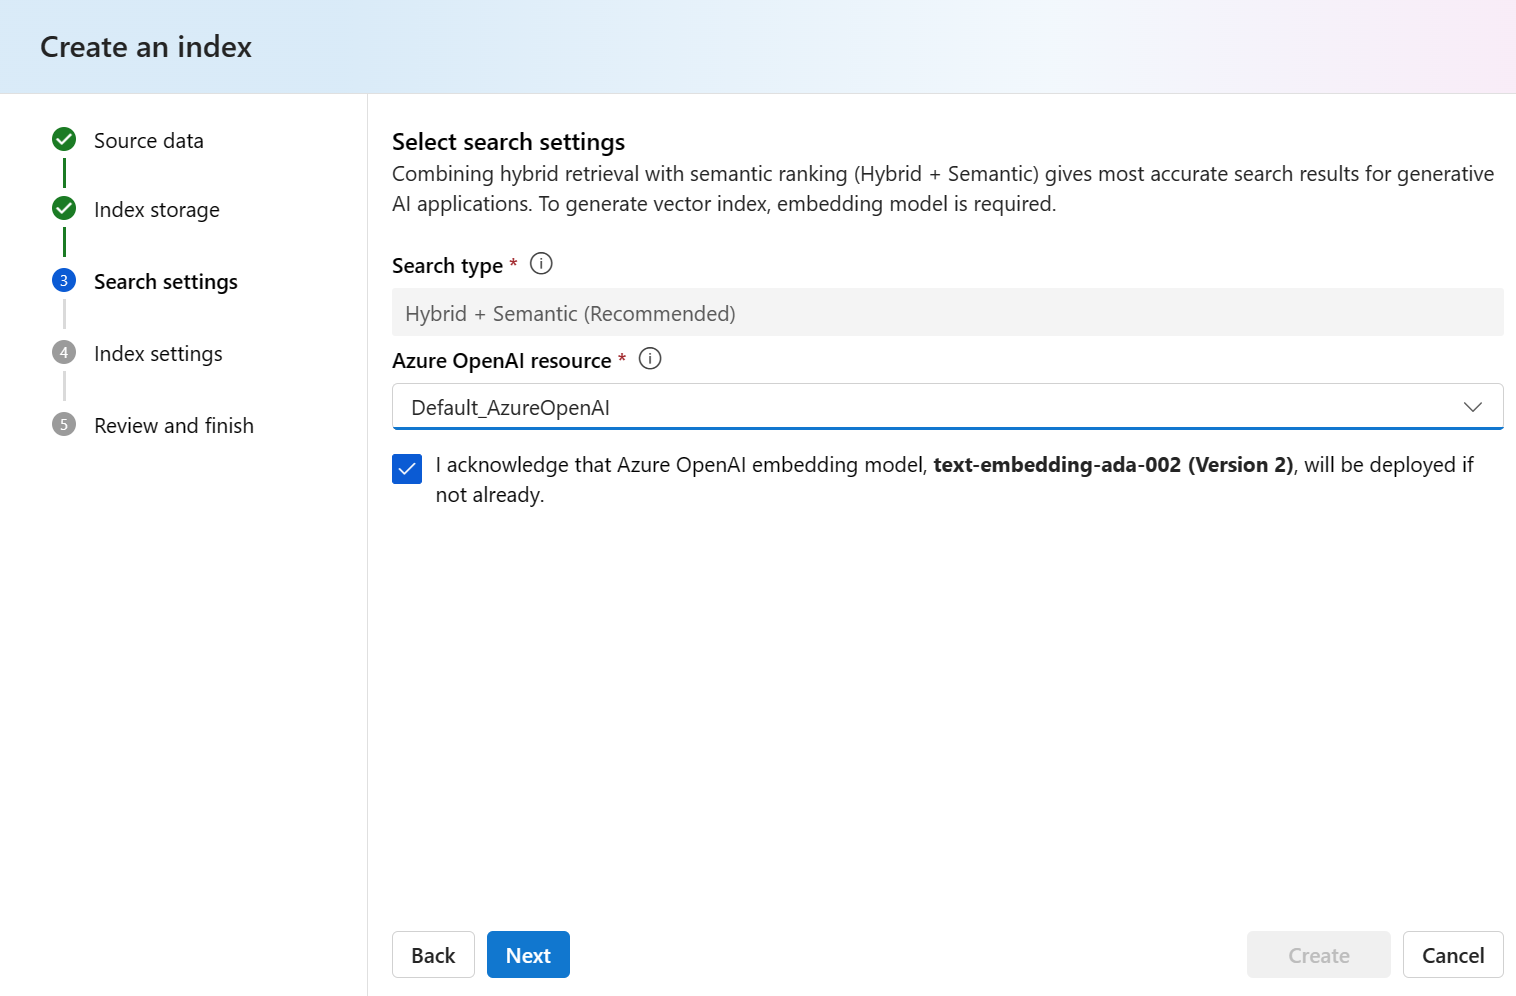
Select Hybrid + Semantic (Recommended) for the Search type. This type should be selected by default.
Select Default_AzureOpenAI from the Azure OpenAI resource dropdown. Select the checkbox to acknowledge that an Azure OpenAI embedding model will be deployed if it's not already. Then select Next.
Note
The embedding model is listed with other model deployments in the Deployments page.
Enter customer-info for the index name. Then select Next.
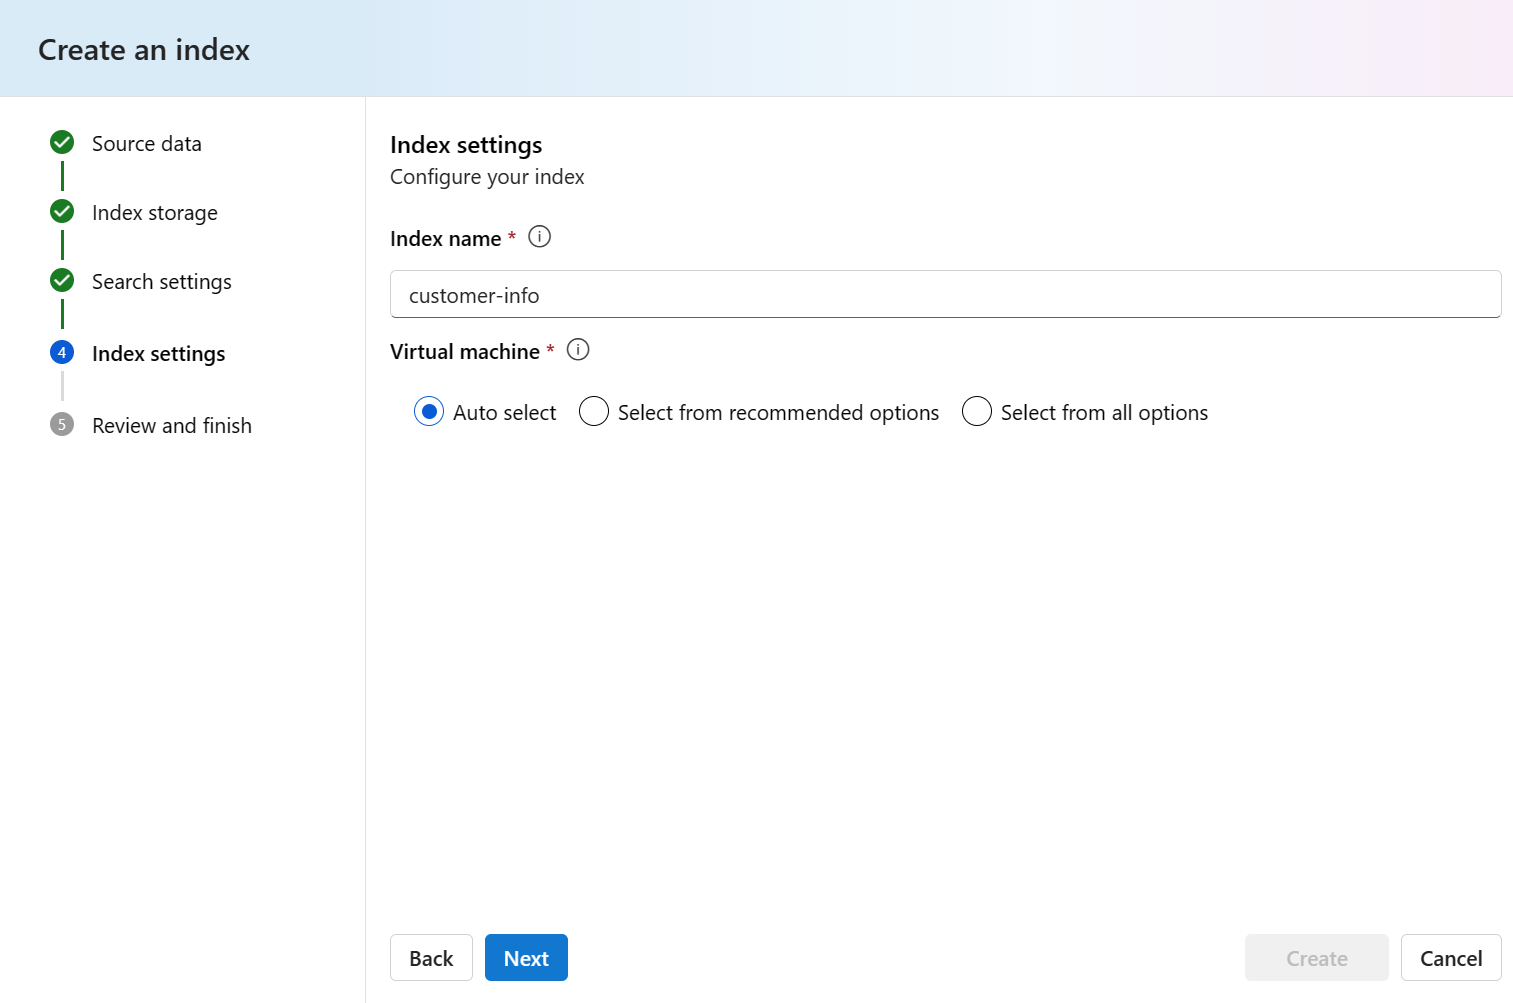
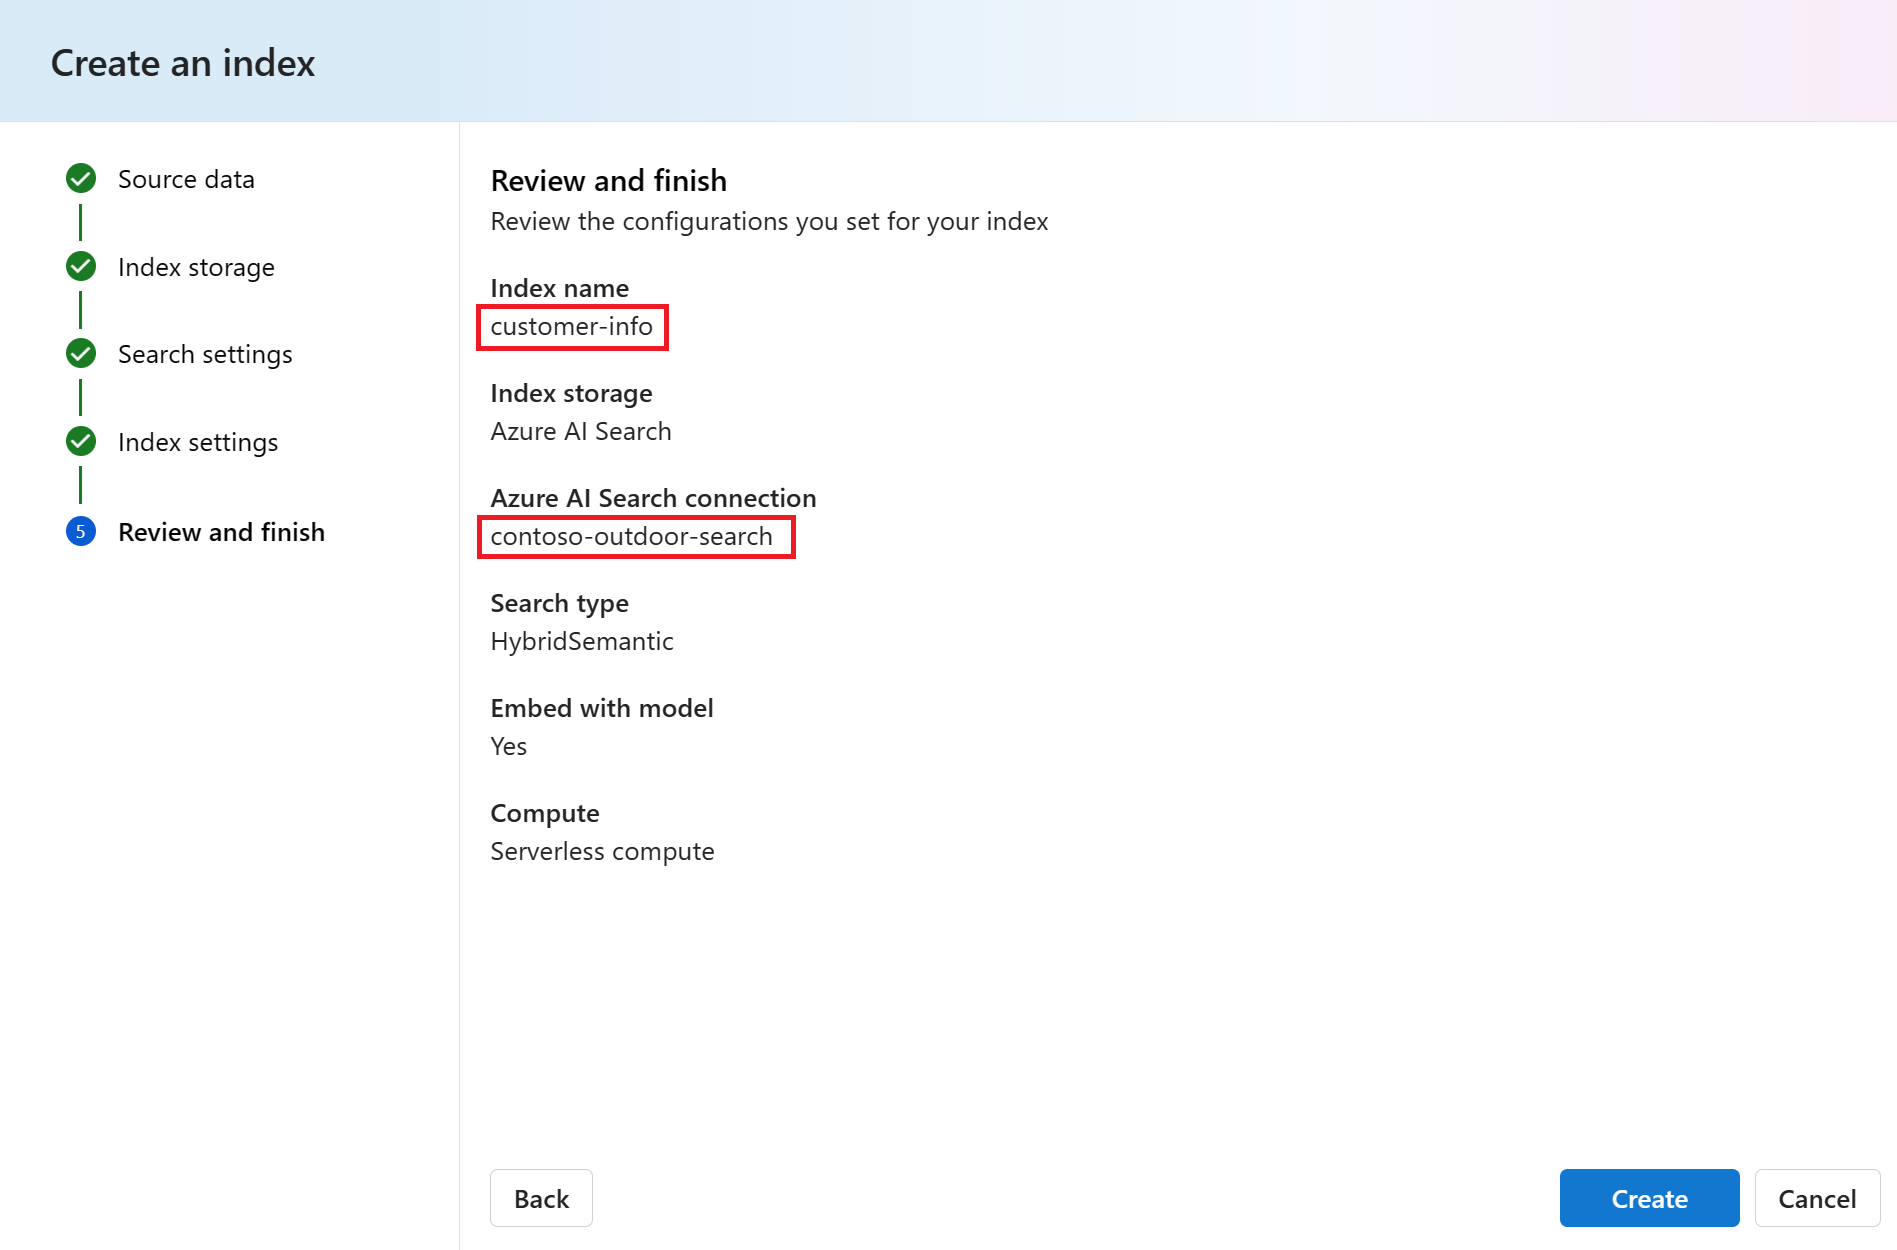
Review the details you entered, and select Create.
Note
You use the customer-info index and the contoso-outdoor-search Azure AI Search resource in prompt flow later in this tutorial. If the names you enter differ from what's specified here, make sure to use the names you entered in the rest of the tutorial.
You're taken to the index details page where you can see the status of your index creation
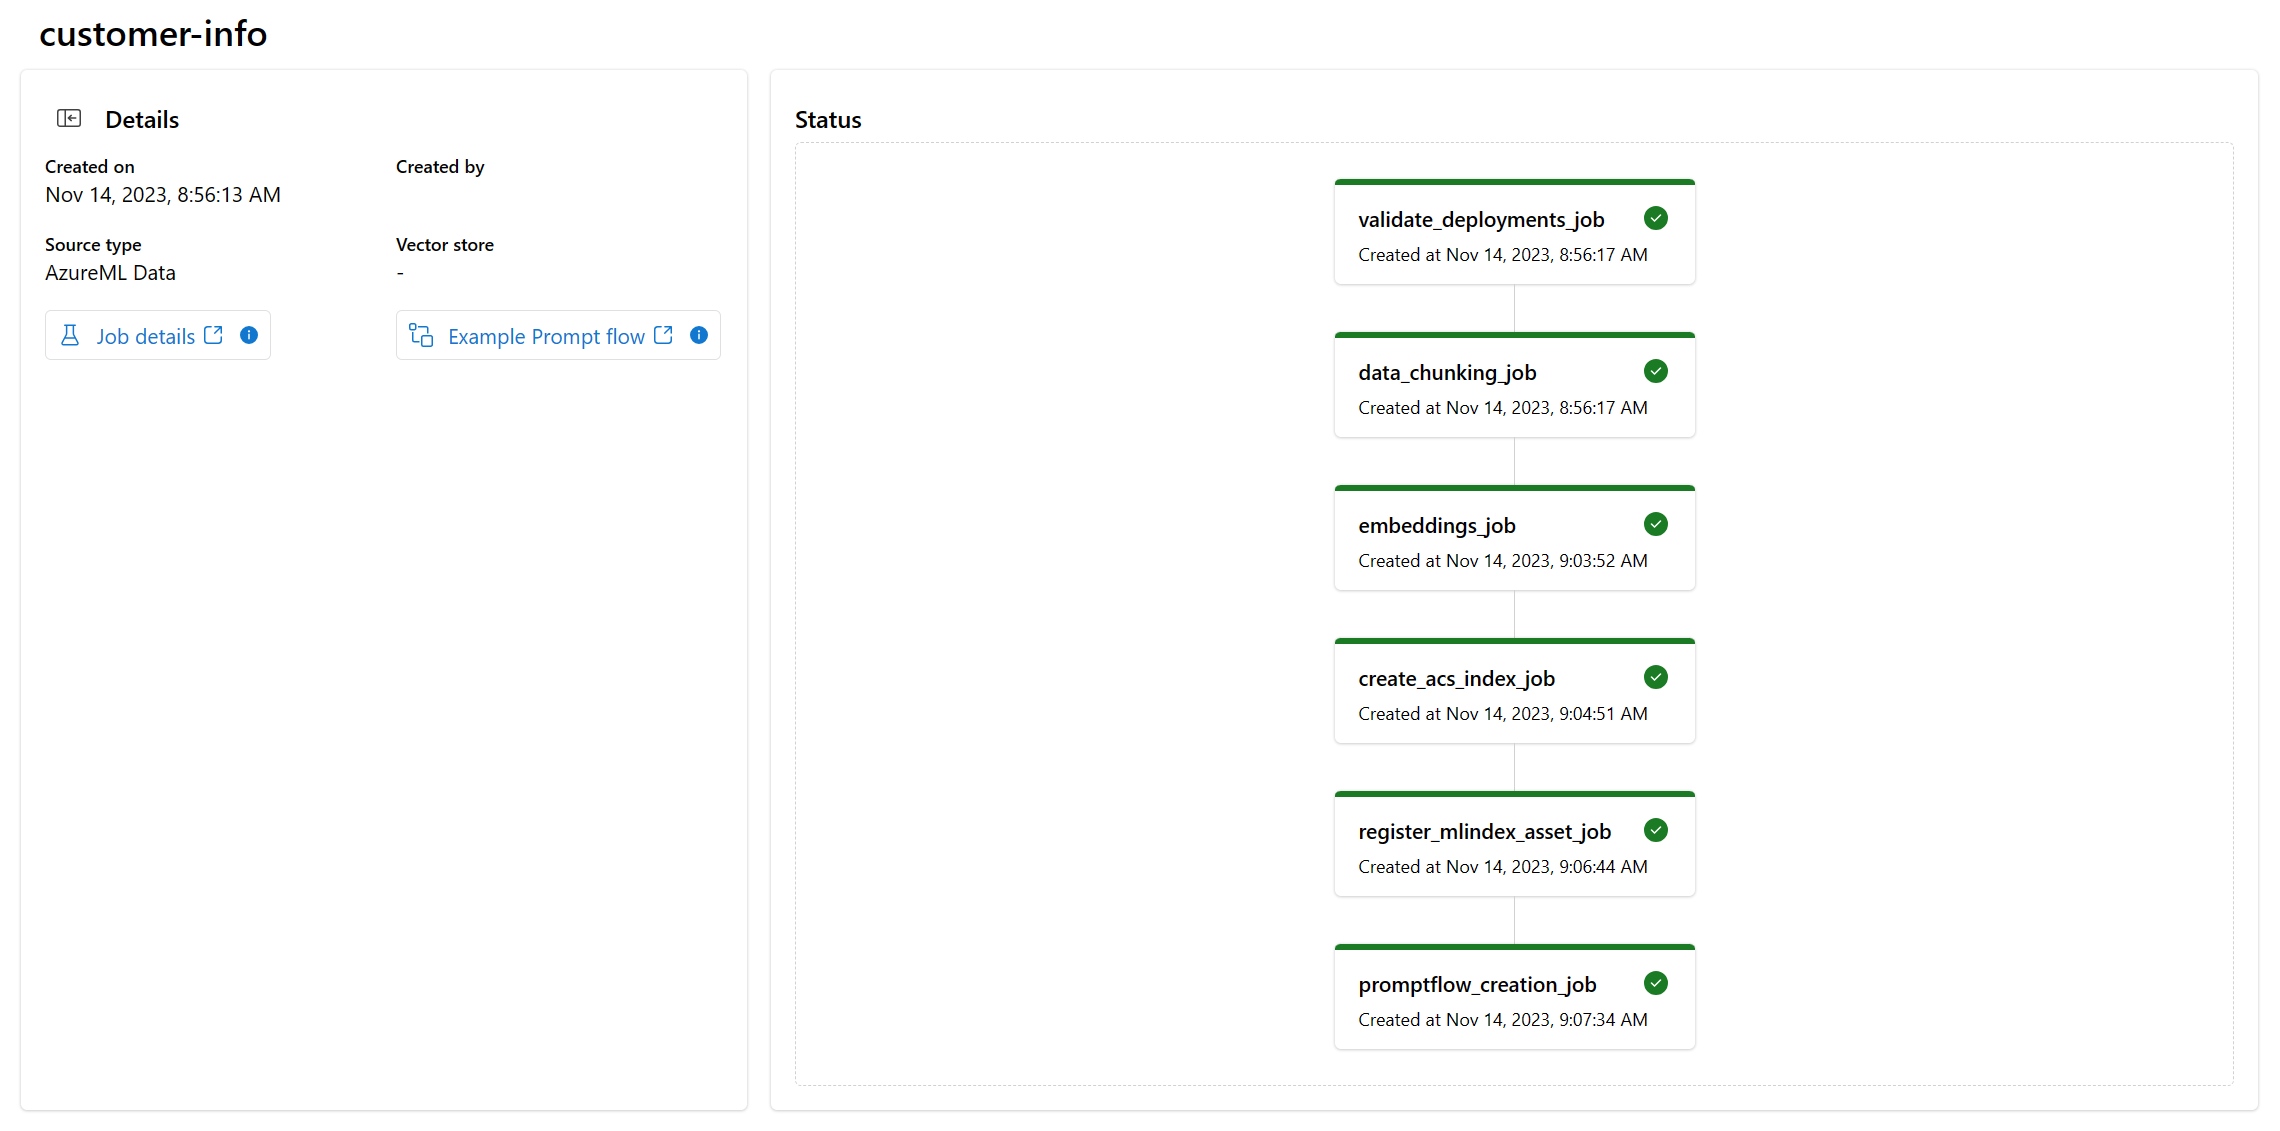


For more information on how to create an index, see Create an index.
Add customer information to the flow
After you're done creating your index, return to your prompt flow and follow these steps to add the customer info to the flow:
Select the RetrieveDocuments node from the graph and rename it RetrieveProductInfo. Now the retrieve product info node can be distinguished from the retrieve customer info node that you add to the flow.

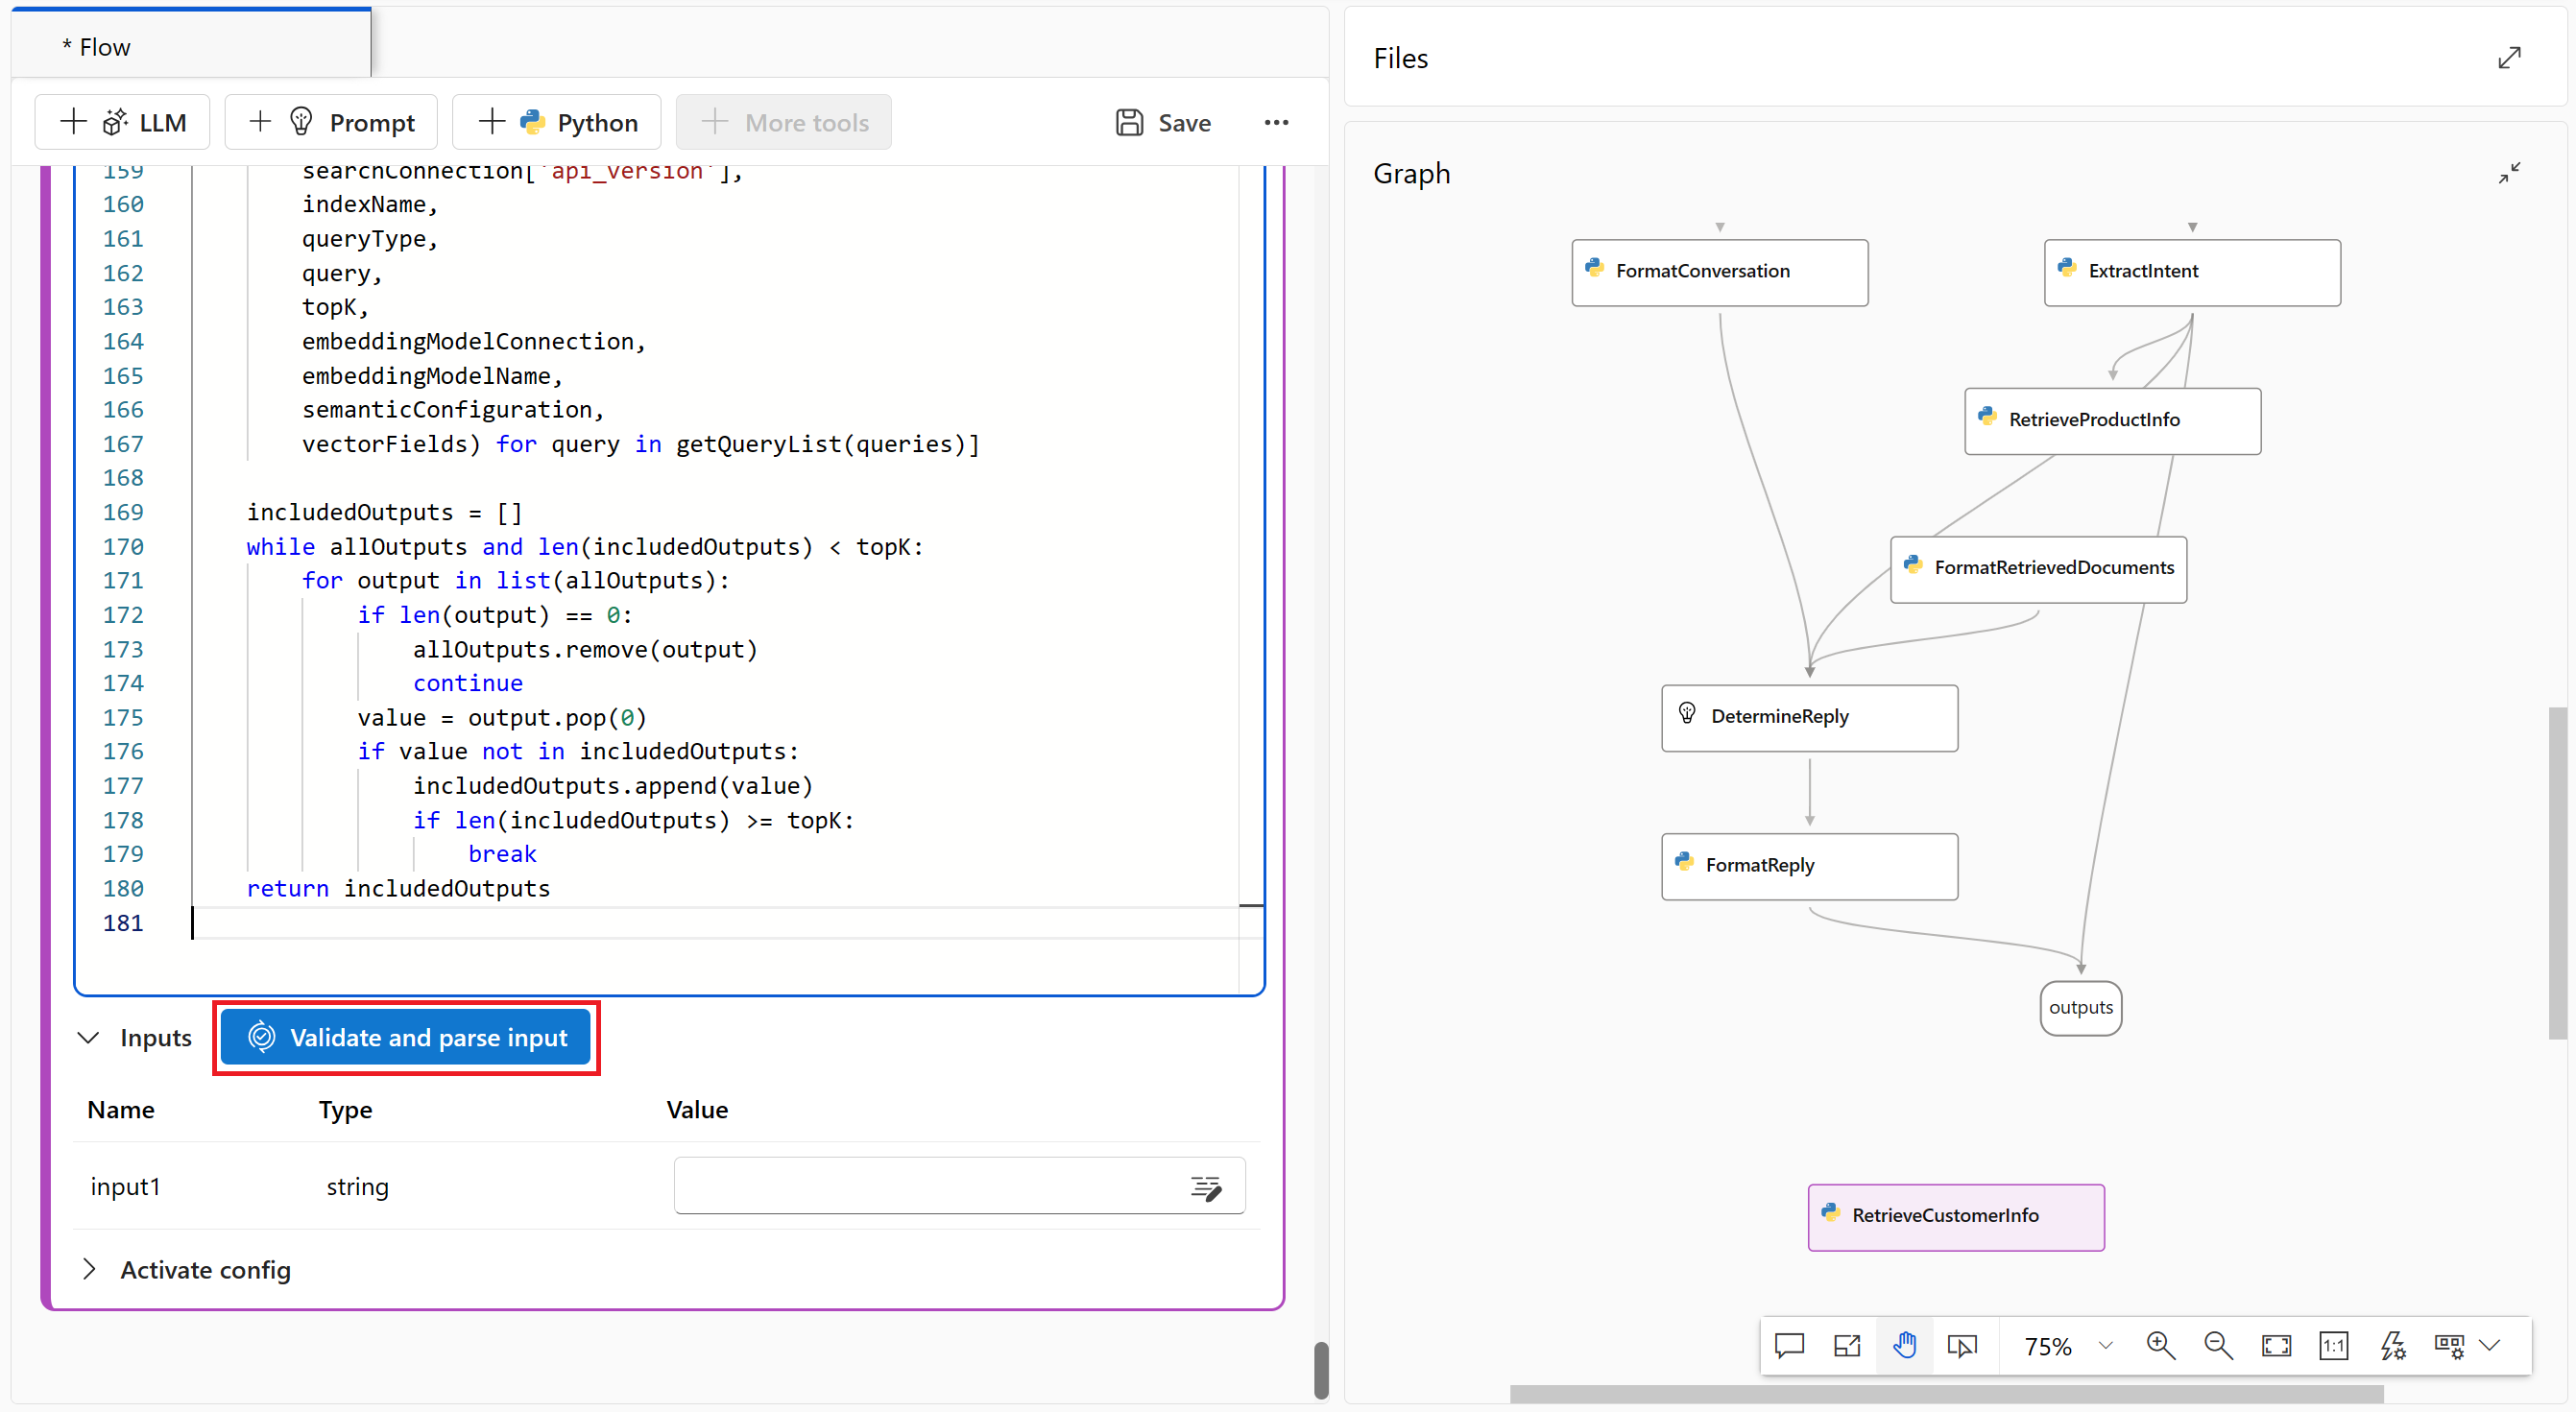
Select + Python from the top menu to create a new Python node that's used to retrieve customer information.

Name the node RetrieveCustomerInfo and select Add.
Copy and paste the Python code from the RetrieveProductInfo node into the RetrieveCustomerInfo node to replace all of the default code.
Select the Validate and parse input button to validate the inputs for the RetrieveCustomerInfo node. If the inputs are valid, prompt flow parses the inputs and creates the necessary variables for you to use in your code.
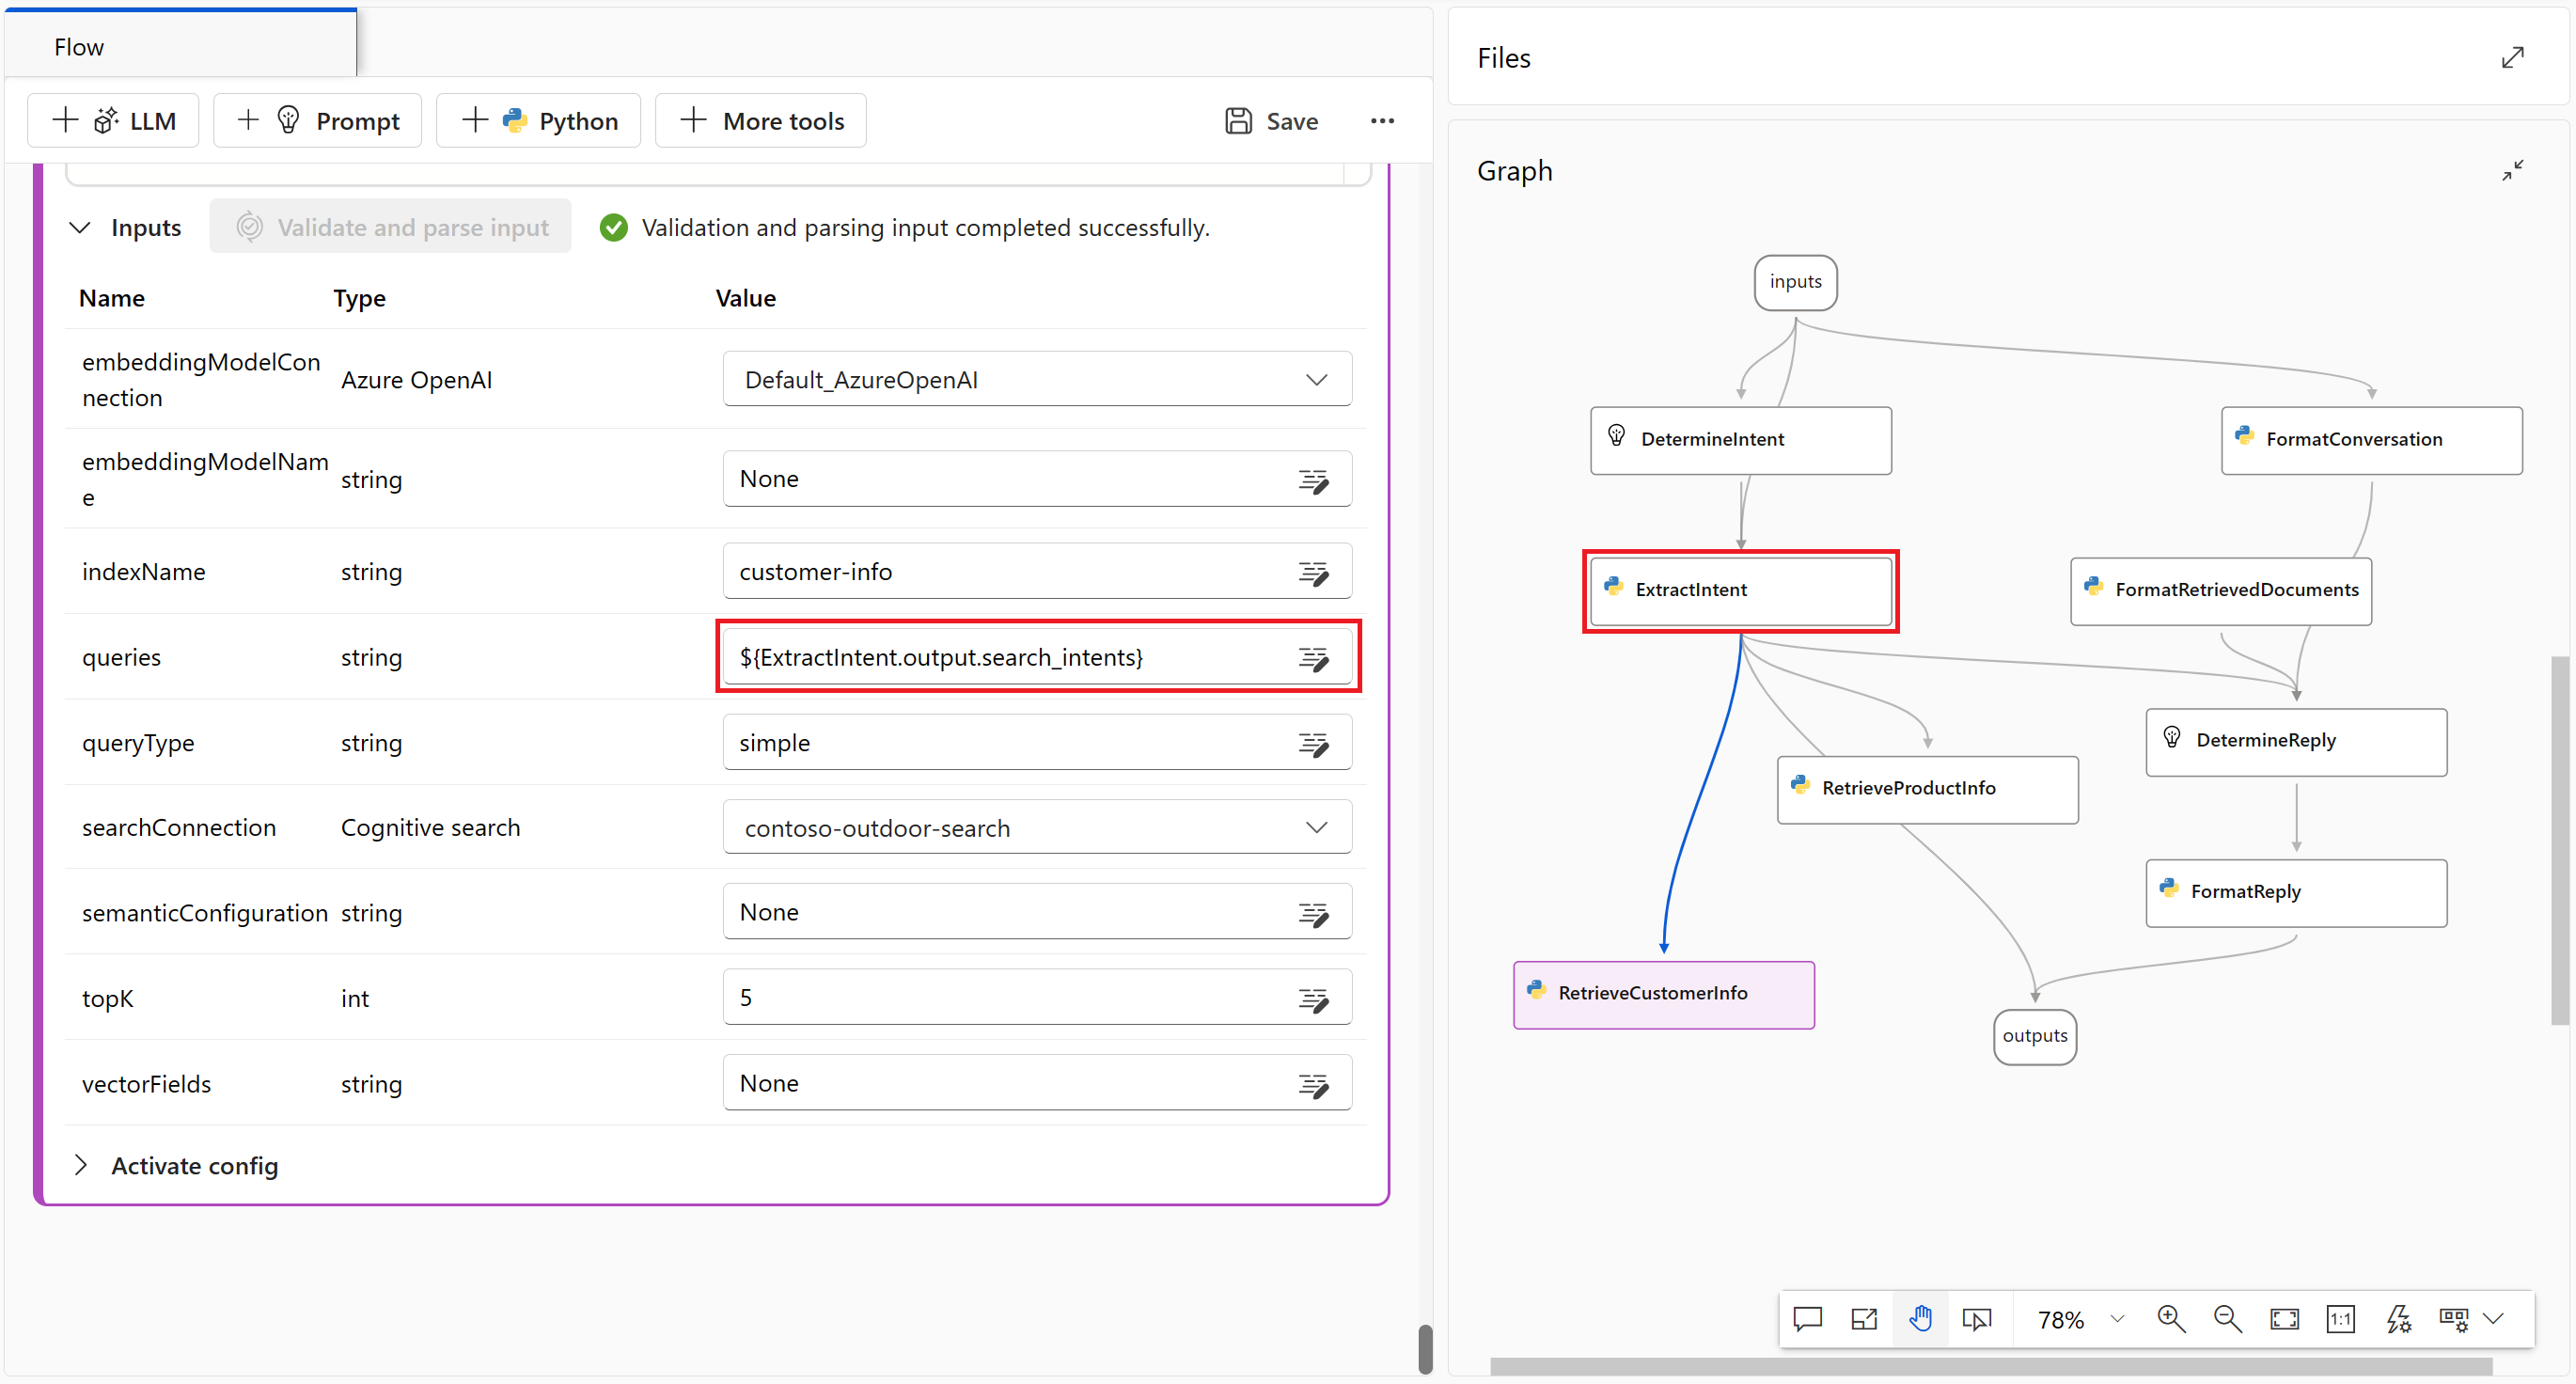
Edit the RetrieveCustomerInfo inputs that prompt flow parsed for you so that it can connect to your customer-info index.
Note
The graph is updated immediately after you set the queries input value to ExtractIntent.output.search_intents. In the graph you can see that RetrieveCustomerInfo gets inputs from ExtractIntent.
The inputs are case sensitive, so be sure they match these values exactly:
Name Type Value embeddingModelConnection Azure OpenAI Default_AzureOpenAI embeddingModelName string None indexName string customer-info queries string ${ExtractIntent.output.search_intents} queryType string simple searchConnection Cognitive search contoso-outdoor-search semanticConfiguration string None topK int 5 Select Save from the top menu to save your changes.


Format the retrieved documents to output
Now that you have both the product and customer info in your prompt flow, you format the retrieved documents so that the large language model can use them.
Select the FormatRetrievedDocuments node from the graph.
Copy and paste the following Python code to replace all contents in the FormatRetrievedDocuments code block.
from promptflow import tool

@tool
def format_retrieved_documents(docs1: object, docs2: object, maxTokens: int) -> str:
  formattedDocs = []
  strResult = ""
  docs = [val for pair in zip(docs1, docs2) for val in pair]
  for index, doc in enumerate(docs):
    formattedDocs.append({
      f"[doc{index}]": {
        "title": doc['title'],
        "content": doc['content']
      }
    })
    formattedResult = { "retrieved_documents": formattedDocs }
    nextStrResult = str(formattedResult)
    if (estimate_tokens(nextStrResult) > maxTokens):
      break
    strResult = nextStrResult

  return {
          "combined_docs": docs,
          "strResult": strResult
      }

def estimate_tokens(text: str) -> int:
  return (len(text) + 2) / 3
Select the Validate and parse input button to validate the inputs for the FormatRetrievedDocuments node. If the inputs are valid, prompt flow parses the inputs and creates the necessary variables for you to use in your code.
Edit the FormatRetrievedDocuments inputs that prompt flow parsed for you so that it can extract product and customer info from the RetrieveProductInfo and RetrieveCustomerInfo nodes.

The inputs are case sensitive, so be sure they match these values exactly:
Name Type Value docs1 object ${RetrieveProductInfo.output} docs2 object ${RetrieveCustomerInfo.output} maxTokens int 5000 Select the DetermineReply node from the graph.
Set the documentation input to ${FormatRetrievedDocuments.output.strResult}.
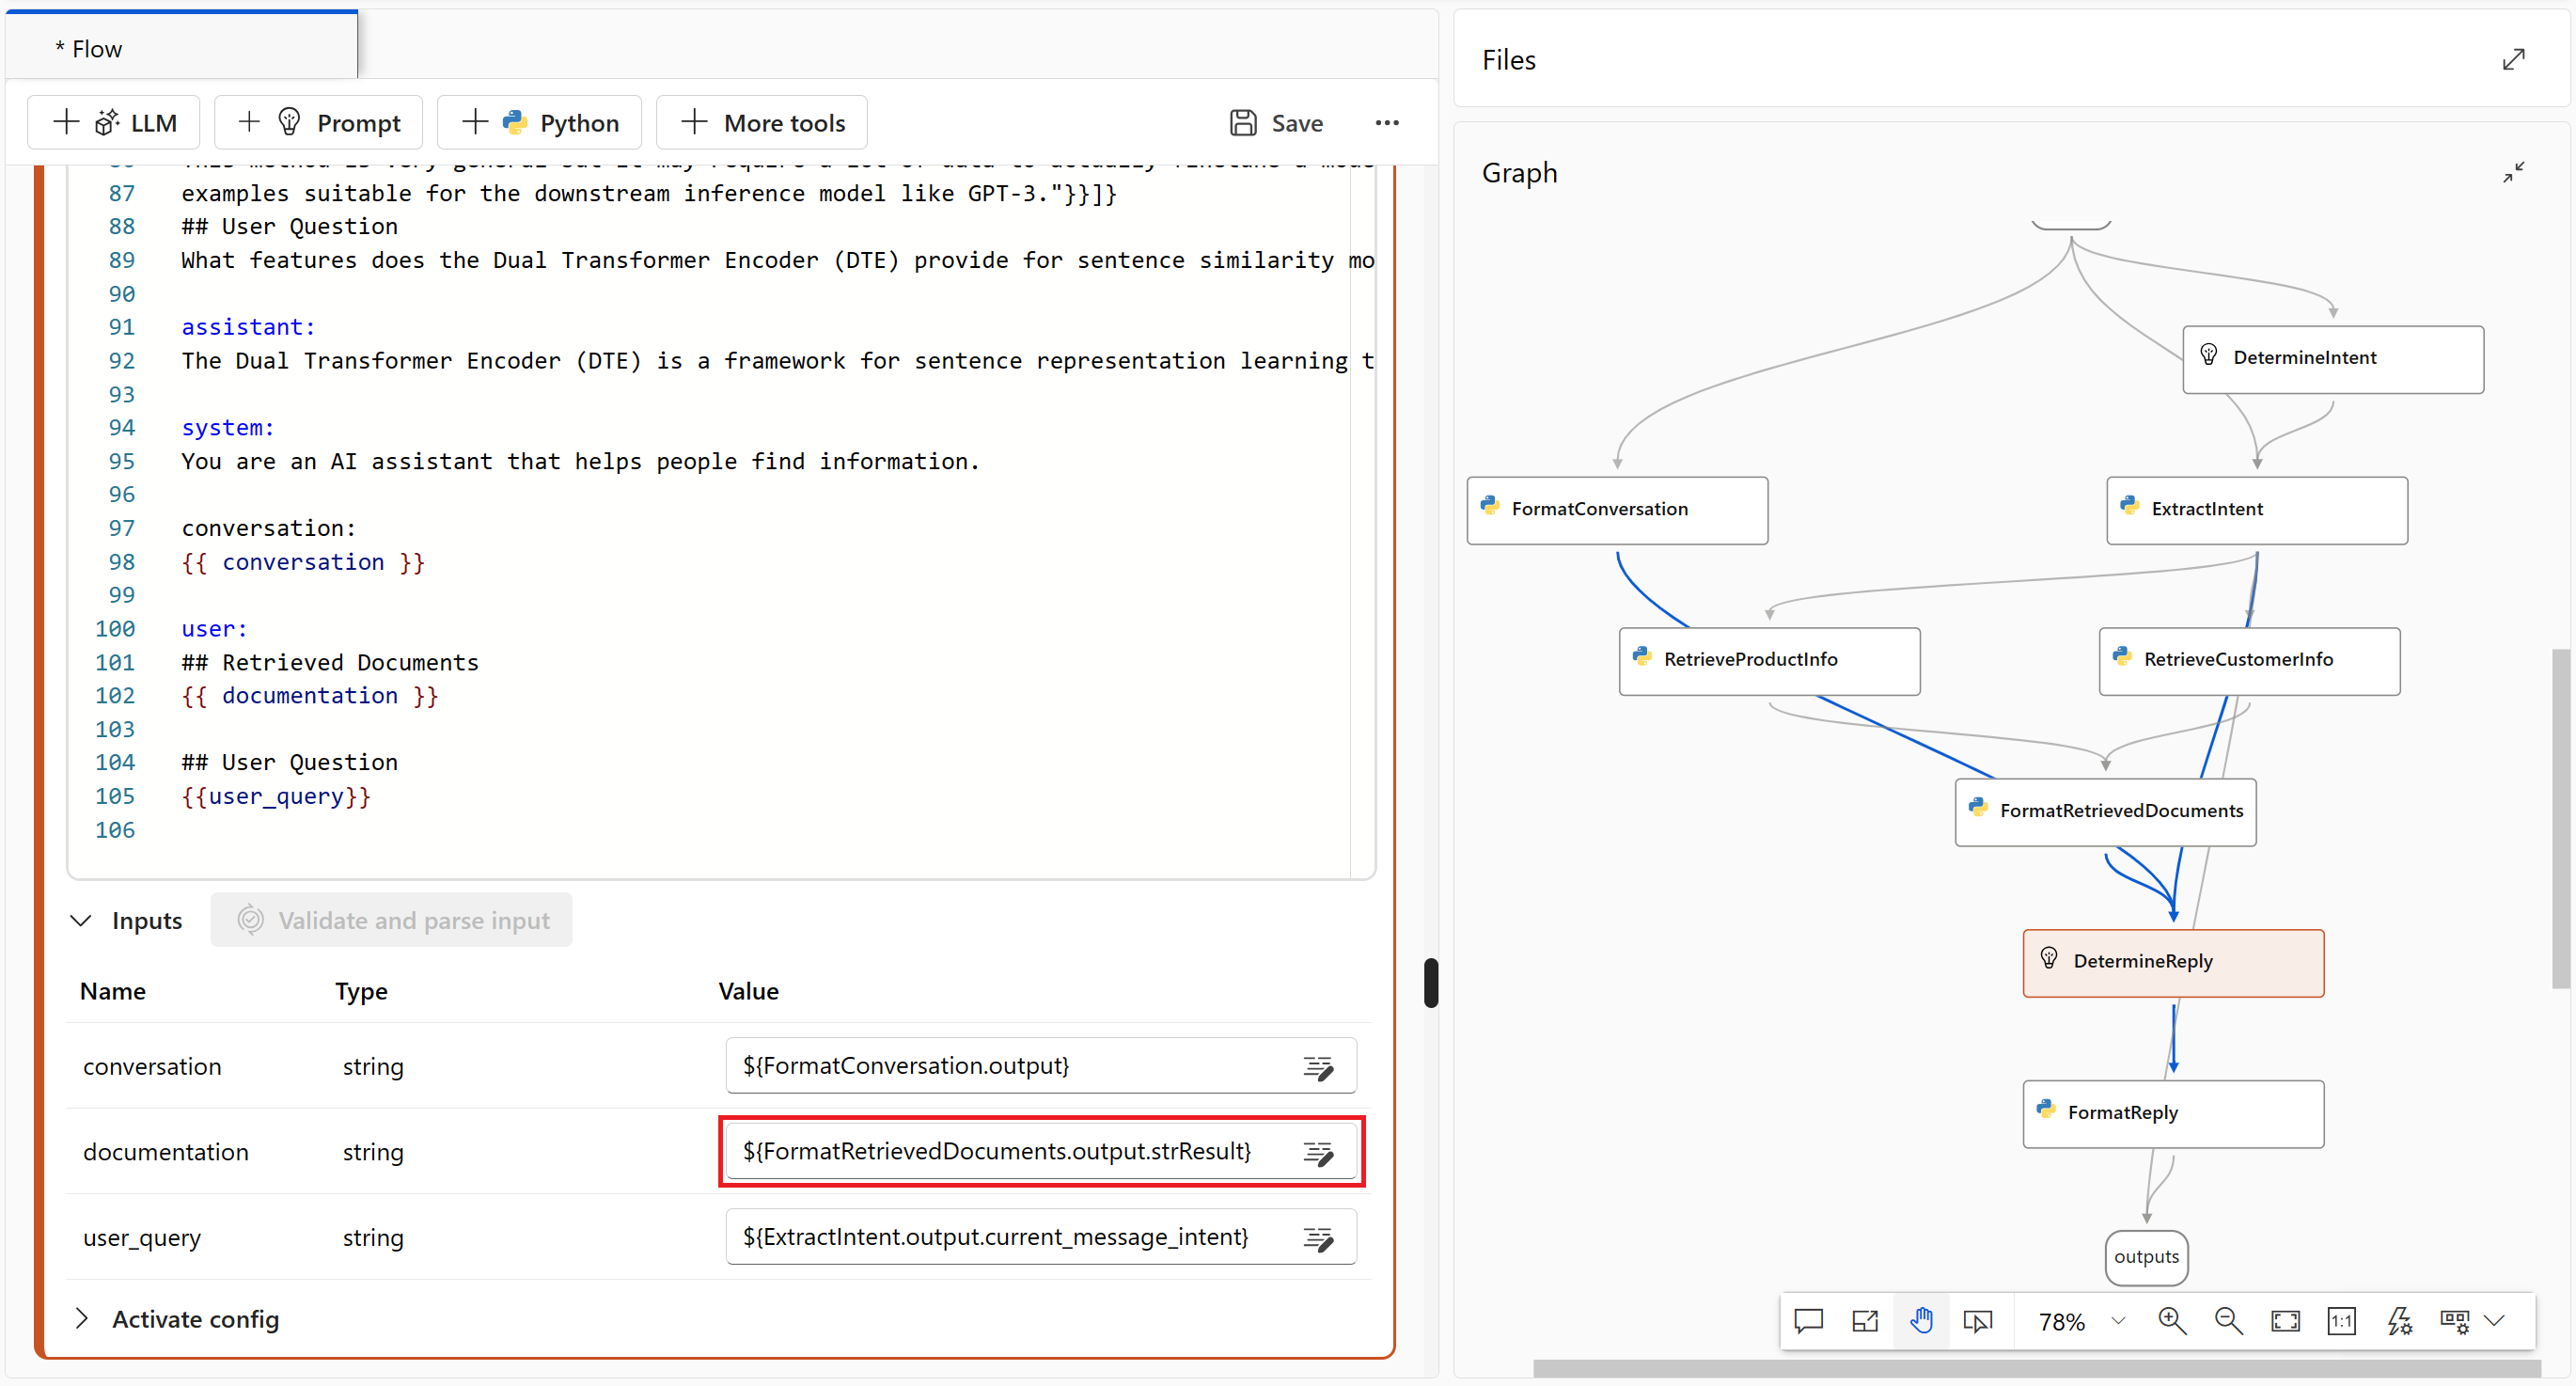
Select the outputs node from the graph.
Set the fetched_docs input to ${FormatRetrievedDocuments.output.combined_docs}.

Select Save from the top menu to save your changes.


Chat in prompt flow with product and customer info
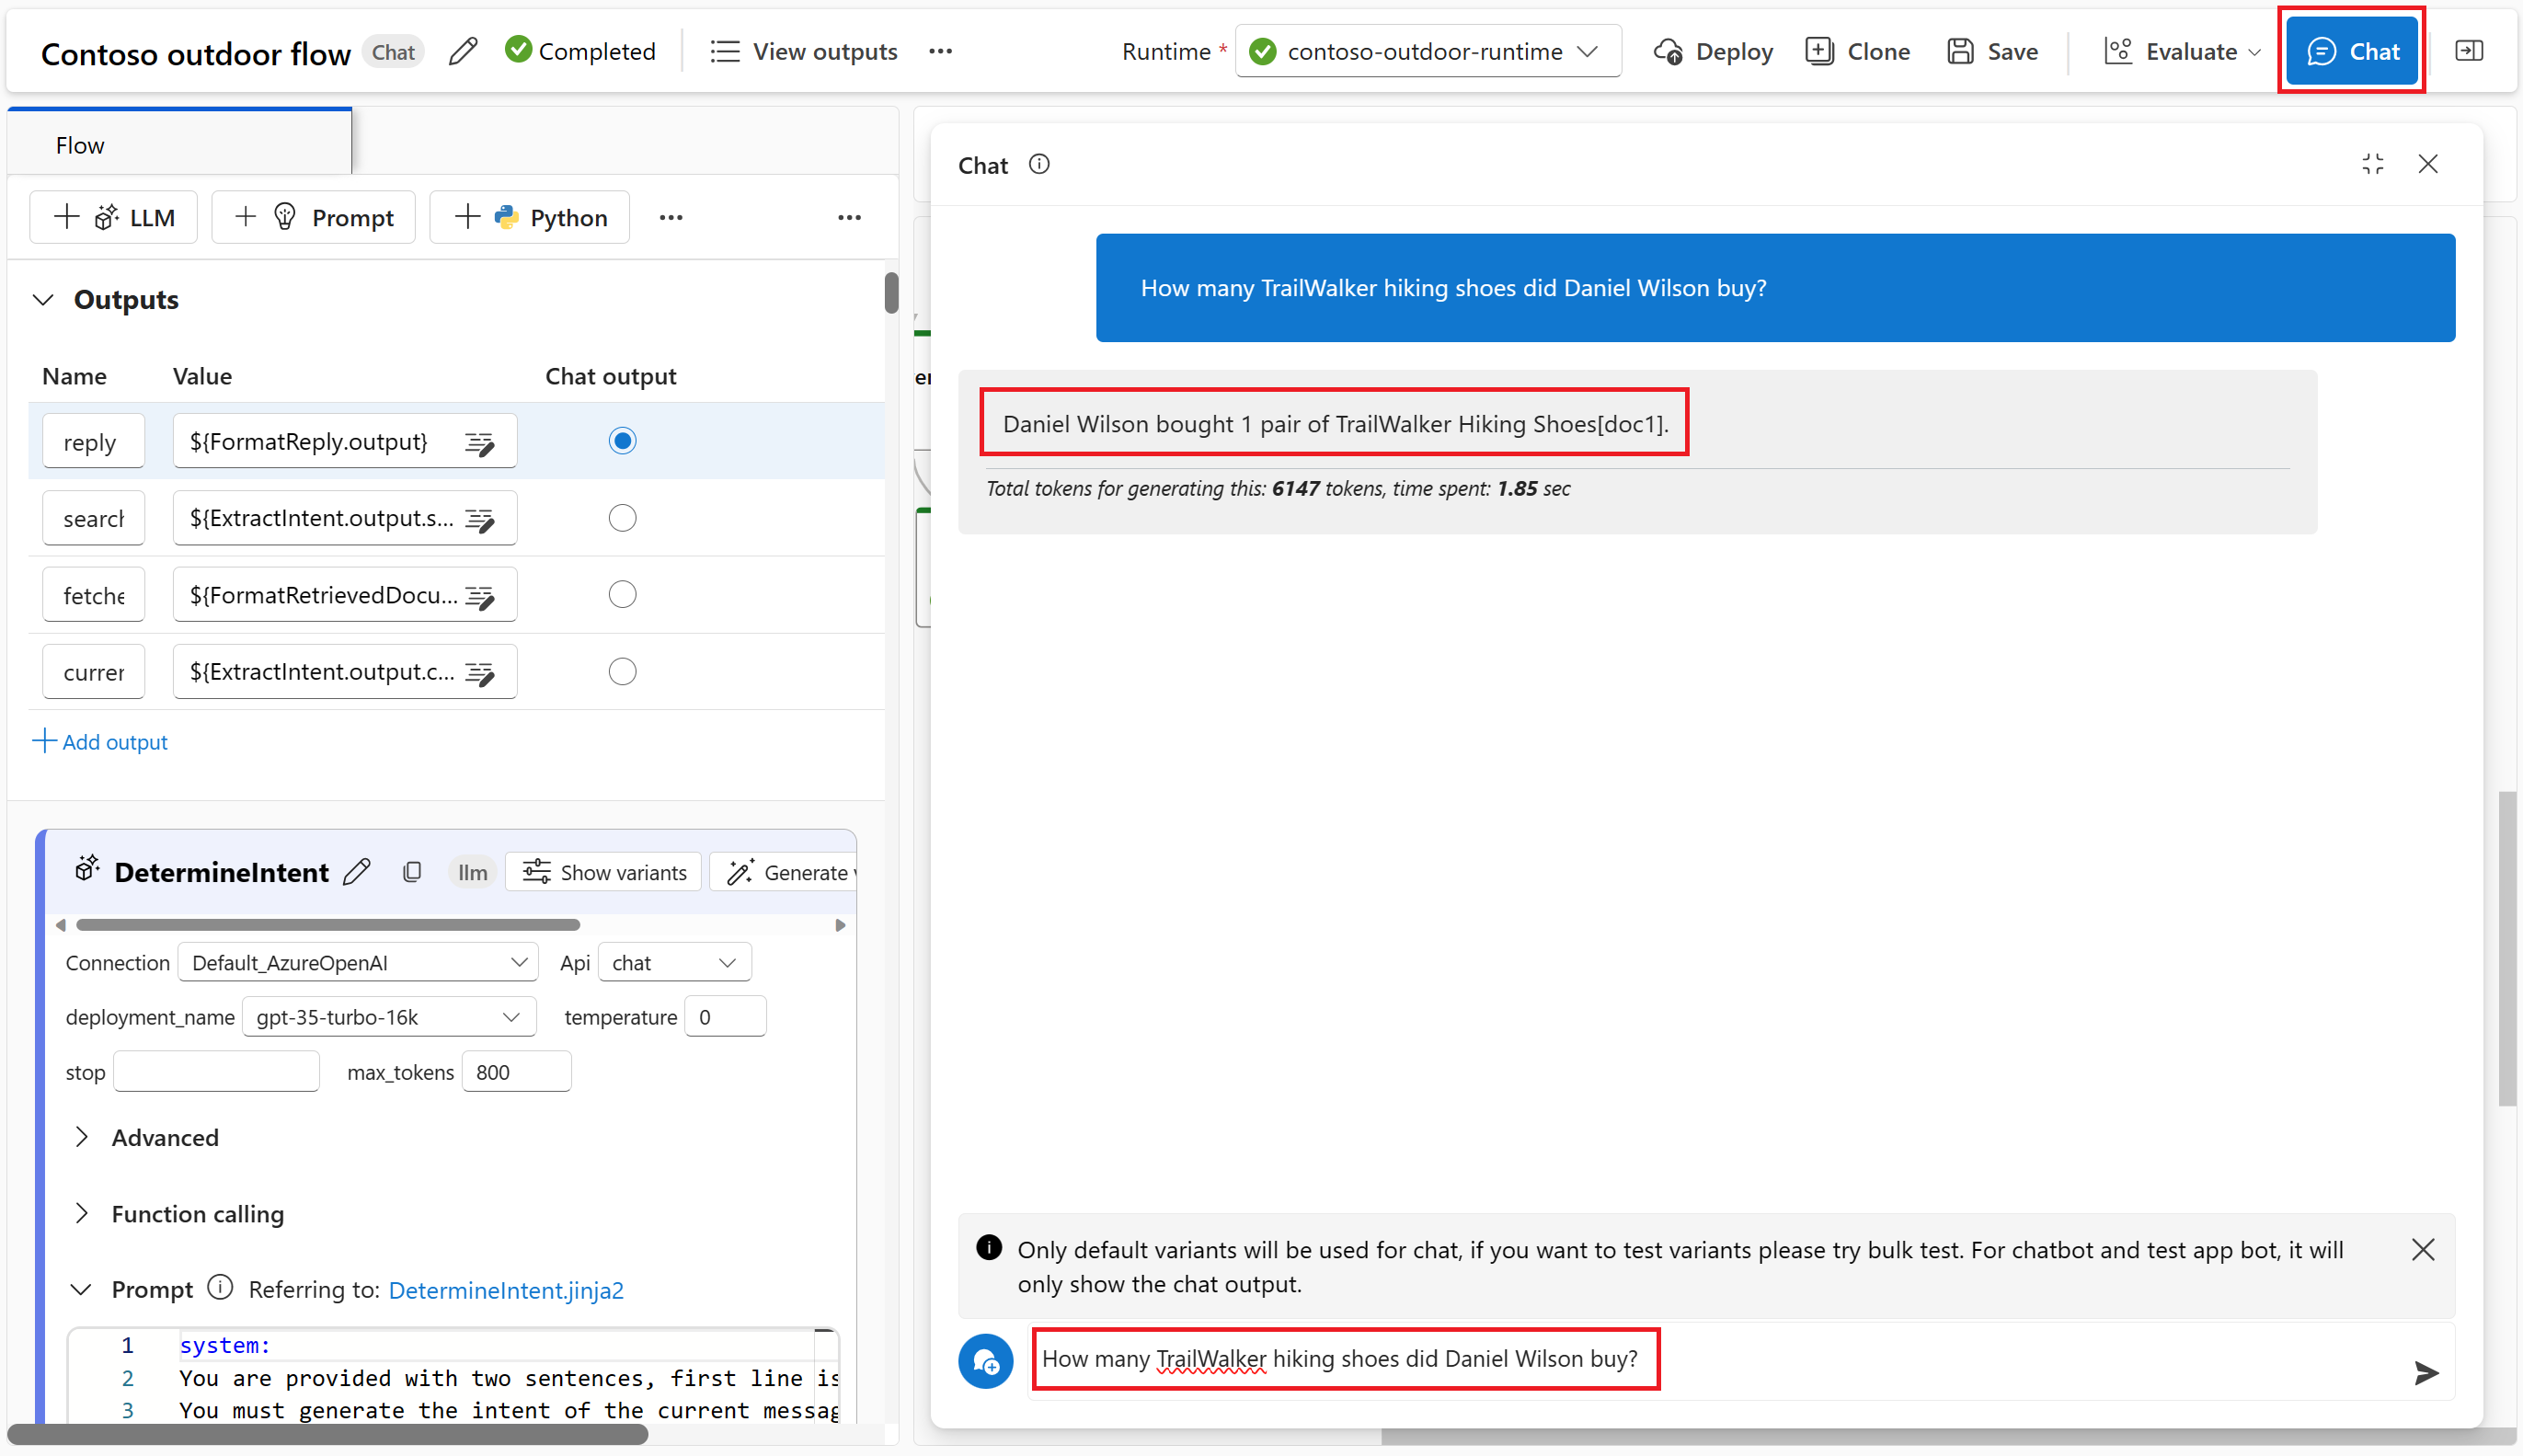
By now you have both the product and customer info in prompt flow. You can chat with the model in prompt flow and get answers to questions such as "How many TrailWalker hiking shoes did Daniel Wilson buy?" Before proceeding to a more formal evaluation, you can optionally chat with the model to see how it responds to your questions.
Select Chat from the top menu in prompt flow to try chat.
Enter "How many TrailWalker hiking shoes did Daniel Wilson buy?" and then select the right arrow icon to send.
The response is what you expect. The model uses the customer info to answer the question.

Evaluate the flow using a question and answer evaluation dataset
In Azure AI Studio, you want to evaluate the flow before you deploy the flow for consumption.
In this section, you use the built-in evaluation to evaluate your flow with a question and answer evaluation dataset. The built-in evaluation uses AI-assisted metrics to evaluate your flow: groundedness, relevance, and retrieval score. For more information, see built-in evaluation metrics.
Create an evaluation
You need a question and answer evaluation dataset that contains questions and answers that are relevant to your scenario. Create a new file locally named qa-evaluation.jsonl. Copy and paste the following questions and answers ("truth") into the file.
{"question": "What color is the CozyNights Sleeping Bag?", "truth": "Red", "chat_history": [], }
{"question": "When did Daniel Wilson order the BaseCamp Folding Table?", "truth": "May 7th, 2023", "chat_history": [] }
{"question": "How much does TrailWalker Hiking Shoes cost? ", "truth": "$110", "chat_history": [] }
{"question": "What kind of tent did Sarah Lee buy?", "truth": "SkyView 2 person tent", "chat_history": [] }
{"question": "What is Melissa Davis's phone number?", "truth": "555-333-4444", "chat_history": [] }
{"question": "What is the proper care for trailwalker hiking shoes?", "truth": "After each use, remove any dirt or debris by brushing or wiping the shoes with a damp cloth.", "chat_history": [] }
{"question": "Does TrailMaster Tent come with a warranty?", "truth": "2 years", "chat_history": [] }
{"question": "How much did David Kim spend on the TrailLite Daypack?", "truth": "$240", "chat_history": [] }
{"question": "What items did Amanda Perez purchase?", "truth": "TrailMaster X4 Tent, TrekReady Hiking Boots (quantity 3), CozyNights Sleeping Bag, TrailBlaze Hiking Pants, RainGuard Hiking Jacket, and CompactCook Camping Stove", "chat_history": [] }
{"question": "What is the Brand for TrekReady Hiking Boots", "truth": "TrekReady", "chat_history": [] }
{"question": "How many items did Karen Williams buy?", "truth": "three items of the Summit Breeze Jacket", "chat_history": [] }
{"question": "France is in Europe", "truth": "Sorry, I can only truth questions related to outdoor/camping gear and equipment", "chat_history": [] }
Now that you have your evaluation dataset, you can evaluate your flow by following these steps:
Select Evaluate > Built-in evaluation from the top menu in prompt flow.
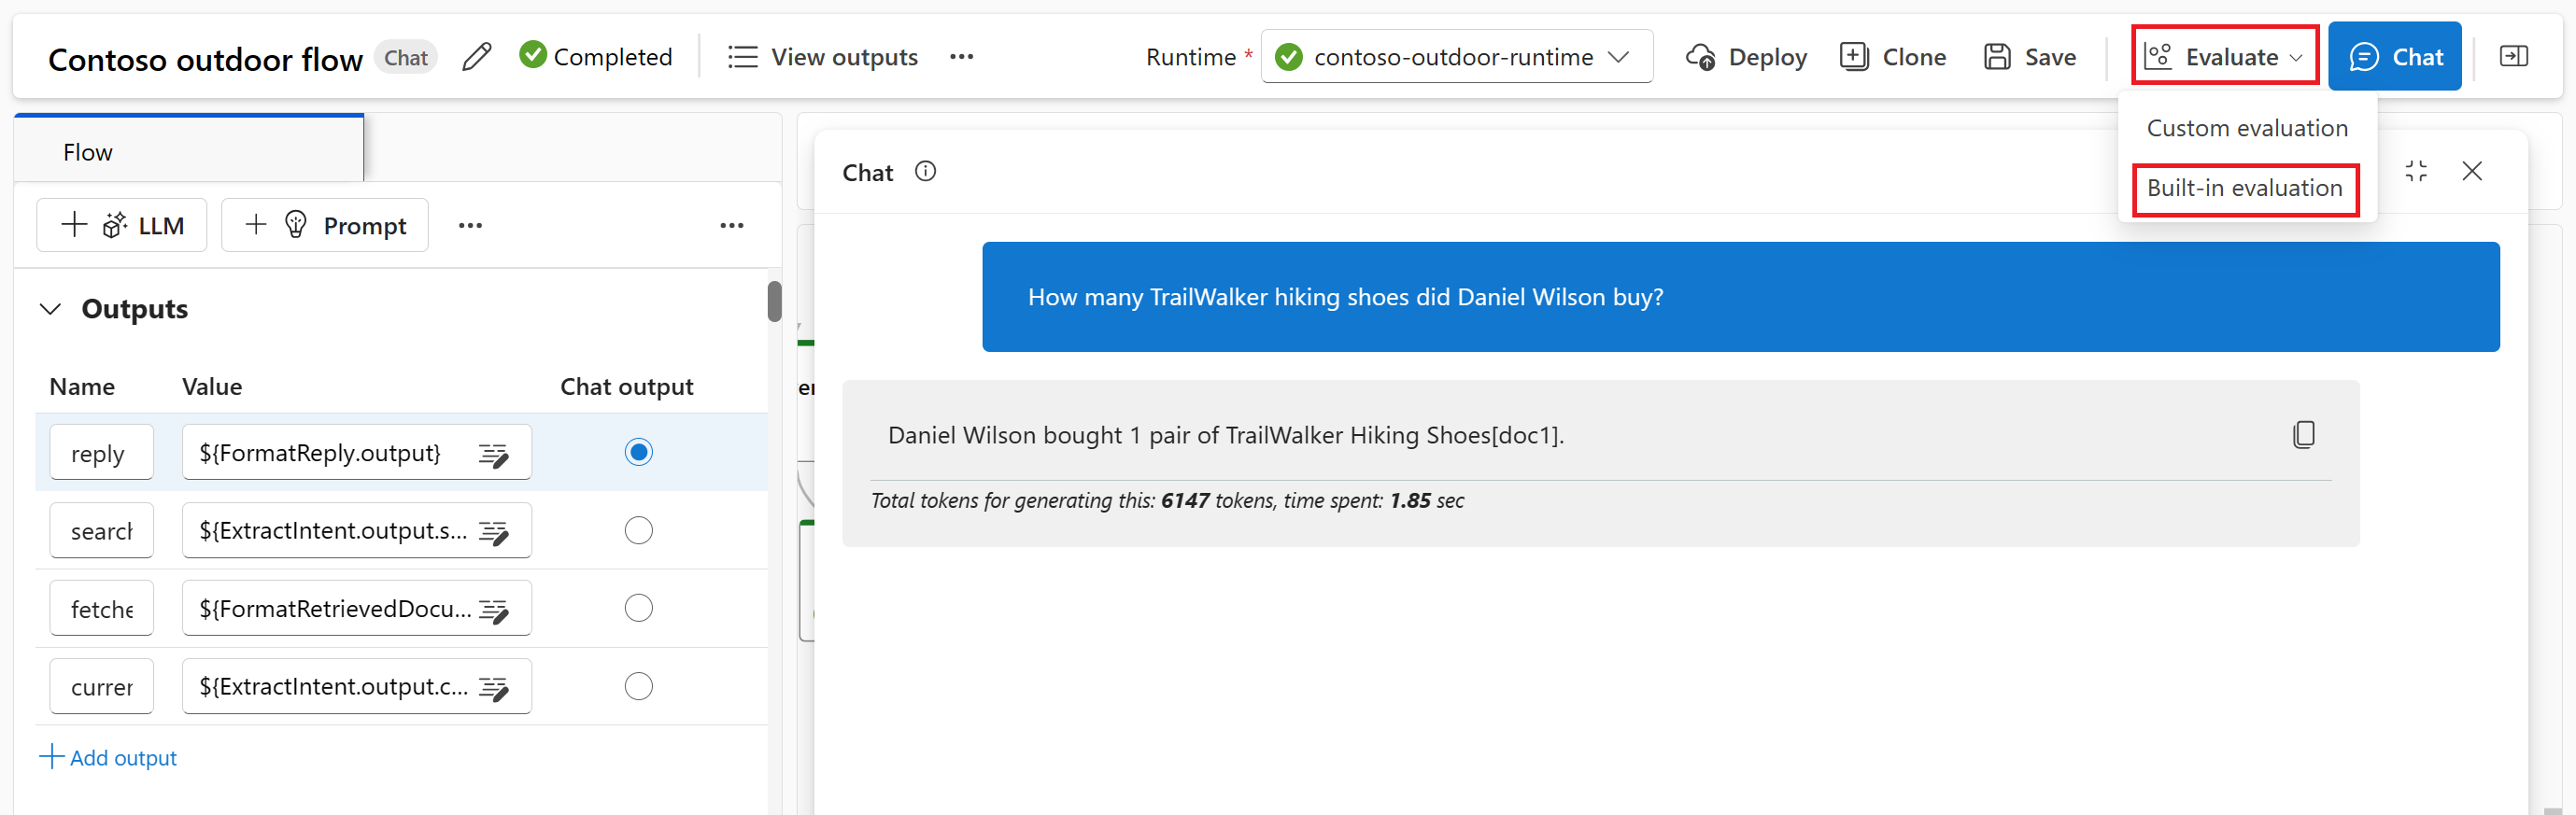
You're taken to the Create a new evaluation wizard.
Enter a name for your evaluation and select a runtime.
Select Question and answer pairs with retrieval-augmented generation from the scenario options.
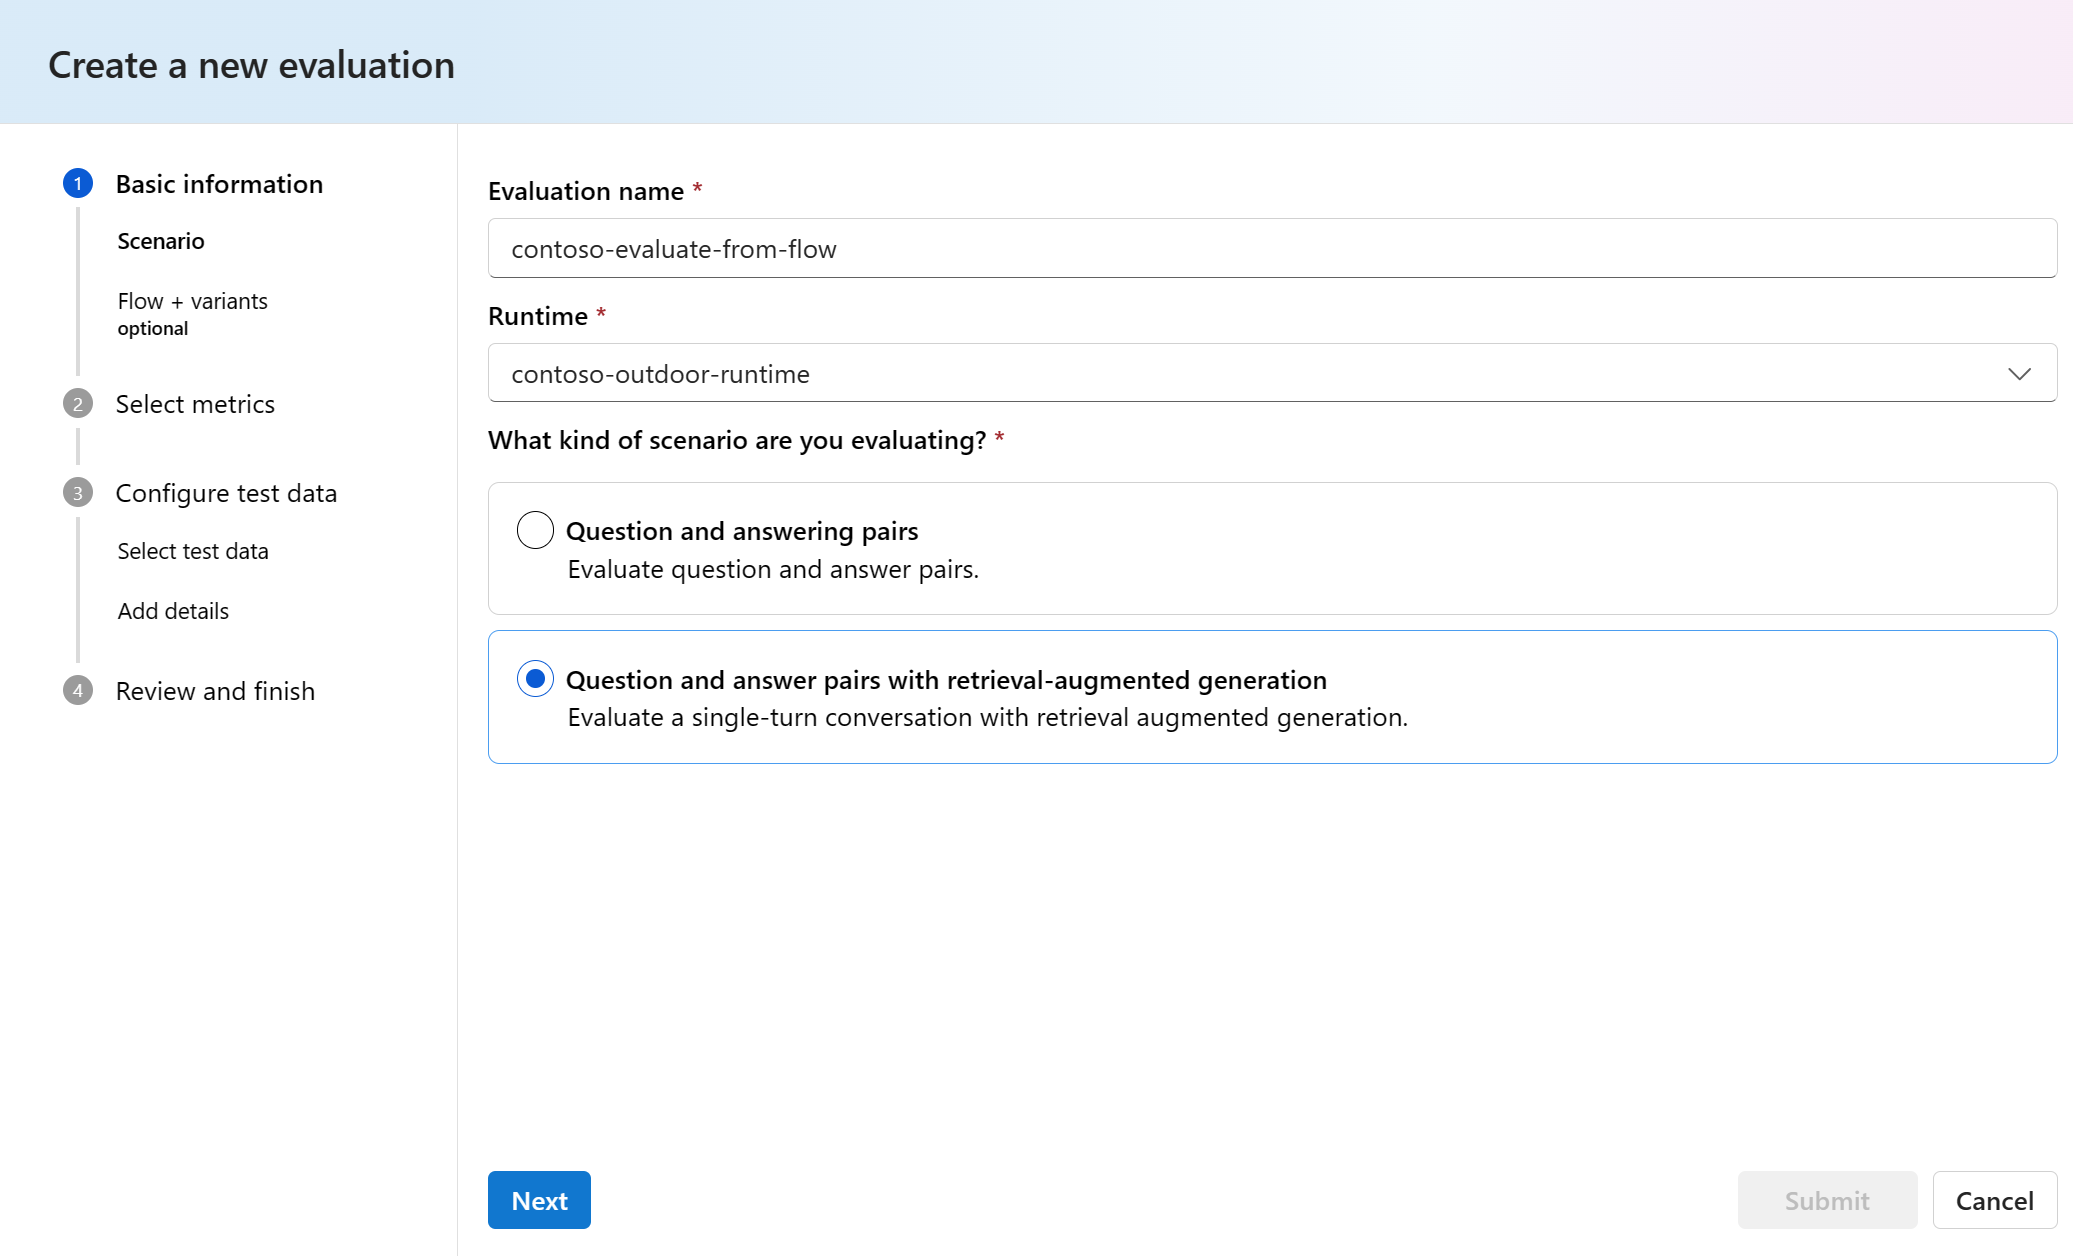
Select the flow to evaluate. In this example, select Contoso outdoor flow or whatever you named your flow. Then select Next.
Select the metrics you want to use to evaluate your flow. In this example, select Groundedness, Relevance, and Retrieval score.
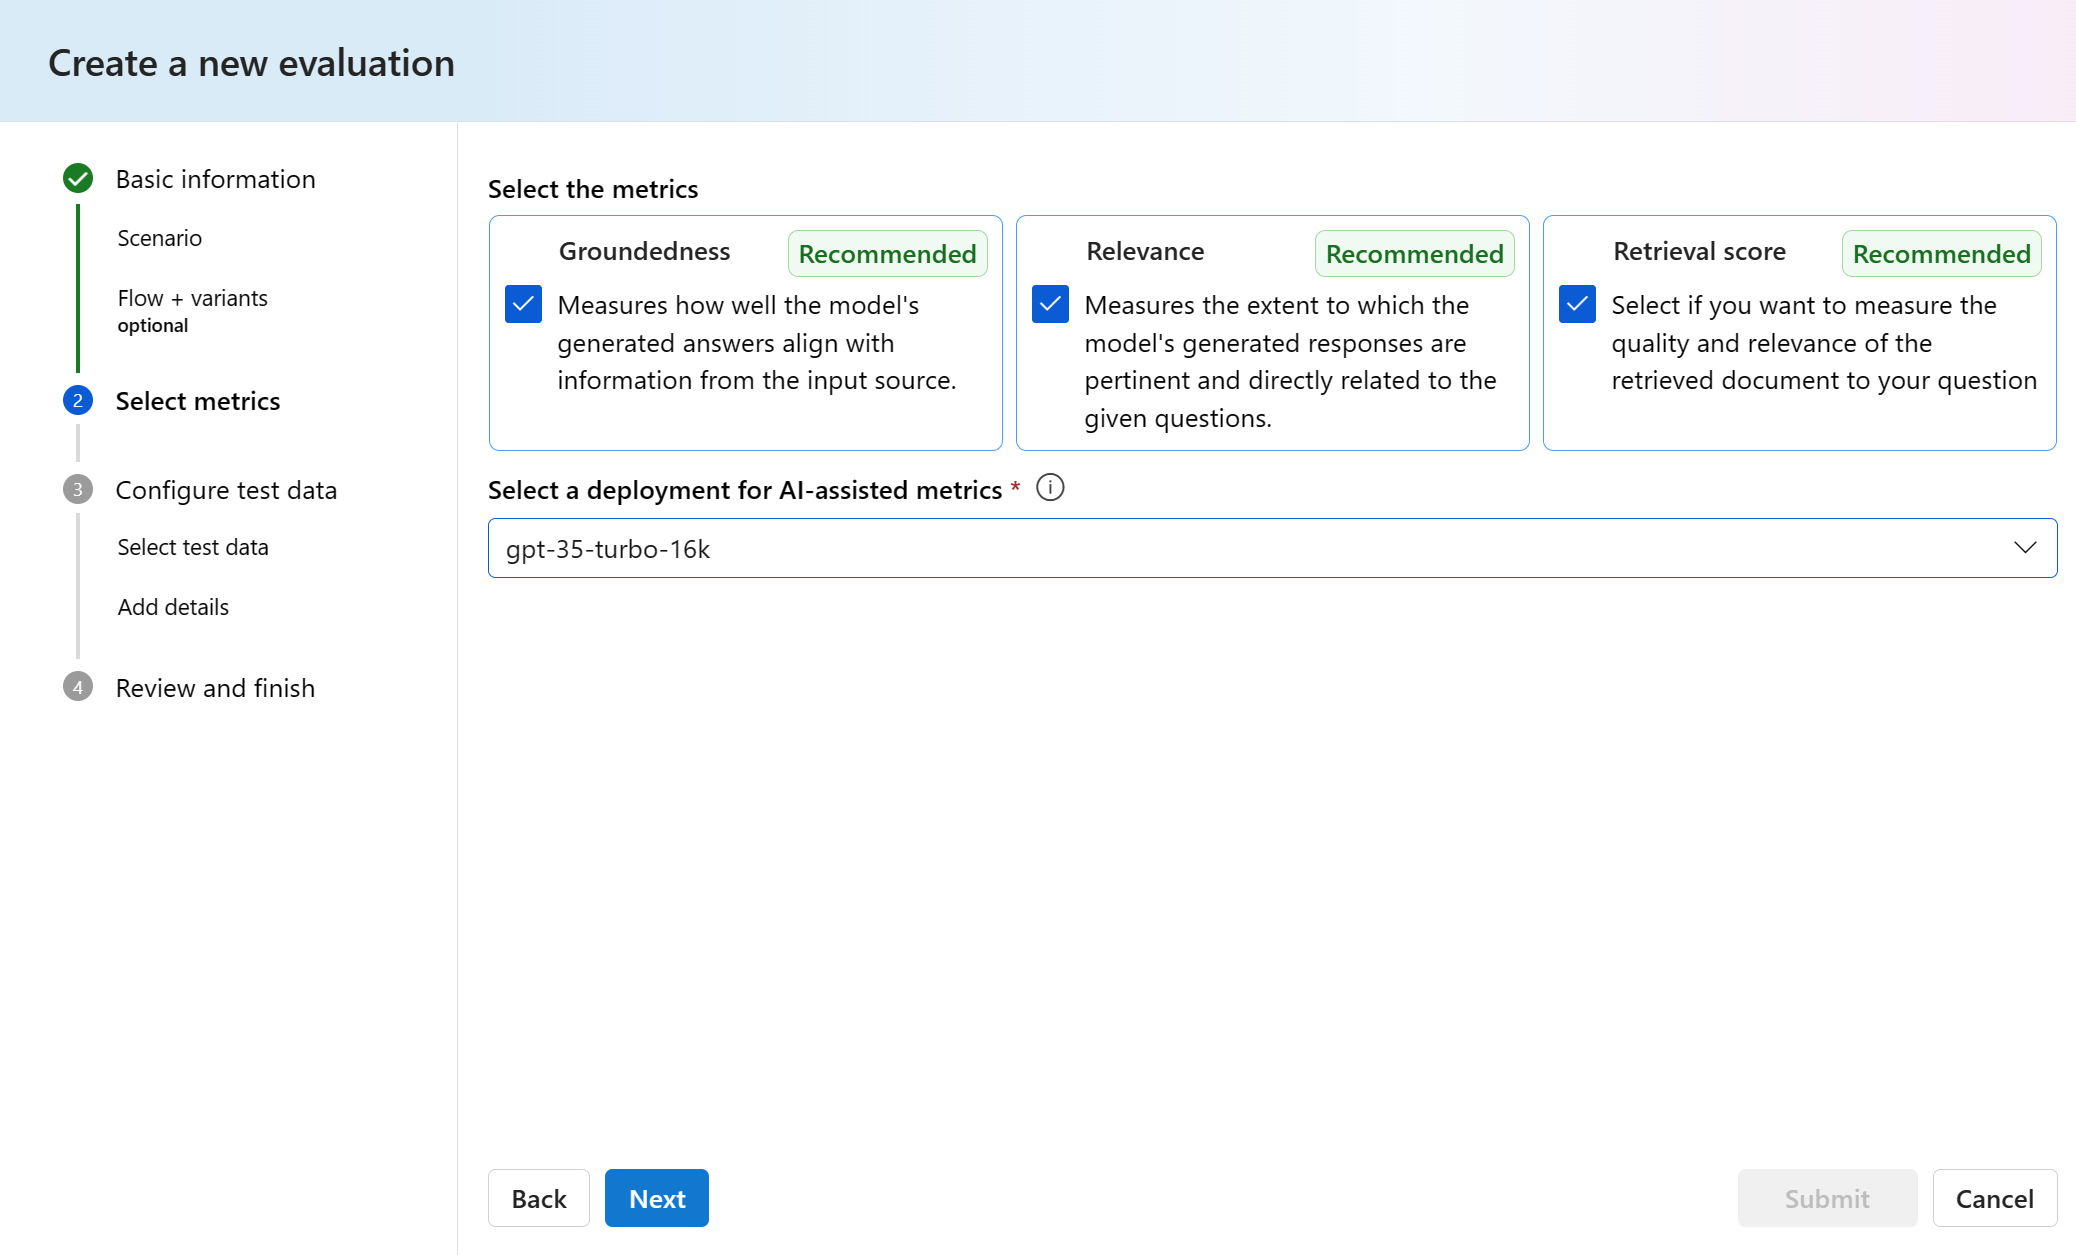
Select a model to use for evaluation. In this example, select gpt-35-turbo-16k. Then select Next.
Note
Evaluation with AI-assisted metrics needs to call another GPT model to do the calculation. For best performance, use a model that supports at least 16k tokens such as gpt-4-32k or gpt-35-turbo-16k model. If you didn't previously deploy such a model, you can deploy another model by following the steps in Deploy a chat model. Then return to this step and select the model you deployed.
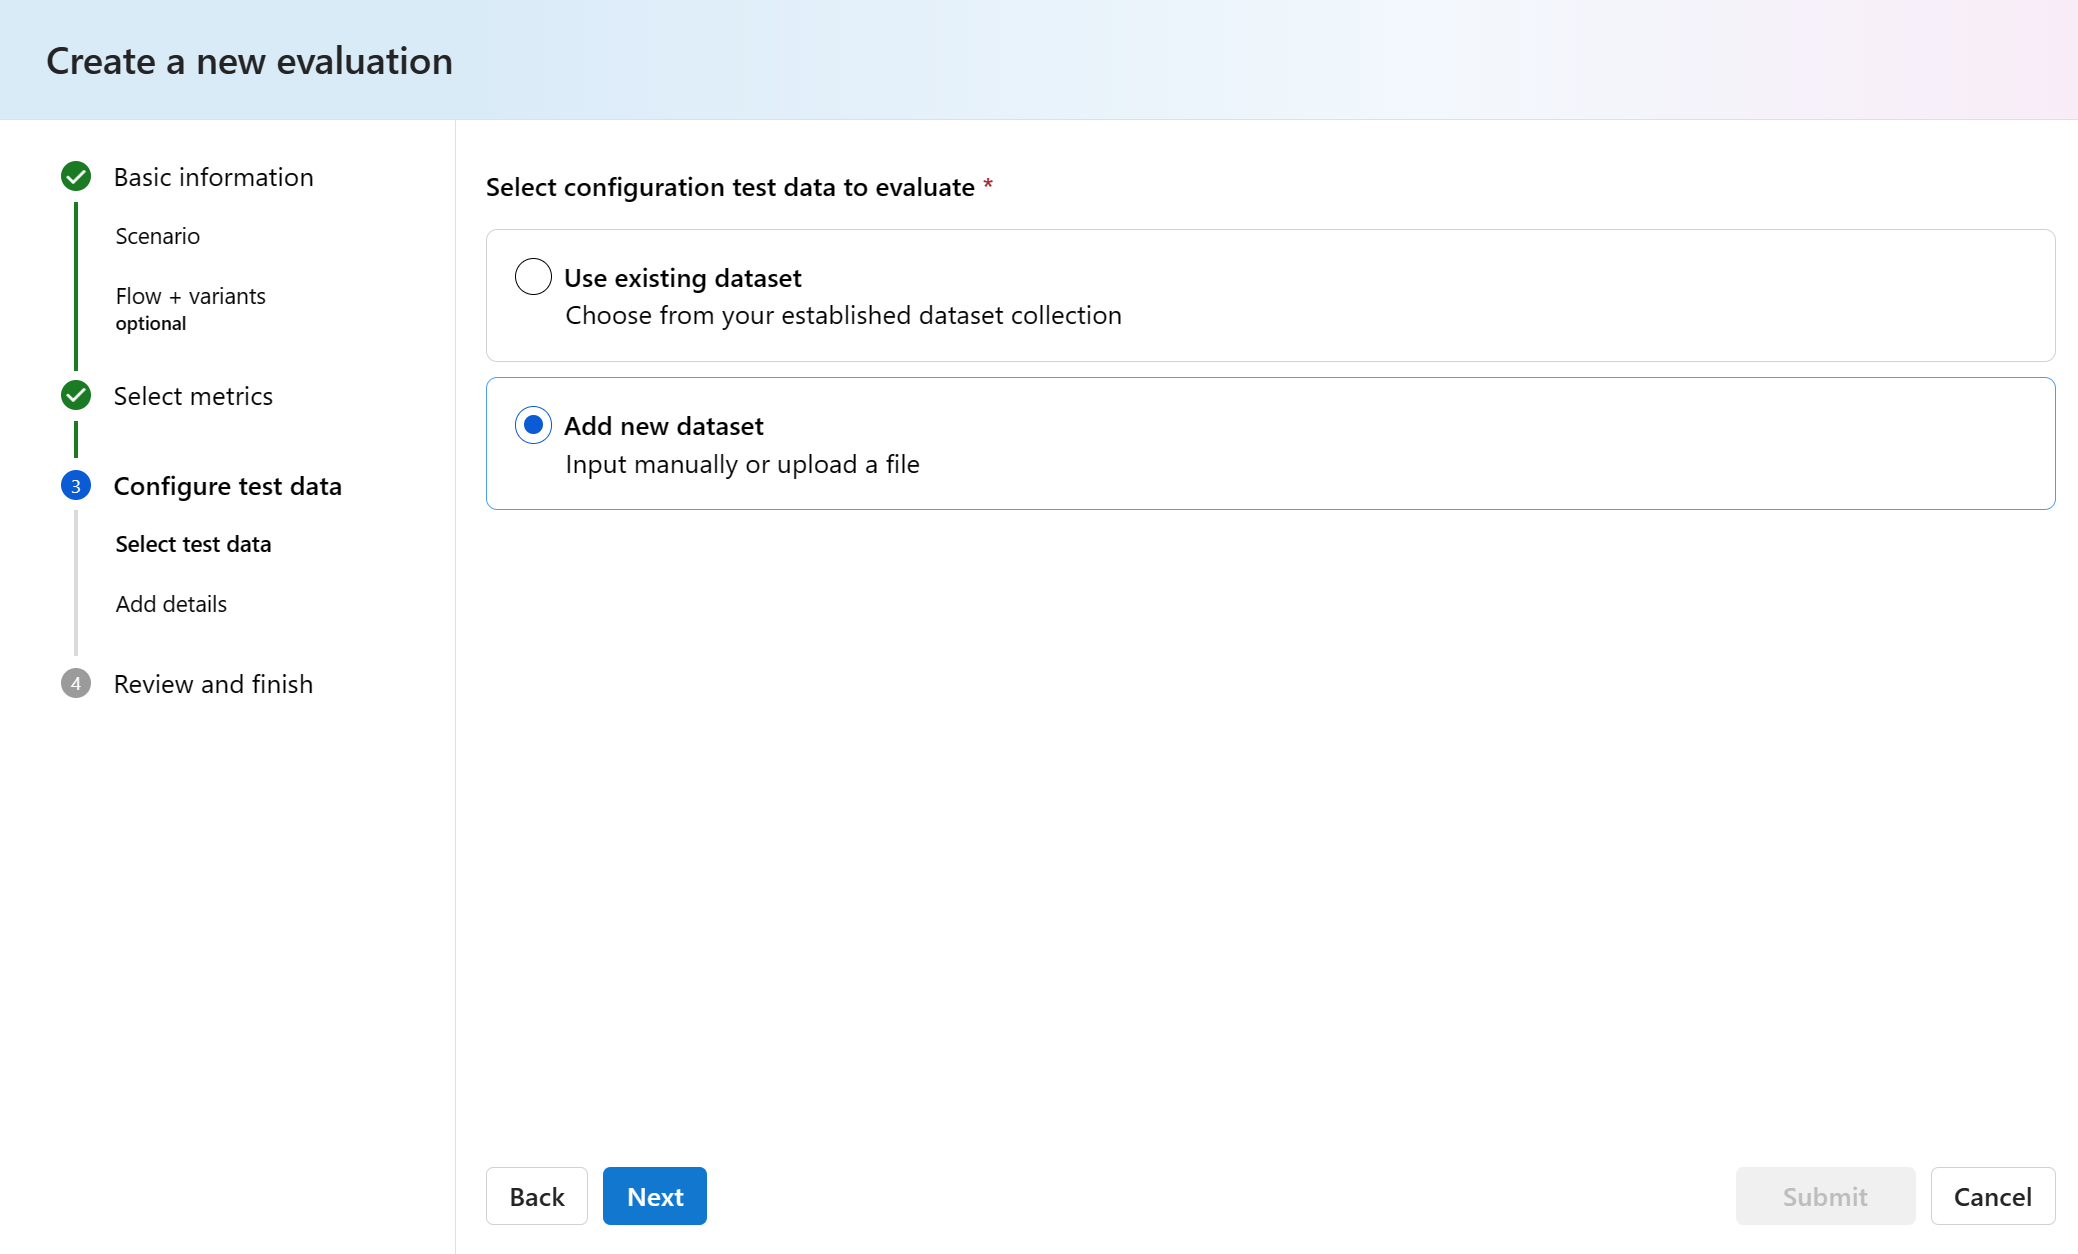
Select Add new dataset. Then select Next.
Select Upload files, browse files, and select the qa-evaluation.jsonl file that you created earlier.
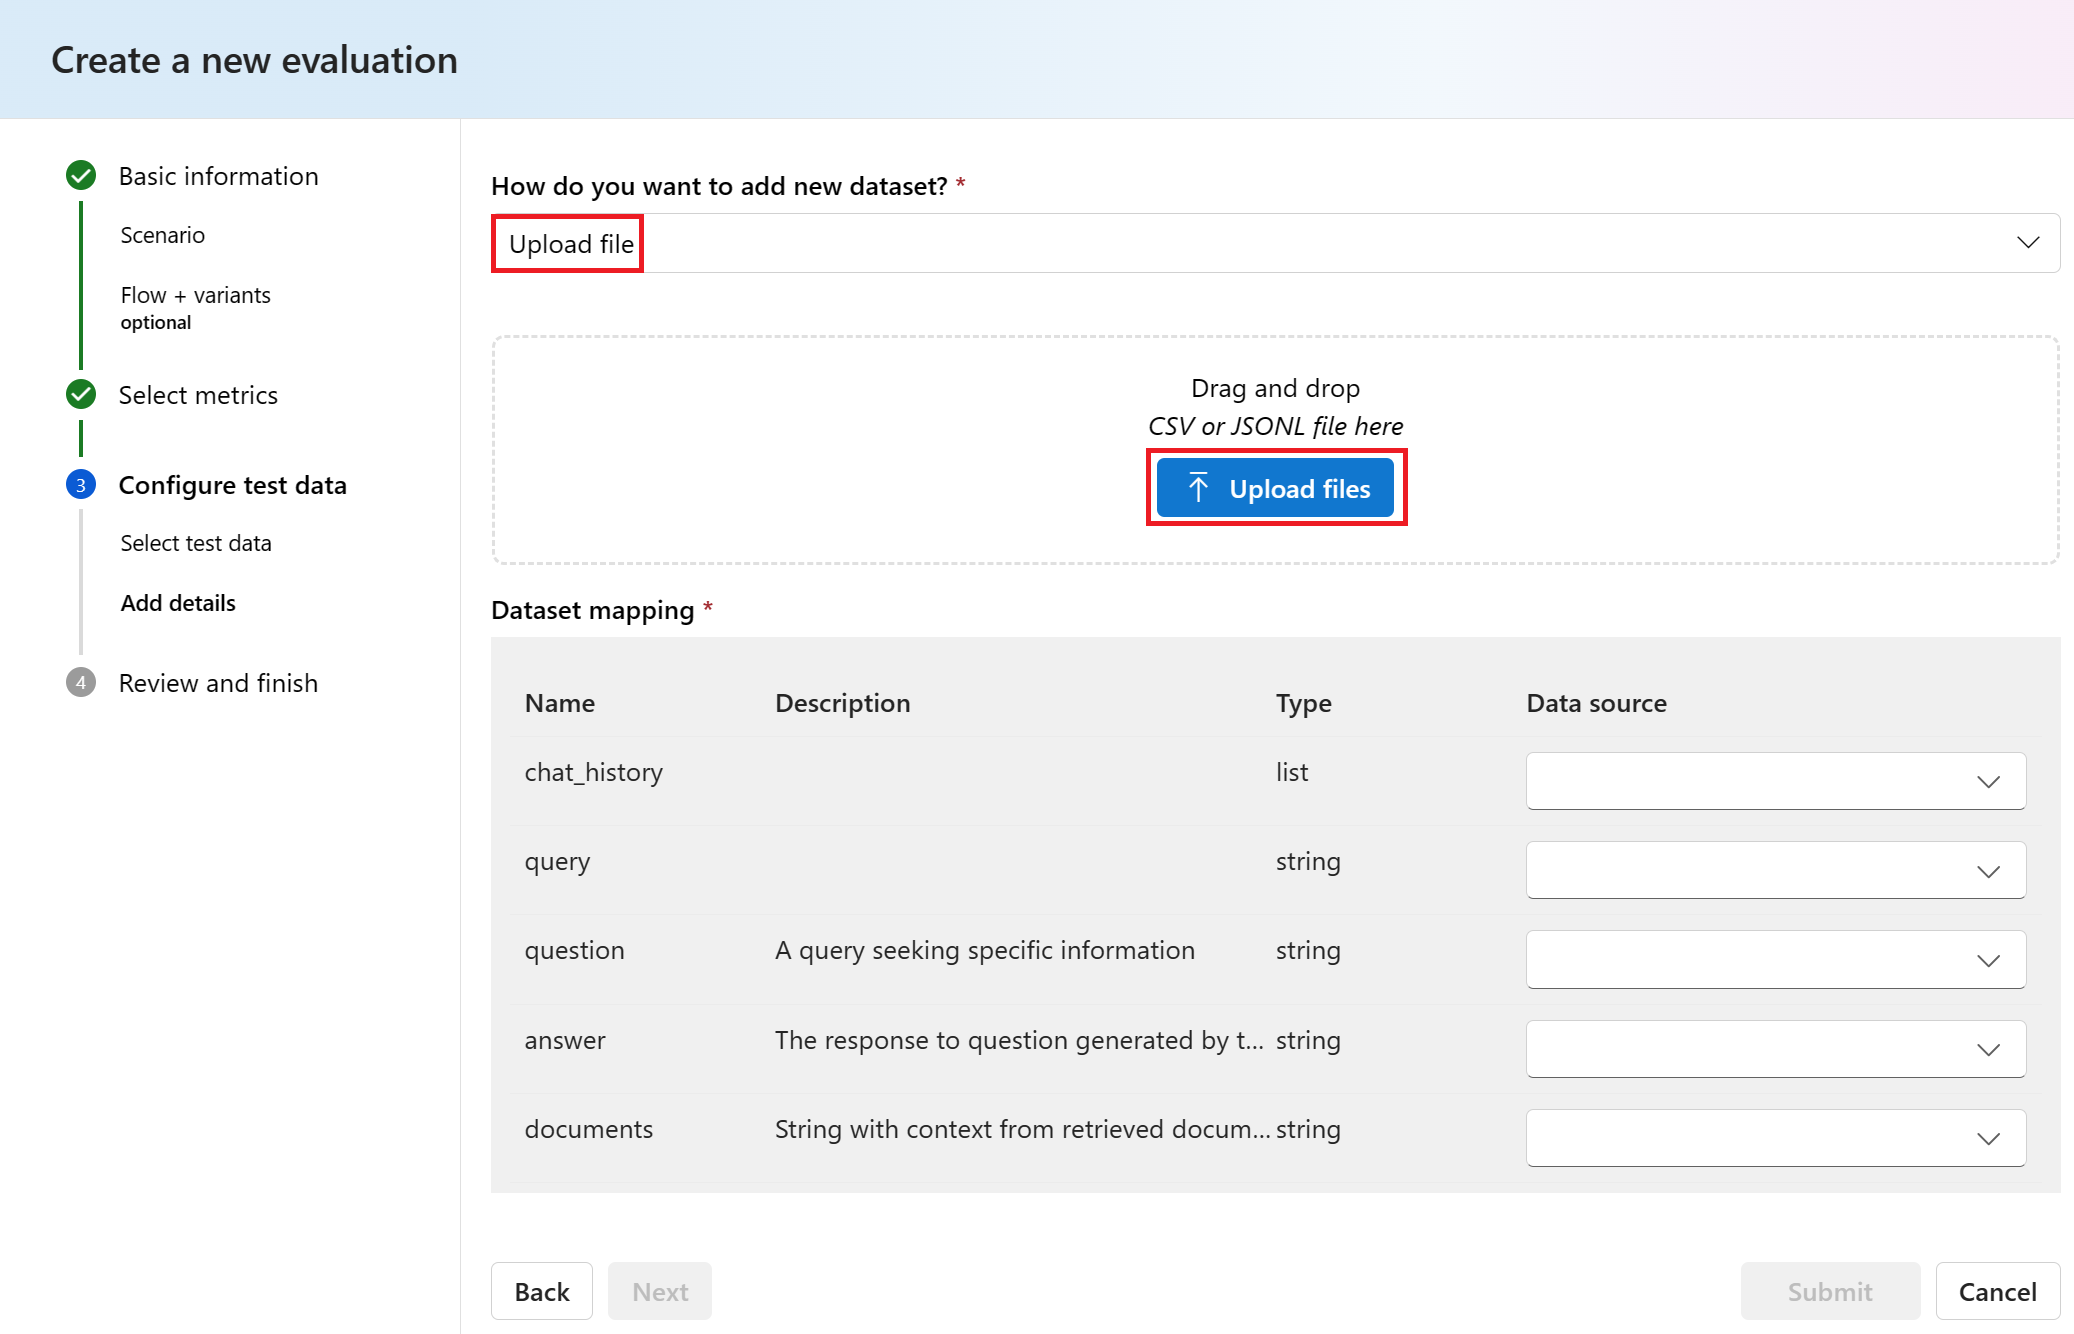
After the file is uploaded, you need to map the properties from the file (data source) to the evaluation properties. Enter the following values for each data source property:
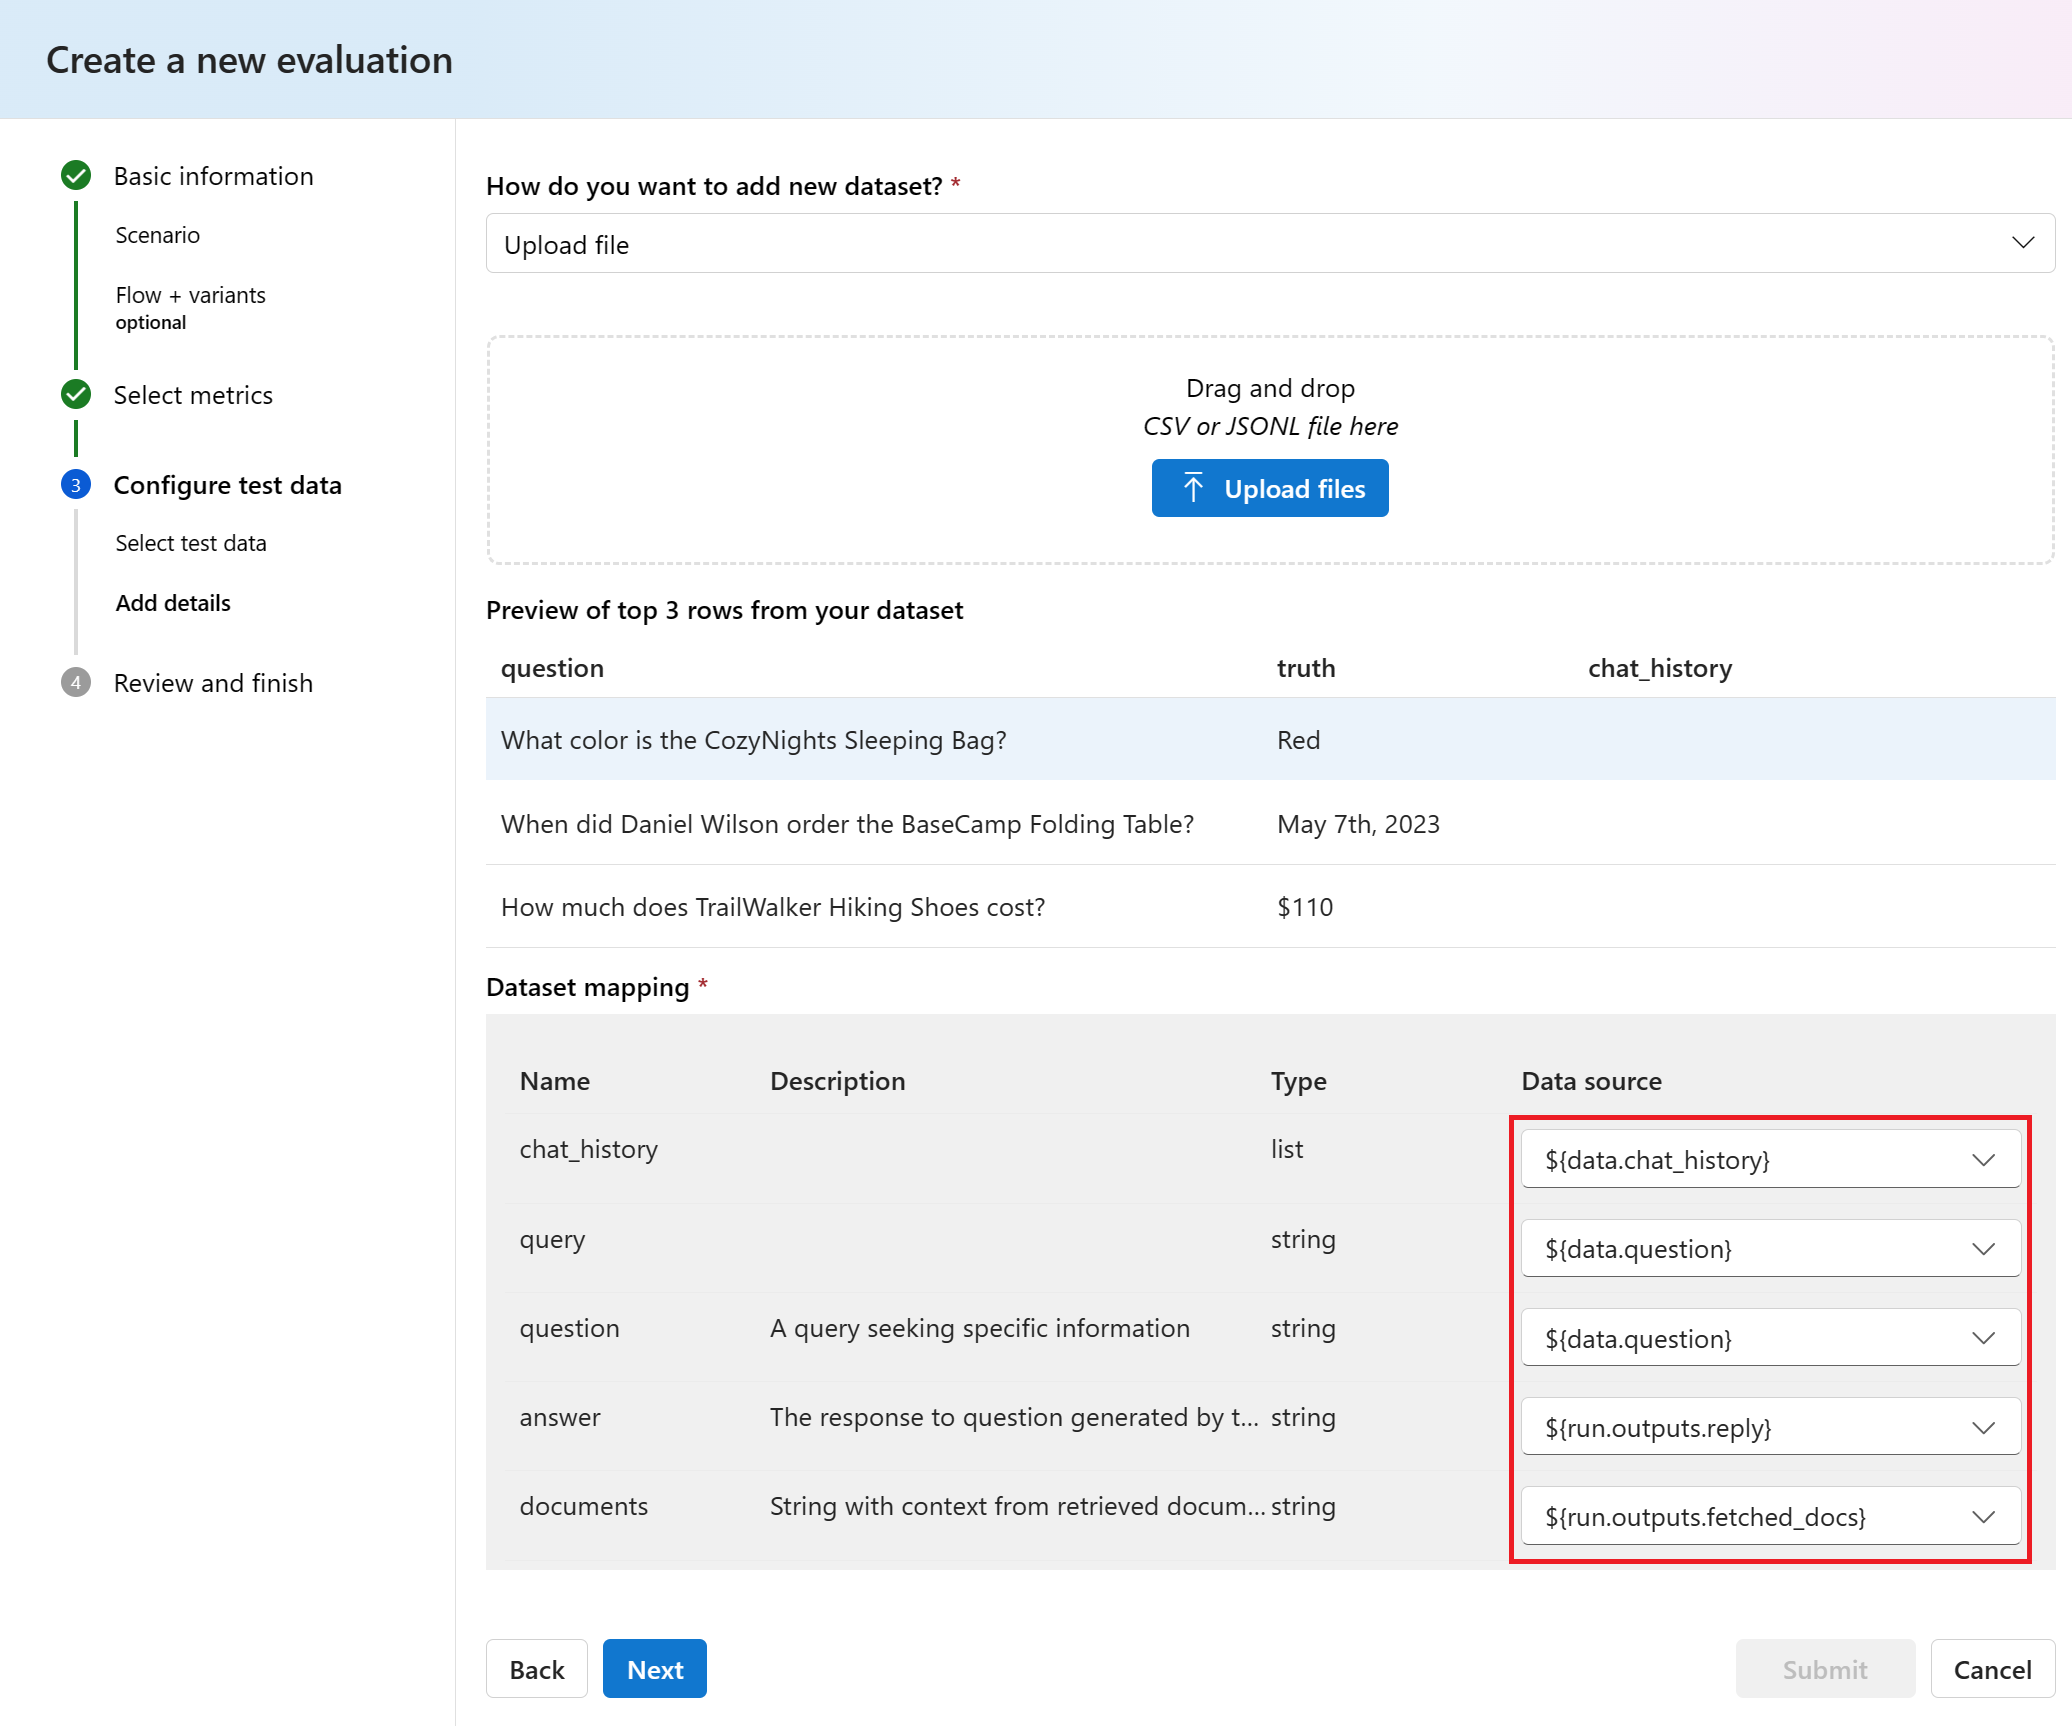
Name Description Type Data source chat_history The chat history list ${data.chat_history} query The query string ${data.question} question A query seeking specific information string ${data.question} answer The response to question generated by the model as answer string ${run.outputs.reply} documents String with context from retrieved documents string ${run.outputs.fetched_docs} Select Next.
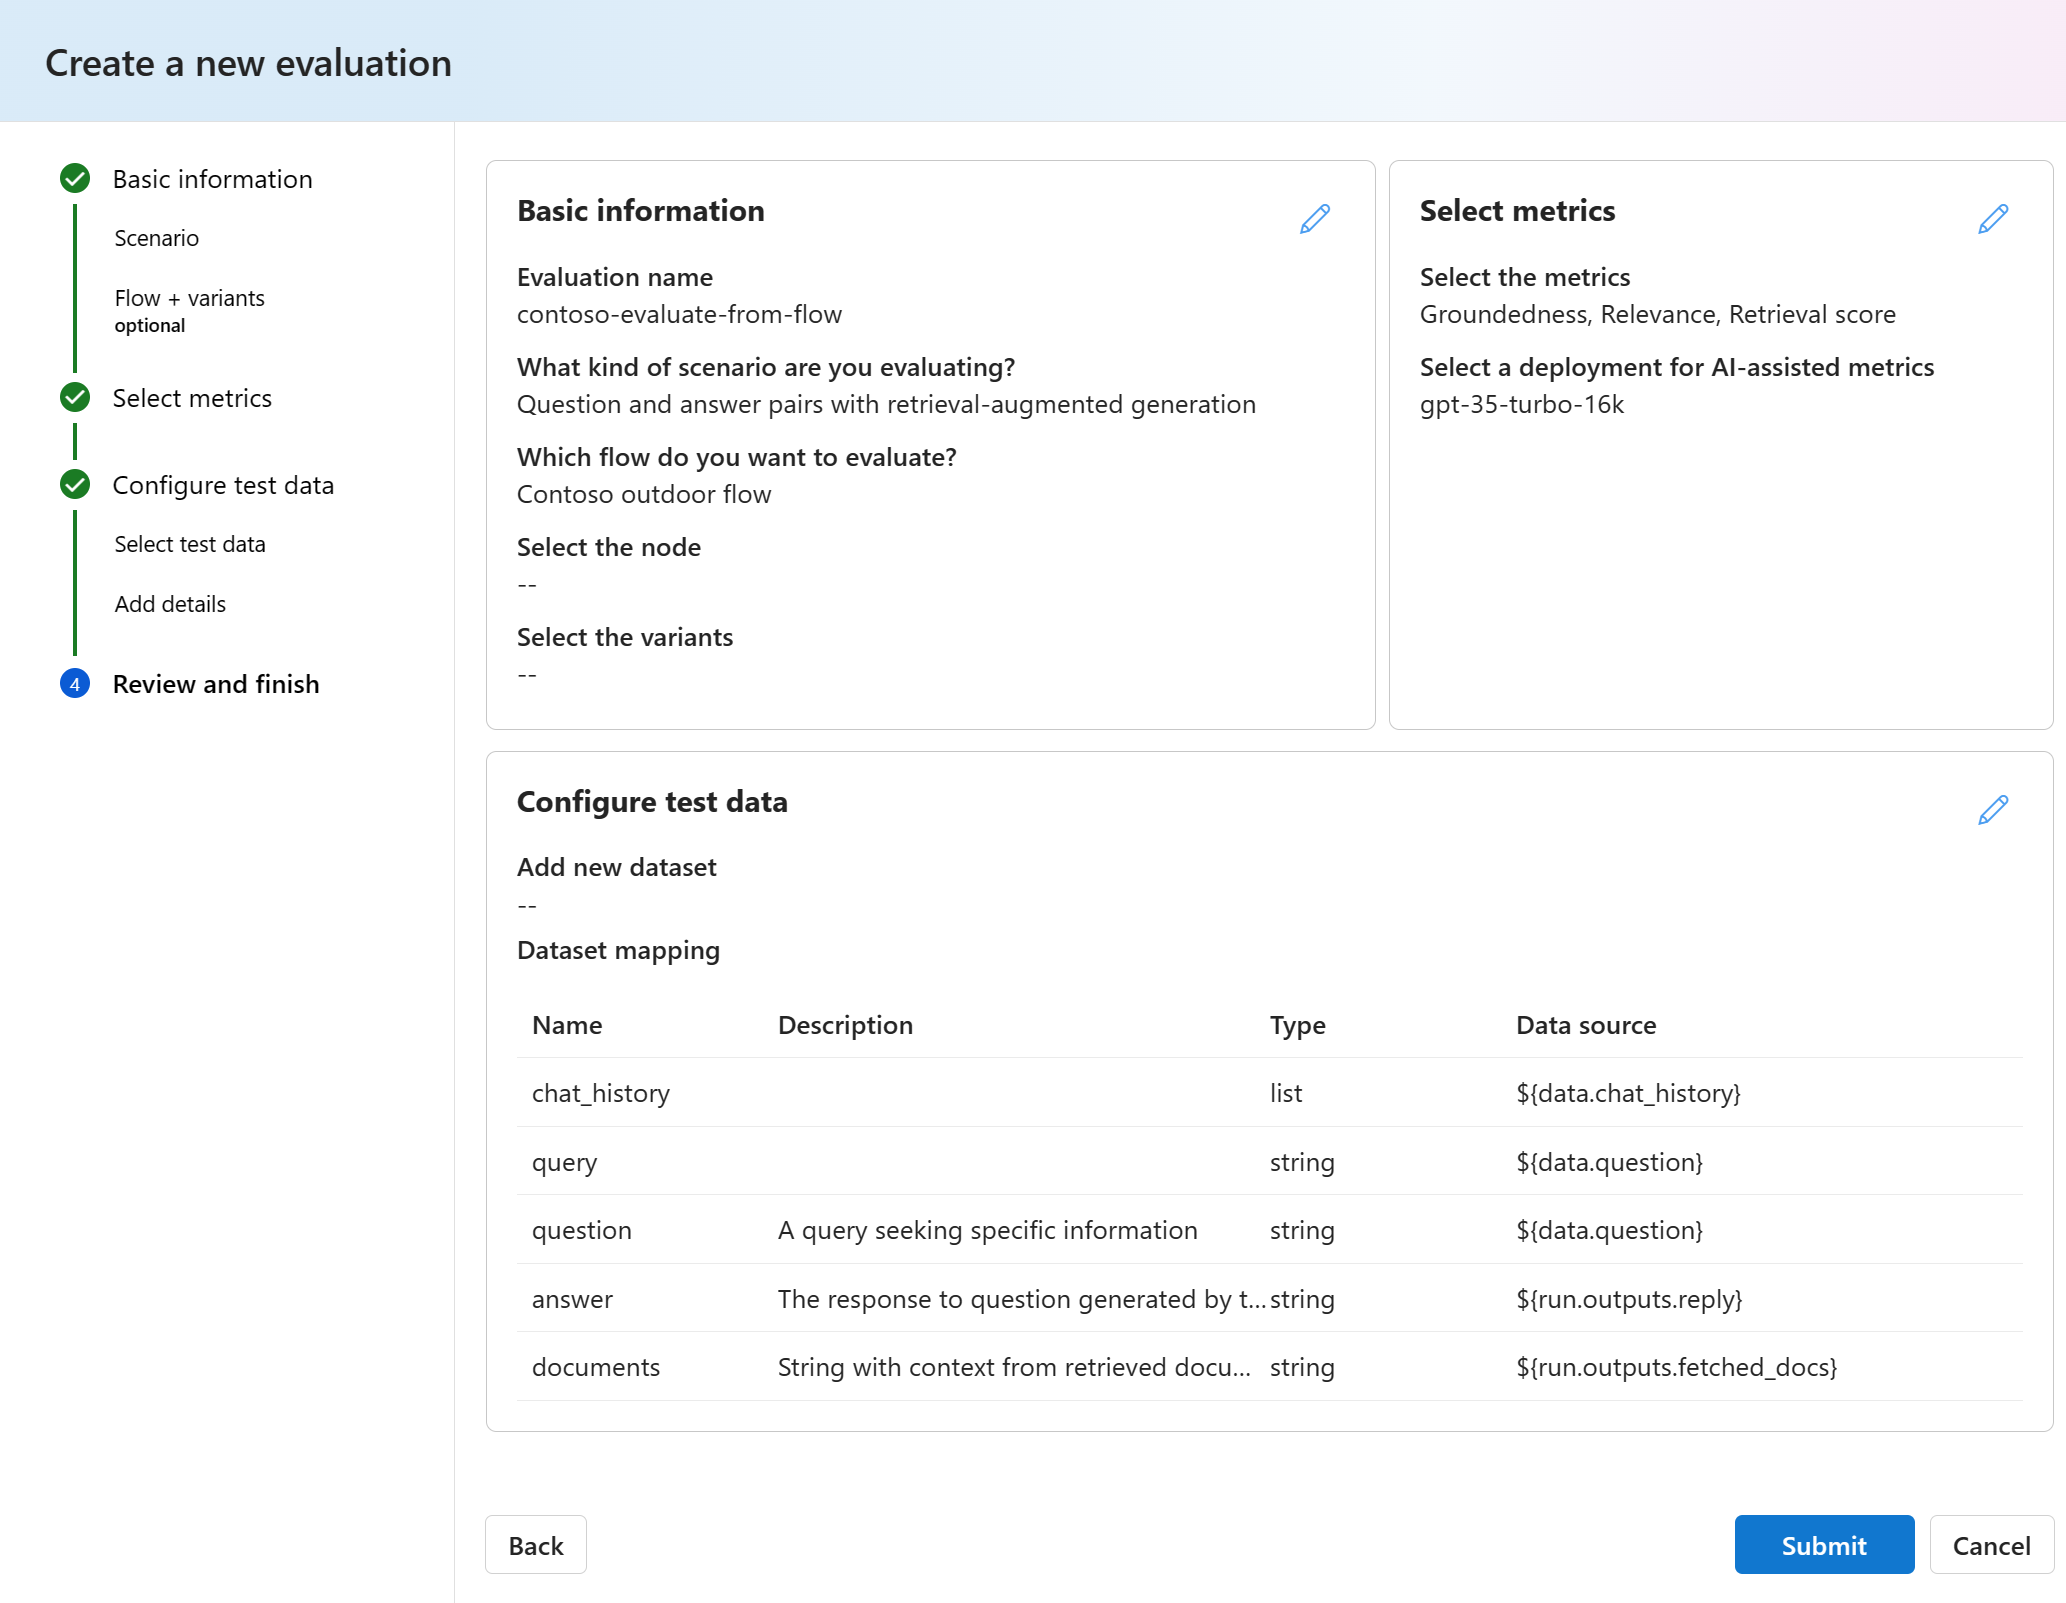
Review the evaluation details and then select Submit.
You're taken to the Metric evaluations page.


View the evaluation status and results
Now you can view the evaluation status and results by following these steps:
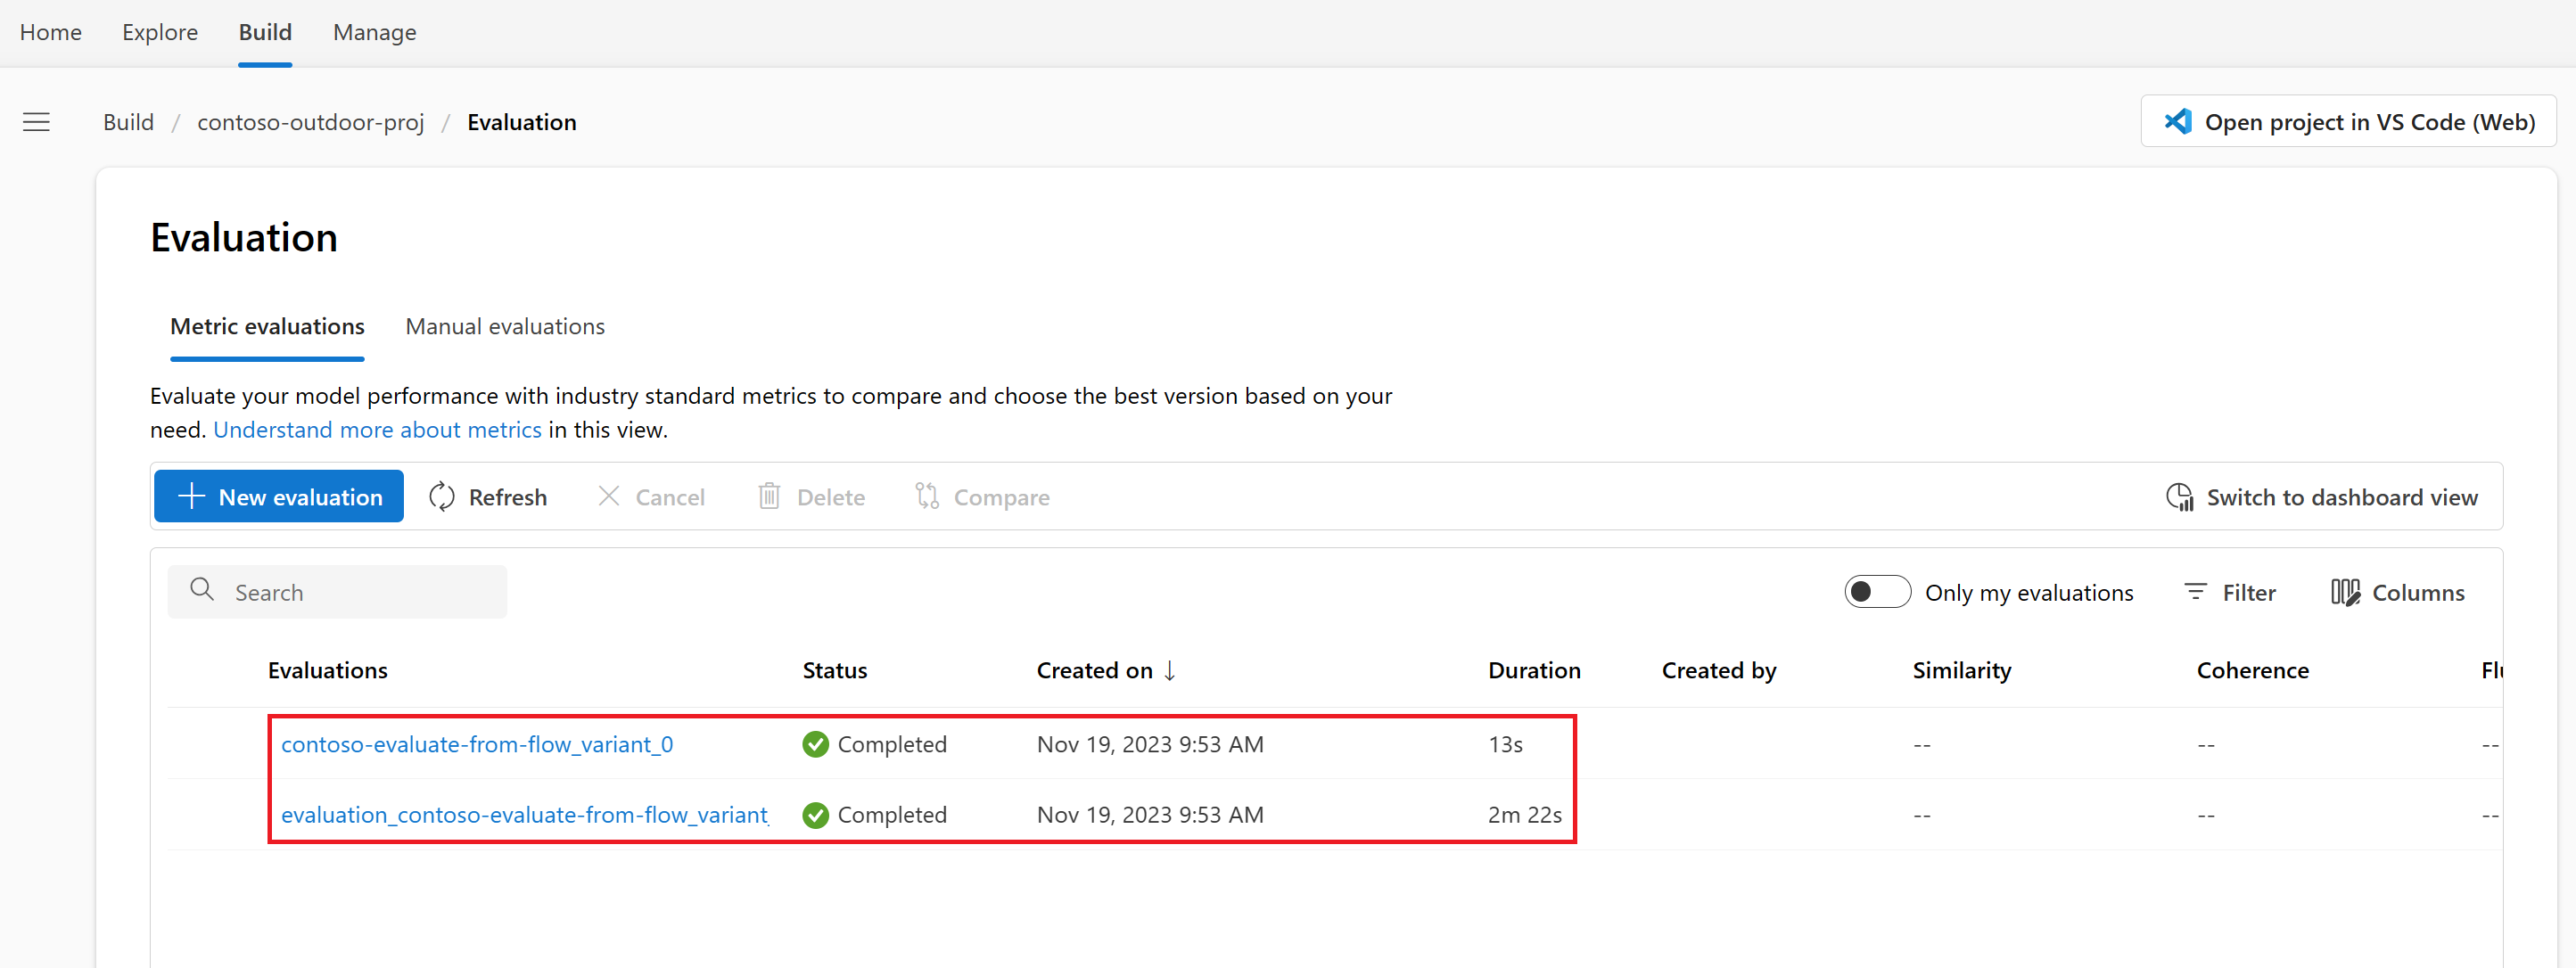
After you create an evaluation, if you aren't there already go to Build > Evaluation. On the Metric evaluations page, you can see the evaluation status and the metrics that you selected. You might need to select Refresh after a couple of minutes to see the Completed status.
Tip
Once the evaluation is in Completed status, you don't need runtime or compute to complete the rest of this tutorial. You can stop your compute instance to avoid incurring unnecessary Azure costs. For more information, see how to start and stop compute.
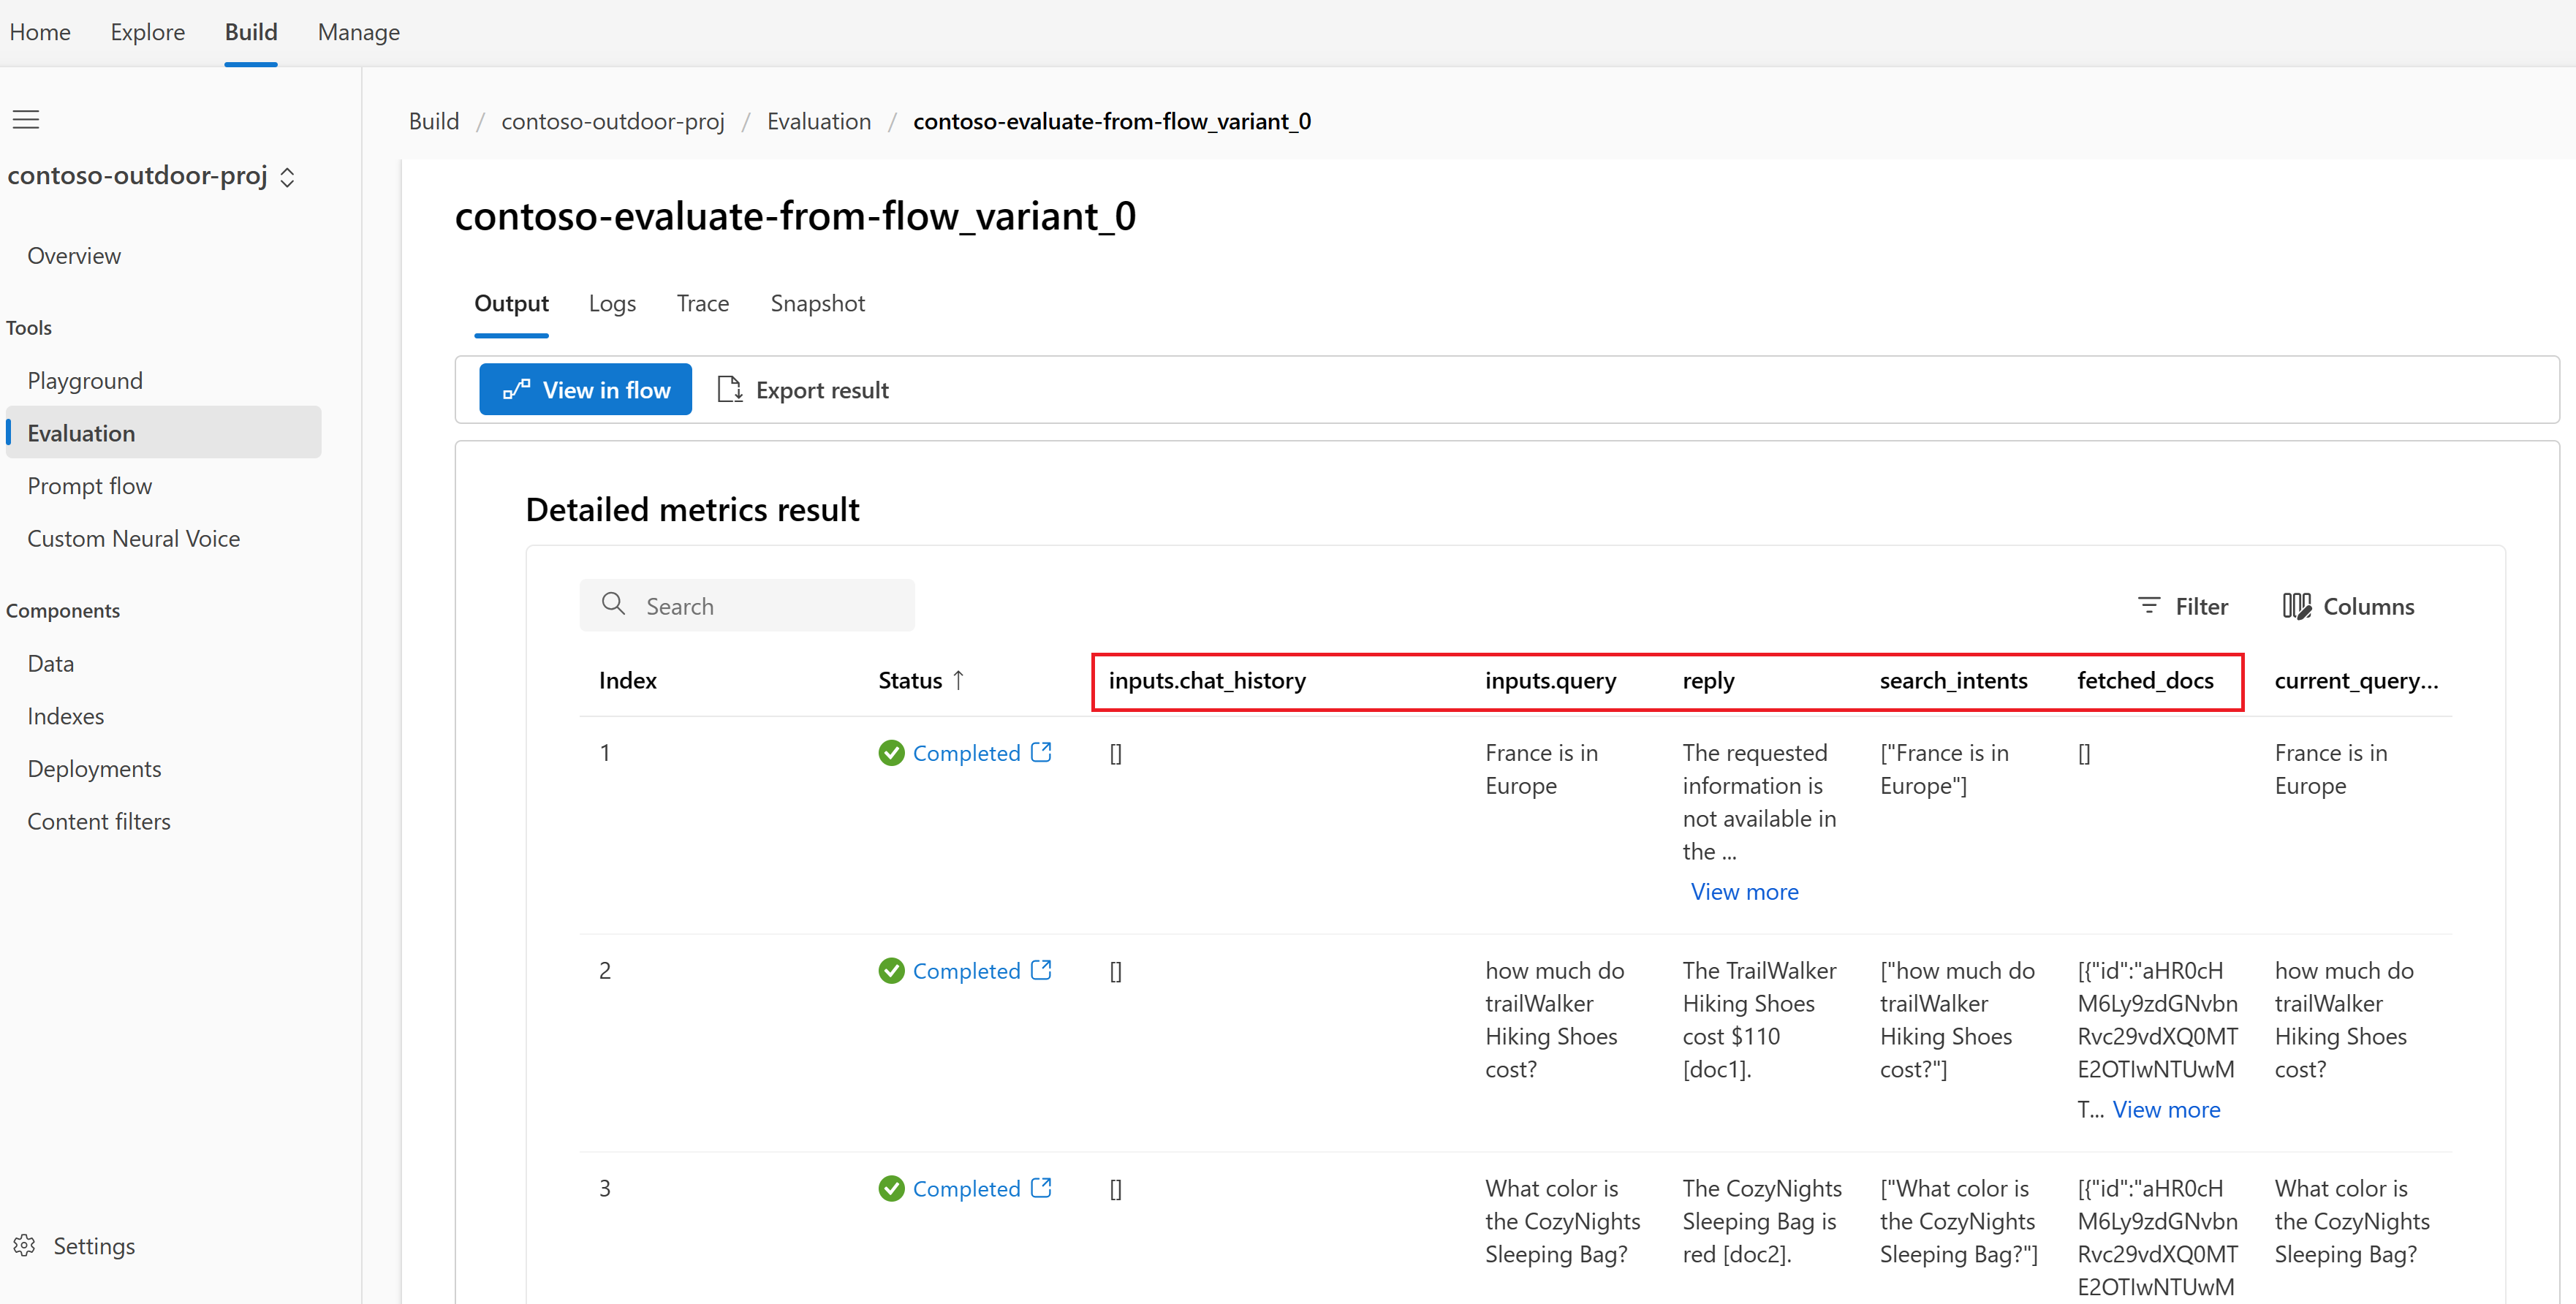
Select the name of the evaluation that completed first (contoso-evaluate-from-flow_variant_0) to see the evaluation details with the columns that you mapped earlier.
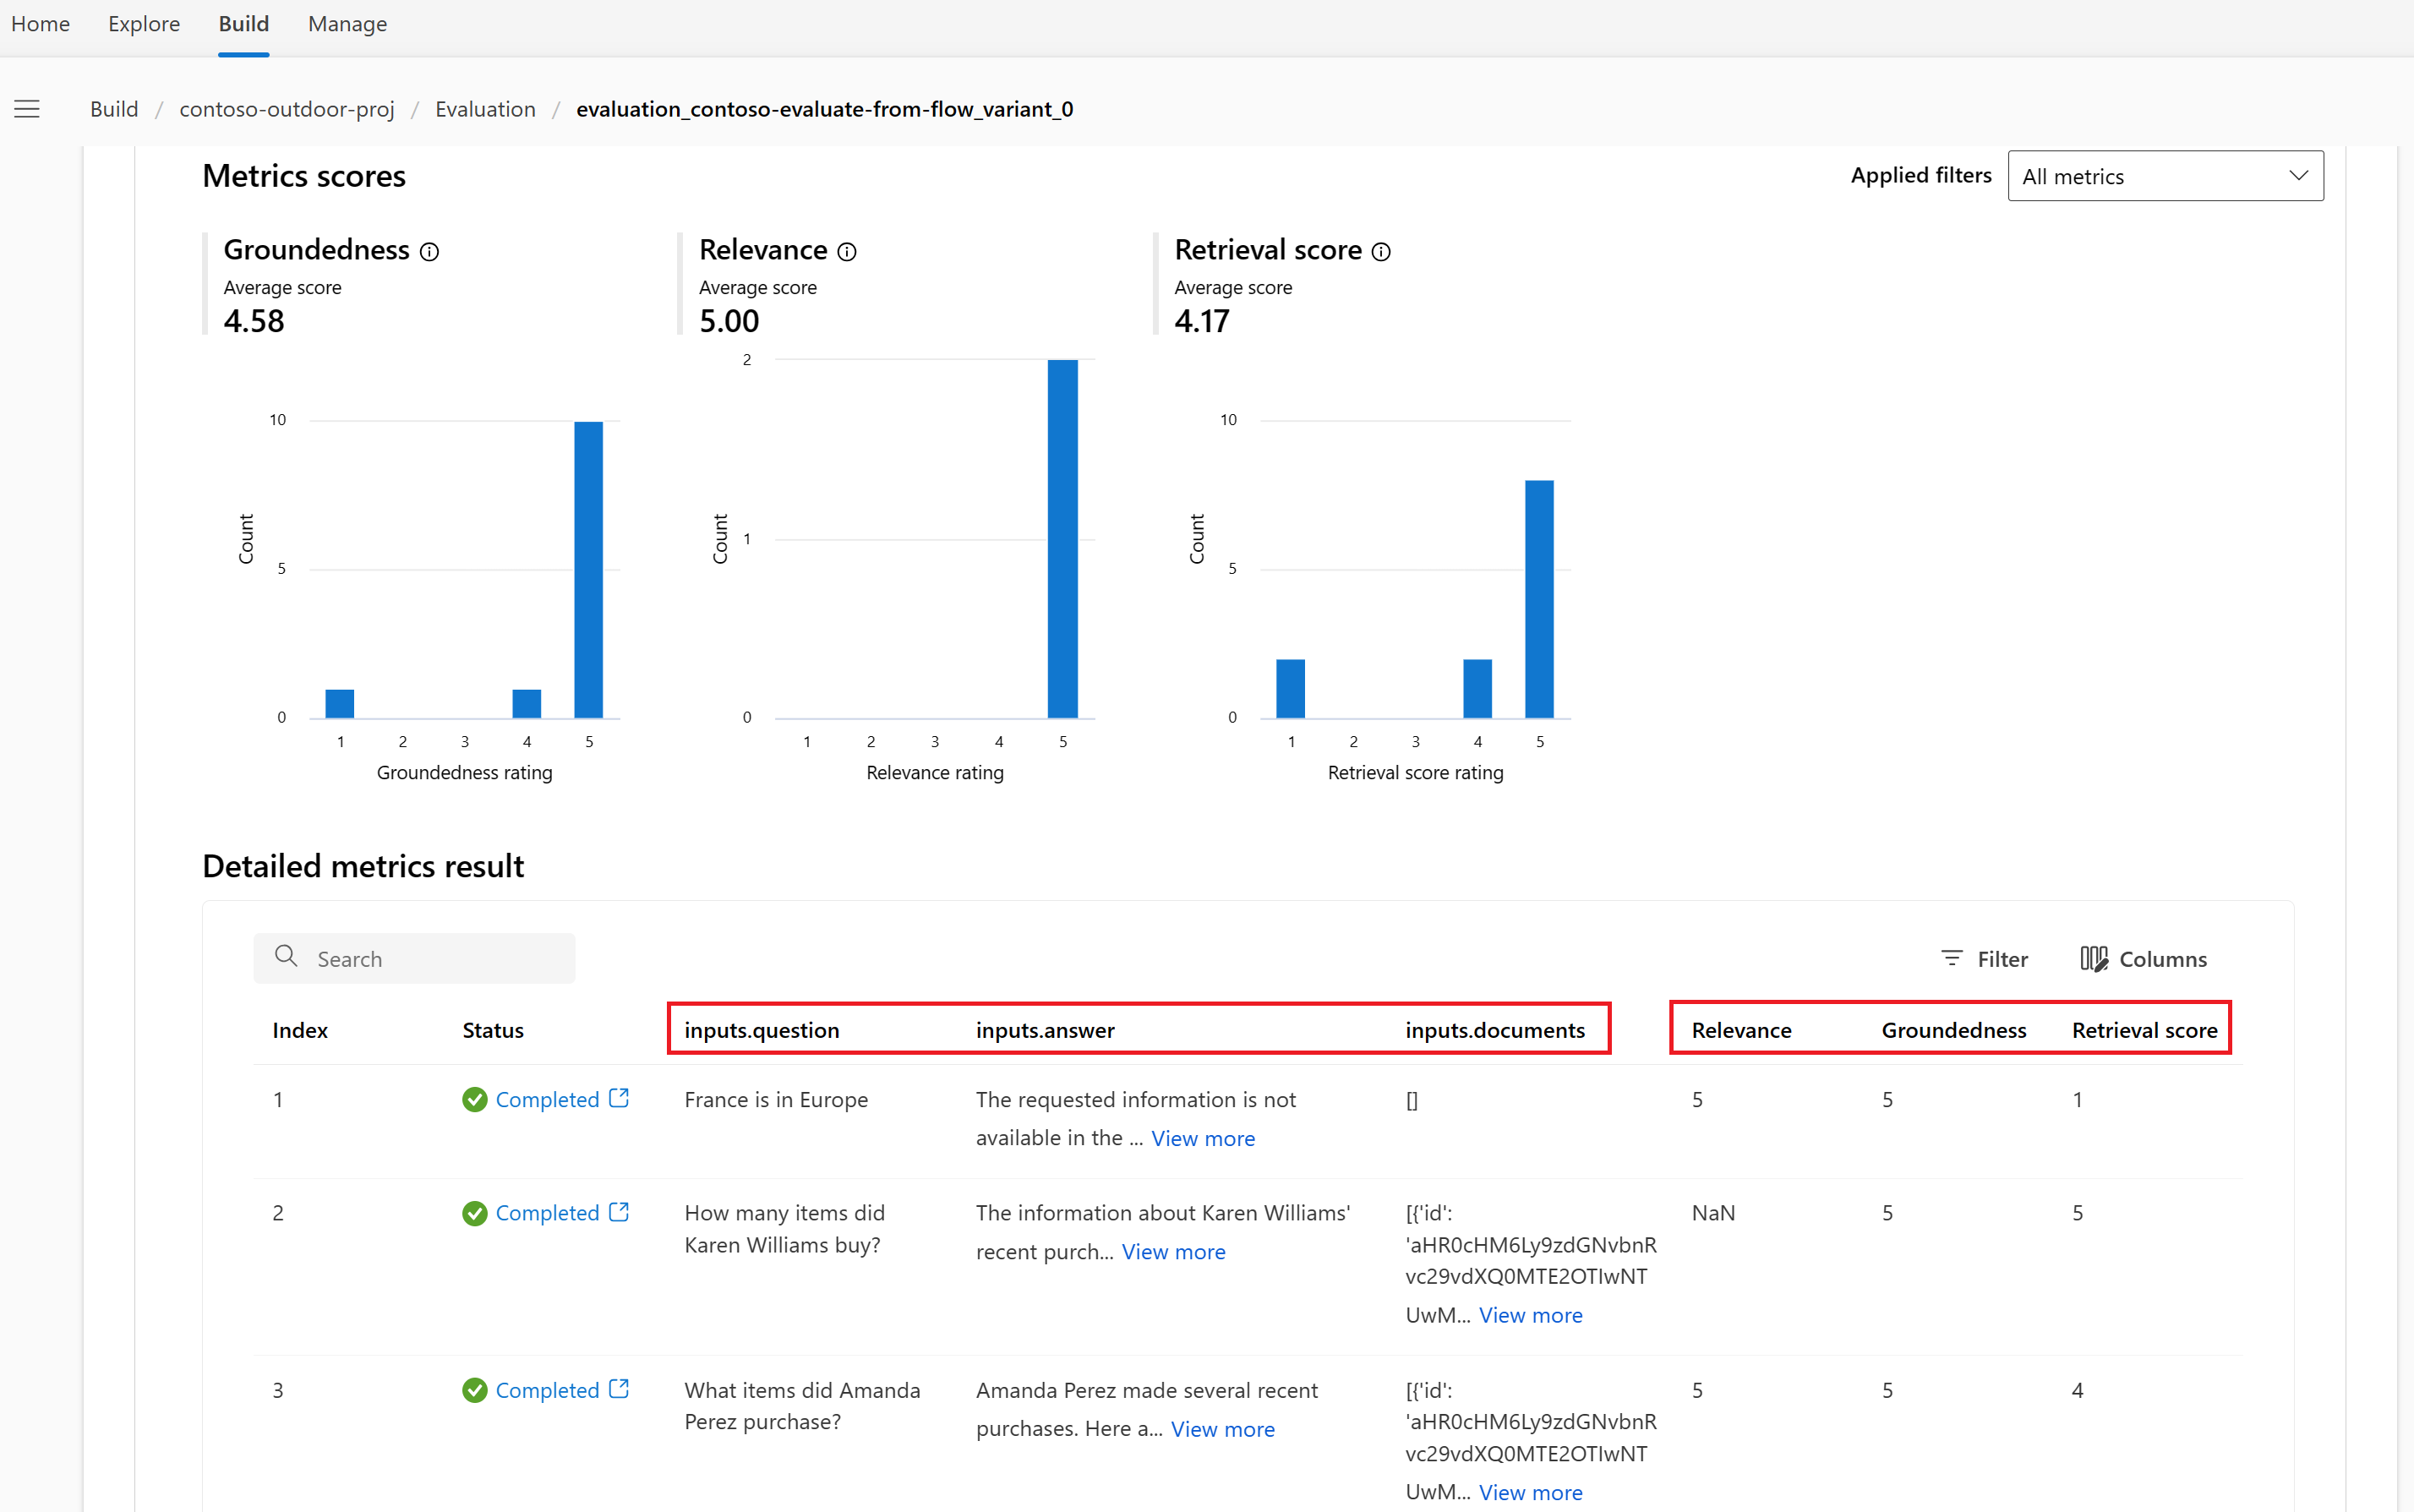
Select the name of the evaluation that completed second (evaluation_contoso-evaluate-from-flow_variant_0) to see the evaluation metrics: Groundedness, Relevance, and Retrieval score.


For more information, see view evaluation results.
Deploy the flow
Now that you built a flow and completed a metrics-based evaluation, it's time to create your online endpoint for real-time inference. That means you can use the deployed flow to answer questions in real time.
Follow these steps to deploy a prompt flow as an online endpoint from Azure AI Studio.
Have a prompt flow ready for deployment. If you don't have one, see how to build a prompt flow.
Optional: Select Chat to test if the flow is working correctly. Testing your flow before deployment is recommended best practice.
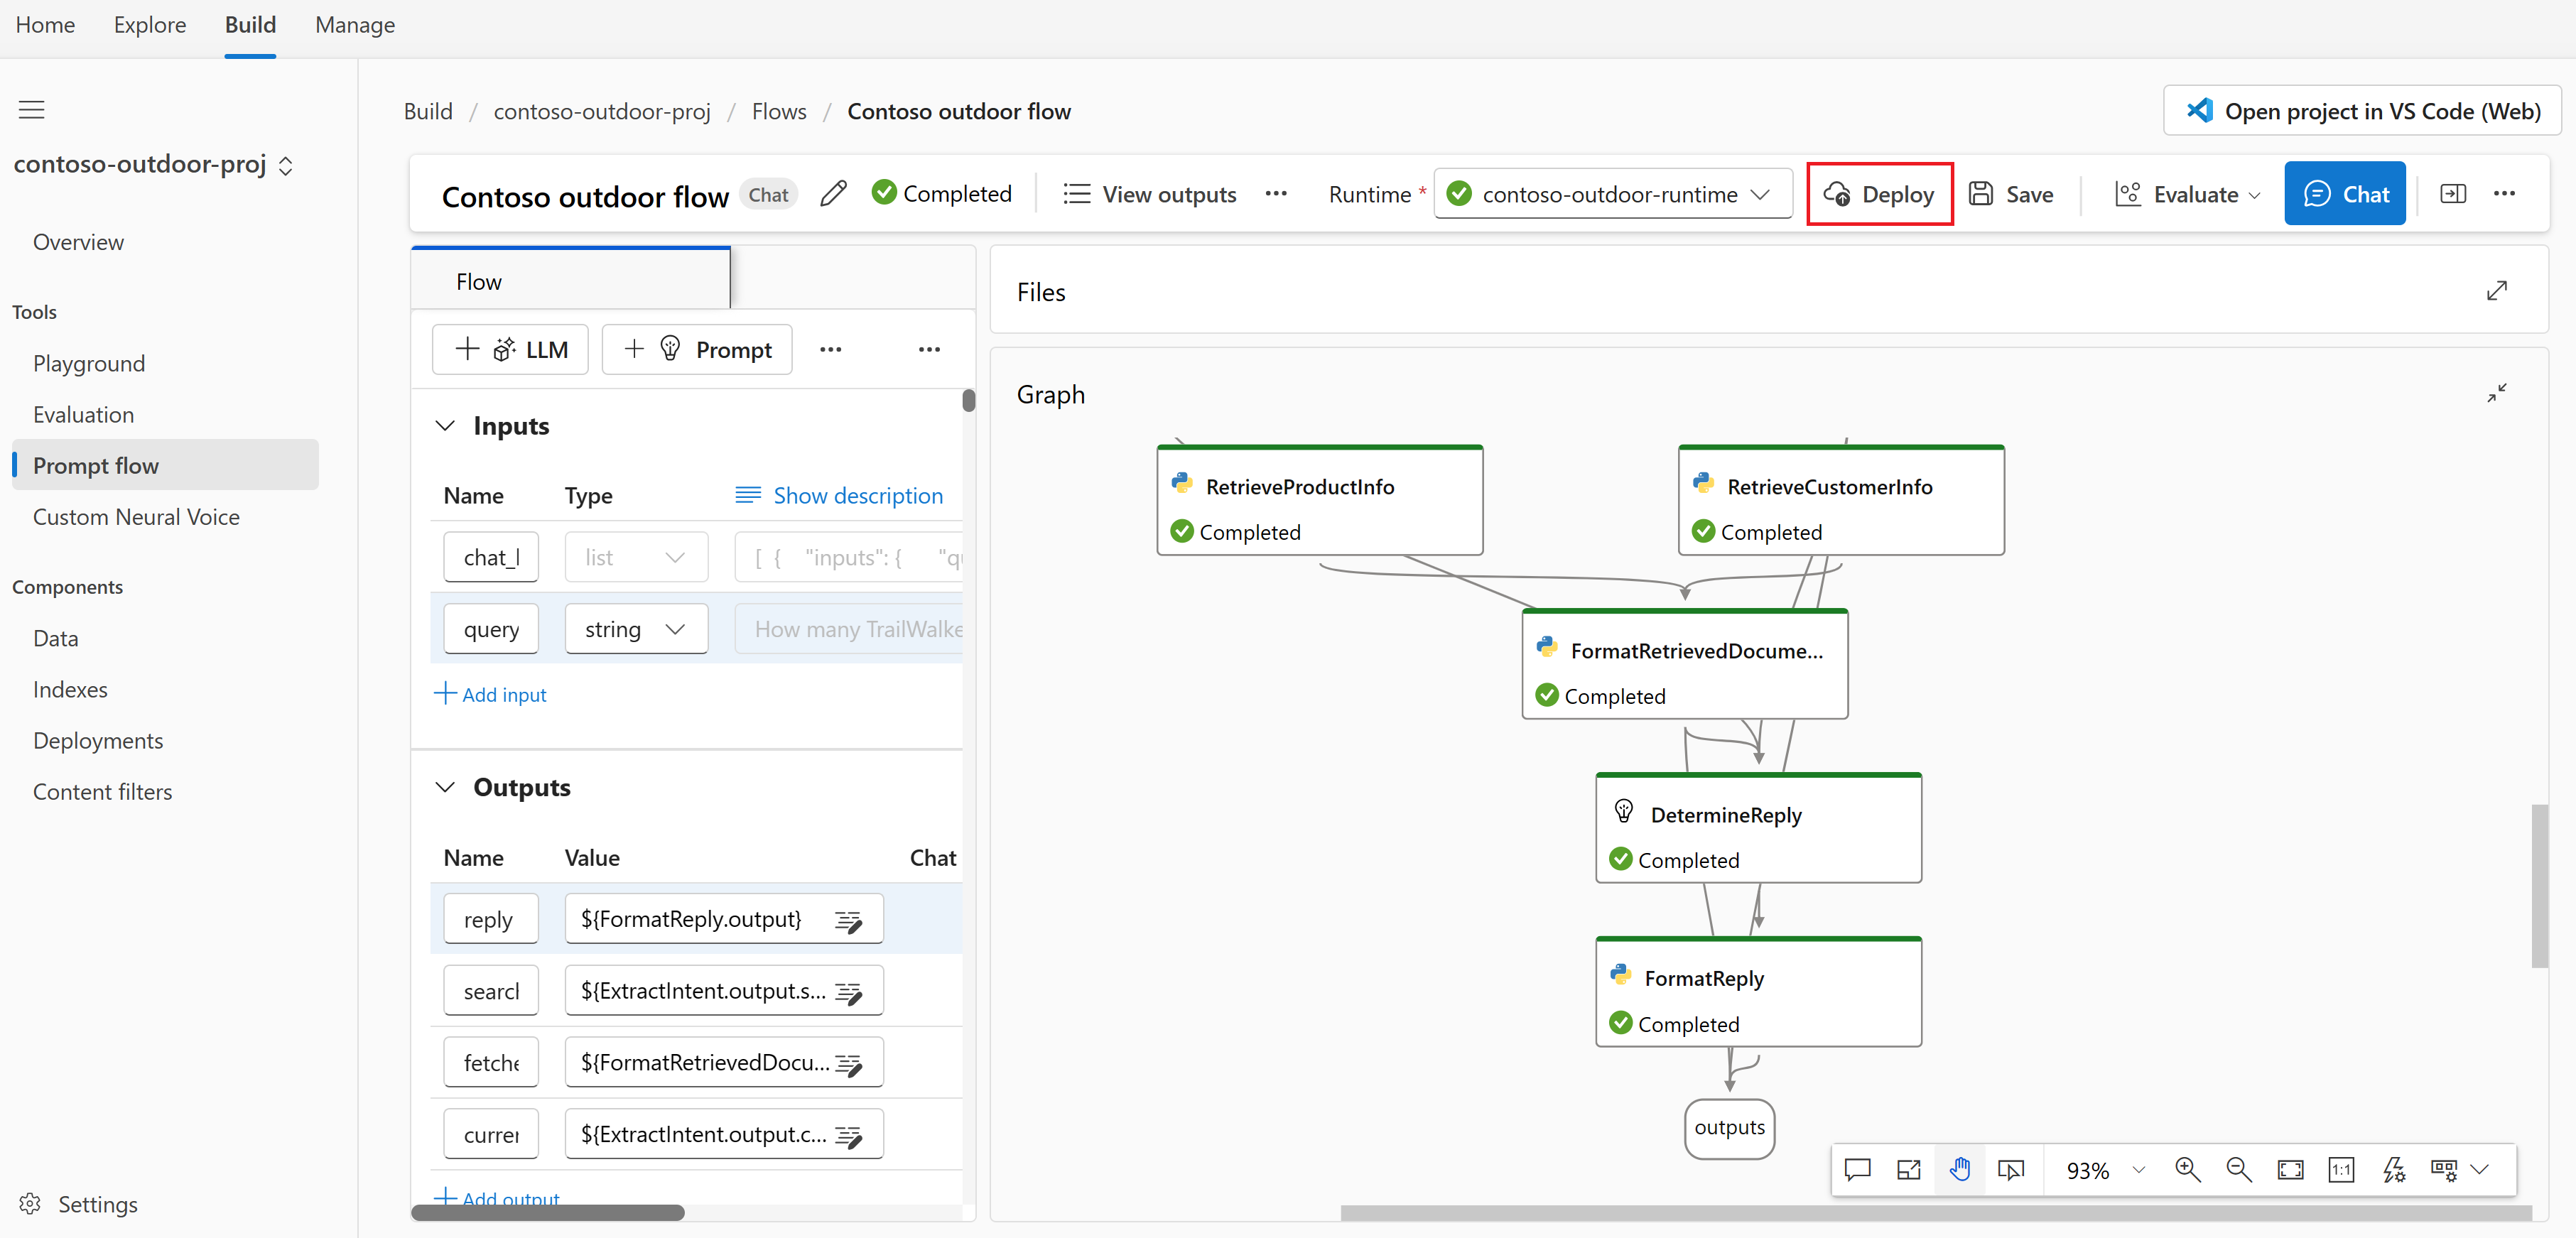
Select Deploy on the flow editor.
Provide the requested information on the Basic Settings page in the deployment wizard.
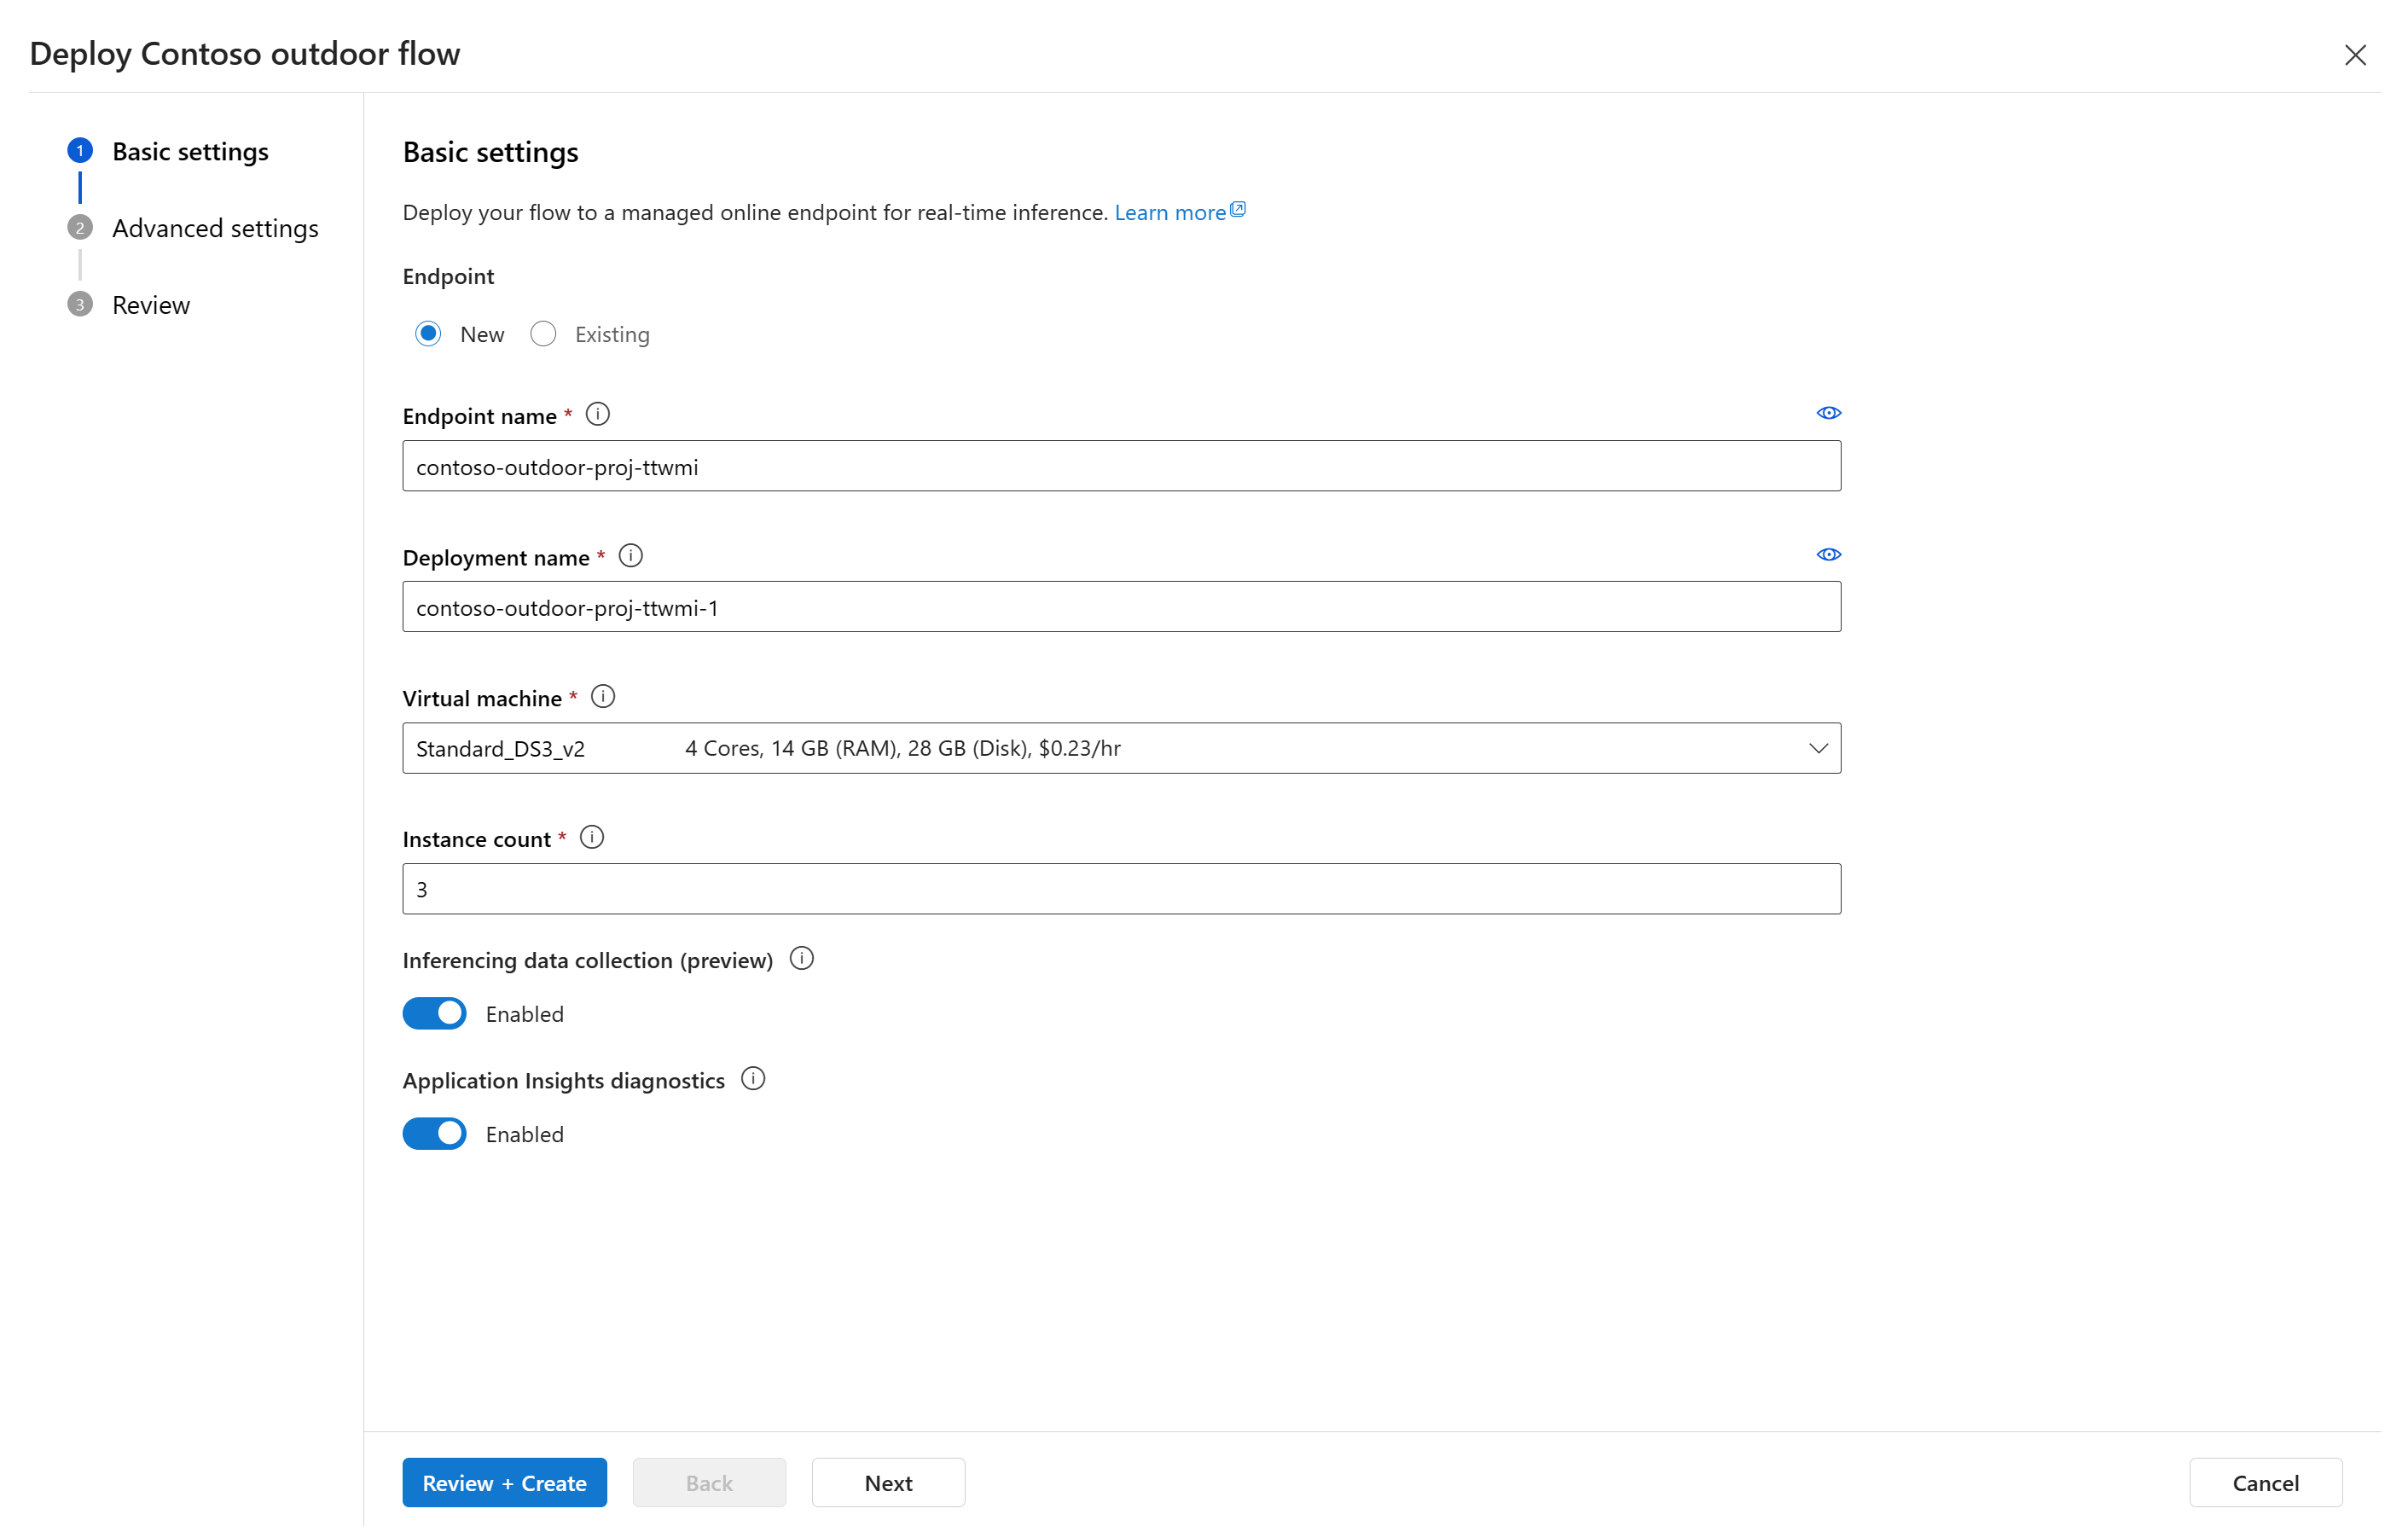
Select Next to proceed to the advanced settings pages.
On the Advanced settings - Endpoint page, leave the default settings and select Next.
On the Advanced settings - Deployment page, leave the default settings and select Next.
On the Advanced settings - Outputs & connections page, make sure all outputs are selected under Included in endpoint response.
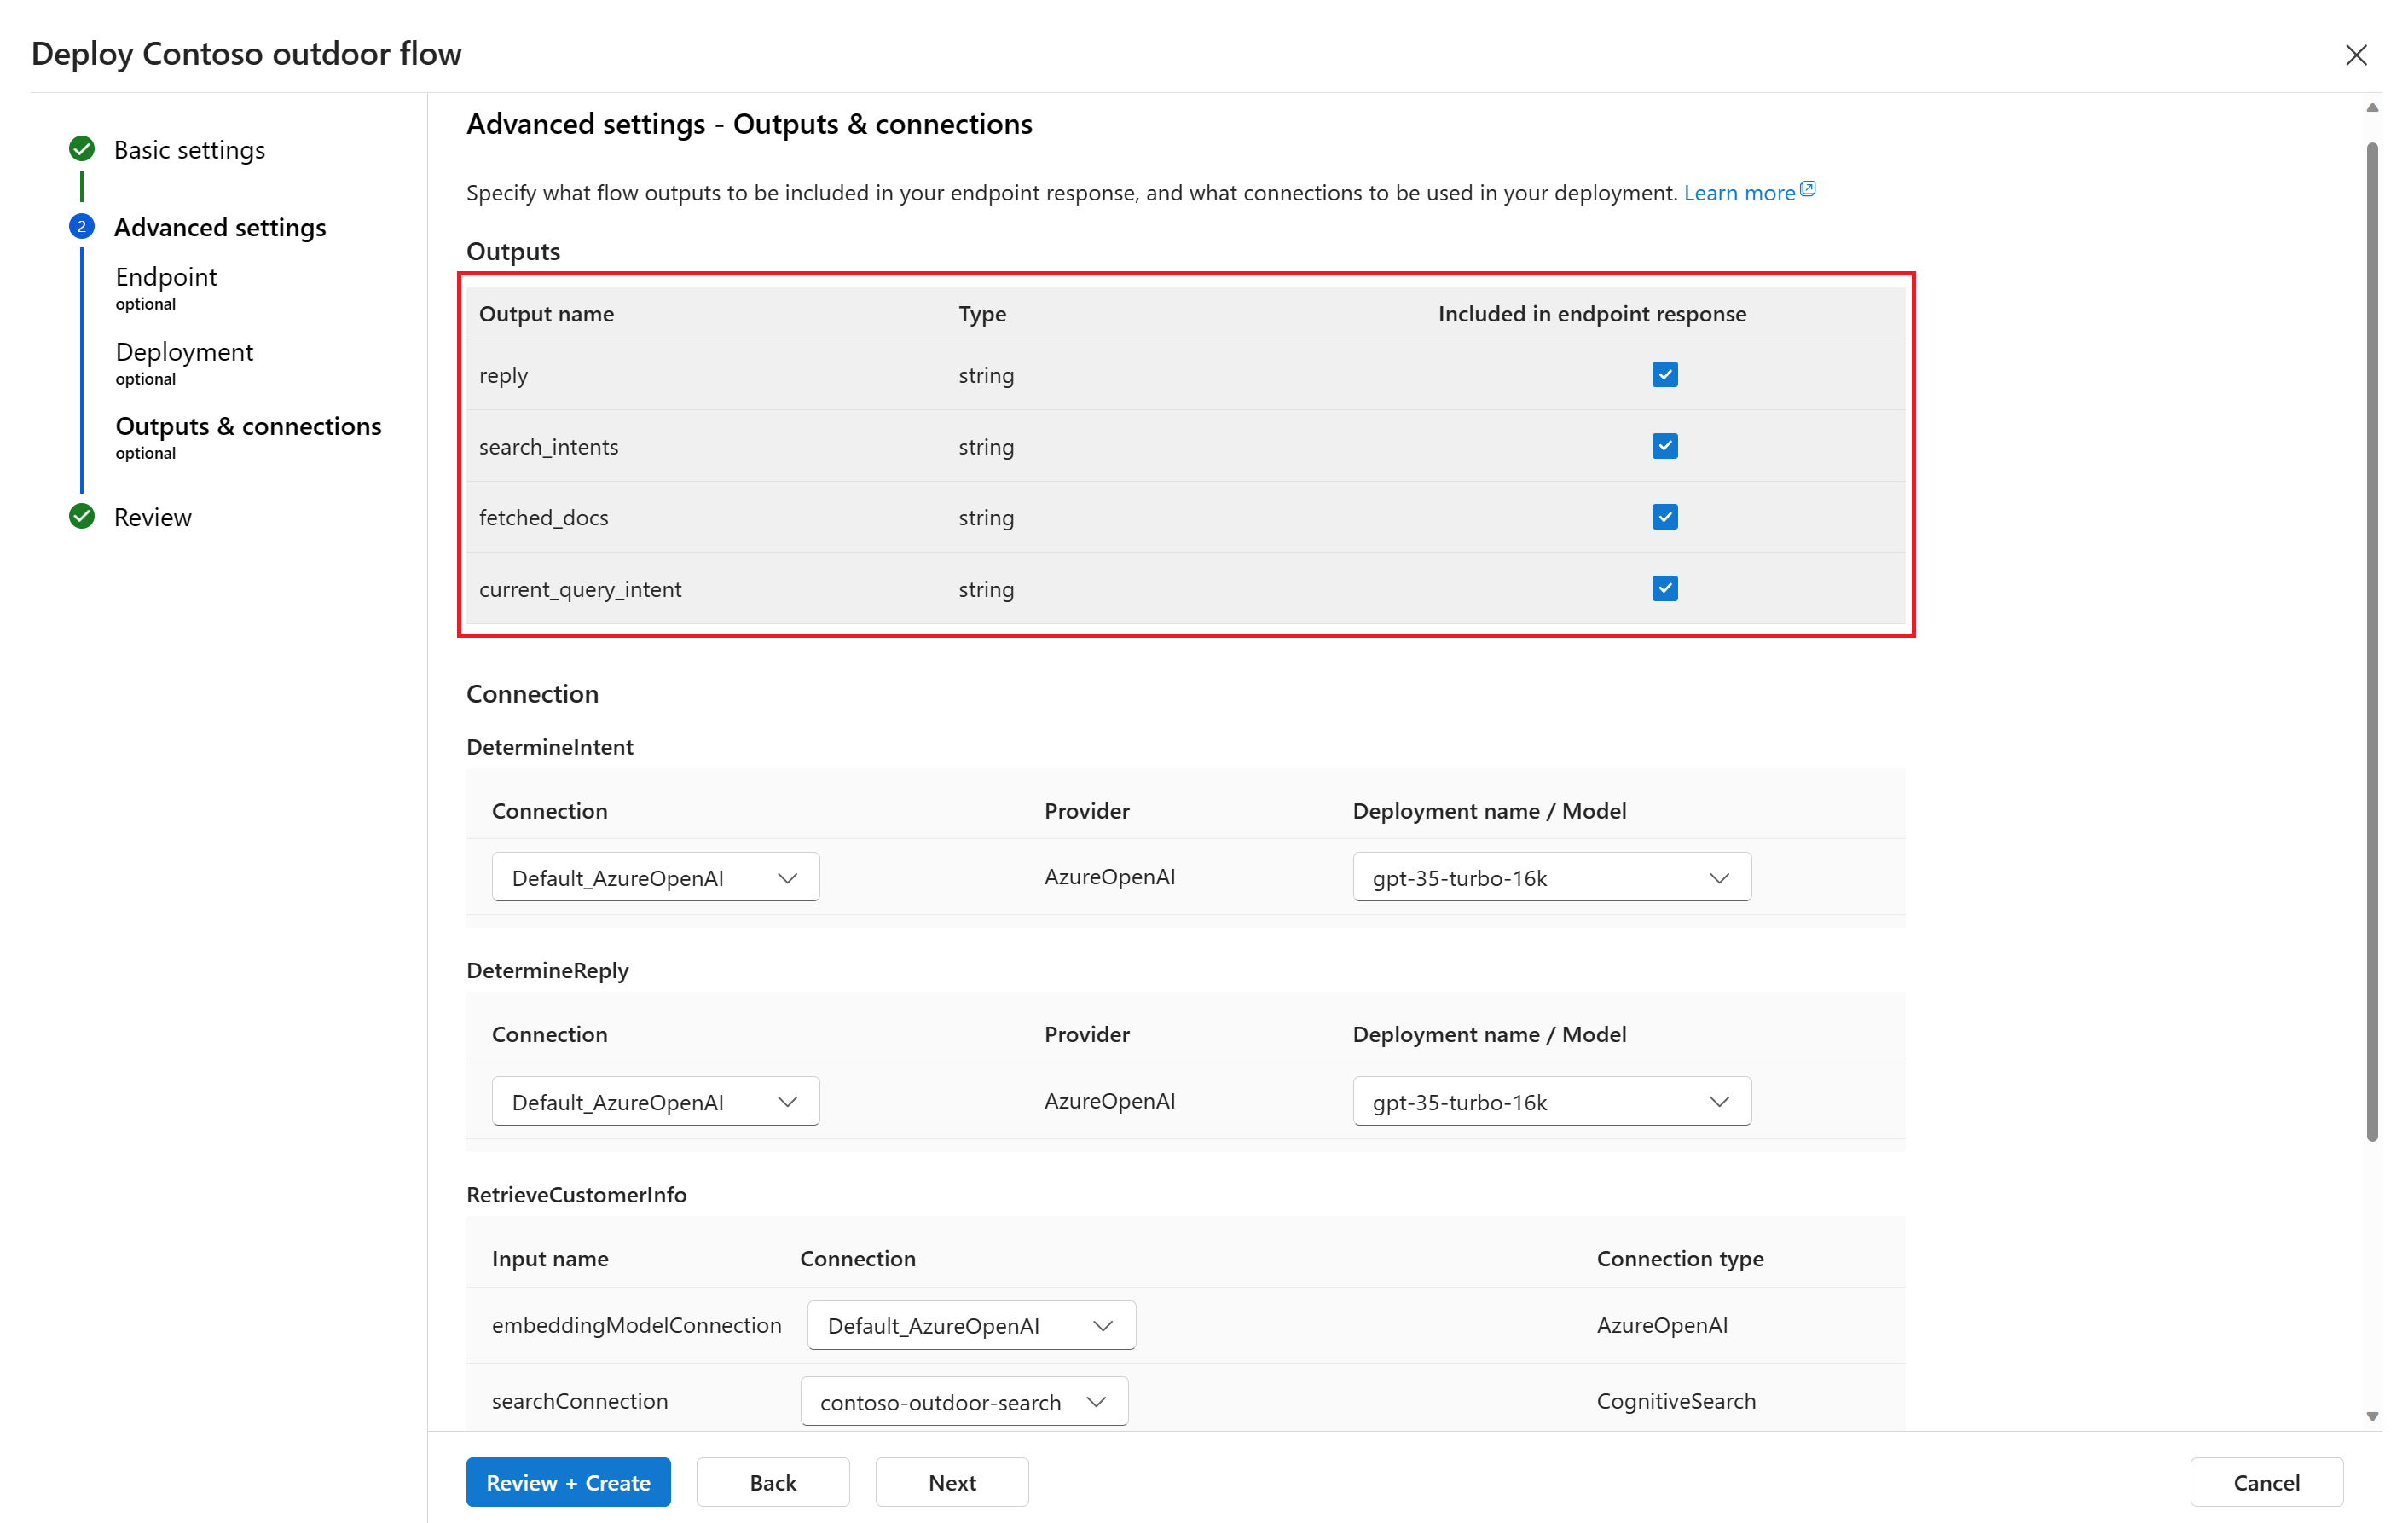
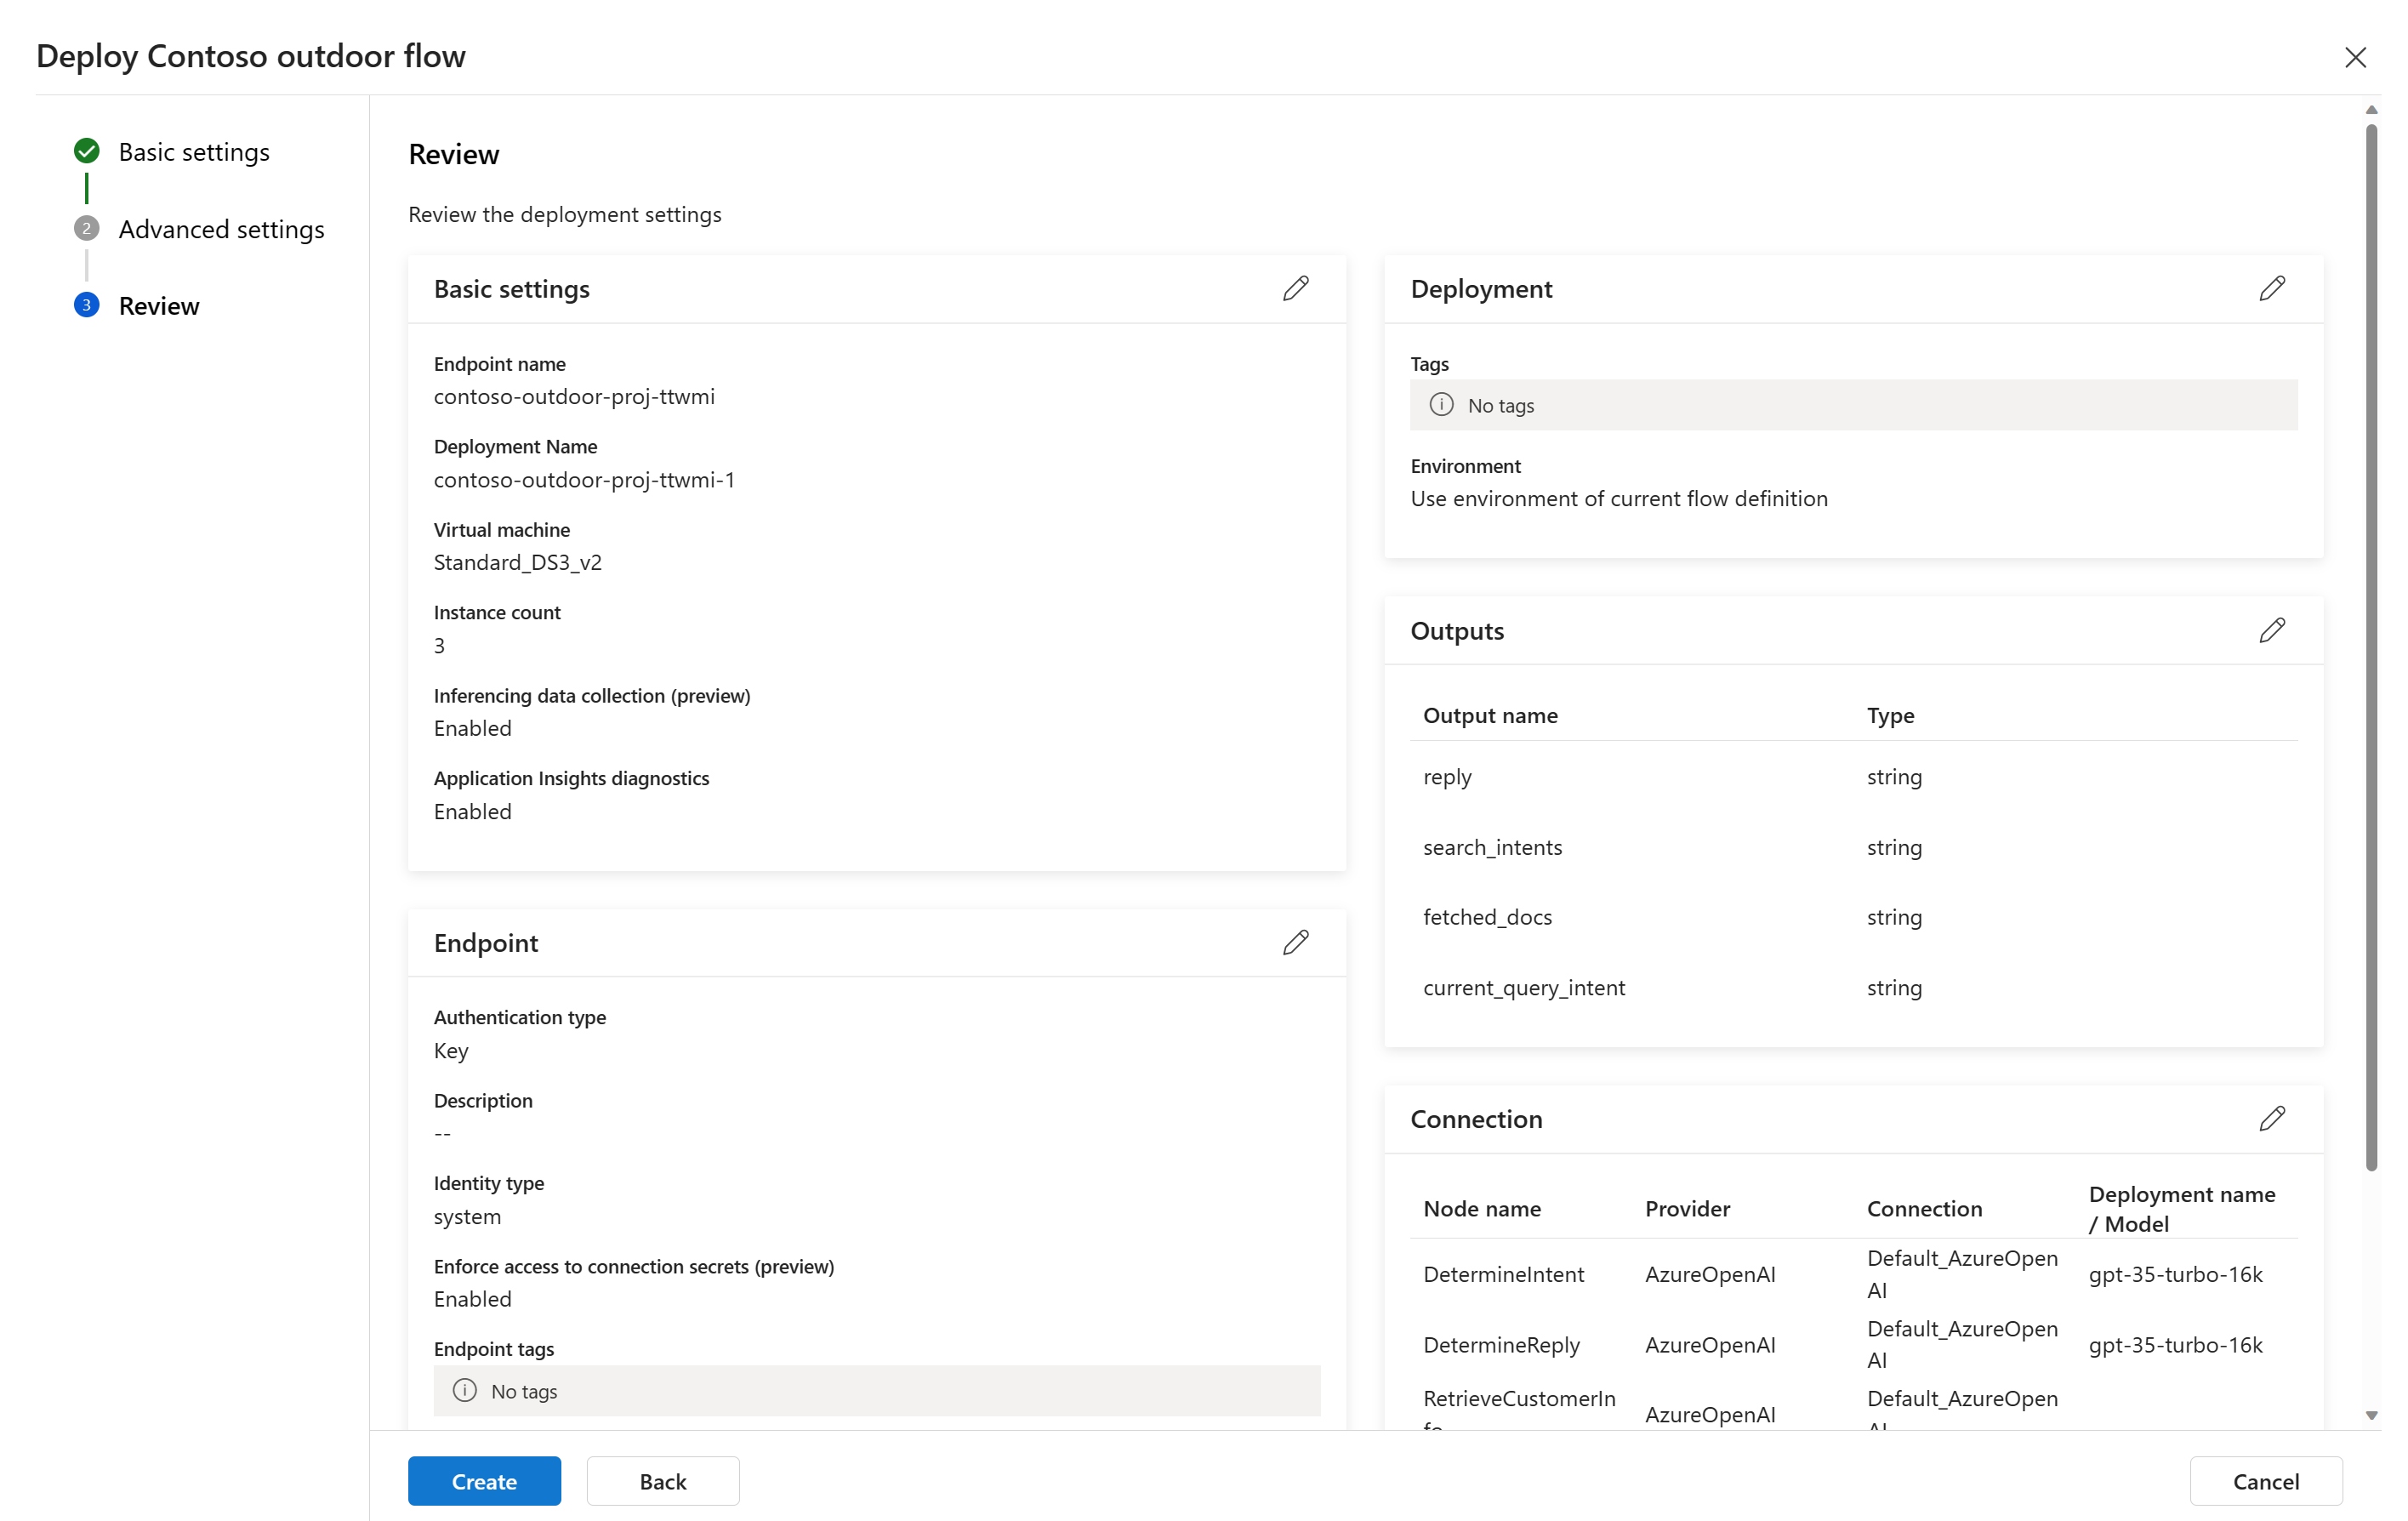
Select Review + Create to review the settings and create the deployment.
Select Create to deploy the prompt flow.


For more information, see how to deploy a flow.
Use the deployed flow
Your copilot application can use the deployed prompt flow to answer questions in real time. You can use the REST endpoint or the SDK to use the deployed flow.
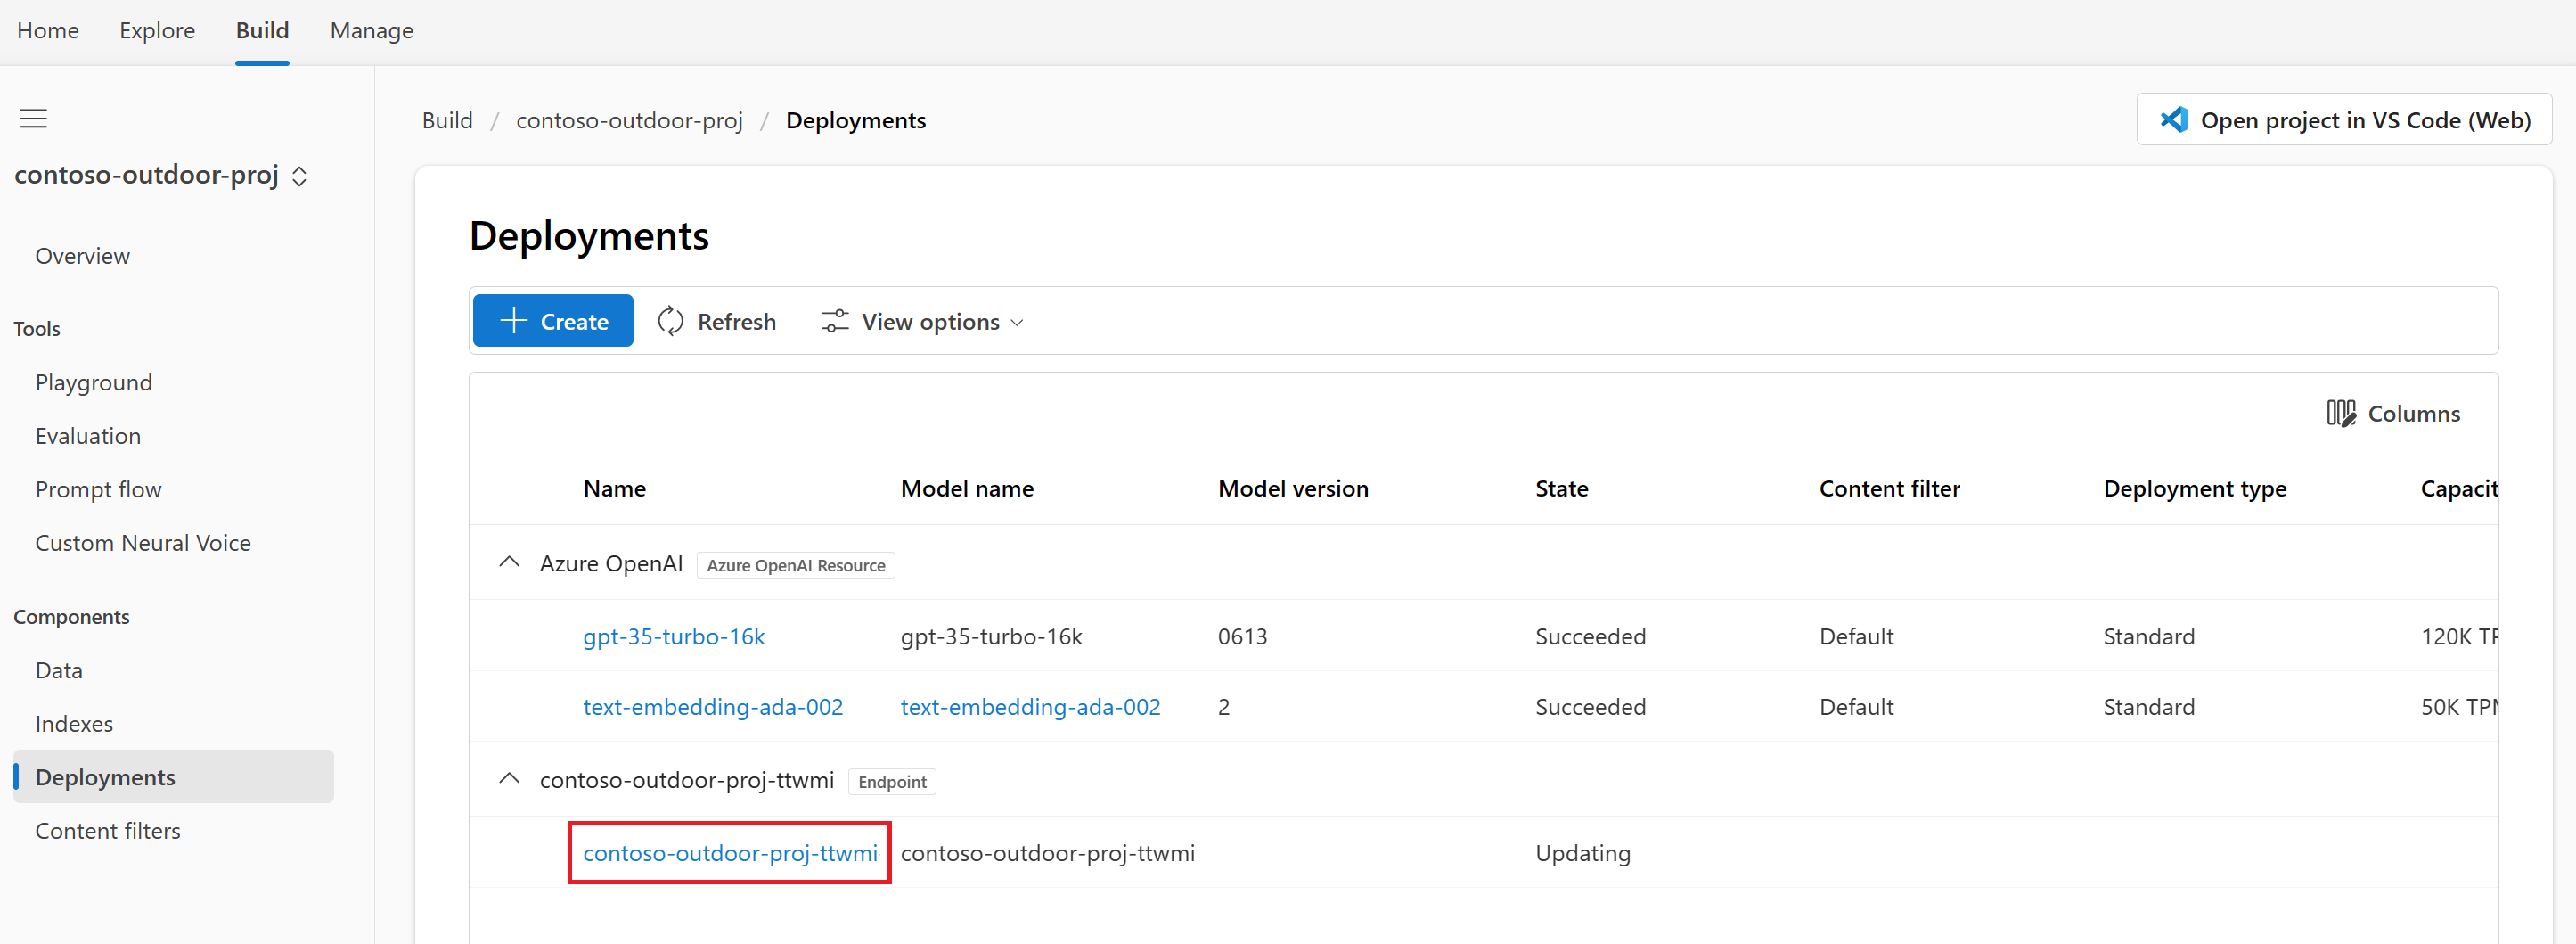
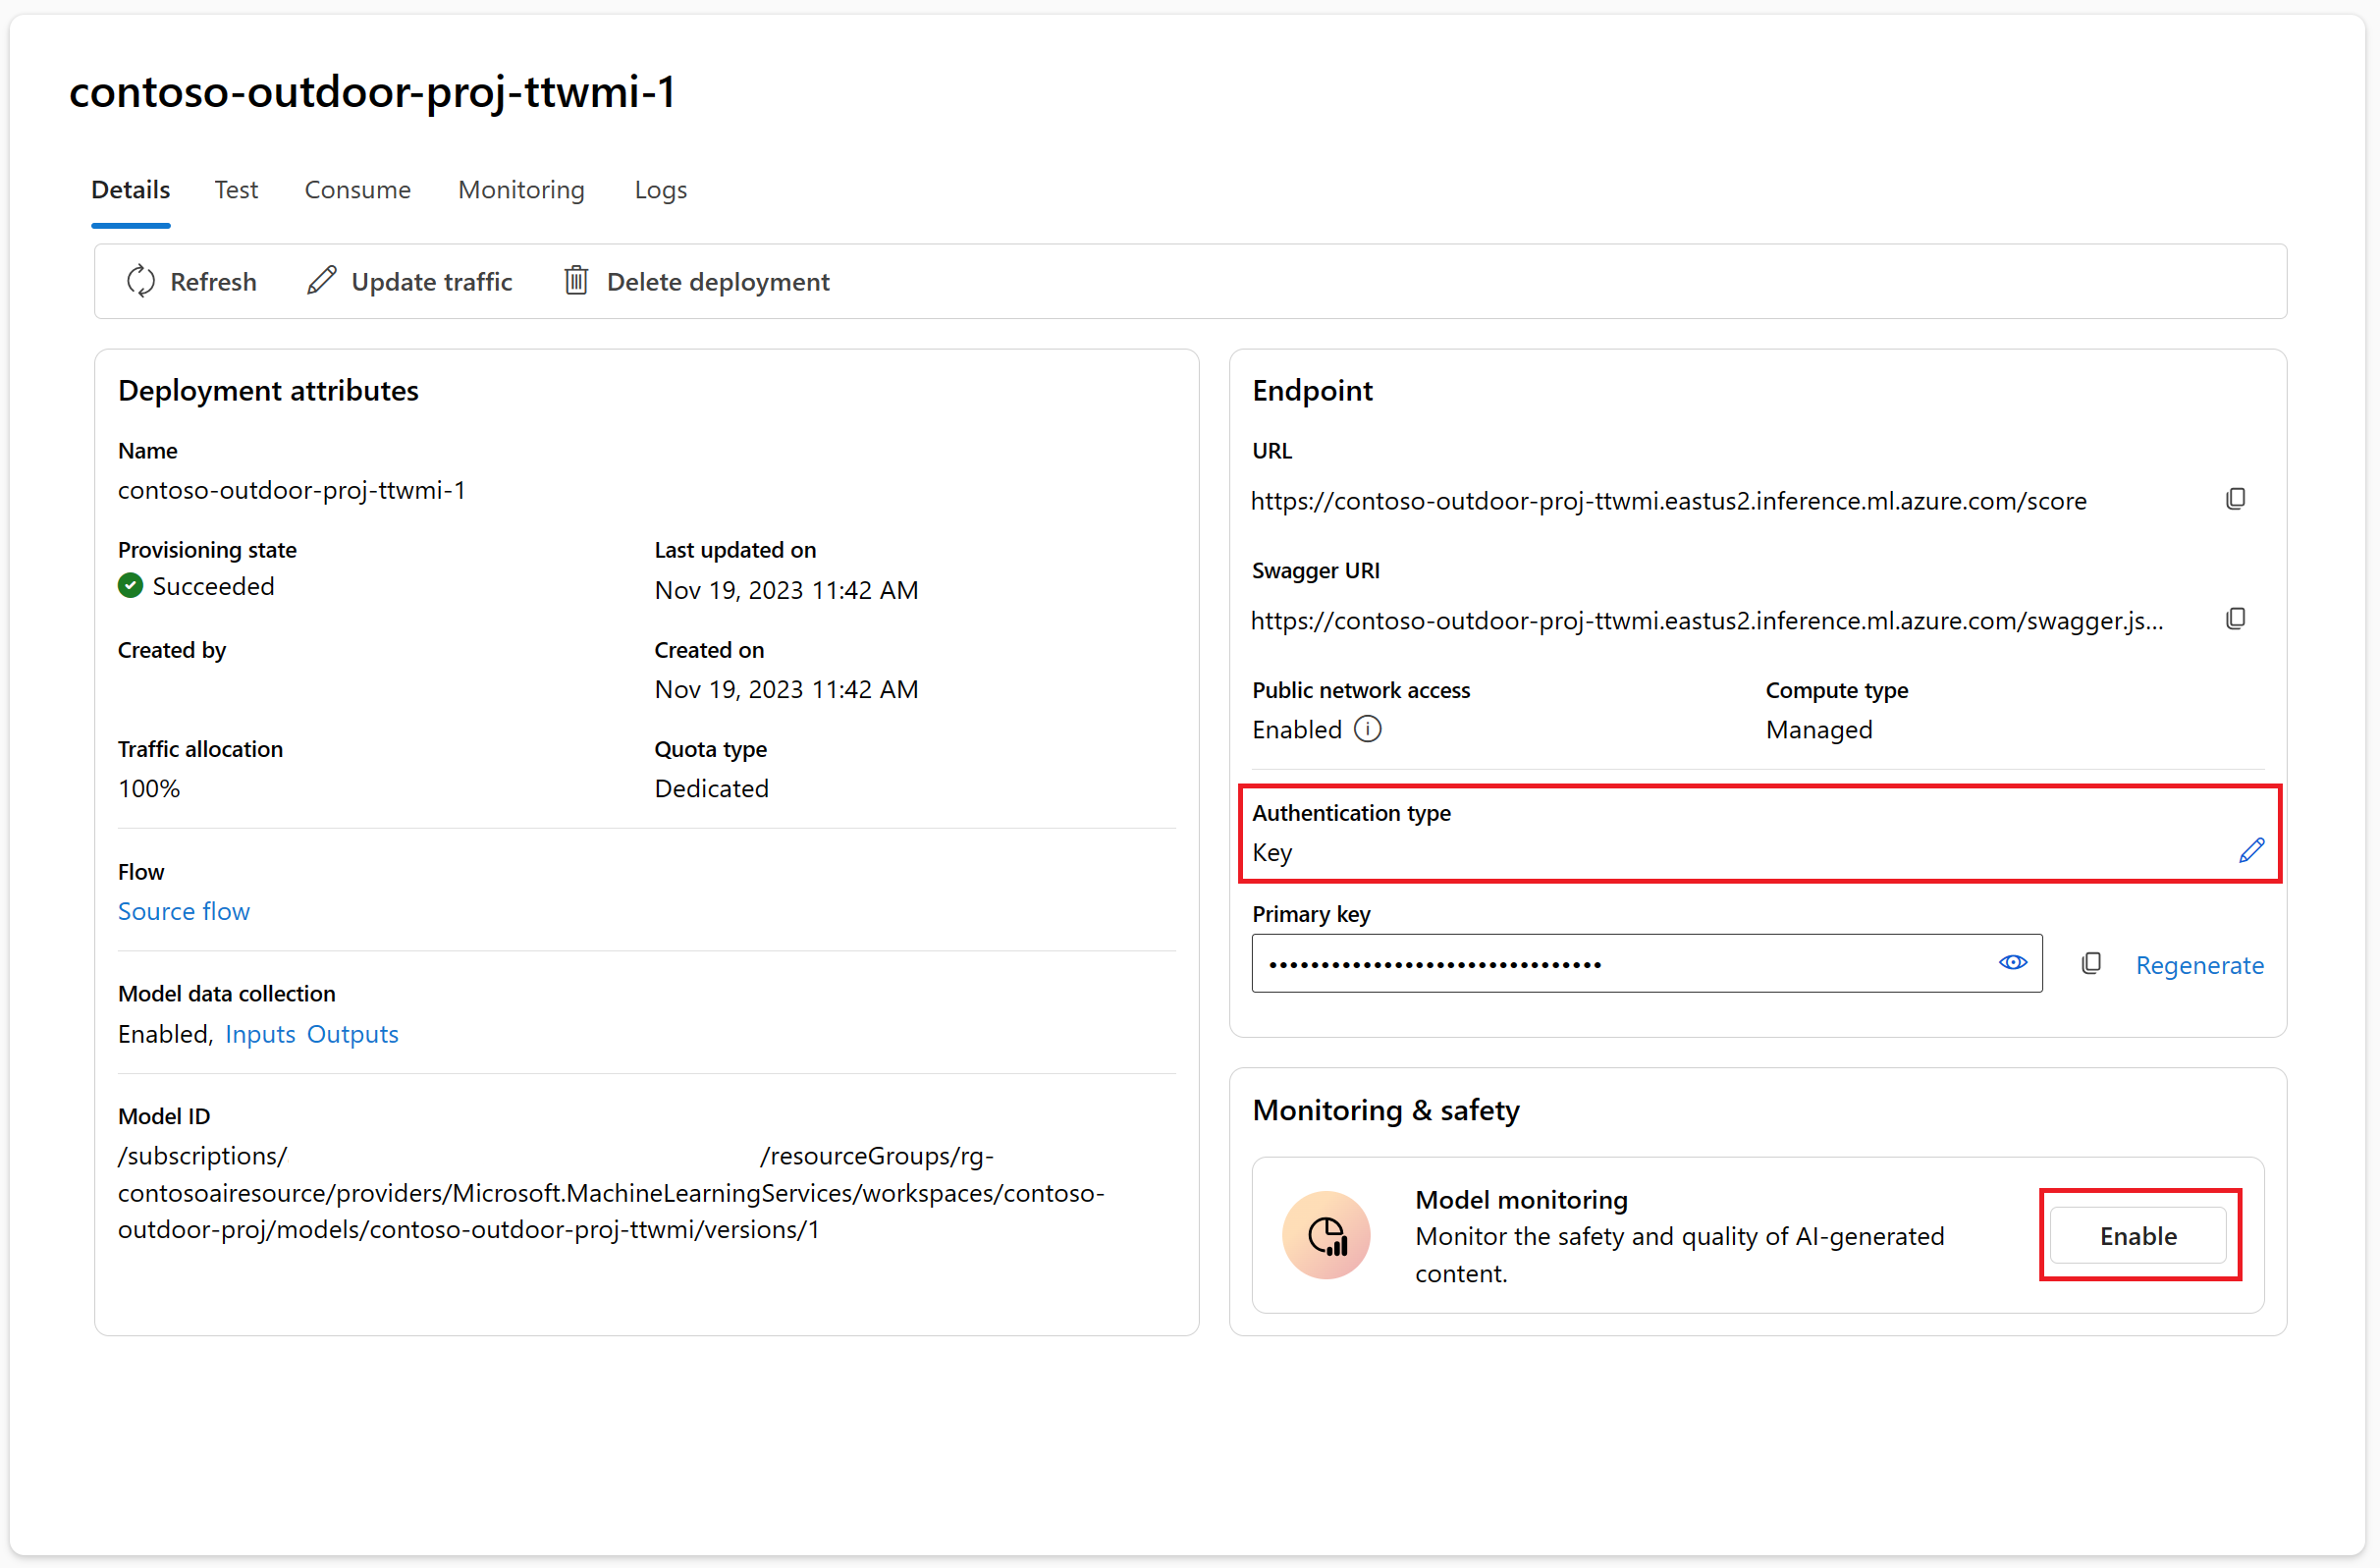
To view the status of your deployment in Azure AI Studio, select Deployments from the left navigation. Once the deployment is created successfully, you can select the deployment to view the details.
Note
If you see a message that says "Currently this endpoint has no deployments" or the State is still Updating, you might need to select Refresh after a couple of minutes to see the deployment.
Optionally, the details page is where you can change the authentication type or enable monitoring.
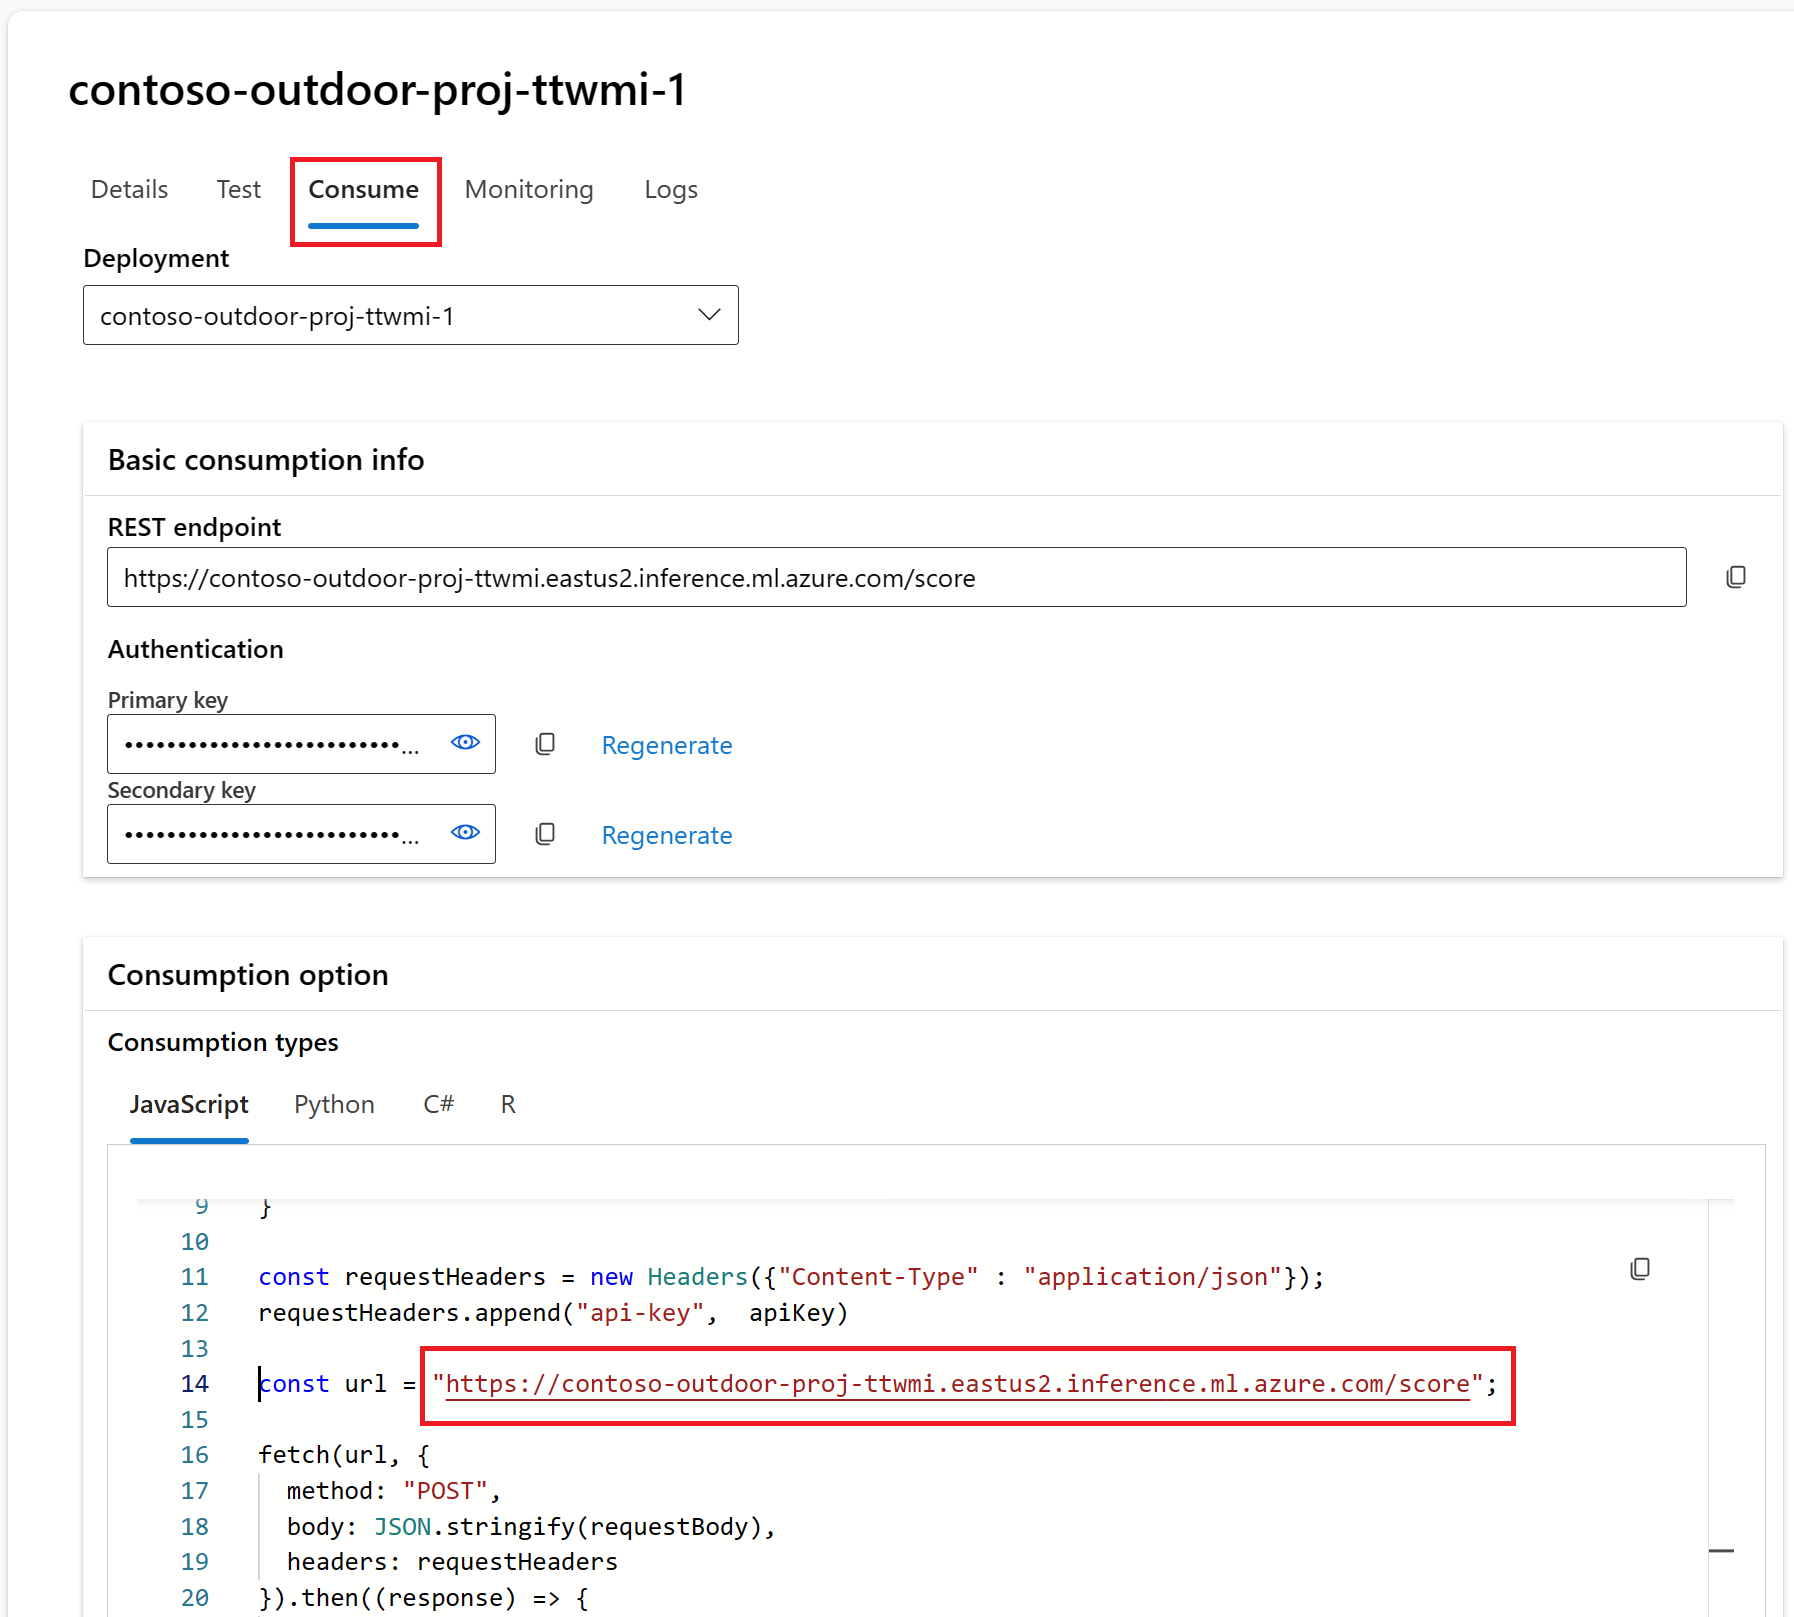
Select the Consume tab. You can see code samples and the REST endpoint for your copilot application to use the deployed flow.


Clean up resources
To avoid incurring unnecessary Azure costs, you should delete the resources you created in this tutorial if they're no longer needed. To manage resources, you can use the Azure portal.
You can also stop or delete your compute instance in Azure AI Studio.
Azure AI Studio enterprise chat solution demo
Learn how to create a retail copilot using your data with Azure AI Studio in this end-to-end walkthrough video.
Next steps
Feedback
Coming soon: Throughout 2024 we will be phasing out GitHub Issues as the feedback mechanism for content and replacing it with a new feedback system. For more information see: https://aka.ms/ContentUserFeedback.
Submit and view feedback for