If provisioning in a subnet that is already delegated to Azure SQL Managed Instance, your user only needs the Microsoft.Sql/managedInstances/write permission assigned at subscription scope.
The latest version of the Az.SQL PowerShell module or the latest version of the Azure CLI.
You can create a deployment of Azure SQL Managed Instance by using the Azure portal, PowerShell, and the Azure CLI.
Consider the following:
You can cancel the provisioning process through Azure portal, or via PowerShell or the Azure CLI or other tooling using the REST API.
Instance deployment delayed if it's impacted by other operations in the same subnet, such as a long-running restore or scaling an instance.
Read permissions for the resource group are required to see the managed instance in your resource group.
Important
Deploying a managed instance is a long-running operation. Deploying the first instance to a subnet typically takes much longer than deploying to a subnet with existing instances.
To create your instance in the Azure portal, you'll first need to sign into the Azure portal, and then fill out the information on the Create Azure SQL Managed Instance page.
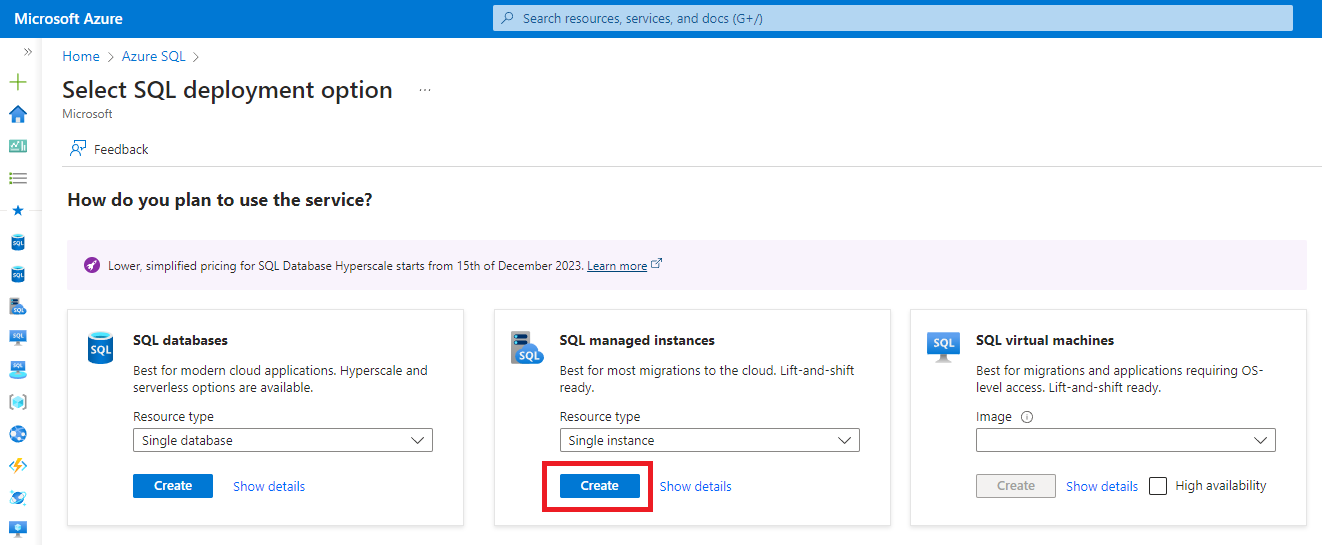
Select Azure SQL on the left menu of the Azure portal. If Azure SQL isn't in the list, select All services, and then enter Azure SQL in the search box.
Select + Create to open the Select SQL deployment option page. You can view additional information about Azure SQL Managed Instance by selecting Show details on the SQL managed instances tile.
Choose Singe instance from the dropdown and then select Create to open the Create Azure SQL Managed Instance page.
Basics tab
Fill out mandatory information required on the Basics tab, which is the minimum requirement to provision a SQL Managed Instance.
The following table provides details for the required information on the Basics tab:
Setting
Suggested value
Description
Subscription
Your subscription.
A subscription that gives you permission to create new resources.
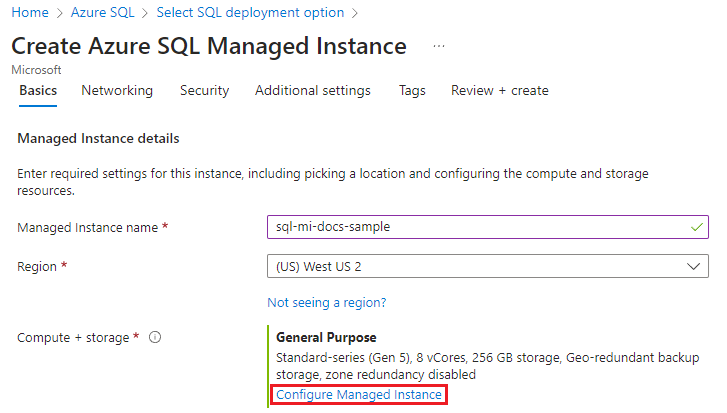
Under Managed Instance details, select Configure Managed Instance in the Compute + storage section to open the Compute + storage page.
The following table provides recommendations for the compute and storage for your sample SQL Managed Instance:
Setting
Suggested value
Description
Service Tier
General Purpose
The General Purpose tier is suitable for most production workloads, and is the default option. The improved Next-gen General Purpose service tier is also a great choice for most workloads. For more information, review resource limits.
Hardware generation
Standard-series (Gen5)
Standard-series (Gen5) is the default hardware generation, which defines compute and memory limits. Standard-series (Gen5) is the default.
vCores
Designate a value.
vCores represent the exact amount of compute resources that are always provisioned for your workload. Eight vCores is the default.
Storage in GB
Designate a value.
Storage size in GB, select based on expected data size.
Storage redundancy inside Azure for backup storage. Geo-redundant backup storage is default and recommended, though Geo-zone, Zone and Local redundancy allow for greater cost flexibility and single region data residency.
Once you've designated your Compute + Storage configuration, use Apply to save your settings, and navigate back to the Create Azure SQL Managed Instance page. Select Next to move to the Networking tab
Networking tab
Fill out optional information on the Networking tab. If you omit this information, the portal will apply default settings.
The following table provides details for information on the Networking tab:
Select Review + create to review your choices before you create a managed instance. Or, configure security settings by selecting Next: Security settings.
Security tab
For the purpose of this quickstart, leave the settings on the Security tab at their default values.
Select Review + create to review your choices before you create a managed instance. Or, configure more custom settings by selecting Next: Additional settings.
Additional settings
Fill out optional information on the Additional settings tab. If you omit this information, the portal applies default settings.
The following table provides details for information on the Additional settings tab:
Setting
Suggested value
Description
Collation
Choose the collation that you want to use for your managed instance. If you migrate databases from SQL Server, check the source collation by using SELECT SERVERPROPERTY(N'Collation') and use that value.
Only enable this option if you plan to use the managed instance as a failover group secondary.
Maintenance window
Choose a suitable maintenance window.
Designate a[schedule for when your instance is maintained by the service.
Select Review + create to review your choices before you create a managed instance. Or, configure Azure Tags by selecting Next: Tags (recommended).
Tags
Add tags to resources in your Azure Resource Manager template (ARM template). Tags help you logically organize your resources. The tag values show up in cost reports and allow for other management activities by tag. Consider at least tagging your new SQL Managed Instance with the Owner tag to identify who created, and the Environment tag to identify whether this system is Production, Development, etc. For more information, see Develop your naming and tagging strategy for Azure resources.
Select Review + create to proceed.
Review + create
On the Review + create tab, review your choices, and then select Create to deploy your managed instance.
Monitor deployment progress
Select the Notifications icon to view the status of the deployment.
Select Deployment in progress in the notification to open the SQL Managed Instance window and further monitor the deployment progress.
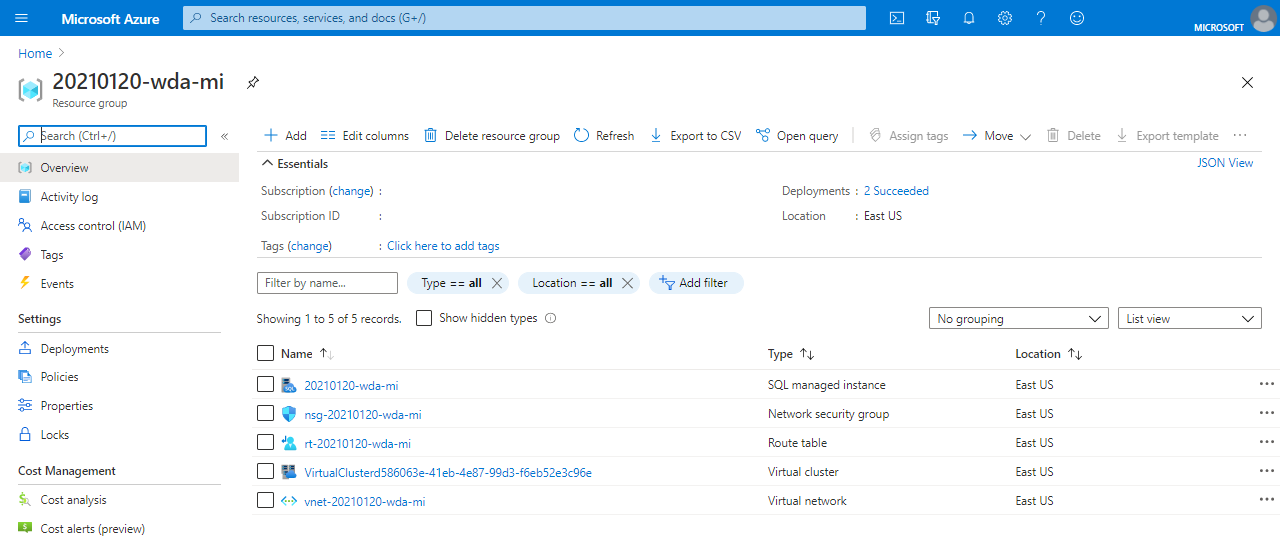
Once deployment completes, navigate to your resource group to view your managed instance:
Tip
If you closed your web browser or moved away from the deployment progress screen, you can monitor the provisioning operation via the managed instance's Overview page in the Azure portal, PowerShell or the Azure CLI.
$NSnetworkModels = "Microsoft.Azure.Commands.Network.Models"
$NScollections = "System.Collections.Generic"

# The SubscriptionId in which to create these objects
$SubscriptionId = '<Enter subscription ID>'
# Set the resource group name and location for your managed instance
$resourceGroupName = "myResourceGroup-$(Get-Random)"
$location = "eastus2"
# Set the networking values for your managed instance
$vNetName = "myVnet-$(Get-Random)"
$vNetAddressPrefix = "10.0.0.0/16"
$defaultSubnetName = "myDefaultSubnet-$(Get-Random)"
$defaultSubnetAddressPrefix = "10.0.0.0/24"
$miSubnetName = "MISubnet-$(Get-Random)"
$miSubnetAddressPrefix = "10.0.0.0/24"
#Set the managed instance name for the new managed instance
$instanceName = "mi-name-$(Get-Random)"
# Set the admin login and password for your managed instance
$miAdminSqlLogin = "SqlAdmin"
$miAdminSqlPassword = "ChangeThisPassword!!"
# Set the managed instance service tier, compute level, and license mode
$edition = "General Purpose"
$vCores = 8
$maxStorage = 256
$computeGeneration = "Gen5"
$license = "LicenseIncluded" #"BasePrice" or LicenseIncluded if you have don't have SQL Server licence that can be used for AHB discount
$dbname = 'SampleDB'
Next, create your resource group:
# Set subscription context
Connect-AzAccount
$subscriptionContextParams = @{
    SubscriptionId = $SubscriptionId
}
Set-AzContext @subscriptionContextParams

# Create a resource group
$resourceGroupParams = @{
    Name = $resourceGroupName
    Location = $location
    Tag = @{Owner="SQLDB-Samples"}
}
$resourceGroup = New-AzResourceGroup @resourceGroupParams
# This step will take awhile to complete. You can monitor deployment progress in the activity log within the Azure portal.
echo "Creating $instance with $vNet and $subnet..."
az sql mi create --admin-password $password --admin-user $login --name $instance --resource-group $resourceGroup --subnet $subnet --vnet-name $vNet --location "$location"
Review network settings
Select the Route table resource in your resource group to review the default user-defined route table object and entries to route traffic from, and within, the SQL Managed Instance virtual network. To change or add routes, open the Routes in the Route table settings.
Select the Network security group object to review the inbound and outbound security rules. To change or add rules, open the Inbound Security Rules and Outbound security rules in the Network security group settings.
Important
If you enabled public endpoint for SQL Managed Instance, open ports to allow network traffic connections to SQL Managed Instance from the public internet.
Create database
You can create a new database by using the Azure portal, PowerShell, or the Azure CLI.
Retrieve connection details to SQL Managed Instance
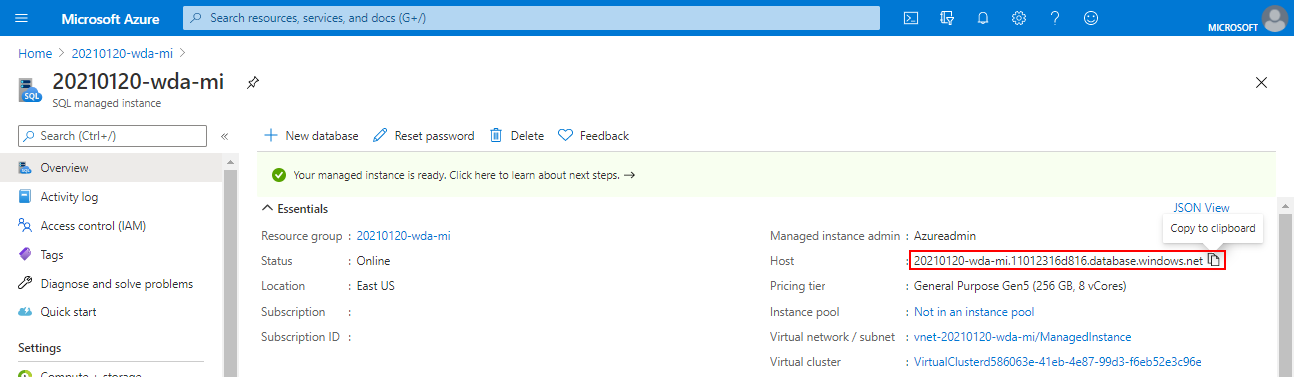
To connect to SQL Managed Instance, follow these steps to retrieve the host name and fully qualified domain name (FQDN):
Return to the resource group and select the SQL managed instance object that was created.
On the Overview tab, locate the Host property. Copy the host name to your clipboard for the managed instance for use in the next quickstart by clicking the Copy to clipboard button.
The value copied represents a fully qualified domain name (FQDN) that can be used to connect to SQL Managed Instance. It's similar to the following address example: your_host_name.a1b2c3d4e5f6.database.windows.net.
Administer an SQL Server database infrastructure for cloud, on-premises and hybrid relational databases using the Microsoft PaaS relational database offerings.
Learn how to create instance pools for Azure SQL Managed Instance, a feature that lets you share resources for multiple instances, and provides a convenient and cost-efficient way to migrate smaller SQL Server databases to the cloud at scale. Create your instance pool by using the Azure portal, PowerShell, or the Azure CLI.