This article describes how to build your first bot with the Bot Framework SDK for C#, Java, JavaScript or Python, and how to test your bot with the Bot Framework Emulator.
Creating your first bot doesn't require an Azure subscription or an Azure AI Bot Service resource. This quickstart focuses on creating your first bot locally. If you'd like to learn how to create a bot in Azure, see Create an Azure Bot resource.
Note
The Bot Framework JavaScript, C#, and Python SDKs will continue to be supported, however, the Java SDK is being retired with final long-term support ending in November 2023.
Existing bots built with the Java SDK will continue to function.
.NET Core Templates will help you to quickly build new conversational AI bots using Bot Framework v4.
As of May 2020, these templates and the code they generate require .NET Core 3.1 or later.
You can use this command to determine which versions of the .NET Core command-line interface are installed.
dotnet --version
Install the three Bot Framework C# templates: the echo, core, and empty bot templates.
dotnet new -i Microsoft.Bot.Framework.CSharp.EchoBot
dotnet new -i Microsoft.Bot.Framework.CSharp.CoreBot
dotnet new -i Microsoft.Bot.Framework.CSharp.EmptyBot
Verify the templates have been installed correctly.
dotnet new --list
Note
The steps above install all three Bot Framework templates. You don't need to install all the templates and can install just the ones you'll use. This article makes use of the echo bot template.
Use the Yeoman generator to quickly create a conversational AI bot using core AI capabilities in the Bot Framework v4. For more information, see yeoman.io.
The generator supports three different template options as shown below.
Template
Description
Echo Bot
A good template if you want a little more than "Hello World!", but not much more. This template handles the very basics of sending messages to a bot, and having the bot process the messages by repeating them back to the user. This template produces a bot that simply "echoes" back to the user anything the user says to the bot.
Empty Bot
A good template if you're familiar with Bot Framework v4, and simply want a basic skeleton project. Also a good option if you want to take sample code from the documentation and paste it into a minimal bot in order to learn.
Core Bot
A good template if you want to create advanced bots, as it uses multi-turn dialogs and Azure AI LUIS to implement language understanding. This template creates a bot that can extract places and dates to book a flight.
Conversational language understanding (CLU), a feature of Azure AI Language, is the updated version of LUIS.
For more information about language understanding support in the Bot Framework SDK, see Natural language understanding.
Install Yeoman
Assure that you have installed node.js version 12.10 or later.
Knowledge of restify and asynchronous programming in JavaScript
Visual Studio Code or your favorite IDE, if you want to edit the bot code.
JavaScript and TypeScript templates
To install Yeoman and the Yeoman generator for Bot Framework v4:
Open a terminal or elevated command prompt.
Switch to the directory for your JavaScript bots. Create it first if you don't already have one.
mkdir myJsBots
cd myJsBots
Make sure you have the latest versions of npm and Yeoman.
npm install -g npm
npm install -g yo
Install the Yeoman generator.
Yeoman is a tool for creating applications. For more information, see yeoman.io.
npm install -g generator-botbuilder
Note
The install of Windows build tools listed below is only required if you use Windows as your development operating system.
For some installations, the install step for restify is giving an error related to node-gyp.
If this is the case you can try running this command with elevated permissions.
This call may also hang without exiting if Python is already installed on your system:
A virtual environment is a combination of a specific Python interpreter and libraries that are different from your global settings. The virtual environment is specific to a project and is maintained in the project folder. A benefit to using a virtual environment is that as you develop a project over time, the virtual environment always reflects the project's exact dependencies. To learn more about virtual environments, see Creation of virtual environments.
Navigate to the directory where you want to create your bot. Then run the following commands for your preferred platform. After you activate your virtual environment, your command line/terminal should be prefaced with (venv). This lets you know that the virtual environment is active. You can deactivate your virtual environment at any time by typing: deactivate.
macOS/Linux
python3 -m venv venv
source venv/bin/activate
Windows
python -m venv venv
venv\Scripts\activate.bat
Python templates
Install the necessary packages by running the following pip install commands:
In Visual Studio, create a new bot project and use the Echo Bot (Bot Framework v4 - .NET Core 3.1) template. To see only bot templates, choose the AI Bots project type.
In Visual Studio Code, open a new terminal window.
Go to the directory in which you want to create your bot project.
Create a new echo bot project using the following command. Replace <your-bot-name> with the name to use for your bot project.
dotnet new echobot -n <your-bot-name>
Open a new terminal window.
Go to the directory in which you want to create your bot project.
Create a new echo bot project using the following command. Replace <your-bot-name> with the name to use for your bot project.
dotnet new echobot -n <your-bot-name>
Thanks to the template, your project contains all the necessary code to create the bot in this quickstart. You don't need any more code to test your bot.
Run the following command to create an echo bot from templates. The command uses default options for its parameters.
yo botbuilder-java -T "echo"
Yeoman prompts you for some information with which to create your bot. For this tutorial, use the default values.
? What's the name of your bot? (echo)
? What's the fully qualified package name of your bot? (com.mycompany.echo)
? Which template would you like to start with? (Use arrow keys) Select "Echo Bot"
? Looking good.  Shall I go ahead and create your new bot? (Y/n) Enter "y"
The generator supports many command-line options you can use to change the generator's defaults or to pre-seed a prompt. The options are case-sensitive.
Command-line option
Description
--help, -h
List help text for all supported command-line options
--botName, -N
The name given to the bot project
--packageName, -P
The Java package name to use for the bot
--template, -T
The template used to generate the project. Options are echo, empty, core. For more information about the different templates, see the GitHub repository for your language, C#, JavaScript, Python, or Java.
--noprompt
The generator won't prompt for confirmation before creating a new bot. Any requirement options not passed on the command line will use a reasonable default value. This option is intended to enable automated bot generation for testing purposes.
Thanks to the template, your project contains all the code that's necessary to create the bot in this quickstart. You don't need any other code to test your bot.
Yeoman prompts you for some information with which to create your bot. For this tutorial, use the default values.
? What's the name of your bot? my-chat-bot
? What will your bot do? Demonstrate the core capabilities of the Microsoft Bot Framework
? What programming language do you want to use? JavaScript
? Which template would you like to start with? Echo Bot - https://aka.ms/bot-template-echo
? Looking good.  Shall I go ahead and create your new bot? Yes
Thanks to the template, your project contains all the code that's necessary to create the bot in this quickstart. You don't need any other code to test your bot.
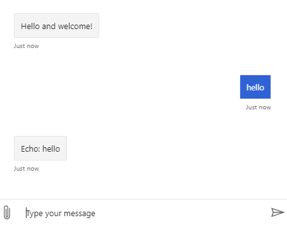
Enter your bot's URL, which is your local host and port, with /api/messages added to the path. The address is usually: http://localhost:3978/api/messages.
Then select Connect.
Send a message to your bot, and the bot will respond back.
A bot, commonly called a chat bot, uses a conversational interface that users can interact with by sending and receiving messages that contain text or interactive cards. Bots are highly flexible and can be used in many ways, such as sending messages proactively, carrying out actions when instructed to, and performing multiple-step workflows. Bots can also be used in many Microsoft Teams contexts, as a personal bot, in a one-to-one or group chat, in Teams channel conversations, or in Teams meeting chats.