Training
Module
Move large amounts of data to the cloud by using Azure Data Box family - Training
Learn how to move large amounts of data to the cloud by using Azure Data Box devices.
This browser is no longer supported.
Upgrade to Microsoft Edge to take advantage of the latest features, security updates, and technical support.
This tutorial describes how to return Azure Data Box and verify the data uploaded to Azure.
In this tutorial, you will learn about topics such as:
Before you begin, make sure:
Based on the region where you're shipping the device, the procedure is different. In many countries/regions, you can use Microsoft managed shipping or self-managed shipping.
If using Microsoft managed shipping, follow these steps.
Take the following steps if returning the device in US or Canada.
If you receive the device packaged in a box, retain the box, and DO NOT discard it.
If using Microsoft managed shipping, follow these steps.
Take the following steps if you're returning the device in Europe.
Make sure that the device is powered off and cables are removed.
Spool and securely place the power cord that was provided with device in the back of the device.
Ensure that the shipping label is displayed on the E-ink display and schedule a pickup with your carrier. If the label is damaged or lost or not displayed on the E-ink display, contact Microsoft Support. If Support suggests, then you can go to Overview > Download shipping label in the Azure portal. Download the shipping label and affix on the device.
If you're shipping back to Azure datacenters in Germany or Switzerland, the Azure datacenter requires advance notice of all device returns:
Email Azure Data Box Operations at adbops@microsoft.com to receive an Inbound ID. Send email to adbops@microsoft.com. Use the following template.
To: adbops@microsoft.com
Subject: Request for Azure Data Box Inbound ID: <orderName>
Body:

I am ready to return an Azure Data Box and would like to request an Inbound ID for the following order:

Order Name: <orderName>
Return Tracking Number: <returnTracking#>
Write down the Inbound ID number provided by Azure Data Box Operations, and paste it onto the unit, where it is clearly visible, near the return label.
Schedule a pickup with UPS if returning the device. To schedule a pickup:
Instead of scheduling the pickup, you can also drop off the Data Box at the nearest drop-off location.
Once the Data Box is picked up and scanned by your carrier, the order status in the portal updates to Picked up. A tracking ID is also displayed.
If you're shipping back to Azure datacenters in Germany or Switzerland, you can also use self-managed shipping.
If using Microsoft managed shipping, follow these steps.
Take the following steps if you're returning the device in Japan.
Keep the original box used to ship the device for return shipment.
Power off the device and remove the cables.
Spool and securely place the power cord that was provided with the device in the back of the device.
Write your company name and address information on the consignment note as your sender information.
Email Quantium Solutions using the following email template.
To: azure.qsjp@quantiumsolutions.com
Subject: Pickup request for Azure Data Box|Job name:
Body:
- Japan Post Yu-Pack tracking number (reference number):
- Requested pickup date:mmdd (Select a requested time slot from below).
a. 08:00-13:00
b. 13:00-15:00
c. 15:00-17:00
d. 17:00-19:00
Receive an email confirmation from Quantium Solutions after you've booked a pickup. The email confirmation also includes information on the Chakubarai consignment note.
If needed, you can contact Quantium Solutions Support (Japanese language) at the following information:
If using Microsoft managed shipping, follow these steps.
Azure datacenters in Australia have an additional security notification. All the inbound shipments must have an advanced notification. Take the following steps to ship in Australia.
Keep the original box used to ship the device for return shipment.
Make sure that the data copy to device is complete and Prepare to ship run is successful.
Power off the device and remove the cables.
Spool and securely place the power cord that was provided with the device in the back of the device.
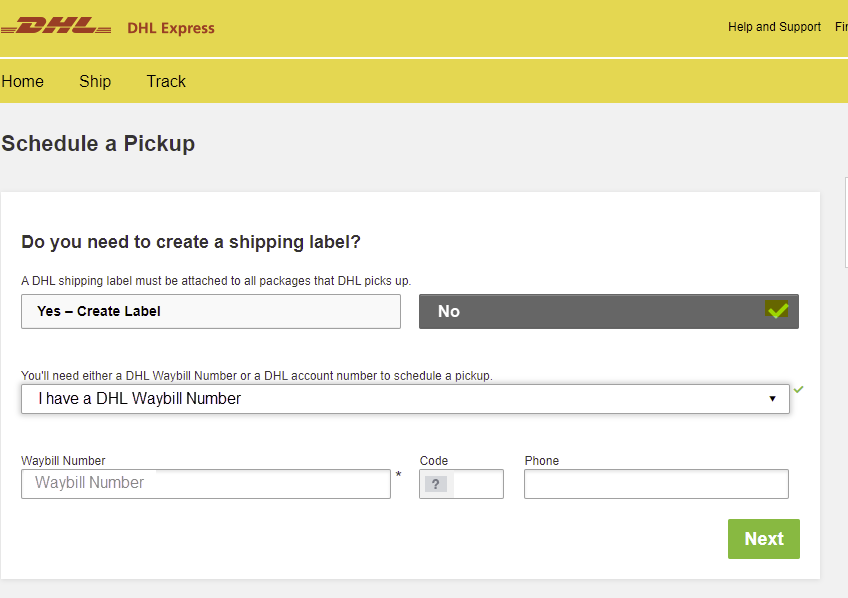
Book a pickup online by going to DHL Express Australia and selecting Schedule a Pickup.
If using Microsoft managed shipping, follow these steps.
Take the following steps if you're returning the device in South Africa.
Pack the device for return shipment in the original box.
Spool and securely place the power cord that was provided with the device in the back of the device.
Note the tracking number (shown as reference number on the Prepare to Ship page of the Data Box local web UI). The tracking number is available after the "Prepare to ship" step completes successfully. Download the shipping label from this page, and paste it on the packing box.
Request a return code from Azure Data Box Operations. A return code is required for delivering the package back to the datacenter. Send email to adbops@microsoft.com. Note this code on the shipping label next to the return address, where it is clearly visible.
Book a pickup with DHL using one of the following methods:
Book a pickup online by going to DHL Express South Africa and selecting Schedule a Pickup.
On the DHL website, select No to create a shipping label. Enter the DHL Waybill number generated when completing Prepare to ship process.

Send an email to Priority.Support@dhl.com using the following template:
To: Priority.Support@dhl.com
Subject: Pickup request for Microsoft Azure
Body: Need pick up for the below shipment
  *  DHL tracking number: (reference number/waybill number)
  *  Requested pickup date: yyyy/mm/dd;time:HH MM
  *  Shipper contact: (company name)
  *  Contact person:
  *  Phone number:
  *  Full physical address:
  *  Item to be collected: Azure Dt
Or drop off the package at the nearest DHL service point.
If you come across any issues, email Priority.Support@dhl.com with details of the issue(s), and put the waybill number in the Subject: line. You can also call +27(0)119213902.
Self-managed shipping is available as an option when you Order Azure Data Box. For detailed steps, see Use self-managed shipping.
Self-managed shipping is only available in the following regions:
| Region | Region | Region | Region | Region |
|---|---|---|---|---|
| US Government | United States | United Kingdom | Western Europe | Japan |
| Singapore | South Korea | India | South Africa | Australia |
| Brazil | Norway |
If you selected self-managed shipping when you created your order, follow these instructions (except for Brazil).
Write down the Authorization code that's shown on the Prepare to Ship page of the local web UI for the Data Box after the step completes successfully.
Power off the device and remove the cables. Spool and securely place the power cord that was provided with the device at the back of the device.
When you're ready to return the device, send an email to the Azure Data Box Operations team using the template below.
To: adbops@microsoft.com
Subject: Request for Azure Data Box drop-off for order: 'orderName'
Body:
    1. Order name
    2. Authorization code available after Prepare to Ship has completed [Yes/No]
    3. Contact name of the person dropping off. You will need to display a government-approved
    ID during the drop off.
To schedule a device return in Brazil, send an email to adbops@microsoft.com with the following information:
Subject: Request Azure Data Box Disk drop-off for order: <ordername>

- Order name
- Contact name of the person who will drop off the Data Box Disk (A government-issued photo ID will be required to validate the contact’s identity upon arrival.)
- Inbound Nota Fiscal (A copy of the inbound Nota Fiscal will be required at drop-off.)
When the Data Box device is connected to the Azure datacenter network, the data upload to Azure starts automatically.
Azure Data Box service notifies you that the data copy is complete via the Azure portal.
Once the upload to Azure is complete, the Data Box erases the data on its disks as per the NIST SP 800-88 Revision 1 guidelines.
When Microsoft receives and scans the device, order status is updated to Received. The device then undergoes physical verification for damage or signs of tampering.
After the verification is complete, the Data Box is connected to the network in the Azure datacenter. The data copy starts automatically. Depending upon the data size, the copy operation can take between a few hours to a few days to complete. You can monitor the copy job progress in the portal.
When files fail to upload due to a nonretryable error, you're notified to review the errors before proceeding. The errors are listed in the data copy log.
You can't fix these errors. The upload has completed with errors. The notification lets you know about any configuration issues you need to fix before you try another upload via network transfer or a new import order. For guidance, see Review copy errors in uploads from Azure Data Box and Azure Data Box Heavy devices.
When you confirm that you've reviewed the errors and are ready to proceed, the data will be secure erased from the device. The order is completed automatically after 14 days. By acting on the notification, you can move things along more quickly.
To review non-retryable errors and proceed with your order, do the following:
Open your order in the Azure portal.
If any non-retryable errors prevented files from uploading, you'll see the following notification. The current order status will be Data copy completed with errors. Device pending data erasure.
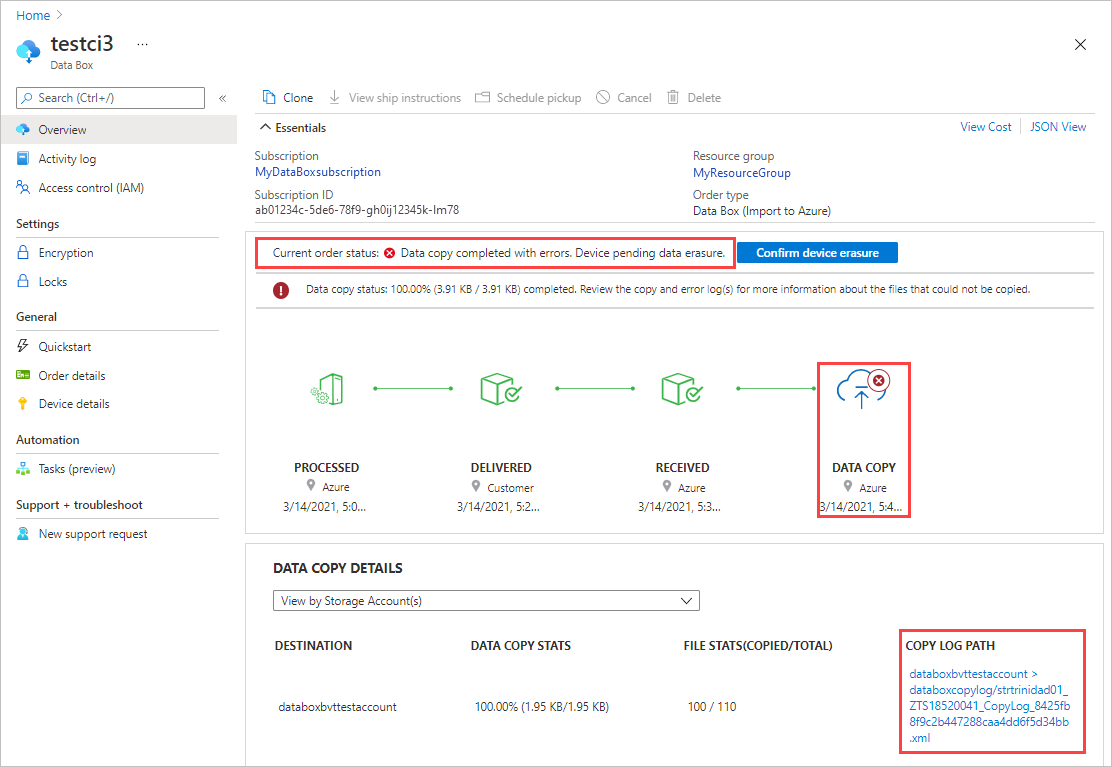
Make a note of the COPY LOG PATH in DATA COPY DETAILS. You'll review the errors in the data copy log.
Note
If firewall rules are set on the storage account for your Data Box, you might not be able to access copy logs from the Azure portal by using COPY LOG PATH on the Overview pane. To access the logs, either modify the storage firewall settings to allow the current system, or use a system which is in the firewall network.
Select Confirm device erasure to open a review panel.
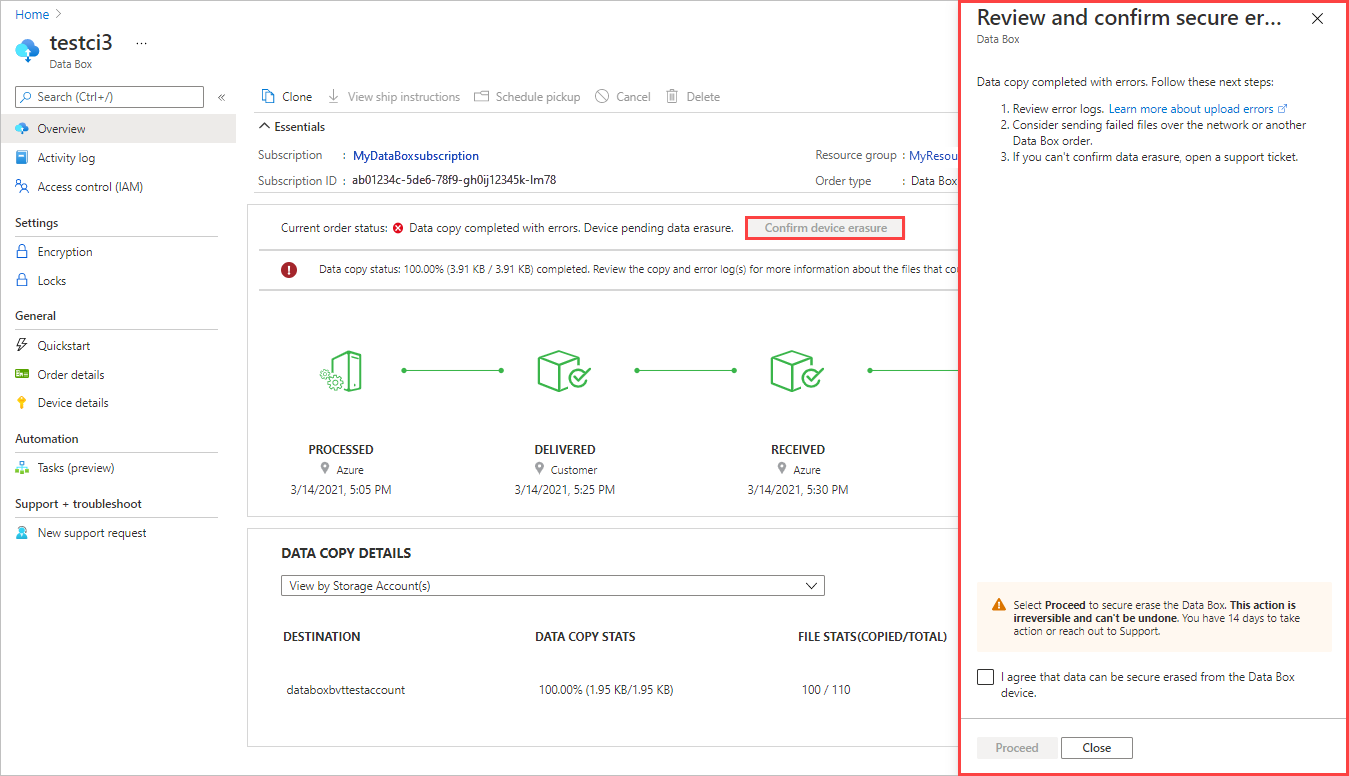
Review the errors in the data copy log using the copy log path that you made a note of earlier. If you need to, you can select Close to display the path again.
You'll need to fix any configuration issues before you try another upload via a network transfer or a new import order.
After you review the errors, select the check box to acknowledge that you're ready to proceed with data erasure. Then select Proceed.
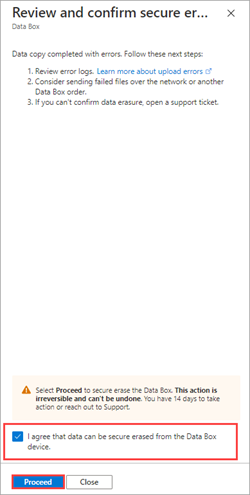
After the data is secure erased from the device, the order status is updated to Copy completed with errors.

If you don't take any action, the order completes automatically after 14 days.
Once the data upload is complete, order status updates to Completed.
Note
A Cyclic Redundancy Check (CRC) computation is completed during the upload to Azure. The CRCs from the data copy and data upload are compared. A CRC mismatch indicates that the corresponding files failed to upload.
You can use the CRC checksum tool script to compare the checksums of the on-premises source data with the data uploaded to Azure. The script can be downloaded from Azure Samples. See the README file for more information.
Verify that your data is uploaded to Azure before you delete it from the source. Your data can be in:
Your Azure Storage account(s). When you copy the data to Data Box, the data is uploaded to one of the following paths in your Azure Storage account:
For block blobs and page blobs: https://<storage_account_name>.blob.core.windows.net/<containername>/files/a.txt
For Azure Files: https://<storage_account_name>.file.core.windows.net/<sharename>/files/a.txt
Alternatively, you could go to your Azure storage account in Azure portal and navigate from there.
Your managed disk resource group(s). When creating managed disks, the VHDs are uploaded as page blobs and then converted to managed disks. The managed disks are attached to the resource groups specified at the time of order creation.
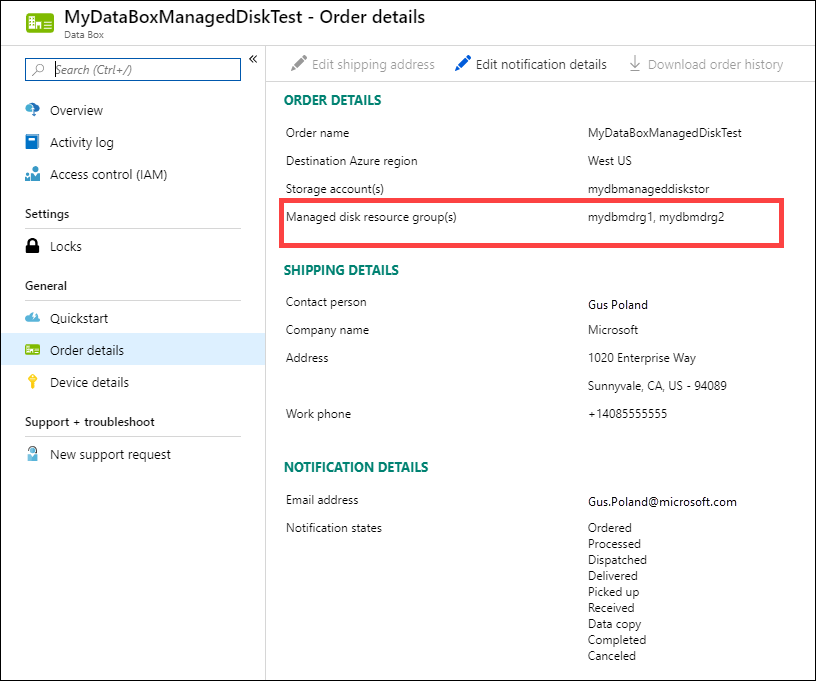
If your copy to managed disks in Azure was successful, you can go to the Order details in the Azure portal and make a note of the resource groups specified for managed disks.
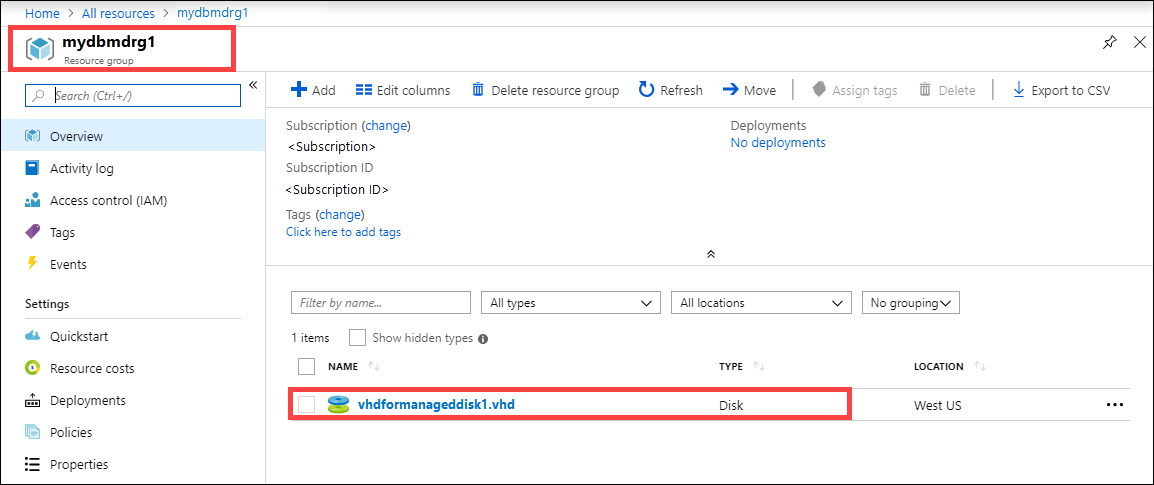
Go to the noted resource group and locate your managed disks.
If you copied a VHDX or a dynamic or differencing VHD, the VHDX or VHD is uploaded to the staging storage account as a page blob, but the conversion of the VHD to a managed disk will fail. Go to your staging Storage account > Blobs, and select the appropriate container - Standard SSD, Standard HDD, or Premium SSD. The VHDs are uploaded as page blobs in your staging storage account and accrue charges.
Once the upload to Azure is complete, the Data Box erases the data on its disks as per the NIST SP 800-88 Revision 1 guidelines.
In this tutorial, you learned about Azure Data Box topics such as:
Advance to the following article to learn how to manage Data Box via the local web UI.
Training
Module
Move large amounts of data to the cloud by using Azure Data Box family - Training
Learn how to move large amounts of data to the cloud by using Azure Data Box devices.
Documentation
Tutorial to copy data via SMB on Azure Data Box
In this tutorial, learn how to connect to and copy data from your host computer to Azure Data Box by using SMB with the local web UI.
Tutorial to ship Azure Data Box
In this tutorial, learn how to prepare to ship Data Box for return.
Tutorial: Use data copy service to copy to your device - Azure Data Box
In this tutorial, you learn how to copy data to your Azure Data Box device via the data copy service.