Events
May 19, 6 PM - May 23, 12 AM
Calling all developers, creators, and AI innovators to join us in Seattle @Microsoft Build May 19-22.
Register todayThis browser is no longer supported.
Upgrade to Microsoft Edge to take advantage of the latest features, security updates, and technical support.
This article describes how to go from Python project code (for example, a web app) to a deployed Docker container in Azure. Discussed are the general process of containerization, deployment options for containers in Azure, and Python-specific configuration of containers in Azure.
The nature of Docker containers is that creating a Docker image from code and deploying that image to a container in Azure is similar across programming languages. The language-specific considerations - Python in this case - are in the configuration during the containerization process in Azure, in particular the Dockerfile structure and configuration supporting Python web frameworks such as Django, Flask, and FastAPI.
For Python container development, some typical workflows for moving from code to container are:
| Scenario | Description | Workflow |
|---|---|---|
| Dev | Build Python Docker images in your dev environment. | Code: git clone code to dev environment (with Docker installed). Build: Use Docker CLI, VS Code (with extensions), PyCharm (with plugin). Described in section Working with Python Docker images and containers. Test: In dev environment in a Docker container. Push: To a registry like Azure Container Registry, Docker Hub, or private registry. Deploy: To Azure service from registry. |
| Hybrid | From your dev environment, build Python Docker images in Azure. | Code: git clone code to dev environment (not necessary for Docker to be installed). Build: VS Code (with extensions), Azure CLI. Push: To Azure Container Registry Deploy: To Azure service from registry. |
| Azure | All in the cloud; use Azure Cloud Shell to build Python Docker images code from GitHub repo. | Code: git clone GitHub repo to Azure Cloud Shell. Build: In Azure Cloud Shell, use Azure CLI or Docker CLI. Push: To registry like Azure Container Registry, Docker Hub, or private registry. Deploy: To Azure service from registry. |
The end goal of these workflows is to have a container running in one of the Azure resources supporting Docker containers as listed in the next section.
A dev environment can be your local workstation with Visual Studio Code or PyCharm, Codespaces (a development environment that's hosted in the cloud), or Visual Studio Dev Containers (a container as a development environment).
Python container apps are supported in the following services.
| Service | Description |
|---|---|
| Web App for Containers | A fully managed hosting service for containerized web applications including websites and web APIs. Containerized web apps on Azure App Service can scale as needed and use streamlined CI/CD workflows with Docker Hub, Azure Container Registry, and GitHub. Ideal as an easy on-ramp for developers to take advantage of the fully managed Azure App Service platform, but who also want a single deployable artifact containing an app and all of its dependencies. Example: Deploy a Flask or FastPI web app on Azure App Service. |
| Azure Container Apps (ACA) | A fully managed serverless container service powered by Kubernetes and open-source technologies like Dapr, KEDA, and envoy. Based on best practices and optimized for general purpose containers. Cluster infrastructure is managed by ACA and direct access to the Kubernetes API is not supported. Provides many application-specific concepts on top of containers, including certificates, revisions, scale, and environments. Ideal for teams that want to start building container microservices without having to manage the underlying complexity of Kubernetes. Example: Deploy a Flask or FastPI web app on Azure Container Apps. |
| Azure Container Instances (ACI) | A serverless offering that provides a single pod of Hyper-V isolated containers on demand. Billed on consumption rather than provisioned resources. Concepts like scale, load balancing, and certificates aren't provided with ACI containers. Users often interact with ACI through other services; for example, AKS for orchestration. Ideal if you need a less "opinionated" building block that doesn't align with the scenarios Azure Container Apps is optimizing for. Example: Create a container image for deployment to Azure Container Instances. (The tutorial isn't Python-specific, but the concepts shown apply to all languages.) |
| Azure Kubernetes Service (AKS) | A fully managed Kubernetes option in Azure. Supports direct access to the Kubernetes API and runs any Kubernetes workload. The full cluster resides in your subscription, with the cluster configurations and operations within your control and responsibility. Ideal for teams looking for a fully managed version of Kubernetes in Azure. Example: Deploy an Azure Kubernetes Service cluster using the Azure CLI. |
| Azure Functions | An event-driven, serverless functions-as-a-service (FAAS) solution. Shares many characteristics with Azure Container Apps around scale and integration with events, but is optimized for ephemeral functions deployed as either code or containers. Ideal for teams looking to trigger the execution of functions on events; for example, to bind to other data sources. Example: Create a function on Linux using a custom container. |
For a more detailed comparison of these services, see Comparing Container Apps with other Azure container options.
When you're running a Python project in a dev environment, using a virtual environment is a common way of managing dependencies and ensuring reproducibility of your project setup. A virtual environment has a Python interpreter, libraries, and scripts installed that are required by the project code running in that environment. Dependencies for Python projects are managed through the requirements.txt file.
Tip
With containers, virtual environments aren't needed unless you're using them for testing or other reasons. If you use virtual environments, don't copy them into the Docker image. Use the .dockerignore file to exclude them.
You can think of Docker containers as providing similar capabilities as virtual environments, but with further advantages in reproducibility and portability. Docker container can be run anywhere containers can be run, regardless of OS.
A Docker container contains your Python project code and everything that code needs to run. To get to that point, you need to build your Python project code into a Docker image, and then create container, a runnable instance of that image.
For containerizing Python projects, the key files are:
| Project file | Description |
|---|---|
| requirements.txt | Used during the building of the Docker image to get the correct dependencies into the image. |
| Dockerfile | Used to specify how to build the Python Docker image. For more information, see the section Dockerfile instructions for Python. |
| .dockerignore | Files and directories in .dockerignore aren't copied to the Docker image with the COPY command in the Dockerfile. The .dockerignore file supports exclusion patterns similar to .gitignore files. For more information, see .dockerignore file. Excluding files helps image build performance, but should also be used to avoid adding sensitive information to the image where it can be inspected. For example, the .dockerignore should contain lines to ignore .env and .venv (virtual environments). |
Web frameworks have default ports on which they listen for web requests. When working with some Azure container solutions, you need to specify the port your container is listening on that will receive traffic.
The following table shows how to set the port for difference Azure container solutions.
| Azure container solution | How to set web app port |
|---|---|
| Web App for Containers | By default, App Service assumes your custom container is listening on either port 80 or port 8080. If your container listens to a different port, set the WEBSITES_PORT app setting in your App Service app. For more information, see Configure a custom container for Azure App Service. |
| Azure Containers Apps | Azure Container Apps allows you to expose your container app to the public web, to your VNET, or to other container apps within your environment by enabling ingress. Set the ingress targetPort to the port your container listens to for incoming requests. Application ingress endpoint is always exposed on port 443. For more information, see Set up HTTPS or TCP ingress in Azure Container Apps. |
| Azure Container Instances, Azure Kubernetes | Set port during creation of a container. You need to ensure your solution has a web framework, application server (for example, gunicorn, uvicorn), and web server (for example, nginx). For example, you can create two containers, one container with a web framework and application server, and another framework with a web server. The two containers communicate on one port, and the web server container exposes 80/443 for external requests. |
A Dockerfile is a text file that contains instructions for building a Docker image. The first line states the base image to begin with. This line is followed by instructions to install required programs, copy files, and other instructions to create a working environment. For example, some Python-specific examples for key Python Dockerfile instructions show in the table below.
| Instruction | Purpose | Example |
|---|---|---|
| FROM | Sets the base image for subsequent instructions. | FROM python:3.8-slim |
| EXPOSE | Tells Docker that the container listens on the specified network ports at runtime. | EXPOSE 5000 |
| COPY | Copies files or directories from the specified source and adds them to the filesystem of the container at the specified destination path. | COPY . /app |
| RUN | Runs a command inside the Docker image. For example, pull in dependencies. The command runs once at build time. | RUN python -m pip install -r requirements.txt |
| CMD | The command provides the default for executing a container. There can only be one CMD instruction. | CMD ["gunicorn", "--bind", "0.0.0.0:5000", "wsgi:app"] |
The Docker build command builds Docker images from a Dockerfile and a context. A build’s context is the set of files located in the specified path or URL. Typically, you'll build an image from the root of your Python project and the path for the build command is "." as shown in the following example.
docker build --rm --pull --file "Dockerfile" --tag "mywebapp:latest" .
The build process can refer to any of the files in the context. For example, your build can use a COPY instruction to reference a file in the context. Here's an example of a Dockerfile for a Python project using the Flask framework:
FROM python:3.8-slim

EXPOSE 5000

# Keeps Python from generating .pyc files in the container.
ENV PYTHONDONTWRITEBYTECODE=1

# Turns off buffering for easier container logging
ENV PYTHONUNBUFFERED=1

# Install pip requirements.
COPY requirements.txt .
RUN python -m pip install -r requirements.txt

WORKDIR /app
COPY . /app

# Creates a non-root user with an explicit UID and adds permission to access the /app folder.
RUN adduser -u 5678 --disabled-password --gecos "" appuser && chown -R appuser /app
USER appuser

# Provides defaults for an executing container; can be overridden with Docker CLI.
CMD ["gunicorn", "--bind", "0.0.0.0:5000", "wsgi:app"]
You can create a Dockerfile by hand or create it automatically with VS Code and the Docker extension. For more information, see Generating Docker files.
The Docker build command is part of the Docker CLI. When you use IDEs like VS Code or PyCharm, the UI commands for working with Docker images call the build command for you and automate specifying options.
Working in an integrated development environment (IDE) for Python container development isn't necessary but can simplify many container-related tasks. Here are some of the things you can do with VS Code and PyCharm.
Download and build Docker images.
Create and run Docker containers from an existing image, a pulled image, or directly from a Dockerfile.
Run multicontainer applications with Docker Compose.
Connect and work with container registries like Docker Hub, GitLab, JetBrains Space, Docker V2, and other self-hosted Docker registries.
(VS Code only) Add a Dockerfile and Docker compose files that are tailored for your Python project.
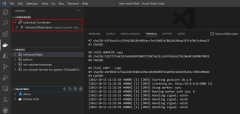
To set up VS Code and PyCharm to run Docker containers in your dev environment, use the following steps.
If you haven't already, install Azure Tools for VS Code.
| Instructions | Screenshot |
|---|---|
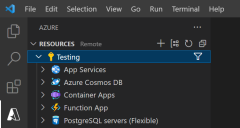
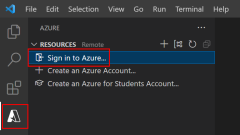
| Step 1: Use SHIFT + ALT + A to open the Azure extension and confirm you're connected to Azure. You can also select the Azure icon on the VS Code extensions bar. If you aren't signed in, select Sign in to Azure and follow the prompts. If you have trouble accessing your Azure subscription, it may be because you are behind a proxy. To resolve connection issues, see Network Connections in Visual Studio Code. |
|
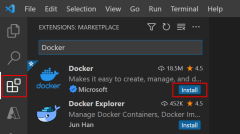
| Step 2: Use CTRL + SHIFT + X to open Extensions, search for the Docker extension, and install the extension. You can also select the Extensions icon on the VS Code extensions bar. |
|
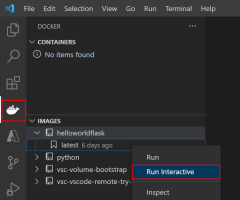
| Step 3: Select the Docker icon in the extension bar, expand images, and right-click an image run it as a container. |
|
| Step 4: Monitor the Docker run output in the Terminal window. |
|
You can also work with Python Docker images and containers using the Azure CLI and Docker CLI. Both VS Code and PyCharm have terminals where you can run these CLIs.
Use a CLI when you want finer control over build and run arguments, and for automation. For example, the following command shows how to use the Azure CLI az acr build to specify the Docker image name.
az acr build --registry <registry-name> \
  --resource-group <resource-group> \
  --target pythoncontainerwebapp:latest .
As another example, consider the following command that shows how to use the Docker CLI run command. The example shows how to run a Docker container that communicates to a MongoDB instance in your dev environment, outside the container. The different values to complete the command are easier to automate when specified in a command line.
docker run --rm -it \
  --publish <port>:<port> --publish 27017:27017 \
  --add-host mongoservice:<your-server-IP-address> \
  --env CONNECTION_STRING=mongodb://mongoservice:27017 \
  --env DB_NAME=<database-name> \
  --env COLLECTION_NAME=<collection-name> \
  containermongo:latest
For more information about this scenario, see Build and test a containerized Python web app locally.
Python projects often make use of environment variables to pass data to code. For example, you might specify database connection information in an environment variable so that it can be easily changed during testing. Or, when deploying the project to production, the database connection can be changed to refer to a production database instance.
Packages like python-dotenv are often used to read key-value pairs from an .env file and set them as environment variables. An .env file is useful when running in a virtual environment but isn't recommended when working with containers. Don't copy the .env file into the Docker image, especially if it contains sensitive information and the container will be made public. Use the .dockerignore file to exclude files from being copied into the Docker image. For more information, see the section Virtual environments and containers in this article.
You can pass environment variables to containers in a few ways:
--build-arg arguments with the Docker build command.--secret arguments with the Docker build command and BuildKit backend.--env or --env-file arguments with the Docker run command.The first two options have the same drawback as noted above with .env files, namely that you're hardcoding potentially sensitive information into a Docker image. You can inspect a Docker image and see the environment variables, for example, with the command docker image inspect.
The third option with BuildKit allows you to pass secret information to be used in the Dockerfile for building docker images in a safe way that won't end up stored in the final image.
The fourth option of passing in environment variables with the Docker run command means the Docker image doesn't contain the variables. However, the variables are still visible inspecting the container instance (for example, with docker container inspect). This option may be acceptable when access to the container instance is controlled or in testing or dev scenarios.
Here's an example of passing environment variables using the Docker CLI run command and using the --env argument.
# PORT=8000 for Django and 5000 for Flask
export PORT=<port-number>

docker run --rm -it \
  --publish $PORT:$PORT \
  --env CONNECTION_STRING=<connection-info> \
  --env DB_NAME=<database-name> \
  <dockerimagename:tag>
If you're using VS Code or PyCharm, the UI options for working with images and containers ultimately use Docker CLI commands like the one shown above.
Finally, specifying environment variables when deploying a container in Azure is different than using environment variables in your dev environment. For example:
For Web App for Containers, you configure application settings during configuration of App Service. These settings are available to your app code as environment variables and accessed using the standard os.environ pattern. You can change values after initial deployment when needed. For more information, see Access app settings as environment variables.
For Azure Container Apps, you configure environment variables during initial configuration of the container app. Subsequent modification of environment variables creates a revision of the container. In addition, Azure Container Apps allows you to define secrets at the application level and then reference them in environment variables. For more information, see Manage secrets in Azure Container Apps.
As another option, you can use Service Connector to help you connect Azure compute services to other backing services. This service configures the network settings and connection information (for example, generating environment variables) between compute services and target backing services in management plane.
View container instance logs to see diagnostic messages output from code and to troubleshoot issues in your container's code. Here are several ways you can view logs when running a container in your dev environment:
Running a container with VS Code or PyCharm, as shown in the section VS Code and PyCharm, you can see logs in terminal windows opened when Docker run executes.
If you're using the Docker CLI run command with the interactive flag -it, you'll see output following the command.
In Docker Desktop, you can also view logs for a running container.
When you deploy a container in Azure, you also have access to container logs. Here are several Azure services and how to access container logs in Azure portal.
| Azure service | How to access logs in Azure portal |
|---|---|
| Web App for Containers | Go to the Diagnose and solve problems resource to view logs. Diagnostics is an intelligent and interactive experience to help you troubleshoot your app with no configuration required. For a real-time view of logs, go to the Monitoring - Log stream. For more detailed log queries and configuration, see the other resources under Monitoring. |
| Azure Container Apps | Go to the environment resource Diagnose and solve problems to troubleshoot environment problems. More often, you'll want to see container logs. In the container resource, under Application - Revision management, select the revision and from there you can view system and console logs. For more detailed log queries and configuration, see the resources under Monitoring. |
| Azure Container Instances | Go to the Containers resource and select Logs. |
For the same services listed above, here are the Azure CLI commands to access logs.
| Azure service | Azure CLI command to access logs |
|---|---|
| Web App for Containers | az webapp log |
| Azure Container Apps | az containerapps logs |
| Azure Container Instances | az container logs |
There's also support for viewing logs in VS Code. You must have Azure Tools for VS Code installed. Below is an example of viewing Web Apps for Containers (App Service) logs in VS Code.
Events
May 19, 6 PM - May 23, 12 AM
Calling all developers, creators, and AI innovators to join us in Seattle @Microsoft Build May 19-22.
Register today