Set up disaster recovery to Azure for on-premises VMware VMs - Modernized
Article
Important
Microsoft recommends that you use roles with the fewest permissions. This helps improve security for your organization. Global Administrator is a highly privileged role that should be limited to emergency scenarios when you can't use an existing role.
This article describes how to enable replication for on-premises VMware VMs, for disaster recovery to Azure using the Modernized VMware/Physical machine protection experience.
For information on how to set up disaster recovery in Azure Site Recovery Classic releases, see the tutorial.
To create and register the Azure Site Recovery replication appliance, you need an Azure account with:
Contributor or Owner permissions on the Azure subscription.
Permissions to register Microsoft Entra apps.
Owner or Contributor and User Access Administrator permissions on the Azure subscription to create a Key Vault, used during agentless VMware migration.
If you just created a free Azure account, you're the owner of your subscription. If you're not the subscription owner, work with the owner for the required permissions.
Use the following steps to assign the required permissions:
In the Azure portal, search for Subscriptions, and under Services, select Subscriptions search box to search for the required Azure subscription.
In the Subscriptions page, select the subscription in which you created the Recovery Services vault.
In the subscription, select Access control (IAM) > Check access. In Check access, search for the relevant user account.
In Add a role assignment, Select Add, select the Contributor or Owner role, and select the account. Then Select Save.
To register the Azure Site Recovery replication appliance, your Azure account needs permissions to register the Microsoft Entra apps.
Follow these steps to assign required permissions:
In Azure portal, navigate to Microsoft Entra ID > Users > User Settings. In User settings, verify that Microsoft Entra users can register applications (set to Yes by default).
In case the App registrations settings is set to No, request the tenant/global admin to assign the required permission. The tenant/global admin must assign the Application Registration role to an account to allow the registration of Microsoft Entra App.
Grant required permissions to the vault
You will also need to grant the managed identity permissions to the cache storage accounts. You can create the storage account in advance and use the same for enabling replication.
Ensure that the following role permissions are present depending on the type of storage account:
Resource Manager based storage accounts (Standard Type):
After an Azure Site Recovery replication appliance is added to a vault, you can get started with protecting the machines.
Ensure the pre-requisites across storage and networking are met.
Follow these steps to enable replication:
Select Site Recovery under Getting Started section. Click Enable Replication (Modernized) under the VMware section.
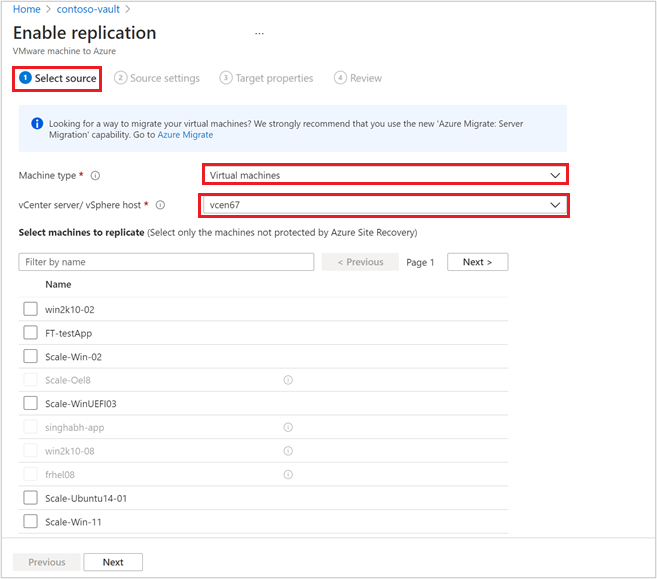
Choose the machine type you want to protect through Azure Site Recovery.
Note
In Modernized, the support is limited to virtual machines.
After choosing the machine type, select the vCenter server added to Azure Site Recovery replication appliance, registered in this vault.
Search the source machine name to protect it. To review the selected machines, select Selected resources.
After you select the list of VMs, select Next to proceed to source settings. Here, select the replication appliance and VM credentials. These credentials will be used to push mobility agent on the machine by Azure Site Recovery replication appliance to complete enabling Azure Site Recovery. Ensure accurate credentials are chosen.
Note
For Linux OS, ensure to provide the root credentials. For Windows OS, a user account with admin privileges should be added. These credentials will be used to push Mobility Service on to the source machine during enable replication operation.
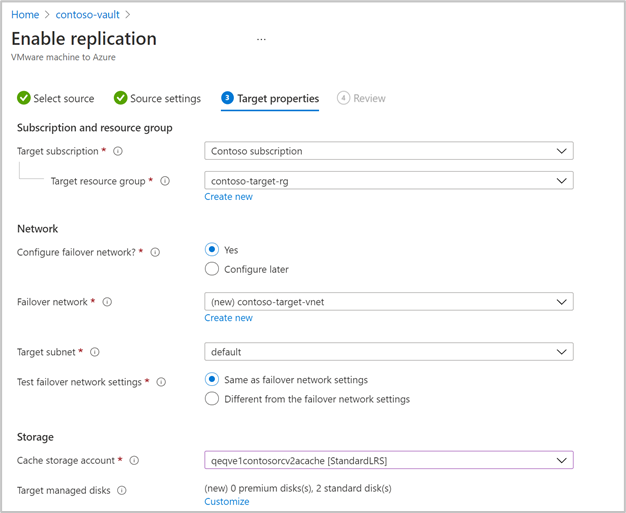
Select Next to provide target region properties. By default, Vault subscription and Vault resource group are selected. You can choose a subscription and resource group of your choice. Your source machines will be deployed in this subscription and resource group when you failover in the future.
Next, you can select an existing Azure network or create a new target network to be used during failover. If you select Create new, you will be redirected to create virtual network context blade and asked to provide address space and subnet details. This network will be created in the target subscription and target resource group selected in the previous step.
Then, provide the test failover network details.
Note
Ensure that the test failover network is different from the failover network. This is to make sure the failover network is readily available in case of an actual disaster.
Select the storage.
Cache storage account:
Now, choose the cache storage account which Azure Site Recovery uses for staging purposes - caching and storing logs before writing the changes on to the managed disks.
By default, a new LRS v1 type storage account will be created by Azure Site Recovery for the first enable replication operation in a vault. For the next operations, the same cache storage account will be re-used.
Managed disks
By default, Standard HDD managed disks are created in Azure. You can customize the type of Managed disks by Selecting Customize. Choose the type of disk based on the business requirement. Ensure appropriate disk type is chosen based on the IOPS of the source machine disks. For pricing information, see managed disk pricing document here.
Note
If Mobility Service is installed manually before enabling replication, you can change the type of managed disk, at a disk level. Else, by default, one managed disk type can be chosen at a machine level
Create a new replication policy if needed.
A default replication policy gets created under the vault with 3 days recovery point retention and app-consistent recovery points disabled by default. You can create a new replication policy or modify the existing one as per your RPO requirements.
Select Create new.
Enter the Name.
Enter a value for Retention period (in days). You can enter any value ranging from 0 to 15.
Enable app consistency frequency if you wish and enter a value for App-consistent snapshot frequency (in hours) as per business requirements.
Select OK to save the policy.
The policy will be created and can be used for protecting the chosen source machines.
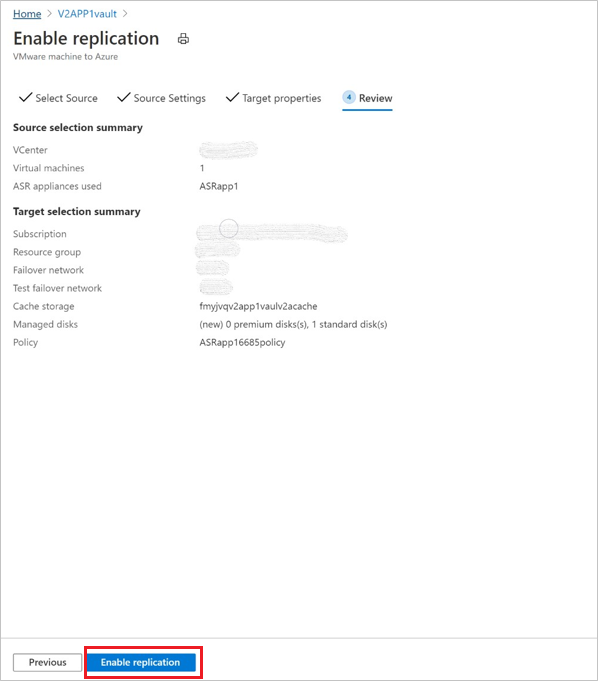
After choosing the replication policy, select Next. Review the Source and Target properties. Select Enable Replication to initiate the operation.
A job is created to enable replication of the selected machines. To track the progress, navigate to Site Recovery jobs in the recovery services vault.
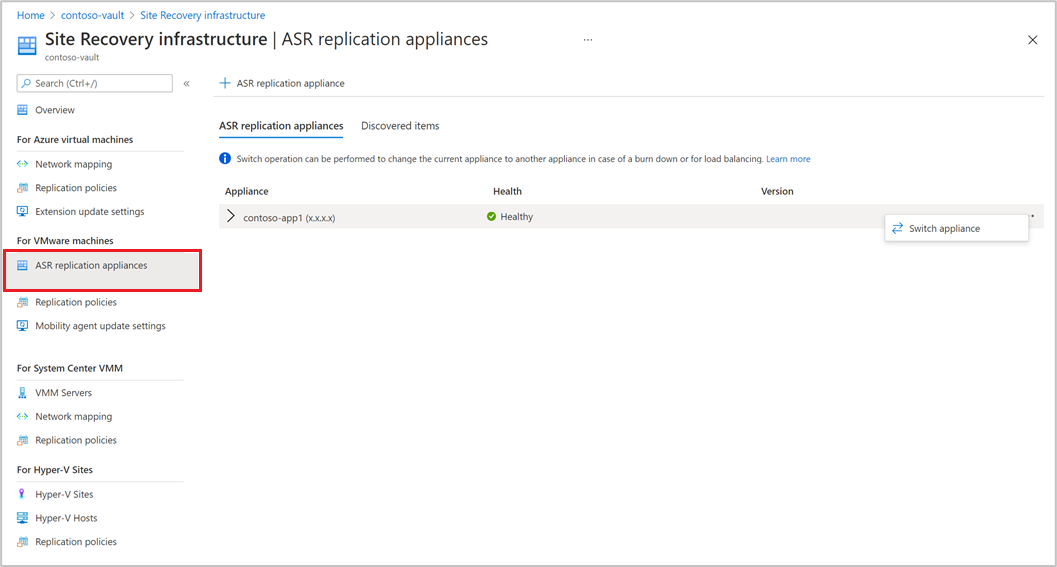
Appliance selection
You can select any of the Azure Site Recovery replication appliances registered under a vault to protect a machine.
Same replication appliance can be used both for forward and backward protection operations, if it is in a non-critical state. It should not impact the performance of the replications.